本文主要是介绍YOLOv5小目标切图检测,希望对大家解决编程问题提供一定的参考价值,需要的开发者们随着小编来一起学习吧!
当我们在检测较大分辨率的图片时,对小目标的检测效果一直是较差的,所以就有了下面几种方法:
- 将图片压缩成大尺寸进行训练( 想法:没显存,搞不来)
- 添加小检测头(想法:P5模型还有点用,P6模型完全没用)
- 添加一些检测模型和玄学机制(想法:你要是写论文就去看看知*吧,只需要在最后面加一句:已达到工业检测要求)
- 切图检测(想法:比较耗时,过程也比较繁琐,可以尝试)
切图检测
思路:
- 将原图切成你想要的数量
- 将切成的小图进行训练,得到模型
- 将你需要检测的图片切成小图,用模型检测,并得到每张图目标位置的信息,保存在对应图片的txt文件
- 将所有txt文件融合,得到1个txt文件,并在原图上显示
一:切块
# -*- coding:utf-8 -*-
import os
import matplotlib.pyplot as plt
import cv2
import numpy as npdef divide_img(img_path, img_name, save_path):imgg = img_path + img_nameimg = cv2.imread(imgg)#   img = cv2.cvtColor(img,cv2.COLOR_BGR2RGB)h = img.shape[0]w = img.shape[1]n = int(np.floor(h * 1.0 / 1000)) + 1m = int(np.floor(w * 1.0 / 1000)) + 1print('h={},w={},n={},m={}'.format(h, w, n, m))dis_h = int(np.floor(h / n))dis_w = int(np.floor(w / m))num = 0for i in range(n):for j in range(m):num += 1print('i,j={}{}'.format(i, j))sub = img[dis_h * i:dis_h * (i + 1), dis_w * j:dis_w * (j + 1), :]cv2.imwrite(save_path + '{}_{}.bmp'.format(name, num), sub)if __name__ == '__main__':img_path = r'G:\1/'save_path = r'G:\3/'img_list = os.listdir(img_path)for name in img_list:divide_img(img_path, name, save_path)
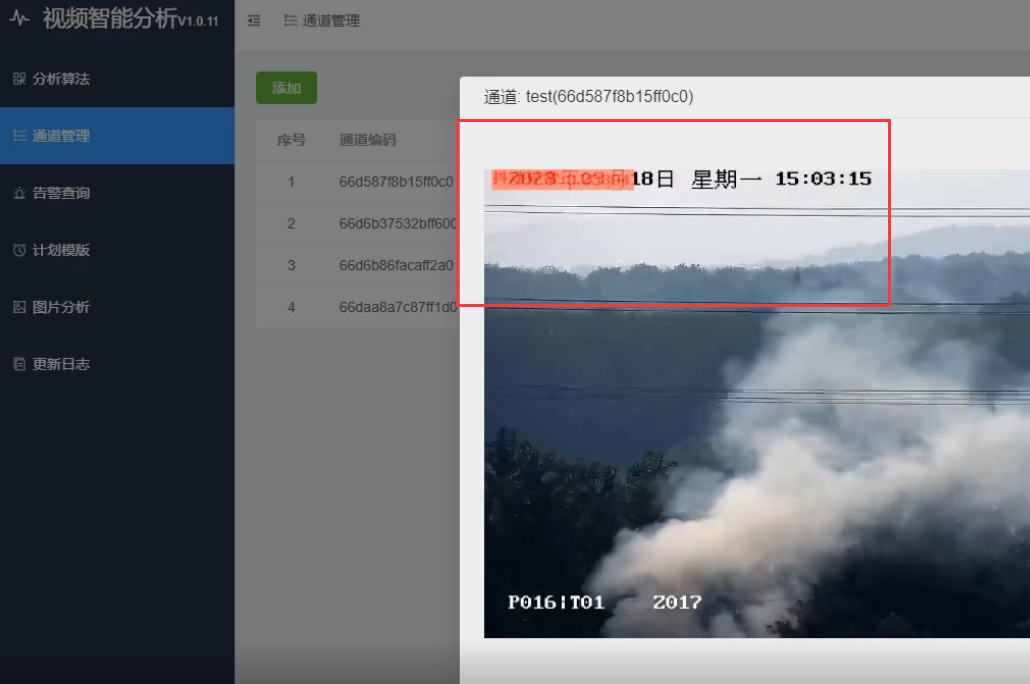
使用模型检测后得到:

二:融合txt文件
import os
from cv2 import cv2# 保存所有图片的宽高
# todo: img_info={'name': [w_h, child_w_h, mix_row_w_h, mix_col_w_h]}
img_info = {}
all_info = {}# 初始化img_info
def init(big_images_path, mix_percent, rows, cols):image_names = os.listdir(big_images_path)for img_name in image_names:big_path = big_images_path + '\\' + img_name# print(big_path)img = cv2.imread(big_path)size = img.shape[0:2]w = size[1]h = size[0]child_width = int(w) // colschild_height = int(h) // rowsmix_row_width = int(child_width * mix_percent * 2)mix_row_height = child_heightmix_col_width = child_widthmix_col_height = int(child_height * mix_percent * 2)# 根据img保存w和himg_info[img_name.split('.')[0]] = [w, h, child_width, child_height, mix_row_width, mix_row_height,mix_col_width, mix_col_height]# 读取所有检测出来的 小图片的label
def get_label_info(labels_path, mix_percent, rows, cols):labels = os.listdir(labels_path)for label in labels:# print(label)# todo: type: 0正常, 1row, 2col# 判断该label属于哪一张图片cur_label_belong = label.split('_')[0]cur_big_width = img_info[cur_label_belong][0]cur_big_height = img_info[cur_label_belong][1]# 融合区域距离边界的一小部分宽高cur_row_width_step = img_info[cur_label_belong][2] * (1 - mix_percent)cur_col_height_step = img_info[cur_label_belong][3] * (1 - mix_percent)# 文件名给予数据# child_type = []# child_num = []# label内容给予数据child_class_index = []child_x = []child_y = []child_width = []child_height = []type = -1num = -1class_index = -1x = 0.0y = 0.0width = 0.0height = 0.0# print(f'{label}')# 读取所有需要的数据f = open(labels_path + '\\' + label, 'r')lines = f.read()# print(lines)f.close()contents = lines.split('\n')[:-1]# print(contents)for content in contents:content = content.split(' ')# print(content)class_index = int(content[0])x = float(content[1])y = float(content[2])width = float(content[3])height = float(content[4])pass# print(class_index, x, y, width, height)assert class_index != -1 or x != -1.0 or y != -1.0 or width != -1.0 or height != -1.0, \f'class_index:{class_index}, x:{x}, y:{y}, width:{width}, height:{height}'# 转换成 数据 坐标, 并根据不同的num进行处理num = label.split('_')[-1].split('.')[0]  # 图片尾号 命名: xxxx_x.jpg  xxxx_mix_row_xx.jpg xxxx_mix_col_xx.jpgcur_img_width = 0cur_img_height = 0distance_x = 0distance_y = 0small_image_width = img_info[cur_label_belong][2]small_image_height = img_info[cur_label_belong][3]if label.find('mix_row') != -1:# type = 1.distance_x = int(num) % (cols-1)distance_y = int(num) // (rows-1)cur_img_width = img_info[cur_label_belong][4]cur_img_height = img_info[cur_label_belong][5]# row x 加上stepx = x * cur_img_width + cur_row_width_step + distance_x * small_image_widthy = y * cur_img_height + distance_y * cur_img_heightelif label.find('mix_col') != -1:# type = 2distance_x = int(num) % colsdistance_y = int(num) // rowscur_img_width = img_info[cur_label_belong][6]cur_img_height = img_info[cur_label_belong][7]# col y 加上stepprint(f'x:{x}, y:{y}, cur_img_width:{cur_img_width}, cur_img_height:{cur_img_height}')x = x * cur_img_width + distance_x * cur_img_widthy = y * cur_img_height + cur_col_height_step + distance_y * small_image_heightprint(f'x:{x}, y:{y}, height:{cur_col_height_step}')else:# type = 0distance_x = int(num) % colsdistance_y = int(num) // rowscur_img_width = img_info[cur_label_belong][2]cur_img_height = img_info[cur_label_belong][3]# 小图片内, 无需加上 stepx = x * cur_img_width + distance_x * cur_img_widthy = y * cur_img_height + distance_y * cur_img_heightassert cur_img_width != 0 or cur_img_height != 0 or distance_x != 0 or distance_y != 0, \f'cur_img_width:{cur_img_width}, cur_img_height:{cur_img_height}, distance_x:{distance_x}, distance_y:{distance_y}'assert x < cur_big_width and y < cur_big_height, f'{label}, {content}\nw:{cur_big_width}, h:{cur_big_height}, x:{x}, y:{y}'width = width * cur_img_widthheight = height * cur_img_heightassert x != 0.0 or y != 0.0 or width != 0.0 or height != 0.0, f'x:{x}, y:{y}, width:{width}, height:{height}'# child_type.append(type)# child_num.append(num)child_class_index.append(class_index)child_x.append(x)child_y.append(y)child_width.append(width)child_height.append(height)# todo: 所有信息 根据 cur_label_belong 存储在all_info中for index, x, y, width, height in zip(child_class_index, child_x, child_y, child_width, child_height):if cur_label_belong not in all_info:all_info[cur_label_belong] = [[index, x, y, width, height]]else:all_info[cur_label_belong].append([index, x, y, width, height])child_class_index.clear()child_x.clear()child_y.clear()child_width.clear()child_height.clear()# print((all_info['0342']))
# todo: 转成 yolo 格式, 保存
def save_yolo_label(yolo_labels_path):for key in all_info:# img_path = r'G:\Unity\code_project\other_project\data\joint\big_images' + '\\' + key + '.JPG'# img = cv2.imread(img_path)yolo_label_path = yolo_labels_path + '\\' + key + '.txt'cur_big_width = img_info[key][0]cur_big_height = img_info[key][1]content = ''i = 0for index, x, y, width, height in all_info[key]:# print(all_info[key][i])x = x / cur_big_widthy = y / cur_big_heightwidth = width / cur_big_widthheight = height / cur_big_heightassert x < 1.0 and y < 1.0 and width < 1.0 and height < 1.0, f'{key} {i}\n{all_info[key][i]}\nx:{x}, y:{y}, width:{width}, height:{height}'content += f'{index} {x} {y} {width} {height}\n'i += 1with open(yolo_label_path, 'w') as f:f.write(content)def joint_main(big_images_path=r'G:\3',labels_path=r'G:\5',yolo_labels_path=r'G:\6',mix_percent=0.2,rows=4,cols=4):print(f'融合图片, 原图片路径:{big_images_path}\n小图检测的txt结果路径:{labels_path}\n数据融合后txt结果路径:{yolo_labels_path}')init(big_images_path, mix_percent, rows, cols)get_label_info(labels_path, mix_percent, rows, cols)save_yolo_label(yolo_labels_path)joint_main()
三:原图显示
# -*- coding: utf-8 -*-
import os
from PIL import Image
from PIL import ImageDraw, ImageFont
from cv2 import cv2def draw_images(images_dir, txt_dir, box_dir, font_type_path):font = ImageFont.truetype(font_type_path, 50)if not os.path.exists(box_dir):os.makedirs(box_dir)# num = 0# 设置颜色all_colors = ['red', 'green', 'yellow', 'blue', 'pink', 'black', 'skyblue', 'brown', 'orange', 'purple', 'gray','lightpink', 'gold', 'brown', 'black']colors = {}for file in os.listdir(txt_dir):print(file)image = os.path.splitext(file)[0].replace('xml', 'bmp') + '.bmp'# 转换成cv2读取,防止图片载入错误img = cv2.imread(images_dir + '/' + image)TURN = cv2.cvtColor(img, cv2.COLOR_BGR2RGB)img = Image.fromarray(TURN)# img.show()if img.mode == "P":img = img.convert('RGB')w, h = img.sizetag_path = txt_dir + '/' + filewith open(tag_path) as f:for line in f:line_parts = line.split(' ')# 根据不同的 label 保存颜色if line_parts[0] not in colors.keys():colors[line_parts[0]] = all_colors[len(colors.keys())]color = colors[line_parts[0]]draw = ImageDraw.Draw(img)x = (float(line_parts[1]) - 0.5 * float(line_parts[3])) * wy = (float(line_parts[2]) - 0.5 * float(line_parts[4])) * hxx = (float(line_parts[1]) + 0.5 * float(line_parts[3])) * wyy = (float(line_parts[2]) + 0.5 * float(line_parts[4])) * hdraw.rectangle([x - 10, y - 10, xx, yy], fill=None, outline=color, width=5)# num += 1del drawimg.save(box_dir + '/' + image)# print(file, num)# print(colors)def draw_main(box_dir=r'G:\5',txt_dir=r'G:\6',image_source_dir=r'G:\3'):font_type_path = 'C:/Windows/Fonts/simsun.ttc'print(f'标注框, 数据来源: {txt_dir}\n 被标注图片: {image_source_dir}\n 结果保存路径: {box_dir}')draw_images(image_source_dir, txt_dir, box_dir, font_type_path)draw_main()
效果对比:(左YOLOv5检测,右YOLOv5+切图检测)


参考:
https://blog.csdn.net/qq_43622870/article/details/124984295?ops_request_misc=&request_id=&biz_id=102&utm_term=yolov5%E5%B0%8F%E7%9B%AE%E6%A0%87%E6%A3%80%E6%B5%8B&utm_medium=distribute.pc_search_result.none-task-blog-2~all~sobaiduweb~default-0-124984295.142^v68^control,201^v4^add_ask,213^v2^t3_control2&spm=1018.2226.3001.4187这篇关于YOLOv5小目标切图检测的文章就介绍到这儿,希望我们推荐的文章对编程师们有所帮助!