本文主要是介绍【html本地工具】html+JS实现一个超好看的绘画板/涂鸦板,带画笔、矩形、圆形、直线、文本、橡皮擦,有撤销、恢复、保存功能,希望对大家解决编程问题提供一定的参考价值,需要的开发者们随着小编来一起学习吧!
前言
大家好,这里是符华,今天我们来用纯html+js实现一个绘画板,需要有以下几个功能:
- 画笔工具
- 自由画笔
- 矩形
- 圆形
- 直线
- 文本输入
- 画笔和橡皮擦调整大小粗细
- 调整画笔颜色
- 橡皮擦
- 保存为图片
- 撤销
- 恢复(反撤销)
实现上面这些功能的话,那这个绘画板还是挺完善的了。
最终效果
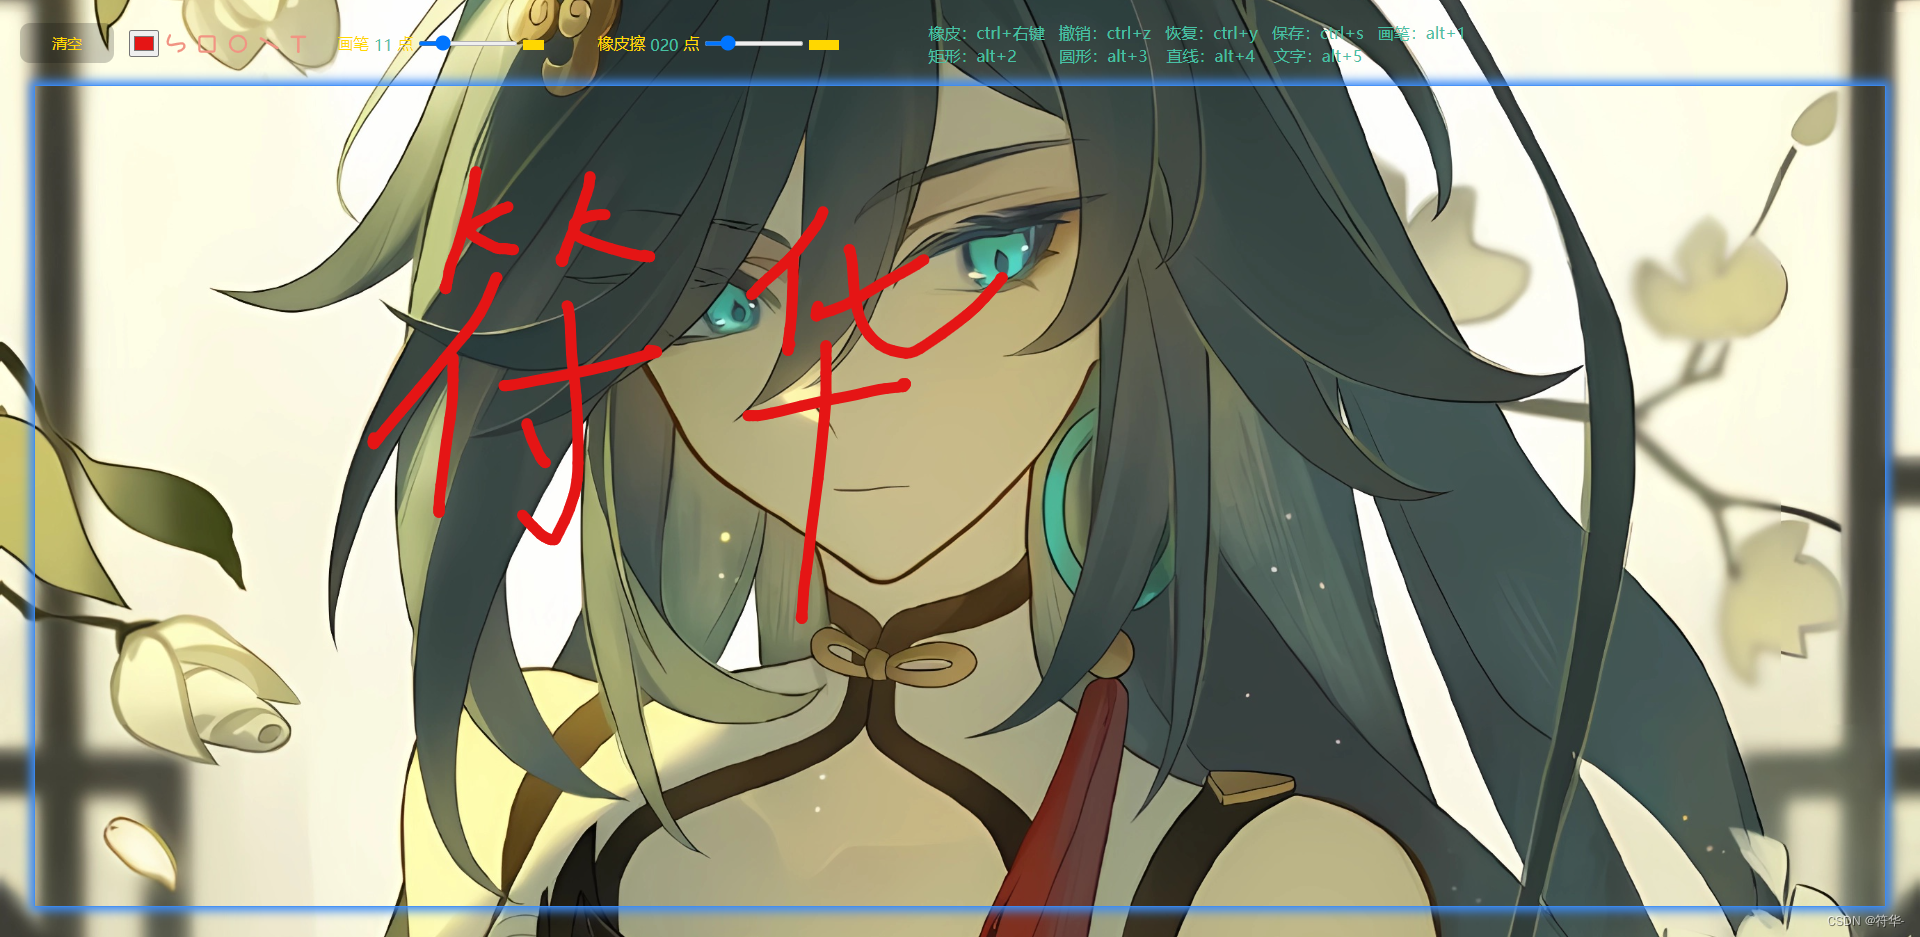
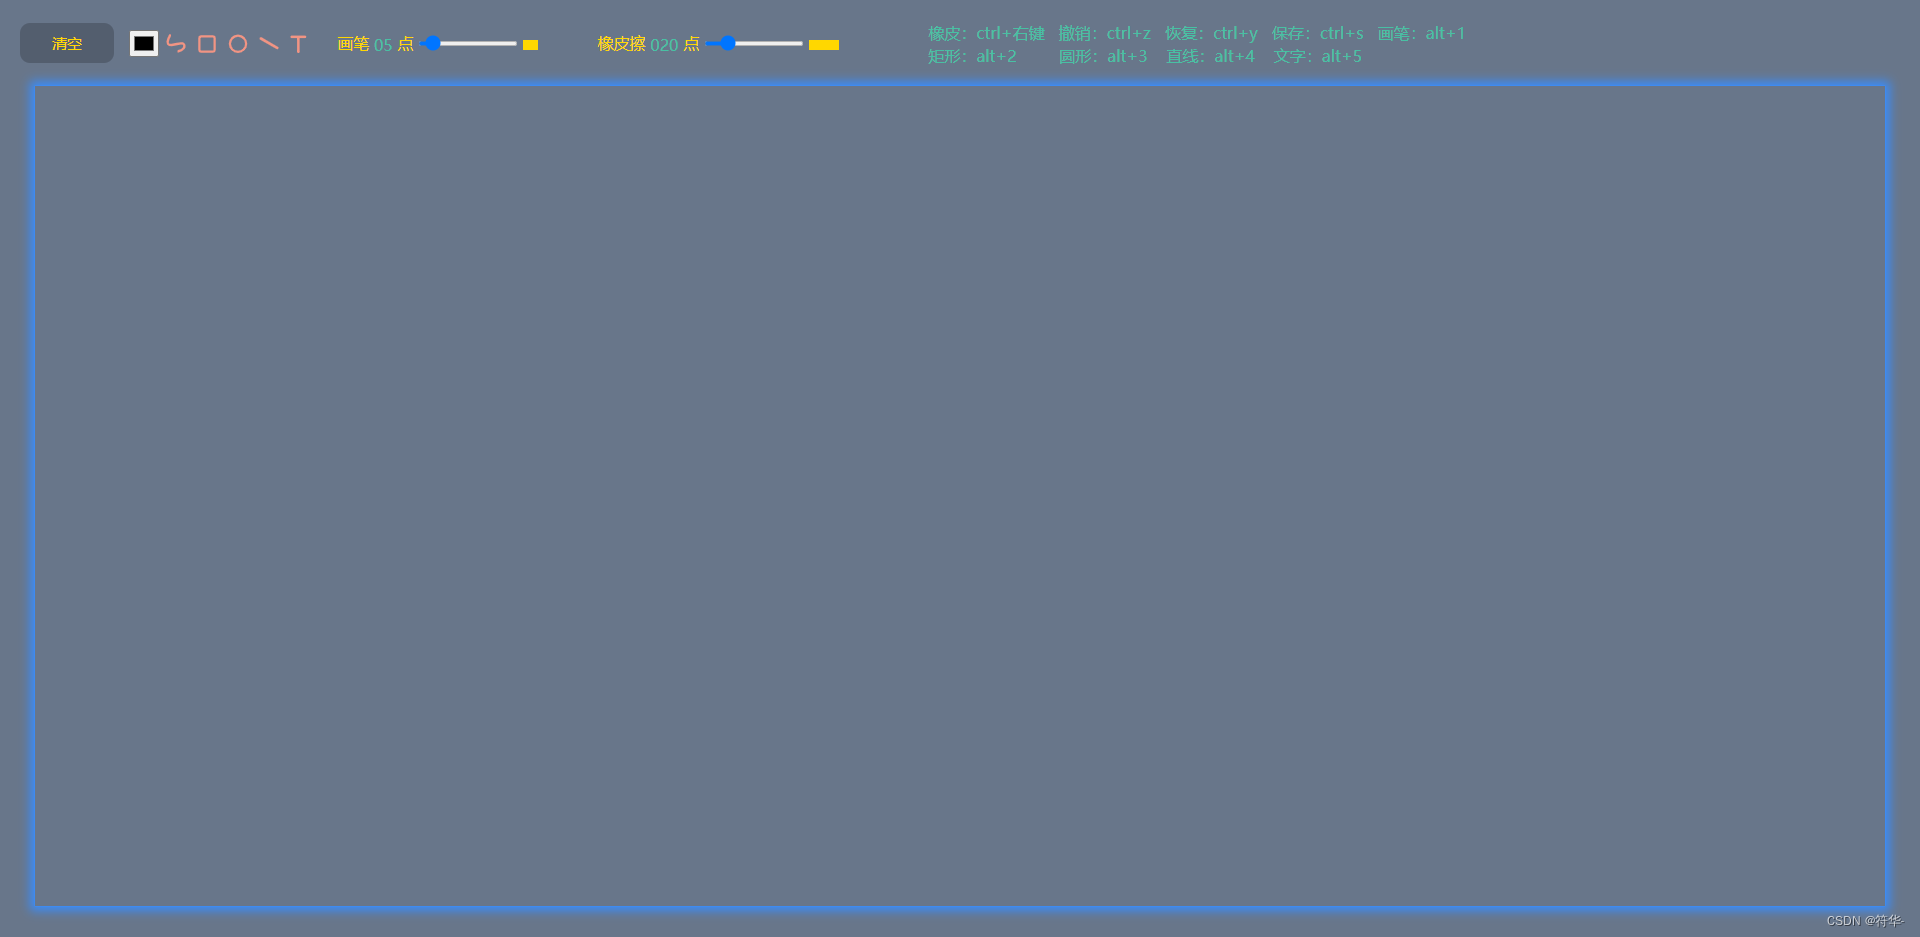
废话不多说,我们先来看看最终的效果
效果一(有背景图片):

效果二(无背景图片):

怎么样,是不是害挺好看的😎😁按照我本人的审美来看,我是觉得非常完美的,低调简洁大气😎


保存的图片背景是透明的。
🍔 实现代码
工具栏和画布
首先就是整个html页面的布局,上面的那一排是工具栏,下面就是整个canvas画布了。
<div class="content"><input class="button1" type="button" onclick="clearCanvas()" value="清空"/><input type="color" id="brushColor" style="width: 30px;"><span class="画笔选择" id="画笔" title="alt+1" onclick="切换画笔('画笔',1);"></span><span class="画笔选择" id="矩形" title="alt+2" onclick="切换画笔('矩形',2);"></span><span class="画笔选择" id="圆形" title="alt+3" onclick="切换画笔('圆形',3);"></span><span class="画笔选择" id="直线" title="alt+4" onclick="切换画笔('直线',4);"></span><span class="画笔选择" id="文字" title="alt+5" onclick="切换画笔('文字',5);"></span><label for="brushSize">画笔 <span id="brushSizeValue">05</span> 点</label><input class="range1" type="range" id="brushSize" min="1" max="50" value="5"onchange="updateValue('brushSize')" oninput="updateLine('brushSize', 'brushSizeLine')"><div style="width: 50px;display: inline-block;"><hr id="brushSizeLine" style="width:5px;"></div><label for="eraserSize">橡皮擦 <span id="eraserSizeValue">020</span> 点</label><input class="range1" type="range" id="eraserSize" min="1" max="100" value="20"onchange="updateValue('eraserSize')" oninput="updateLine('eraserSize', 'eraserSizeLine')"><div style="width: 100px;display: inline-block;margin-right: 15px;"><hr id="eraserSizeLine" style="width:20px;"></div><div style="width: 560px;display: inline-block;color: #48c0a4;"><span>橡皮:ctrl+右键</span> <span>撤销:ctrl+z</span> <span>恢复:ctrl+y</span> <span>保存:ctrl+s</span> <span>画笔:alt+1</span> <span>矩形:alt+2</span> <span>圆形:alt+3</span> <span>直线:alt+4</span> <span>文字:alt+5</span></div>
</div>
<div style="margin: 0 auto;width: 1850px;"><canvas id="canvas" width="1850" height="820"></canvas>
</div>
// 当前画笔模式:1 画笔 2 矩形 3 圆形 4 直线 5 文字
let brush = 1;// 获取画布和绘画工具
const canvas = document.getElementById('canvas');
const ctx = canvas.getContext('2d');// 跟踪绘画状态
ctx.lineJoin = 'round';
ctx.lineCap = 'round';
let isDrawing = false; //标记是否要绘制
let isMouseDown = false; //标记鼠标是否按下
let points = []; //存储坐标点
let undoStack = []; // 存储画布状态,用于撤销上一步操作
let step = 0; // 记录当前步数
清空按钮
清空整个画布,存储的各坐标点、画布状态等也都需要清空。
// 清空画布
function clearCanvas() {ctx.clearRect(0, 0, canvas.width, canvas.height);step = 0;points = [];undoStack = []; // 清空撤销栈
}
画笔工具
点击对应的div切换不同画笔工具,然后每一次在画布上绘画时,先获取当前是哪一个画笔工具,然后执行对应的绘制方法。
function 切换画笔(id,val){brush = val;messageplugin({ message: "切换为"+id, type: "success" });
}
调整画布、橡皮擦粗细
// 更新滑块值
function updateValue(inputId) {var value = document.getElementById(inputId).value;if (inputId==='brushSize'){if (value < 10) { value = '0'+value; }}else {if (value < 10) { value = '00'+value;}else if (value >= 10 && value < 100) { value = '0'+value; }}document.getElementById(inputId + "Value").textContent = value;
}// 更新画笔线条宽度
function updateLine(inputId, lineId) {var value = document.getElementById(inputId).value;var line = document.getElementById(lineId);line.style.width = value + 'px';
}
监听键盘操作,判断快捷键,实现对应功能
// 监听键盘事件,实现撤销操作和保存绘画内容、切换画笔工具
window.addEventListener('keydown', (e) => {// 撤销if (e.ctrlKey && e.key === 'z') {e.preventDefault();undo();}// 恢复if (e.ctrlKey && e.key === 'y') {e.preventDefault();restore();}// 保存if (e.ctrlKey && e.key === 's') {e.preventDefault();const image = canvas.toDataURL('image/png');const link = document.createElement('a');link.href = image;link.download = 'drawing.png';link.click();}// 切换画笔if (e.altKey && e.key === '1') {brush = 1;messageplugin({ message: "切换为画笔", type: "success" });}if (e.altKey && e.key === '2') {brush = 2;messageplugin({ message: "切换为矩形", type: "success" });}if (e.altKey && e.key === '3') {brush = 3;messageplugin({ message: "切换为圆形", type: "success" });}if (e.altKey && e.key === '4') {brush = 4;messageplugin({ message: "切换为直线", type: "success" });}if (e.altKey && e.key === '5') {brush = 5;messageplugin({ message: "切换为文字", type: "success" });}
});
监听事件
接下来就是在画布上绘制了。
正常来说,我们在画布上绘制,是需要先按住鼠标右键,然后开始拖动鼠标,绘制我们想要的图案。当画完后,我们松开鼠标右键,这样就完成了一次绘制。
所以我们需要需要监听三个事件,一个是鼠标按下(开始绘制),然后是鼠标拖动(绘制中),最后是鼠标抬起(绘制完成)。
// 鼠标按下
canvas.onpointerdown = function (e) {if(brush != 5){ // 排除文本模式isDrawing = true;isMouseDown = true;points.push({ x: e.offsetX, y: e.offsetY });if(e.ctrlKey){ // 如果是橡皮擦,则设置为destination-outctx.globalCompositeOperation = 'destination-out';}else{ // 否则设置为默认值source-overctx.globalCompositeOperation = 'source-over';}ctx.beginPath(); // 新增:开始一个绘画路径}
};// 鼠标移动
canvas.onpointermove = function (e) {if(brush != 5){ // 排除文本模式if (!isDrawing) return;const brushSize = document.getElementById('brushSize').value;const eraserSize = document.getElementById('eraserSize').value;const lineWidth = e.ctrlKey ? eraserSize : brushSize;const lineColor = document.getElementById('brushColor').value;ctx.lineWidth = lineWidth;ctx.strokeStyle = lineColor;draw(e.offsetX,e.offsetY,e.ctrlKey);}
};// 鼠标抬起
canvas.onpointerup = function (e) {isMouseDown = false;if(brush != 5){ // 排除文本模式points = [];isDrawing = false;ctx.closePath(); // 新增:结束绘画路径// 绘画结束后,将值重新设置为默认值,否则当前值为destination-out时,使用撤销功能后会把整个画布的内容都给擦掉ctx.globalCompositeOperation = 'source-over';addUndoStack(canvas.toDataURL()); // 将当前画布状态保存起来}
};
还有一个就是,当我们正在绘制的时候,移动鼠标时用的力大了点,不小心把鼠标移到画布外去了,这个时候鼠标离开了画布,我们也需要结束绘制。
所以我们还要加监听鼠标离开画布的方法,但是离开画布的时候,不能每次离开都执行一遍里面的逻辑,必须要在绘制状态下,离开画布时才执行里面的逻辑。
这时我们加一个参数:isMouseDown(鼠标是否按下)用于标记当前是否是正在绘制。
// 鼠标离开画布
canvas.onpointerout = function (e) {if(brush != 5 && isMouseDown){ // 排除文本模式points = [];isDrawing = false;isMouseDown = false;ctx.closePath(); // 新增:结束绘画路径ctx.globalCompositeOperation = 'source-over';// 绘画结束后,将值重新设置为默认值,否则当前值为destination-out时,使用撤销功能后会把整个画布的内容都给擦掉addUndoStack(canvas.toDataURL()); // 将当前画布状态保存起来}
};
写完了上面四个监听事件,我们发现当我们选择文本输入时,不能按照鼠标按下、移动、抬起、离开这几个事件来判断文本输入。所以上面几个事件,我都排除了画笔工具为5,也就是文本状态下绘制。
既然上面四个事件不适用文本输入,那哪个事件适用呢?仔细想一下,假如当前是文本输入,一般是点击一下画布,出现输入框我们进行输入,输入完成后点击画布其他位置,将输入的内容填充到画布里面。点击画布,触发输入,所以我们用 onclick 事件。
// 鼠标单击
canvas.onclick = function (e) {if(brush === 5){ // 只有当画笔模式为文本模式时points = [];draw(e.offsetX,e.offsetY,e.ctrlKey);}
};
绘制
监听事件写好了,我们来实现绘制。绘制的时候,鼠标每次移动,会调用对应的绘制方法,然后记录每次的坐标点。结束这一步的绘制后(鼠标抬起)保存画布状态(画布内容)。
1、首先是自由画笔,这里我们使用 二次贝塞尔曲线 来绘制线条,这样绘制出来的线条较平滑。
// 绘制自由线条
function draw画笔(){ctx.beginPath();let x = (points[points.length - 2].x + points[points.length - 1].x) / 2,y = (points[points.length - 2].y + points[points.length - 1].y) / 2;if (points.length == 2) {ctx.moveTo(points[points.length - 2].x, points[points.length - 2].y);ctx.lineTo(x, y);} else {let lastX = (points[points.length - 3].x + points[points.length - 2].x) / 2,lastY = (points[points.length - 3].y + points[points.length - 2].y) / 2;ctx.moveTo(lastX, lastY);ctx.quadraticCurveTo(points[points.length - 2].x, points[points.length - 2].y, x, y);}
}
2、然后绘制矩形、圆形、直线的时候,鼠标每次移动时记录好坐标点,在创建图形之前,我们先要将画布清空,然后开启一个新路径,最后创建图形。如果不先清空画布的话,那么每移动一次鼠标,就会有一个图形被创建出来显示到画布上,就像下面这样:

这不是我们想要的结果,所以在创建图形之前要先清空画布,这样直到我们抬起鼠标结束这一次的绘制的时候,就只会保留最后一次移动鼠标时创建的图形。
因为我们每次都先将画布给清空了,这就出现了一个问题,当我们绘制了第一个图形松开鼠标,再按下鼠标开始绘制第二个的时候,之前绘制的内容全部没了。这导致我们每次绘制,画布上同时只能存在一个图形,这也不是我们想要的结果。那怎么办呢?
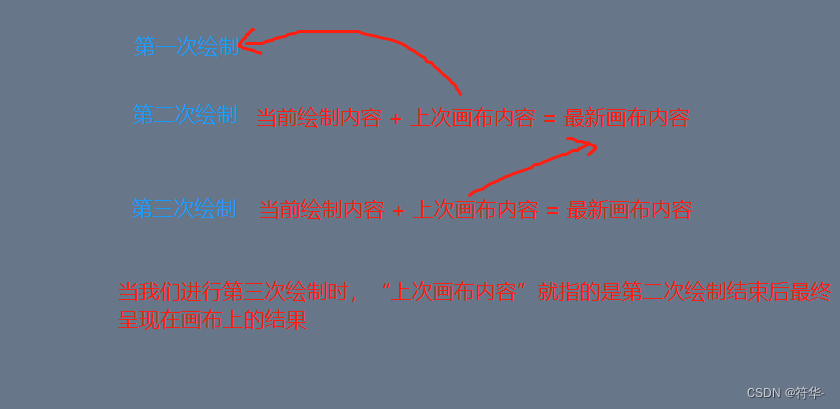
因为我们每完成一次绘制画布内容都保存起来了,我们在绘制矩形时,将上一次的画布内容也显示到画布中,这样 当前绘制的内容和上一次画布的内容都显示到画布上,结束当前绘制时,就形成了最新的画布内容。(我这么说不知道大家能不能理解)
也就是说:当前绘制内容 + 上次画布内容 = 最新画布内容。

// 绘制矩形
function draw矩形(){const startX = points[0].x;const startY = points[0].y;const endX = points[points.length - 1].x;const endY = points[points.length - 1].y;ctx.clearRect(0, 0, canvas.width, canvas.height); // 清空画布ctx.beginPath();ctx.rect(startX, startY, endX - startX, endY - startY);loadImage(); // 清空画布后,显示画布之前的状态,不然画布上同时只能存在一个图形
}// 绘制圆形
function draw圆形(){const startX = points[0].x;const startY = points[0].y;const endX = points[points.length - 1].x;const endY = points[points.length - 1].y;const radius = Math.sqrt(Math.pow(endX - startX, 2) + Math.pow(endY - startY, 2));ctx.clearRect(0, 0, canvas.width, canvas.height); // 清空画布ctx.beginPath();ctx.arc(startX, startY, radius, 0, 2 * Math.PI);loadImage(); // 清空画布后,显示画布之前的状态,不然画布上同时只能存在一个图形
}// 绘制直线
function draw直线(){const startX = points[0].x;const startY = points[0].y;const endX = points[points.length - 1].x;const endY = points[points.length - 1].y;ctx.clearRect(0, 0, canvas.width, canvas.height); // 清空画布ctx.beginPath();ctx.moveTo(startX, startY);ctx.lineTo(endX, endY);loadImage(); // 清空画布后,显示画布之前的状态,不然画布上同时只能存在一个图形
}
3、文本输入,其实就是一个input输入框(如果想要换行输入,可以把input换成textarea),只不过把边框、背景这些全部给去掉了,然后宽高自适应等。
// 输入文字(文本模式下,按住ctrl键,不触发橡皮擦功能)
function draw文字(){const startX = points[0].x;const startY = points[0].y;const input = document.createElement('textarea'); // 创建一个多行输入框元素const canvasRect = canvas.getBoundingClientRect(); // 获取画布的位置信息var fontSize = document.getElementById('brushSize').value;var color = document.getElementById('brushColor').value;if(fontSize < 30) fontSize = 30;input.rows = 10; // 默认为10行input.style.position = 'absolute';input.style.left = (canvasRect.left + startX) - 10 + 'px'; // 计算输入框的左边距(最后-10是为了让光标能显示在鼠标前面一点点)input.style.top = (canvasRect.top + startY) + 'px'; // 计算输入框的上边距input.style.border = 'none';input.style.background = 'transparent';input.style.font = fontSize+'px 微软雅黑';input.style.color = color;input.style.outline = 'none';input.style.padding = '0';input.style.margin = '0';input.style.width = 'auto';input.style.height = 'auto';input.style.resize = 'none';input.style.overflow = 'hidden';input.style.zIndex = '100';input.addEventListener('blur', function() {const text = input.value;if(text.length > 0){ctx.font = fontSize+'px 微软雅黑';ctx.fillStyle = color;
const lines = text.split('\n'); // 将输入的文本按换行符分割成多行
let y = startY;
lines.forEach(function(line) {
ctx.fillText(line, startX, y); // 在画布上绘制每一行文字
y += (fontSize+5); // 每行文字的垂直间距为30像素(这个一般要根据字体大小进行设置,我设置的是字体大小+5比较合适)
});addUndoStack(canvas.toDataURL()); // 将当前画布状态保存起来}document.body.removeChild(input); // 移除输入框元素});document.body.appendChild(input); // 将输入框元素添加到页面中input.focus(); // 让输入框获得焦点
}
撤销、恢复
每一次绘制我们都存储了画布状态(内容),所以我们还需要一个参数 step 用于记录当前步数。撤销时,step–,获取上一个画布状态显示。恢复时,stpe++,获取下一个画布状态显示。
// 撤销操作
function undo() {if (step > 1) {step--;const image = new Image();image.src = undoStack[step-1]; // 获取上一个画布状态image.onload = function() {ctx.clearRect(0, 0, canvas.width, canvas.height);ctx.drawImage(image, 0, 0); // 绘制上一个画布状态}}else {step = 0;ctx.clearRect(0, 0, canvas.width, canvas.height);}
}// 恢复操作
function restore() {if (step < undoStack.length) {step++;const image = new Image();image.src = undoStack[step-1]; // 获取下一个画布状态image.onload = function() {ctx.clearRect(0, 0, canvas.width, canvas.height);ctx.drawImage(image, 0, 0); // 绘制下一个画布状态}}
}
最后(完整代码)
这样我们就实现了一个绘画板/涂鸦板,并且将我们文章开头的那些功能全部都给实现了😎
完整代码可以看这里:CSDN下载
或者是这里:Gitee下载
(期待大家给我多多点赞吖~😘)
这篇关于【html本地工具】html+JS实现一个超好看的绘画板/涂鸦板,带画笔、矩形、圆形、直线、文本、橡皮擦,有撤销、恢复、保存功能的文章就介绍到这儿,希望我们推荐的文章对编程师们有所帮助!


