本文主要是介绍K8S安装异常篇:通过Coredns解决执行 kubeadm init卡住Pulling images required for setting up a Kubernetes cluster,希望对大家解决编程问题提供一定的参考价值,需要的开发者们随着小编来一起学习吧!
文章目录
- 一:异常复现
- 二:解决方案
- 三:再次查看
一:异常复现
执行
kubeadm init --kubernetes-version=v1.22.4 --pod-network-cidr=10.244.0.0/16 --service-cidr=10.96.0.0/12 --apiserver-advertise-address=192.168.56.101 --image-repository registry.aliyuncs.com/google_containers
[root@master kubernetes]# kubeadm init --kubernetes-version=v1.22.4 --pod-network-cidr=10.244.0.0/16 --service-cidr=10.96.0.0/12 --apiserver-advertise-address=192.168.56.101 --image-repository registry.aliyuncs.com/google_containersI0503 01:36:09.609199    3107 version.go:254] remote version is much newer: v1.27.1; falling back to: stable-1.21
[init] Using Kubernetes version: v1.21.14
[preflight] Running pre-flight checks[WARNING Service-Docker]: docker service is not enabled, please run 'systemctl enable docker.service'[WARNING SystemVerification]: this Docker version is not on the list of validated versions: 23.0.5. Latest validated version: 20.10
[preflight] Pulling images required for setting up a Kubernetes cluster
[preflight] This might take a minute or two, depending on the speed of your internet connection
[preflight] You can also perform this action in beforehand using 'kubeadm config images pull'
error execution phase preflight: [preflight] Some fatal errors occurred:[ERROR ImagePull]: failed to pull image registry.cn-hangzhou.aliyuncs.com/google_containers/coredns/coredns:v1.8.0: output: Error response from daemon: pull access denied for registry.cn-hangzhou.aliyuncs.com/google_containers/coredns/coredns, repository does not exist or may require 'docker login': denied: requested access to the resource is denied
, error: exit status 1
[preflight] If you know what you are doing, you can make a check non-fatal with `--ignore-preflight-errors=...`
To see the stack trace of this error execute with --v=5 or higher
二:解决方案
docker pull coredns/coredns
docker tag coredns/coredns:latest
docker tag coredns/coredns:latest registry.aliyuncs.com/google_containers/coredns/coredns:v1.8.0
[root@master kubernetes]# docker pull coredns/coredns
Using default tag: latest
latest: Pulling from coredns/coredns
d92bdee79785: Pull complete
6e1b7c06e42d: Pull complete
Digest: sha256:5b6ec0d6de9baaf3e92d0f66cd96a25b9edbce8716f5f15dcd1a616b3abd590e
Status: Downloaded newer image for coredns/coredns:latest
docker.io/coredns/coredns:latest
[root@master kubernetes]# docker tag coredns/coredns:latest
"docker tag" requires exactly 2 arguments.
See 'docker tag --help'.Usage:  docker tag SOURCE_IMAGE[:TAG] TARGET_IMAGE[:TAG]Create a tag TARGET_IMAGE that refers to SOURCE_IMAGE
[root@master kubernetes]# docker tag coredns/coredns:latest registry.aliyuncs.com/google_containers/coredns/coredns[root@master kubernetes]# docker tag coredns/coredns:latest registry.aliyuncs.com/google_containers/coredns/coredns:v1.8.0
三:再次查看
[root@master kubernetes]# kubeadm init --kubernetes-version=v1.22.4 --pod-network-cidr=10.244.0.0/16 --service-cidr=10.96.0.0/12 --apiserver-advertise-address=192.168.56.101 --image-repository registry.aliyuncs.com/google_containers
[init] Using Kubernetes version: v1.22.4
[preflight] Running pre-flight checks[WARNING KubernetesVersion]: Kubernetes version is greater than kubeadm version. Please consider to upgrade kubeadm. Kubernetes version: 1.22.4. Kubeadm version: 1.21.x[WARNING Service-Docker]: docker service is not enabled, please run 'systemctl enable docker.service'[WARNING SystemVerification]: this Docker version is not on the list of validated versions: 23.0.5. Latest validated version: 20.10
[preflight] Pulling images required for setting up a Kubernetes cluster
[preflight] This might take a minute or two, depending on the speed of your internet connection
[preflight] You can also perform this action in beforehand using 'kubeadm config images pull'
[certs] Using certificateDir folder "/etc/kubernetes/pki"
[certs] Generating "ca" certificate and key
[certs] Generating "apiserver" certificate and key
[certs] apiserver serving cert is signed for DNS names [kubernetes kubernetes.default kubernetes.default.svc kubernetes.default.svc.cluster.local master] and IPs [10.96.0.1 192.168.56.101]
[certs] Generating "apiserver-kubelet-client" certificate and key
[certs] Generating "front-proxy-ca" certificate and key
[certs] Generating "front-proxy-client" certificate and key
[certs] Generating "etcd/ca" certificate and key
[certs] Generating "etcd/server" certificate and key
[certs] etcd/server serving cert is signed for DNS names [localhost master] and IPs [192.168.56.101 127.0.0.1 ::1]
[certs] Generating "etcd/peer" certificate and key
[certs] etcd/peer serving cert is signed for DNS names [localhost master] and IPs [192.168.56.101 127.0.0.1 ::1]
[certs] Generating "etcd/healthcheck-client" certificate and key
[certs] Generating "apiserver-etcd-client" certificate and key
[certs] Generating "sa" key and public key
[kubeconfig] Using kubeconfig folder "/etc/kubernetes"
[kubeconfig] Writing "admin.conf" kubeconfig file
[kubeconfig] Writing "kubelet.conf" kubeconfig file
[kubeconfig] Writing "controller-manager.conf" kubeconfig file
[kubeconfig] Writing "scheduler.conf" kubeconfig file
[kubelet-start] Writing kubelet environment file with flags to file "/var/lib/kubelet/kubeadm-flags.env"
[kubelet-start] Writing kubelet configuration to file "/var/lib/kubelet/config.yaml"
[kubelet-start] Starting the kubelet
[control-plane] Using manifest folder "/etc/kubernetes/manifests"
[control-plane] Creating static Pod manifest for "kube-apiserver"
[control-plane] Creating static Pod manifest for "kube-controller-manager"
[control-plane] Creating static Pod manifest for "kube-scheduler"
[etcd] Creating static Pod manifest for local etcd in "/etc/kubernetes/manifests"
[wait-control-plane] Waiting for the kubelet to boot up the control plane as static Pods from directory "/etc/kubernetes/manifests". This can take up to 4m0s
[kubelet-check] Initial timeout of 40s passed.
[apiclient] All control plane components are healthy after 100.007446 seconds
[upload-config] Storing the configuration used in ConfigMap "kubeadm-config" in the "kube-system" Namespace
[kubelet] Creating a ConfigMap "kubelet-config-1.22" in namespace kube-system with the configuration for the kubelets in the cluster
[upload-certs] Skipping phase. Please see --upload-certs
[mark-control-plane] Marking the node master as control-plane by adding the labels: [node-role.kubernetes.io/master(deprecated) node-role.kubernetes.io/control-plane node.kubernetes.io/exclude-from-external-load-balancers]
[mark-control-plane] Marking the node master as control-plane by adding the taints [node-role.kubernetes.io/master:NoSchedule]
[bootstrap-token] Using token: ofgeif.siy6c7i3bkwd8zhe
[bootstrap-token] Configuring bootstrap tokens, cluster-info ConfigMap, RBAC Roles
[bootstrap-token] configured RBAC rules to allow Node Bootstrap tokens to get nodes
[bootstrap-token] configured RBAC rules to allow Node Bootstrap tokens to post CSRs in order for nodes to get long term certificate credentials
[bootstrap-token] configured RBAC rules to allow the csrapprover controller automatically approve CSRs from a Node Bootstrap Token
[bootstrap-token] configured RBAC rules to allow certificate rotation for all node client certificates in the cluster
[bootstrap-token] Creating the "cluster-info" ConfigMap in the "kube-public" namespace
[kubelet-finalize] Updating "/etc/kubernetes/kubelet.conf" to point to a rotatable kubelet client certificate and key
[addons] Applied essential addon: CoreDNS
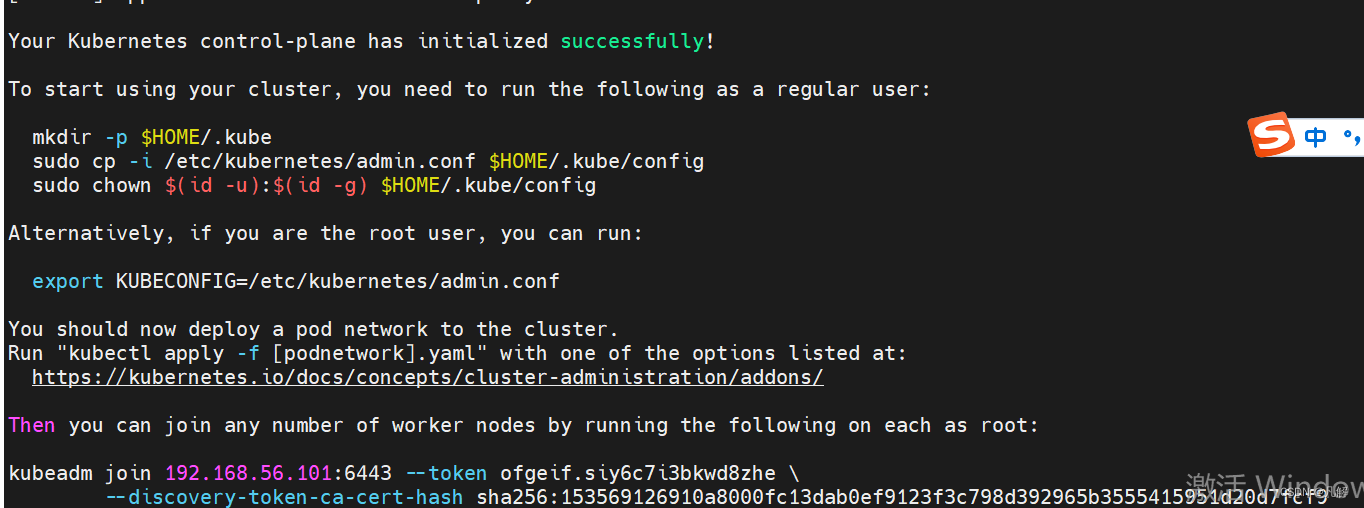
[addons] Applied essential addon: kube-proxyYour Kubernetes control-plane has initialized successfully!To start using your cluster, you need to run the following as a regular user:mkdir -p $HOME/.kubesudo cp -i /etc/kubernetes/admin.conf $HOME/.kube/configsudo chown $(id -u):$(id -g) $HOME/.kube/configAlternatively, if you are the root user, you can run:export KUBECONFIG=/etc/kubernetes/admin.confYou should now deploy a pod network to the cluster.
Run "kubectl apply -f [podnetwork].yaml" with one of the options listed at:https://kubernetes.io/docs/concepts/cluster-administration/addons/Then you can join any number of worker nodes by running the following on each as root:kubeadm join 192.168.56.101:6443 --token ofgeif.siy6c7i3bkwd8zhe \--discovery-token-ca-cert-hash sha256:153569126910a8000fc13dab0ef9123f3c798d392965b3555415951d20d7fcf9
这篇关于K8S安装异常篇:通过Coredns解决执行 kubeadm init卡住Pulling images required for setting up a Kubernetes cluster的文章就介绍到这儿,希望我们推荐的文章对编程师们有所帮助!


