本文主要是介绍A deep learning approach to detection of splicing and copy-move forgeries in images,希望对大家解决编程问题提供一定的参考价值,需要的开发者们随着小编来一起学习吧!
https://github.com/kPsarakis/Image-Forgery-Detection-CNN![]() https://github.com/kPsarakis/Image-Forgery-Detection-CNN
https://github.com/kPsarakis/Image-Forgery-Detection-CNN
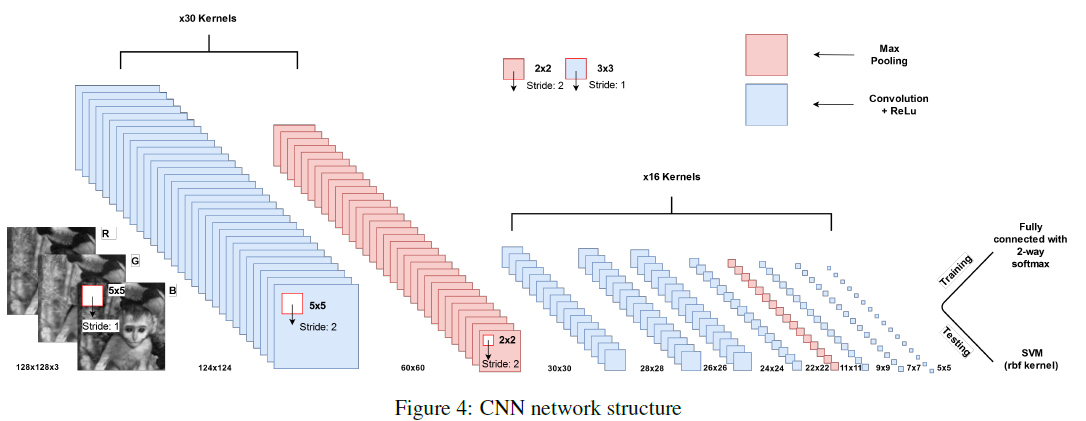
代码是结合代尔夫特理工大学的deep learning这门课的大作业来讲的。整体上一个分类的框架,但是用了srm噪声提取器,这个后来被RGBN作为双流fasterrcnn中的噪声流支路引用,srm在篡改检测中是比较常见的人工设计的算子。这篇文章的代码我跑过,本身还是有效果的,其中它里面数据预训练的分patch操作也在后续中被引进,但说实话,这种简单的网络设计其实跑不过不做任何设计的分类模型,比如res2net。篡改检测常用的基本都是自然场景数据集,比如CASIA1/2,中科院出的数据集,还有BHSig60,COVERAGE,NC16等,这些数据集的篡改手段包括了resize,压缩啊这些操作,其实和常规的文档类的数据集的ps还是有差别的,我们常说自然场景和文档篡改的差别挺大的,文档主要还是以ps这种操作为主。

上面这张图是网络设计,核心是第一组蓝色的cnn操作,这里面融合例如srm滤波器。srm滤波器最早出自于Rich models for steganalysis of digital images中,是Steganalysis Rich Model的缩写,富隐写分析模型,篡改操作会带来十分尖锐的边缘,尤其是拼接操作,会被高通滤波器很明显的体现出来。文章在cnn的结构里对第一层卷积的权重使用30个在srm中九三残差图的基本高通滤波器进行初始化,这些基础的滤波器对应了7个srm残差类别,分布如下:
| 个数 | 滤波器类别 |
|---|---|
| 8 | 1st |
| 4 | 2nd |
| 8 | 3rd |
| 1 | SQUARE3x3 |
| 4 | EDGE3x3 |
| 1 | SQUARE5x5 |
| 4 | EDGE3x3 |
from typing import Dictimport numpy as np
from torch import Tensor, stackdef get_filters():"""Function that return the required high pass SRM filters for the first convolutional layer of our implementation:return: A pytorch Tensor containing the 30x3x5x5 filter tensor with type[number_of_filters, input_channels, height, width]"""filters: Dict[str, Tensor] = {}# 1st Orderfilters["1O1"] = Tensor(np.array([[0, 0, 0, 0, 0], [0, 0, 0, 0, 0], [0, 0, -1, 1, 0], [0, 0, 0, 0, 0], [0, 0, 0, 0, 0]]))filters["1O2"] = Tensor(np.rot90(filters["1O1"]).copy())filters["1O3"] = Tensor(np.rot90(filters["1O2"]).copy())filters["1O4"] = Tensor(np.rot90(filters["1O3"]).copy())filters["1O5"] = Tensor(np.array([[0, 0, 0, 0, 0], [0, 0, 0, 1, 0], [0, 0, -1, 0, 0], [0, 0, 0, 0, 0], [0, 0, 0, 0, 0]]))filters["1O6"] = Tensor(np.rot90(filters["1O5"]).copy())filters["1O7"] = Tensor(np.rot90(filters["1O6"]).copy())filters["1O8"] = Tensor(np.rot90(filters["1O7"]).copy())# 2nd Orderfilters["2O1"] = Tensor(np.array([[0, 0, 0, 0, 0], [0, 0, 0, 0, 0], [0, 1, -2, 1, 0], [0, 0, 0, 0, 0], [0, 0, 0, 0, 0]]))filters["2O2"] = Tensor(np.rot90(filters["2O1"]).copy())filters["2O3"] = Tensor(np.array([[0, 0, 0, 0, 0], [0, 1, 0, 0, 0], [0, 0, -2, 0, 0], [0, 0, 0, 1, 0], [0, 0, 0, 0, 0]]))filters["2O4"] = Tensor(np.rot90(filters["2O3"]).copy())# 3rd Orderfilters["3O1"] = Tensor(np.array([[0, 0, 0, 0, 0], [0, 0, 1, 0, 0], [0, 1, -3, 1, 0], [0, 0, 0, 0, 0], [0, 0, 0, 0, 0]]))filters["3O2"] = Tensor(np.rot90(filters["3O1"]).copy())filters["3O3"] = Tensor(np.rot90(filters["3O2"]).copy())filters["3O4"] = Tensor(np.rot90(filters["3O3"]).copy())filters["3O5"] = Tensor(np.array([[0, 0, 0, 0, 0], [0, 1, 0, 1, 0], [0, 0, -3, 0, 0], [0, 1, 0, 0, 0], [0, 0, 0, 0, 0]]))filters["3O6"] = Tensor(np.rot90(filters["3O5"]).copy())filters["3O7"] = Tensor(np.rot90(filters["3O6"]).copy())filters["3O8"] = Tensor(np.rot90(filters["3O7"]).copy())# 3x3 SQUAREfilters["3x3S"] = Tensor(np.array([[0, 0, 0, 0, 0], [0, -1, 2, -1, 0], [0, 2, -4, 2, 0], [0, -1, 2, -1, 0], [0, 0, 0, 0, 0]]))# 3x3 EDGEfilters["3x3E1"] = Tensor(np.array([[0, 0, 0, 0, 0], [0, -1, 2, -1, 0], [0, 2, -4, 2, 0], [0, 0, 0, 0, 0], [0, 0, 0, 0, 0]]))filters["3x3E2"] = Tensor(np.rot90(filters["3x3E1"]).copy())filters["3x3E3"] = Tensor(np.rot90(filters["3x3E2"]).copy())filters["3x3E4"] = Tensor(np.rot90(filters["3x3E3"]).copy())# 5X5 EDGEfilters["5x5E1"] = Tensor(np.array([[-1, 2, -2, 2, -1], [2, -6, 8, -6, 2], [-2, 8, -12, 8, -2], [0, 0, 0, 0, 0], [0, 0, 0, 0, 0]]))filters["5x5E2"] = Tensor(np.rot90(filters["5x5E1"]).copy())filters["5x5E3"] = Tensor(np.rot90(filters["5x5E2"]).copy())filters["5x5E4"] = Tensor(np.rot90(filters["5x5E3"]).copy())# 5x5 SQUAREfilters["5x5S"] = Tensor(np.array([[-1, 2, -2, 2, -1], [2, -6, 8, -6, 2], [-2, 8, -12, 8, -2], [2, -6, 8, -6, 2], [-1, 2, -2, 2, -1]]))return vectorize_filters(filters)def vectorize_filters(filters: dict):"""Function that takes as input the 30x5x5 different SRM high pass filters and creates the 30x3x5x5 tensor with thefollowing permutations 𝑾𝑗 = [𝑊3𝑘−2 𝑊3𝑘−1 𝑊3𝑘] where 𝑘 = ((𝑗 − 1) mod 10) + 1 and (𝑗 = 1, ⋅ ⋅ ⋅ , 30).:arg filters: The 30 SRM high pass filters:return: Returns the 30x3x5x5 filter tensor of the type [number_of_filters, input_channels, height, width]"""tensor_list = []w = list(filters.values())for i in range(1, 31):tmp = []k = ((i - 1) % 10) + 1tmp.append(w[3 * k - 3])tmp.append(w[3 * k - 2])tmp.append(w[3 * k - 1])tensor_list.append(stack(tmp))return stack(tensor_list)if __name__ == '__main__':print(get_filters().shape)pass
在RGBN中只采用了三组。
class CNN(nn.Module):"""The convolutional neural network (CNN) class"""def __init__(self):"""Initialization of all the layers in the network."""super(CNN, self).__init__()self.conv0 = nn.Conv2d(3, 3, kernel_size=5, stride=1, padding=0)nn.init.xavier_uniform_(self.conv0.weight)self.conv1 = nn.Conv2d(3, 30, kernel_size=5, stride=2, padding=0)self.conv1.weight = nn.Parameter(get_filters())self.pool1 = nn.MaxPool2d(kernel_size=2, stride=2, padding=0)self.conv2 = nn.Conv2d(30, 16, kernel_size=3, stride=1, padding=0)nn.init.xavier_uniform_(self.conv2.weight)self.conv3 = nn.Conv2d(16, 16, kernel_size=3, stride=1, padding=0)nn.init.xavier_uniform_(self.conv3.weight)self.conv4 = nn.Conv2d(16, 16, kernel_size=3, stride=1, padding=0)nn.init.xavier_uniform_(self.conv4.weight)self.pool2 = nn.MaxPool2d(kernel_size=2, stride=2, padding=0)self.conv5 = nn.Conv2d(16, 16, kernel_size=3, stride=1, padding=0)nn.init.xavier_uniform_(self.conv5.weight)self.conv6 = nn.Conv2d(16, 16, kernel_size=3, stride=1, padding=0)nn.init.xavier_uniform_(self.conv6.weight)self.conv7 = nn.Conv2d(16, 16, kernel_size=3, stride=1, padding=0)nn.init.xavier_uniform_(self.conv7.weight)self.conv8 = nn.Conv2d(16, 16, kernel_size=3, stride=1, padding=0)nn.init.xavier_uniform_(self.conv8.weight)self.fc = nn.Linear(16 * 17 * 17, 2)self.drop1 = nn.Dropout(p=0.5) # used only for the NC datasetdef forward(self, x):"""The forward step of the network that consumes an image patch and either uses a fully connected layer in thetraining phase with a softmax or just returns the feature map after the final convolutional layer.:returns: Either the output of the softmax during training or the 400-D feature representation at testing"""x = f.relu(self.conv0(x))x = f.relu(self.conv1(x))lrn = nn.LocalResponseNorm(3)x = lrn(x)x = self.pool1(x)x = f.relu(self.conv2(x))x = f.relu(self.conv3(x))x = f.relu(self.conv4(x))x = f.relu(self.conv5(x))x = lrn(x)x = self.pool2(x)x = f.relu(self.conv6(x))x = f.relu(self.conv7(x))x = f.relu(self.conv8(x))x = x.view(-1, 16 * 17 * 17)# In the training phase we also need the fully connected layer with softmaxif self.training:# x = self.drop1(x) # used only for the NC datasetx = f.relu(self.fc(x))x = f.softmax(x, dim=1)return xif __name__ == '__main__':cnn1 = CNN()print(cnn1)网络结构很普通,没什么好说的。
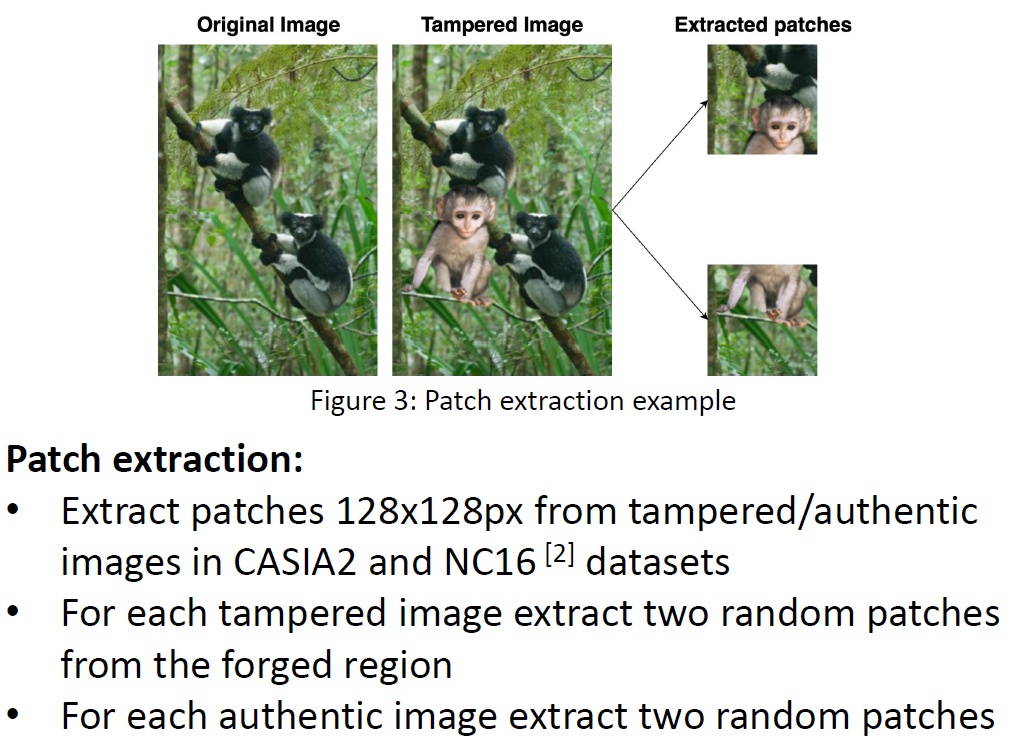
还有一点就是输入,CASIA中有真假两类样本,假样本有mask,真样本没有,真假样本也不是严格成对的,其实我做文档篡改检测的时候,有时候特别希望能够拿到成对的篡改检测样本,这样的话可用孪生网络去做,类似于笔迹鉴别的思路去搞。CASIA2中假样本其实有和真样本成对的数据,分patch操作就是利用假样本的mask去真样本假样本中分别做裁剪,其中假样本裁出来的128x128作为假样本,真样本中128x128作为真样本。如果你有成对数据,这是一个很好的数据预处理手段。我们自己在做文档篡改数据时,也借鉴了CASIA2做数据的方式。

这篇关于A deep learning approach to detection of splicing and copy-move forgeries in images的文章就介绍到这儿,希望我们推荐的文章对编程师们有所帮助!


