本文主要是介绍PIL报错:TypeError: Cannot handle this data type: (1, 1, 3), <f4及解决Image.fromarray保存后的结果是纯黑的图片,希望对大家解决编程问题提供一定的参考价值,需要的开发者们随着小编来一起学习吧!
PIL报错:TypeError: Cannot handle this data type: 1, 1, 3 <f4及解决Image.fromarray保存后的结果是纯黑的图片
- 1.问题背景
- 2.解决办法
- 2.1.解决`Image.fromarray()`保存图片报错
- 2.2.解决保存后的结果是纯黑的图片
⚡插播一条老家自产的糖心苹果,有问题随时私信我⚡:🍎🍎来自雪域高原的馈赠——海拔2000米的大凉山高原生态糖心苹果,欢迎选购!!🍎🍎
大凉山高原生态糖心苹果

1.问题背景
在使用深度学习进行图像分类时,有时候需要将内存中的ndarray保存为本地图像,我这边使用了PIL的Image.fromarray函数,具体代码如下:
from PIL import Image
import os
import uuidimg_file = Image.fromarray(images_array_list[_index])
img_file.save(os.path.join(images_save_path, "{}-{}.jpg".format(TIME_STAMP, uuid.uuid4())))
却发生报错:
TypeError: Cannot handle this data type: (1, 1, 3), <f4:
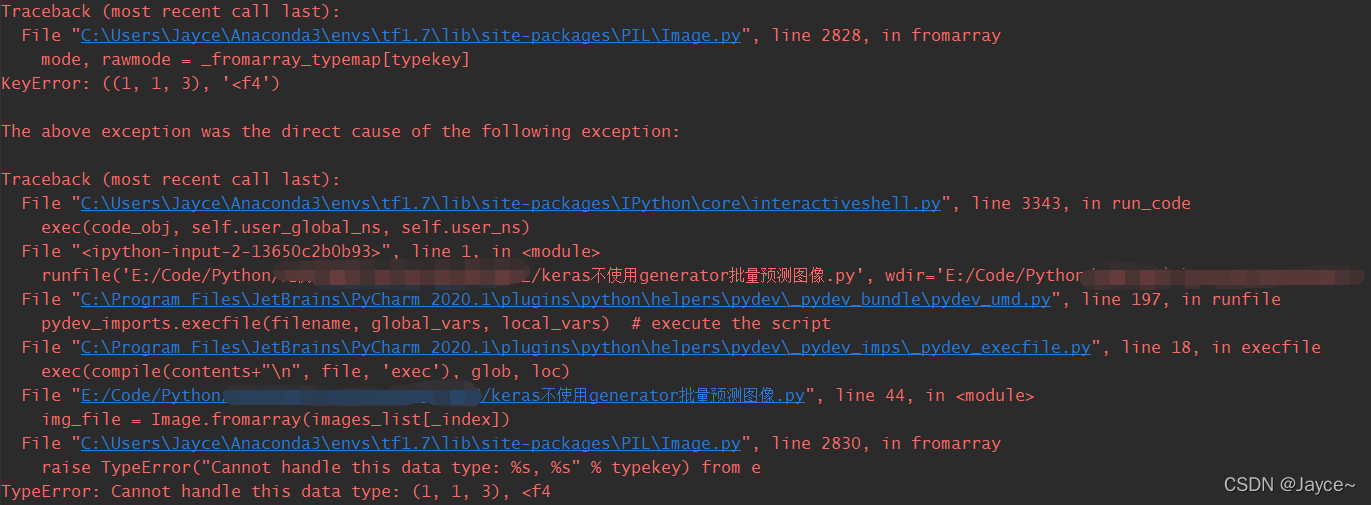
具体报错信息:
Traceback (most recent call last):File "C:\Users\Anaconda3\envs\tf1.7\lib\site-packages\PIL\Image.py", line 2828, in fromarraymode, rawmode = _fromarray_typemap[typekey]
KeyError: ((1, 1, 3), '<f4')
The above exception was the direct cause of the following exception:
Traceback (most recent call last):File "C:\Users\Anaconda3\envs\tf1.7\lib\site-packages\IPython\core\interactiveshell.py", line 3343, in run_codeexec(code_obj, self.user_global_ns, self.user_ns)File "<ipython-input-2-13650c2b0b93>", line 1, in <module>runfile('E:/Code/Python/keras不使用generator批量预测图像.py', wdir='E:/Code/Python')File "C:\Program Files\JetBrains\PyCharm 2020.1\plugins\python\helpers\pydev\_pydev_bundle\pydev_umd.py", line 197, in runfilepydev_imports.execfile(filename, global_vars, local_vars)  # execute the scriptFile "C:\Program Files\JetBrains\PyCharm 2020.1\plugins\python\helpers\pydev\_pydev_imps\_pydev_execfile.py", line 18, in execfileexec(compile(contents+"\n", file, 'exec'), glob, loc)File "E:/Code/Python/keras不使用generator批量预测图像.py", line 44, in <module>img_file = Image.fromarray(images_list[_index])File "C:\Users\Anaconda3\envs\tf1.7\lib\site-packages\PIL\Image.py", line 2830, in fromarrayraise TypeError("Cannot handle this data type: %s, %s" % typekey) from e
TypeError: Cannot handle this data type: (1, 1, 3), <f4
2.解决办法
2.1.解决Image.fromarray()保存图片报错
原因是Image.fromarray() 不支持float32类型的数据,但我这边输入的images_array_list数据类型是 float32,便造成了上述报错!因此,只需要将类型转换为Image.fromarray() 支持的类型即可(本文转为uint8类型),如下所示:
from PIL import Image
import os
import uuid
import numpy as npimg_file = Image.fromarray(np.uint8(images_list[_index]))
img_file.save(os.path.join(images_save_path, "{}-{}.jpg".format(TIME_STAMP, uuid.uuid4())))
运行上述代码,没有报错且成功保存了图像,但为啥图像是这样的:

这又是咋回事?

咱们接着往下看:
2.2.解决保存后的结果是纯黑的图片
这主要是因为我们的图片中的像素值被预处理之后,其值在[-1,1]之间,而图片的像素值取值范围一般是[0,255],所以我们只需要将像素值由[-1,1]缩放到[0,255]即可!因为我这边使用的是Keras框架,里面自带了array_to_img函数,可以方便的转换图像:
def array_to_img(x, data_format=None, scale=True):"""Converts a 3D Numpy array to a PIL Image instance.# Argumentsx: Input Numpy array.data_format: Image data format.scale: Whether to rescale image valuesto be within [0, 255].# ReturnsA PIL Image instance.# RaisesImportError: if PIL is not available.ValueError: if invalid `x` or `data_format` is passed."""if pil_image is None:raise ImportError('Could not import PIL.Image. ''The use of `array_to_img` requires PIL.')x = np.asarray(x, dtype=K.floatx())if x.ndim != 3:raise ValueError('Expected image array to have rank 3 (single image). ''Got array with shape:', x.shape)if data_format is None:data_format = K.image_data_format()if data_format not in {'channels_first', 'channels_last'}:raise ValueError('Invalid data_format:', data_format)# Original Numpy array x has format (height, width, channel)# or (channel, height, width)# but target PIL image has format (width, height, channel)if data_format == 'channels_first':x = x.transpose(1, 2, 0)if scale:x = x + max(-np.min(x), 0)x_max = np.max(x)if x_max != 0:x /= x_maxx *= 255if x.shape[2] == 3:# RGBreturn pil_image.fromarray(x.astype('uint8'), 'RGB')elif x.shape[2] == 1:# grayscalereturn pil_image.fromarray(x[:, :, 0].astype('uint8'), 'L')else:raise ValueError('Unsupported channel number: ', x.shape[2])
我们直接使用上述函数即可,即:
img_file = Image.fromarray(np.uint8(_images_list[_index]))
修改为
img_file = array_to_img(images_list[_index])
可以看到图像显示正常了:

这篇关于PIL报错:TypeError: Cannot handle this data type: (1, 1, 3), <f4及解决Image.fromarray保存后的结果是纯黑的图片的文章就介绍到这儿,希望我们推荐的文章对编程师们有所帮助!


