本文主要是介绍OpenCV零基础实战项目2:测角,希望对大家解决编程问题提供一定的参考价值,需要的开发者们随着小编来一起学习吧!
简述
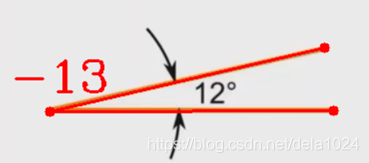
主要任务:获取鼠标点击点的位置信息(第一个点是顶点),绘制两条线构成的夹角,计算夹角并显示出来。
其他功能:读取图片,展示图片,键入q清空坐标点,键入d销毁所有窗口。
目录
- 简述
- 资源
- 实现
- 1. 获取点位置信息并显示
- 2. 计算夹角
- 3. 键入q清空坐标点,键入d销毁所有窗口
- 实际操作中的问题和注意事项
- 完整代码与结果示意
资源
视频资源:
(强推)OpenCV实战项目
图片:
实现
1. 获取点位置信息并显示
读取并显示图片:imread(), imshow().
鼠标响应:setMousecallback()。
void setMousecallback(const string& winname, MouseCallback onMouse, void* userdata=0)winname:窗口的名字onMouse:鼠标响应函数,回调函数。指定窗口里每次鼠标时间发生的时候,被调用的函数指针。 这个函数的原型应该为void on_Mouse(int event, int x, int y, int flags, void* param);userdate:传给回调函数的参数
它的参数函数有固定参数设置,可以自定义名称,这里定义为mousePoints()
void on_Mouse(int event, int x, int y, int flags, void* param);
event是 CV_EVENT_*变量之一
x和y是鼠标指针在图像坐标系的坐标(不是窗口坐标系)
flags是CV_EVENT_FLAG的组合, param是用户定义的传递到setMouseCallback函数调用的参数。
我们通过自定义的函数mousePoints()绘制出点击的点(cv.circle()),并绘制出两条线。该函数具体如下:
def mousePoints(event, x, y, flags, params):if event == cv.EVENT_LBUTTONDOWN:cv.circle(img, (x,y), 5, (0,0,255), cv.FILLED)pointList.append([x,y])#print(pointList)#draw out the linessize = len(pointList)if size != 1 and (size-1) % 3 != 0:cv.line(img, tuple(pointList[round((size-2)/3)*3]), (x,y), (0,0,255), 2)
当按下左键时,获取x和y坐标绘制,并通过append()加入pointList。
以三点为一组,第一个点(顶点)作为point1,第二或第三点作为point2. 此处除以三取整(round()四舍五入)再乘三就可以取到这一组的第一个点。
例如该组三点序号为6,7,8. pointList加入点[8]时,size=9,(9-2)/3取整乘3为6. pointList加入点[9]时,size=10,(10-2)/3取整乘3为9,恰是下一组的第一个点。事实上,我们需要的顶点需要应该为0,3,6,9等3的整倍数序号点。
2. 计算夹角
公式:

当获取一组点(三个)以后,可以调用自定义的函数getAngle()计算夹角度数。获取最后三个点,调用自定义的gradient()函数计算两条线的斜率,根据公式得到角度并打印。具体代码如下:
def gradient(pt1, pt2):#(y2-y1)/(x2-x1)return (pt2[1]-pt1[1])/(pt2[0]-pt1[0])def getAngle(pointList):pt1, pt2, pt3 = pointList[-3:]#the last 3 pointsm1 = gradient(pt1, pt2)m2 = gradient(pt1, pt3)angR = math.atan((m1-m2)/(1+m1*m2))angD = round(math.degrees(angR))cv.putText(img, str(angD), (pt1[0]-40, pt1[1]-20), cv.FONT_HERSHEY_COMPLEX, 1.5, (0,0,255), 2)
Math.atan()是arctan的计算,由正切值得到角度,再通过math.degrees()将弧度转化为角度。
3. 键入q清空坐标点,键入d销毁所有窗口
cv.waitkey(delay)在键入字符时返回一个对应的ASCII值,当它等于’q’时,清空pointList。当它等于’d’时,关闭窗口退出。由于我们在一个循环中,需要break才可以。代码如下:
if cv.waitKey(1) & 0xFF == ord('d'):cv.destroyAllWindows()breakelif cv.waitKey(1) & 0xFF == ord('q'):pointList = []
其中,cv.waitKey(1) & 0xFF是因为不同系统返回的值不全是八位,与操作进行一个第八位的获取。
cv2.waitKey(1) returns the character code of the currently pressed key
and -1 if no key is pressed. the & 0xFF is a binary AND operation to
ensure only the single byte (ASCII) representation of the key remains
as for some operating systems cv2.waitKey(1) will return a code that
is not a single byte. ord(‘q’) always returns the ASCII representation
of ‘q’ which is 113 (0x71 in hex).
实际操作中的问题和注意事项
-
Fail to close the window properly

While Ture: 环境内没有break -
Too much lines

cv.line(img, tuple(pointList[round((size-1)/3)*3]), (x,y), (0,0,255), 2)
应该在if event == cv.EVENT_LBUTTONDOWN:下
完整代码与结果示意
import cv2 as cv
import mathpath = 'E:\\CV\\pics\\angle.png'
img = cv.imread(path)
pointList = []def mousePoints(event, x, y, flags, params):if event == cv.EVENT_LBUTTONDOWN:cv.circle(img, (x,y), 5, (0,0,255), cv.FILLED)pointList.append([x,y])#print(pointList)#draw out the linessize = len(pointList)if size != 1 and (size-1) % 3 != 0:cv.line(img, tuple(pointList[round((size-2)/3)*3]), (x,y), (0,0,255), 2)def gradient(pt1, pt2):#(y2-y1)/(x2-x1)return (pt2[1]-pt1[1])/(pt2[0]-pt1[0])def getAngle(pointList):pt1, pt2, pt3 = pointList[-3:]#the last 3 pointsm1 = gradient(pt1, pt2)m2 = gradient(pt1, pt3)angR = math.atan((m1-m2)/(1+m1*m2))angD = round(math.degrees(angR))cv.putText(img, str(angD), (pt1[0]-40, pt1[1]-20), cv.FONT_HERSHEY_COMPLEX, 1.5, (0,0,255), 2)while True:        if len(pointList) % 3 == 0 and len(pointList) != 0:getAngle(pointList)cv.imshow('image',img)cv.setMouseCallback('image', mousePoints)#delete the wrong pointsif cv.waitKey(1) & 0xFF == ord('d'):cv.destroyAllWindows()breakelif cv.waitKey(1) & 0xFF == ord('q'):pointList = []
结果:
这篇关于OpenCV零基础实战项目2:测角的文章就介绍到这儿,希望我们推荐的文章对编程师们有所帮助!


