本文主要是介绍【Vue3 博物馆管理系统】定制上中下(顶部菜单、底部区域、中间主区域显示)三层结构首页,希望对大家解决编程问题提供一定的参考价值,需要的开发者们随着小编来一起学习吧!
系列文章目录
第一章 定制上中下(顶部菜单、底部区域、中间主区域显示)三层结构首页
第二章 使用Vue3、Element-plus菜单组件构建菜单
[第三章 使用Vue3、Element-plus菜单组件构建轮播图]
[第四章 使用Vue3、Element-plus菜单组件构建组图文章]
文章目录
- 系列文章目录
- @[TOC](文章目录)
- 1、系统设计
- 1.1、前台用户
- 1.1.1、用户模块
- 1.1.2、资讯模块
- 1.1.3、藏品模块
- 2、本章节效果图
- 2.1、拆解任务
- 3、动手开干
- 3.1、Vue3项目的创建
- 3.1.1、创建museum空白目录
- 3.1.2、使用idea打开
- 3.1.3、创建Vue3项目
- 3.1.3.1、打开cmd命令,进入到上一步创建的目录;
- 3.1.3.2、运行命令:vue create front
- 3.1.3.3、选择 Vue3项目
- 3.1.3.4、项目构建中
- 3.1.3.5、构建成功
- 3.1.3.6、按照提示启动项目
- 3.1.3.7、在浏览器访问项目
- 3.2、Vue3 路由应用
- 3.2.1、在Idea里打开museum项目,展开front工程
- 3.2.2、为项目安装router
- 3.2.3、在src下创建view、router目录
- 3.2.3.1、/view/Home.vue文件
- 3.2.3.2、/router/index.js文件
- 3.2.3.3、main.js加载路由
- 3.2.3.4、App.vue 加载 router-view
- 3.2.3.5、修改启动端口:80
- 3.2.4、访问页面
- 3.3、Element-plus 应用
- 3.3.1、为项目安装Element-plus
- 3.3.2、Vue项目加载Element-plus
- 3.4、Element-plus 的布局、在顶栏区域放置菜单、底栏容器放置站内导航\版权等信息
- 3.5、执行npm run serve启动项目,可见到第一部分的效果图
- 总结

1、系统设计
Vue3 博物馆管理系统,从构建Vue3项目开始,打造一个博物馆系统。
分为2个系统:前台用户、后台管理
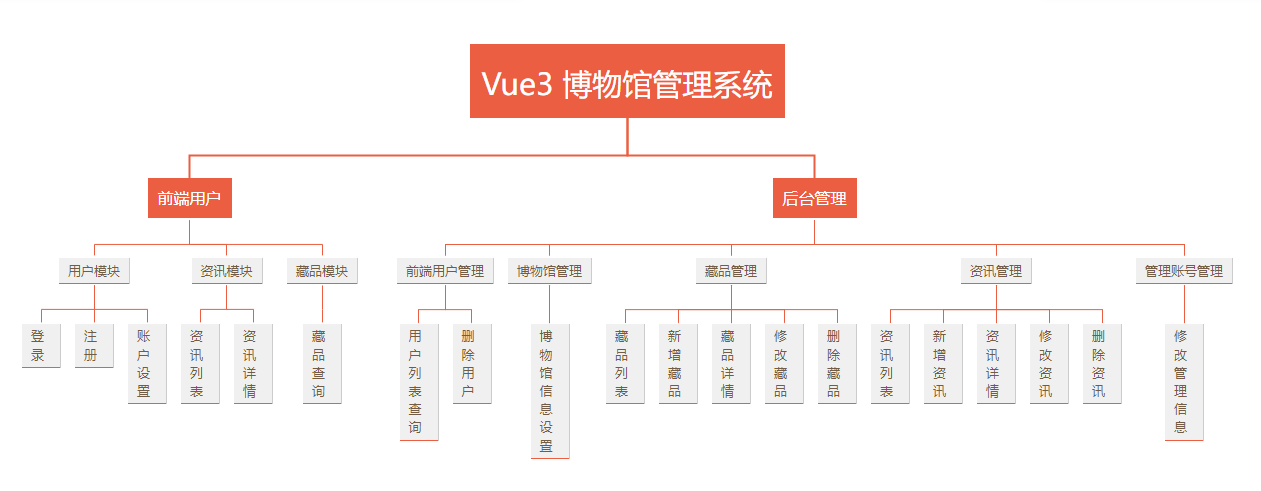
1.1、前台用户
包含模块:用户模块、资讯模块、藏品模块
1.1.1、用户模块
- 登录
提供前台用户登录功能 - 注册
提供前台用户注册功能 - 检查登录账号是否唯一
检索用户库,是否存在相同账号
1.1.2、资讯模块
- 资讯列表
咨询列表信息展示 - 资讯详情
资讯详情数据展示,展示资讯标题、副标题、发布时间、来源、作者、资讯内容等信息
1.1.3、藏品模块
- 藏品分类信息查询
藏品分类信息展示 - 藏品列表信息查询
藏品列表信息展示,可根据分类信息过滤查询,可根据藏品标题过滤查询 - 藏品详情信息查询
藏品详细信息展示,展示藏品标题、副标题、收藏时间、来源、发现人、收藏价值、年代、藏品内容等信息
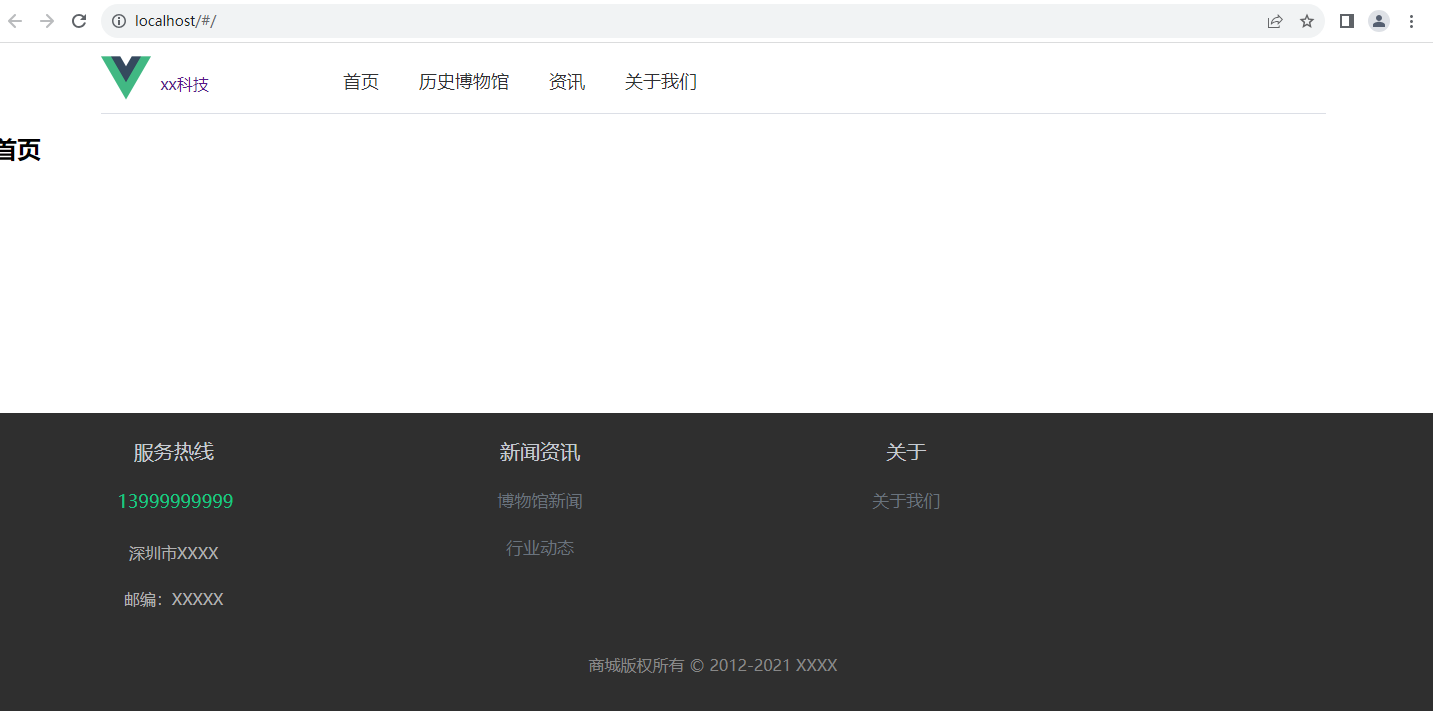
2、本章节效果图
2.1、拆解任务
本章节的任务:
1、Vue3项目的创建;
2、Vue3 路由应用;
3、Element-plus 应用;
4、Element-plus 的布局;
5、在顶栏区域放置菜单;
6、底栏容器放置站内导航、版权等信息
3、动手开干
3.1、Vue3项目的创建
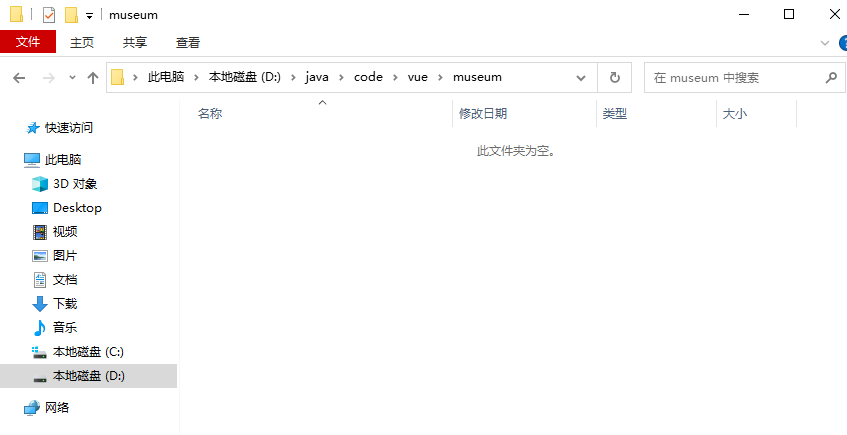
3.1.1、创建museum空白目录
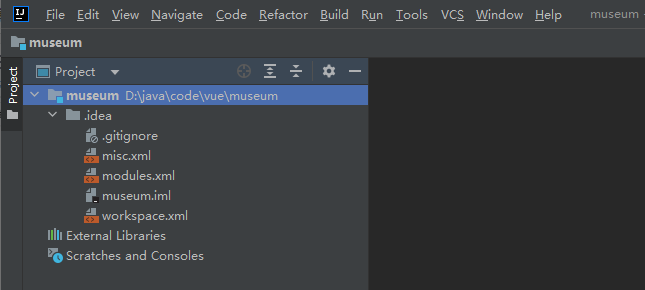
3.1.2、使用idea打开
3.1.3、创建Vue3项目
命令格式:vue create 项目名称
由于本章节讲解的是构建前端用户首页,因此我们创建前端项目
vue create front
3.1.3.1、打开cmd命令,进入到上一步创建的目录;
3.1.3.2、运行命令:vue create front
3.1.3.3、选择 Vue3项目
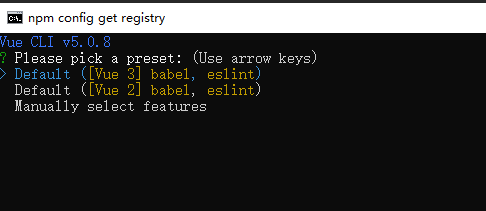
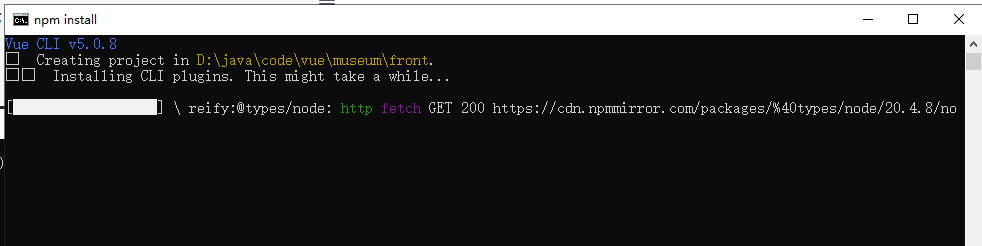
3.1.3.4、项目构建中
3.1.3.5、构建成功
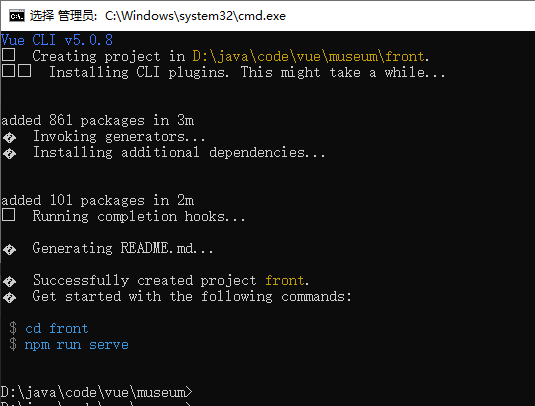
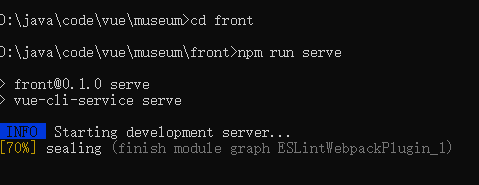
3.1.3.6、按照提示启动项目
cd front
npm run serve
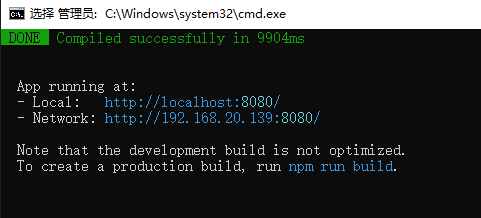
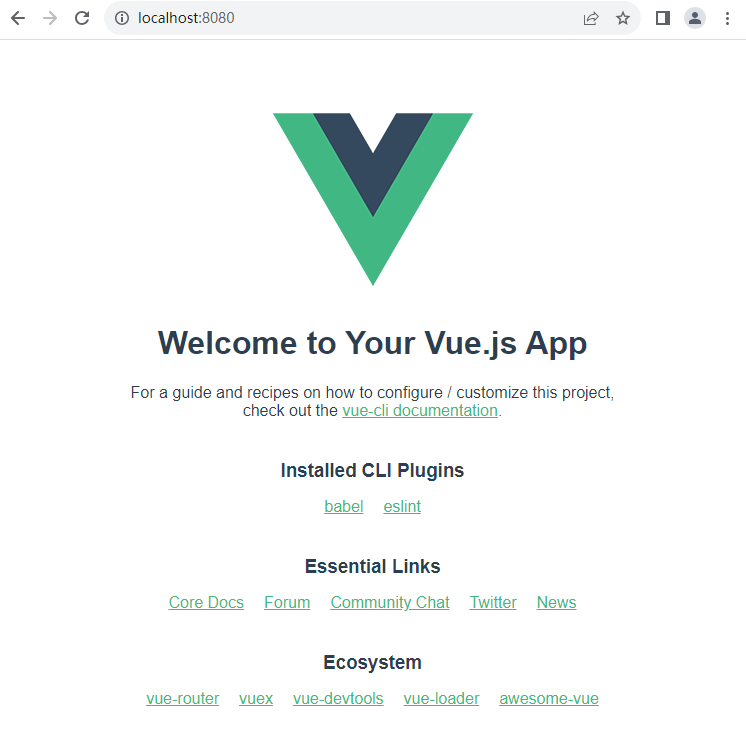
3.1.3.7、在浏览器访问项目
访问地址:http://localhost:8080/
3.2、Vue3 路由应用
3.2.1、在Idea里打开museum项目,展开front工程
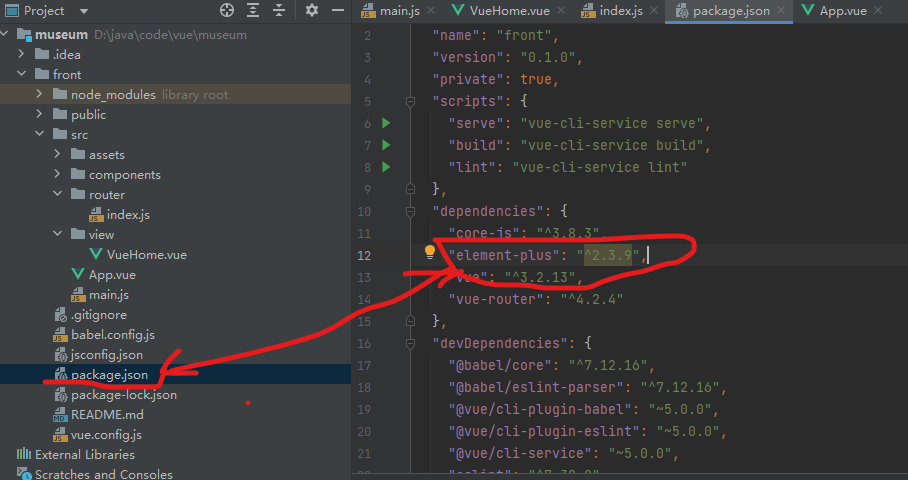
3.2.2、为项目安装router
npm install vue-router@4
安装好之后,打开package.json文件,验证是否有vue-router依赖

3.2.3、在src下创建view、router目录

3.2.3.1、/view/Home.vue文件
<template><div><h1>{{msg}}</h1></div>
</template><script>
export default {name: 'Home',data() {return {msg: "首页"}}
}
</script><style scoped></style>
3.2.3.2、/router/index.js文件
import { createRouter, createWebHashHistory } from 'vue-router'const routes = [{path: "/",name: 'home',component: ()=>import("@/view/Home.vue")}
]const router = createRouter({history:createWebHashHistory(),routes
})export default router;
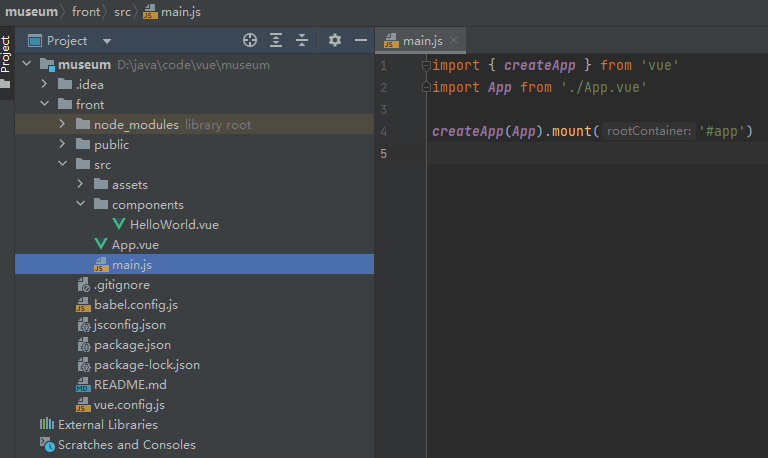
3.2.3.3、main.js加载路由
import { createApp } from 'vue'
import App from './App.vue'
import router from "./router/index"const app = createApp(App);
app.use(router);app.mount('#app');
3.2.3.4、App.vue 加载 router-view
<template><p><router-view/></p>
</template>
3.2.3.5、修改启动端口:80
npm run serve – --port 80
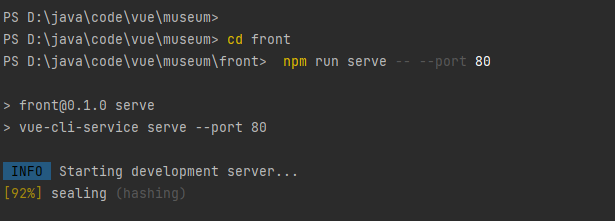
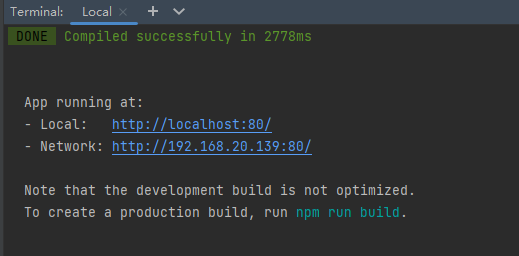
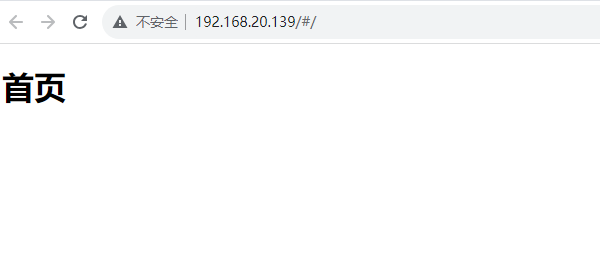
3.2.4、访问页面
可以看到这里显示了路由"/"(/view/VueHome.vue)页面的数据
3.3、Element-plus 应用
3.3.1、为项目安装Element-plus
npm install element-plus --save
检查package.json文件里的element-plus已经加上了
3.3.2、Vue项目加载Element-plus
在上一步router 的基础上,进一步引入了element-plus
import { createApp } from 'vue'
import App from './App.vue'
import router from "./router/index"
import ElementPlus from 'element-plus';
import 'element-plus/theme-chalk/index.css';const app = createApp(App);
app.use(router);
app.use(ElementPlus)app.mount('#app');
3.4、Element-plus 的布局、在顶栏区域放置菜单、底栏容器放置站内导航\版权等信息
修改App.Vue文件
<template><div id="app" name="app"><el-container><!-- 顶栏容器 --><el-header style="margin-top: 10px;"><el-menu:default-active="1"class="el-menu-demo"mode="horizontal"active-text-color="#409eff"router><div class="logo" style="width: 10%;" ><router-link to="/"><span style="width: 240px; position: absolute; top: 20px; left: 60px; ">xx科技</span><img src="./assets/logo.png" style="height: 50px;" alt /></router-link></div><el-menu-item index="/" >首页</el-menu-item><el-menu-item index="/history">历史博物馆</el-menu-item><el-menu-item index="/news" >资讯</el-menu-item><el-menu-item index="/about" >关于我们</el-menu-item></el-menu></el-header><!-- 主要区域容器 --><el-main><keep-alive><router-view :key="$route.path+$route.query"></router-view></keep-alive></el-main><!-- 底栏容器 --><el-footer><div class="footer"><el-row :gutter="25"><el-col :span="6" ><div style="width: 100%; color: #c6cbd1; margin: 25px 10px; font-size: 20px"> 服务热线 </div><div style="color: #14cb85; font-size: 18px"><span> <el-icon color="#14cb85"> <phone /> </el-icon> 13999999999</span></div><div style="width: 100%; color: #b0b0b0; margin: 25px 10px"> 深圳市XXXX </div><div style="width: 100%; color: #b0b0b0; margin: 25px 10px"> 邮编:XXXXX</div></el-col><el-col :span="6" ><div style="width: 100%; color: #c6cbd1; margin: 25px 10px; font-size: 20px"> 新闻资讯 </div><div style="width: 100%; color: #b0b0b0; margin: 25px 10px"> <router-link to="/news" style="color: #6a737d;font-size: 17px ">博物馆新闻</router-link> </div><div style="width: 100%; color: #b0b0b0; margin: 25px 10px"> <router-link to="/news" style="color: #6a737d;font-size: 17px ">行业动态</router-link> </div></el-col><el-col :span="6" ><div style="width: 100%; color: #c6cbd1; margin: 25px 10px; font-size: 20px"> 关于 </div><div style="width: 100%; margin: 25px 10px"> <router-link to="/about" style="color: #6a737d;font-size: 17px ">关于我们</router-link> </div></el-col></el-row><div class="mod_help"><p class="coty">商城版权所有 © 2012-2021 XXXX</p></div></div></el-footer><!-- 底栏容器END --></el-container></div>
</template><script>export default {name: 'App',components: {}
}
</script><style>
/* 全局CSS */
* {padding: 0;margin: 0;border: 0;list-style: none;
}
#app .el-header {padding: 0;
}
#app .el-main {min-height: 300px;padding: 20px 0;
}
#app .el-footer {padding: 0;
}
a,
a:hover {text-decoration: none;
}
/* 全局CSS END *//* 顶部导航栏CSS */
.topbar {height: 40px;background-color: #3d3d3d;margin-bottom: 20px;
}
.topbar .nav {width: 1225px;margin: 0 auto;
}
.topbar .nav ul {float: right;
}
.topbar .nav li {float: left;height: 40px;color: #b0b0b0;font-size: 14px;text-align: center;line-height: 40px;margin-left: 20px;
}
.topbar .nav .sep {color: #b0b0b0;font-size: 12px;margin: 0 5px;
}
.topbar .nav li .el-button {color: #b0b0b0;
}
.topbar .nav .el-button:hover {color: #fff;
}
.topbar .nav li a {color: #b0b0b0;
}
.topbar .nav a:hover {color: #fff;
}
.topbar .nav .shopCart {width: 120px;background: #424242;
}
.topbar .nav .shopCart:hover {background: #fff;
}
.topbar .nav .shopCart:hover a {color: #ff6700;
}
.topbar .nav .shopCart-full {width: 120px;background: #ff6700;
}
.topbar .nav .shopCart-full a {color: white;
}
/* 顶部导航栏CSS END *//* 顶栏容器CSS */
.el-header .el-menu {max-width: 1225px;margin: 0 auto;
}
.el-header .logo {height: 60px;width: 339px;float: left;margin-right: 100px;position: relative;
}
.el-header .so {margin-top: 10px;width: 300px;position: absolute;right: 1%;}
/* 顶栏容器CSS END *//* 底栏容器CSS */
.footer {width: 100%;text-align: center;background: #2f2f2f;padding-bottom: 20px;
}
.footer .ng-promise-box {border-bottom: 1px solid #3d3d3d;line-height: 145px;
}
.footer .ng-promise-box {margin: 0 auto;border-bottom: 1px solid #3d3d3d;line-height: 145px;
}
.footer .ng-promise-box .ng-promise p a {color: #fff;font-size: 20px;margin-right: 210px;padding-left: 44px;height: 40px;display: inline-block;line-height: 40px;text-decoration: none;background: url("assets/imgs/us-icon.png") no-repeat left 0;
}
.footer .github {height: 50px;line-height: 50px;margin-top: 20px;
}
.footer .github .github-but {width: 50px;height: 50px;margin: 0 auto;background: url("assets/imgs/github.png") no-repeat;
}
.footer .mod_help {text-align: center;color: #888888;
}
.footer .mod_help p {margin: 20px 0 16px 0;
}.footer .mod_help p a {color: #888888;text-decoration: none;
}
.footer .mod_help p a:hover {color: #fff;
}
.footer .mod_help p span {padding: 0 22px;
}
/* 底栏容器CSS END */.flex-grow {flex-grow: 1;
}li.el-menu-item{font-size: 18px;
}</style>
3.5、执行npm run serve启动项目,可见到第一部分的效果图
本章节内容完毕,后续在讲解路由变更、监控路由变化、主要区域容器布局、轮播图、e-tab组件、e-row、e-col组件如何使用。
总结
以上就是今天要讲的内容,本文仅仅简单介绍了博物馆管理系统首页布局,涉及Vue3项目的创建,Vue3 路由,Element-plus 的菜单,Element-plus 的布局等。
这篇关于【Vue3 博物馆管理系统】定制上中下(顶部菜单、底部区域、中间主区域显示)三层结构首页的文章就介绍到这儿,希望我们推荐的文章对编程师们有所帮助!


