本文主要是介绍Colab/PyTorch - 004 Torchvision Semantic Segmentation,希望对大家解决编程问题提供一定的参考价值,需要的开发者们随着小编来一起学习吧!
Colab/PyTorch - 004 Torchvision Semantic Segmentation
- 1. 源由
- 2. 语义分割 - 应用
- 2.1 自动驾驶
- 2.2 面部分割
- 2.3 室内物体分割
- 2.4 地理遥感
- 3. 语义分割 - torchvision
- 3.1 FCN 使用 ResNet-101 语义分割
- 3.1.1 加载模型
- 3.1.2 加载图像
- 3.1.3 预处理图像
- 3.1.4 网络的前向传播
- 3.1.5 解码输出
- 3.1.6 最终结果
- 3.2 使用 DeepLab 语义分割
- 3.3 多物体语义分割
- 4. 总结
- 4.1 推理时间
- 4.2 模型大小
- 5. 参考资料
1. 源由
循序渐进的原则:
- 逻辑上模型是否具备合理性
- 实测能否线性拟合
- 实测能否非线性拟合
- 实测能否多因素(图像)分类问题分析
- 实测能否多因素(图像)分类模型收敛
- 实测能否多因素(图像)轮廓勾画
- 实测能否多因素(图像)目标关联关系分析
- 实测能否多因素(图像)目标场景分析
- 。。。 。。。
识别物体类别后,接下来就是轮廓勾画了。这样就能在一张大图中将不同类型的目标进行区分,为后面的关联关系,甚至场景分析做好准备。当然,从一个静态的图片分析关联关系,场景分析是非常难的。
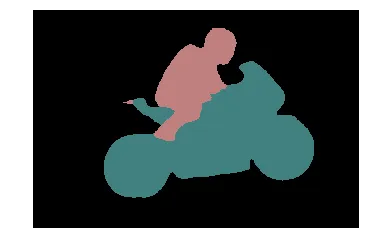
对以下图像进行语义分割,轮廓勾画:

我们可以得到以下图像:正如您所看到的,图像中的每个像素都被分类到其相应的类别。例如,人是一类,自行车是另一类,第三类是背景。简单来说,这就是语义分割的基本原理 - 识别和分离图像中的每个对象,并相应地对它们进行标记。
2. 语义分割 - 应用
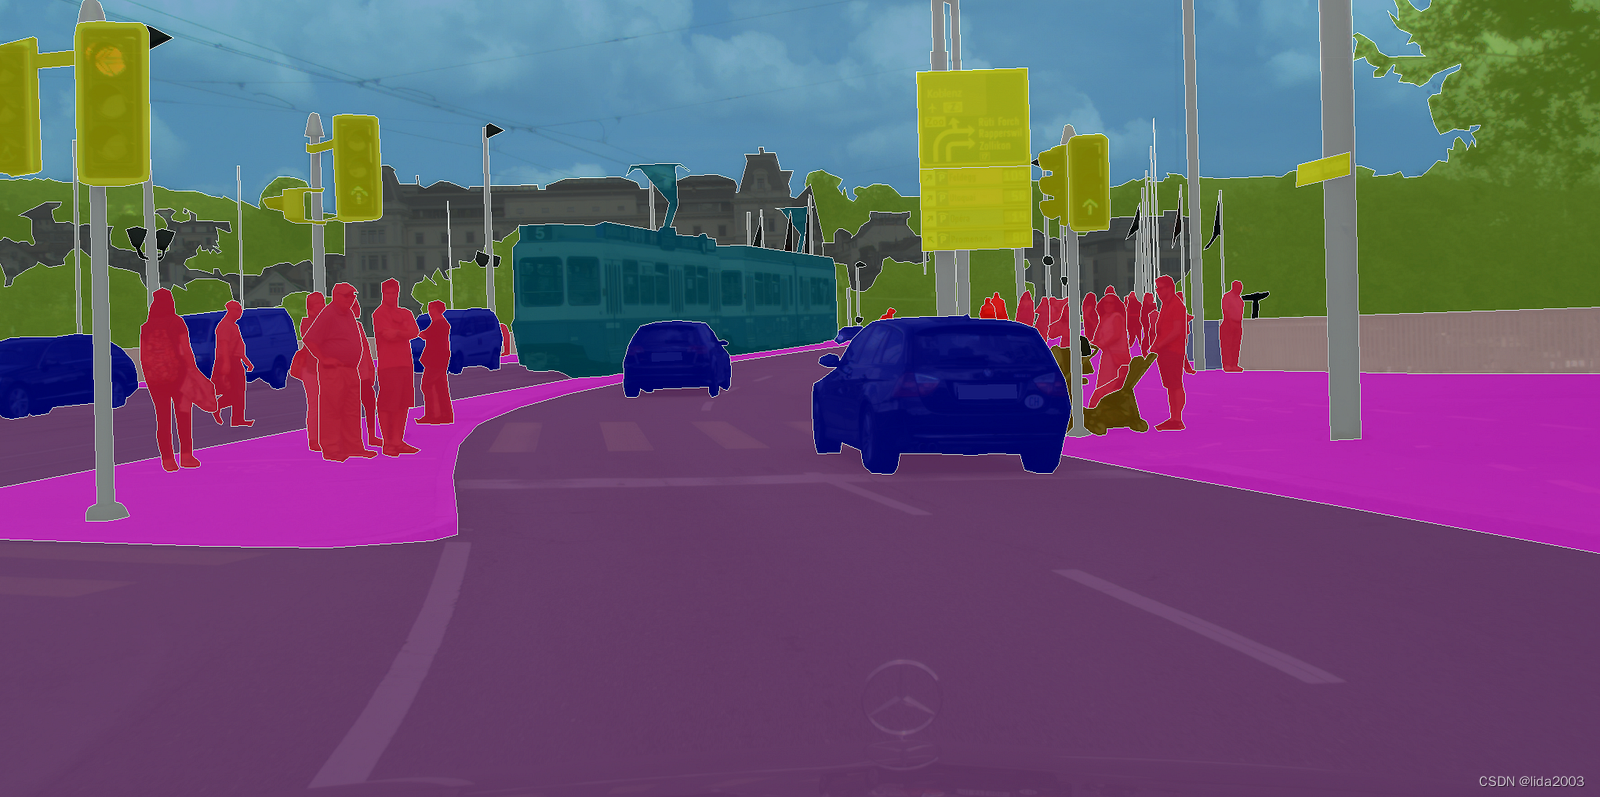
2.1 自动驾驶
在自动驾驶中,驾驶汽车的计算机需要对其前方的道路场景有很好的理解。将汽车、行人、车道和交通标志等物体分割出来非常重要。
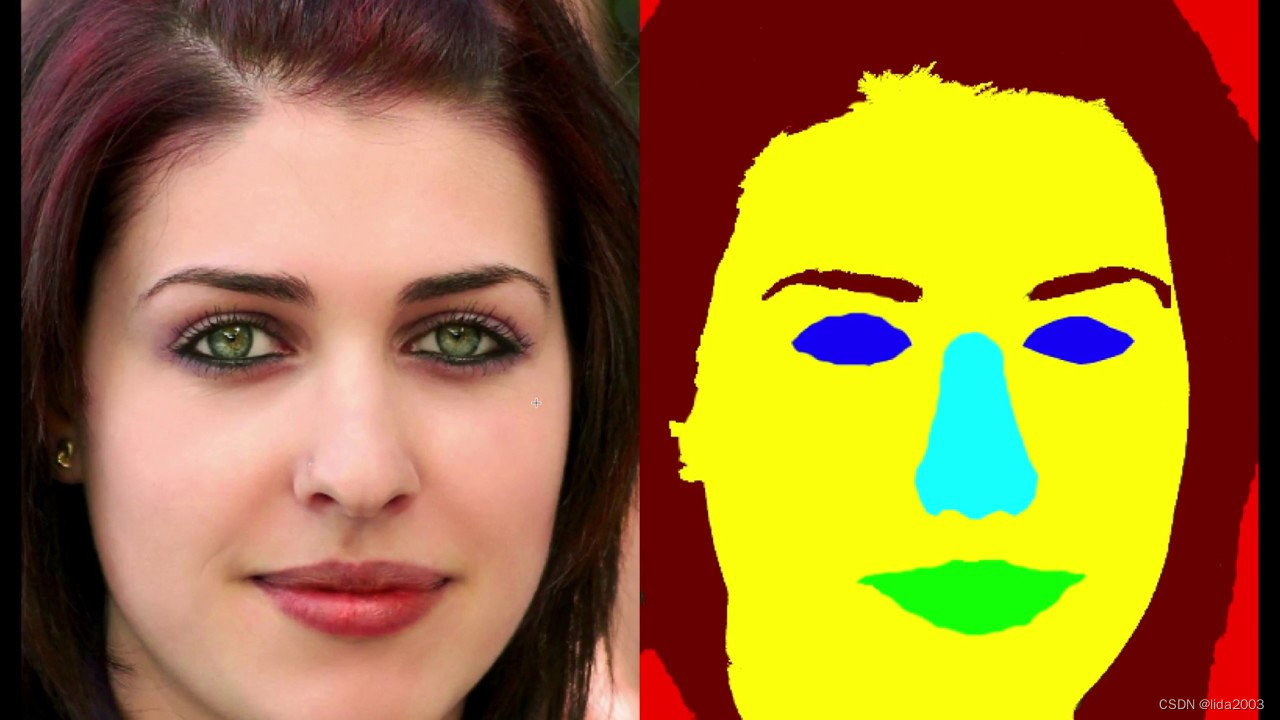
2.2 面部分割
面部分割用于将脸部的每个部分分割成语义上相似的区域——如嘴唇、眼睛等。这在许多现实世界的应用中都非常有用。一个非常有趣的应用可以是虚拟化妆。
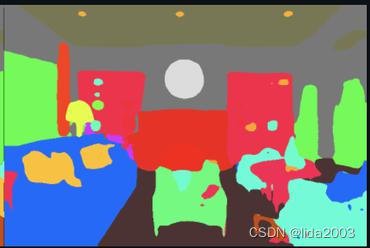
2.3 室内物体分割
在增强现实(AR)和虚拟现实(VR)中。AR 应用可以对整个室内区域进行分割,以了解椅子、桌子、人、墙壁和其他类似物体的位置,从而可以有效地放置和操作虚拟物体。
2.4 地理遥感
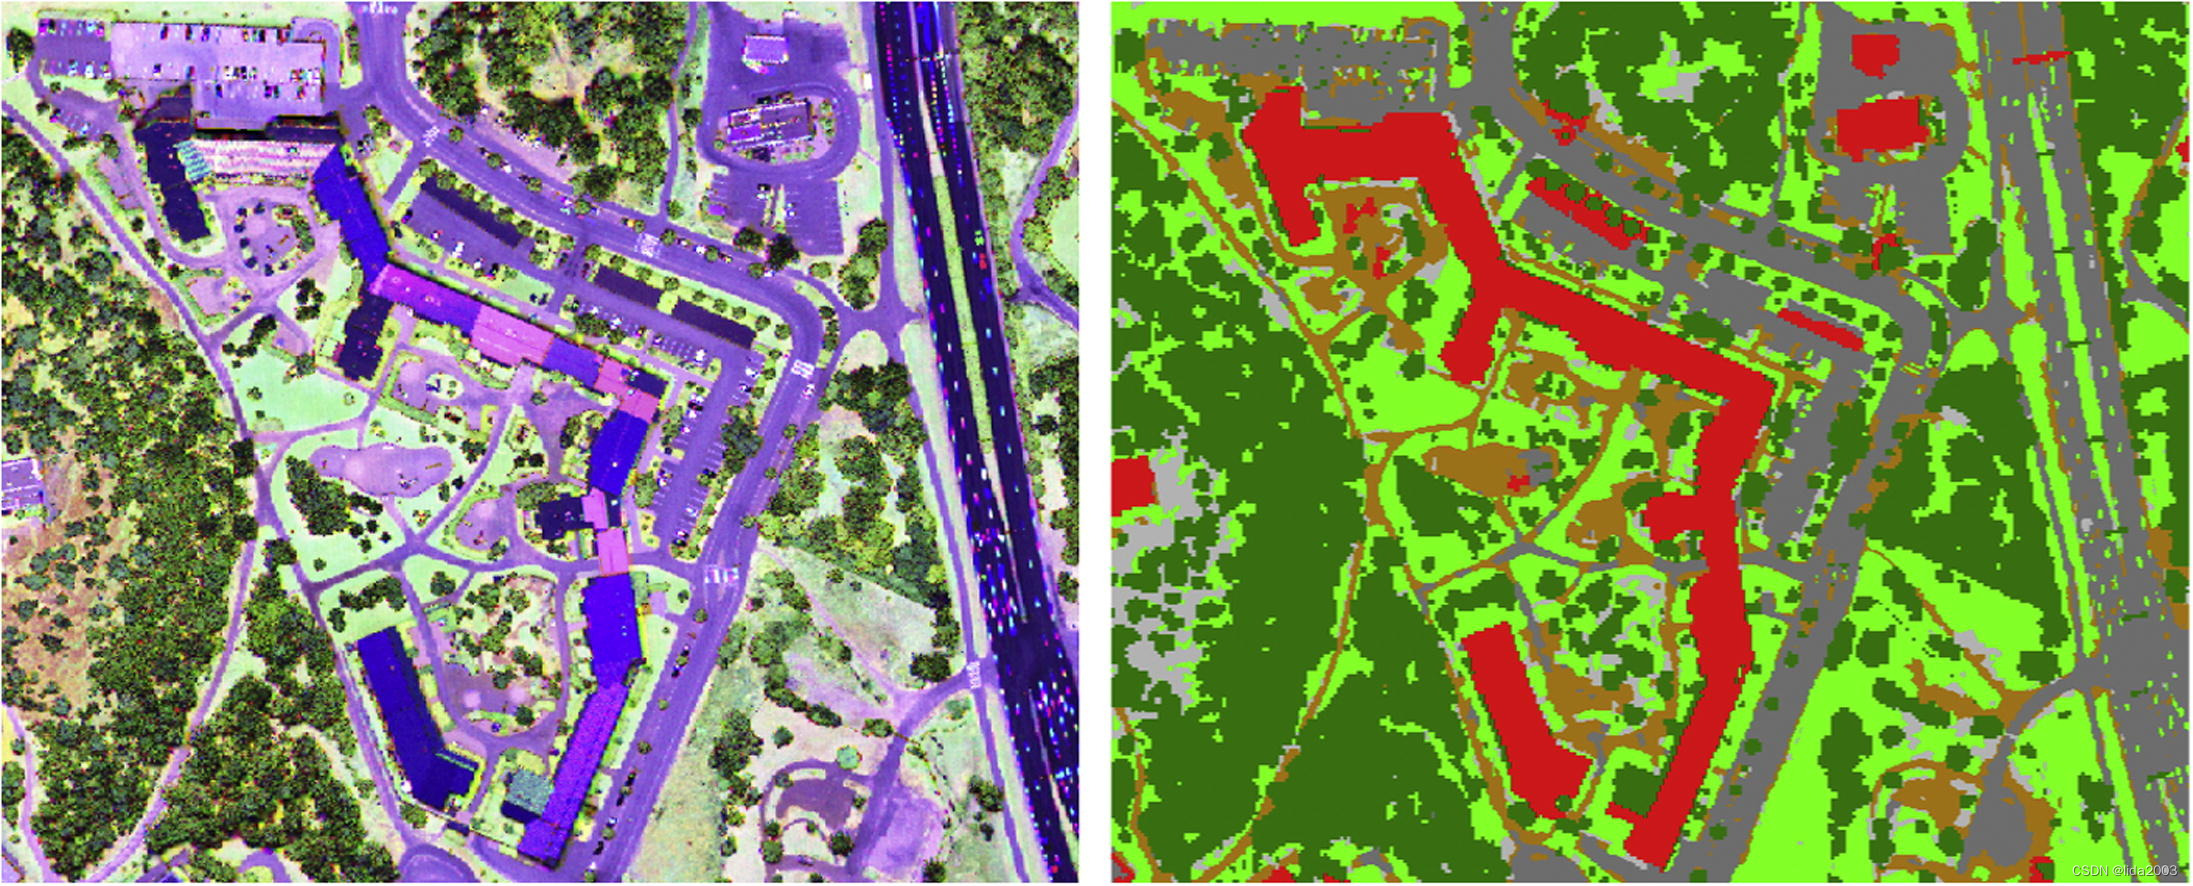
地理遥感是将卫星图像中的每个像素分为一类的一种方式,以便我们可以跟踪每个区域的土地覆盖情况。如果有地区发生严重的森林砍伐,可以采取适当的措施。利用卫星图像进行语义分割可以有许多其他应用。
3. 语义分割 - torchvision
我们将研究两种基于深度学习的语义分割模型——全卷积网络(FCN)和DeepLab v3。这些模型已经在 COCO 2017 训练集的子集上进行了训练,该子集对应于 PASCAL VOC 数据集。模型支持共计 20 个类别。
在我们开始之前,让我们了解一下模型的输入和输出。
这些模型期望一个三通道图像(RGB),并使用Imagenet的均值和标准差进行归一化,即
mean = [0.485, 0.456, 0.406], std = [0.229, 0.224, 0.225]
因此,输入维度是[Ni x Ci x Hi x Wi]
其中,
Ni -> 批量大小
Ci -> 通道数(即3)
Hi -> 图像的高度
Wi -> 图像的宽度
模型的输出维度是[No x Co x Ho x Wo]
其中,
No -> 批量大小(与Ni相同)
Co -> 数据集的类别数
Ho -> 图像的高度(在几乎所有情况下与Hi相同)
Wo -> 图像的宽度(在几乎所有情况下与Wi相同)
注意:torchvision模型的输出是一个OrderedDict而不是torch.Tensor。在推断(.eval()模式)期间,输出是一个OrderedDict,只有一个键 - out。这个out键保存输出,相应的值的形状是[No x Co x Ho x Wo]。
3.1 FCN 使用 ResNet-101 语义分割
3.1.1 加载模型
现在,我们有一个带有 Resnet101 主干的 FCN 预训练模型。如果缓存中不存在该模型,设置 pretrained=True 标志将会下载模型。.eval 方法将以推断模式加载模型。
from torchvision import models
fcn = models.segmentation.fcn_resnet101(pretrained=True).eval()
/usr/local/lib/python3.10/dist-packages/torchvision/models/_utils.py:208: UserWarning: The parameter 'pretrained' is deprecated since 0.13 and may be removed in the future, please use 'weights' instead.warnings.warn(
/usr/local/lib/python3.10/dist-packages/torchvision/models/_utils.py:223: UserWarning: Arguments other than a weight enum or `None` for 'weights' are deprecated since 0.13 and may be removed in the future. The current behavior is equivalent to passing `weights=FCN_ResNet101_Weights.COCO_WITH_VOC_LABELS_V1`. You can also use `weights=FCN_ResNet101_Weights.DEFAULT` to get the most up-to-date weights.warnings.warn(msg)
Downloading: "https://download.pytorch.org/models/fcn_resnet101_coco-7ecb50ca.pth" to /root/.cache/torch/hub/checkpoints/fcn_resnet101_coco-7ecb50ca.pth
100%|██████████| 208M/208M [00:03<00:00, 57.5MB/s]
3.1.2 加载图像
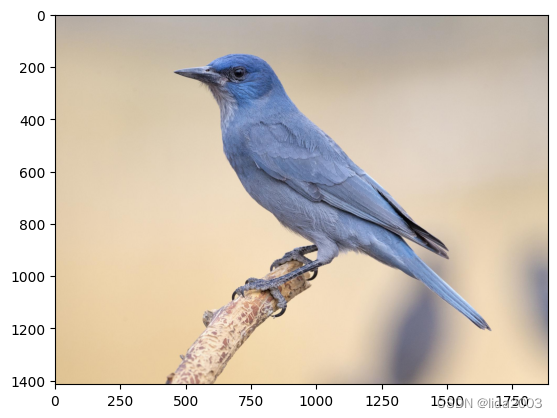
接下来,让我们获取一张图片!我们直接从 URL 下载一张鸟的图片并保存下来。正如你在代码中将看到的,我们使用 PIL 加载图片。
from PIL import Image
import matplotlib.pyplot as plt
import torch!wget -nv https://static.independent.co.uk/s3fs-public/thumbnails/image/2018/04/10/19/pinyon-jay-bird.jpg -O bird.png
img = Image.open('./bird.png')
plt.imshow(img); plt.show()
2024-05-15 02:18:38 URL:https://static.independent.co.uk/s3fs-public/thumbnails/image/2018/04/10/19/pinyon-jay-bird.jpg [182904/182904] -> "bird.png" [1]
3.1.3 预处理图像
为了将图像准备成模型推断所需的正确格式,我们需要对其进行预处理和归一化!因此,对于预处理步骤,我们执行以下操作:
- 将图像调整大小为 (256 x 256)
- 对其进行中心裁剪为 (224 x 224)
- 将其转换为张量 —— 图像中的所有值将被缩放,使它们位于 [0, 1] 范围内,而不是原始的 [0, 255] 范围。
- 使用特定于Imagenet的值对其进行标准化,其中 mean = [0.485, 0.456, 0.406],std = [0.229, 0.224, 0.225]
最后,我们将图像维度进行扩展,使其从 [C x H x W] 变为 [1 x C x H x W]。这是必需的,因为在通过网络时我们需要一个批次。
# Apply the transformations needed
import torchvision.transforms as T
trf = T.Compose([T.Resize(256),T.CenterCrop(224),T.ToTensor(),T.Normalize(mean = [0.485, 0.456, 0.406],std = [0.229, 0.224, 0.225])])
inp = trf(img).unsqueeze(0)
Torchvision有许多有用的函数。其中之一是Transforms,用于对图像进行预处理。T.Compose 是一个函数,它接受一个列表,其中每个元素都是 transforms 类型。这将返回一个对象,通过该对象我们可以传递图像的批次,所有所需的变换都将应用于所有图像。
让我们看一下应用在图像上的变换:
- T.Resize(256):将图像调整大小为 256 x 256
- T.CenterCrop(224):将图像居中裁剪,使结果大小为 224 x 224
- T.ToTensor():将图像转换为 torch.Tensor 类型,并将值缩放到 [0, 1] 范围内
- T.Normalize(mean, std):使用给定的均值和标准差对图像进行归一化。
3.1.4 网络的前向传播
现在我们有了一个经过预处理和准备好的图像,让我们将其通过模型并获取输出键。
如前所述,模型的输出是一个 OrderedDict,因此我们需要从中获取 out 键来获得模型的输出。
# Pass the input through the net
out = fcn(inp)['out']
print (out.shape)
torch.Size([1, 21, 224, 224])
因此,out 是模型的最终输出。正如之前讨论的,它的形状是 [1 x 21 x H x W]。由于模型是在 21 个类上训练的,输出有 21 个通道!
现在我们需要做的是,将这个具有 21 个通道的输出转换成一个 2D 图像或一个 1 通道图像,其中该图像的每个像素对应一个类!
这个 2D 图像(形状为 [H x W])将每个像素对应到一个类别标签。请注意,该 2D 图像中的每个(x,y)像素对应于一个介于 0 - 20 之间的数字,代表一个类别。
现在的问题是,我们如何从当前具有维度 [1 x 21 x H x W] 的图像得到这个?
很简单!我们对每个像素位置取最大索引,它代表了该类别。
import numpy as np
om = torch.argmax(out.squeeze(), dim=0).detach().cpu().numpy()
print(om.shape)
print(np.unique(om))
(224, 224)
[0 3]
通过处理后,我们现在有了一个 2D 图像,其中每个像素对应一个类别。最后要做的是将这个 2D 图像转换成一个分割地图,其中每个类别标签都转换成一个 RGB 颜色,从而帮助可视化。
3.1.5 解码输出
我们将使用以下函数将这个 2D 图像转换为一个 RGB 图像,其中每个标签都映射到其对应的颜色。
# Define the helper function
def decode_segmap(image, nc=21):label_colors = np.array([(0, 0, 0),  # 0=background# 1=aeroplane, 2=bicycle, 3=bird, 4=boat, 5=bottle(128, 0, 0), (0, 128, 0), (128, 128, 0), (0, 0, 128), (128, 0, 128),# 6=bus, 7=car, 8=cat, 9=chair, 10=cow(0, 128, 128), (128, 128, 128), (64, 0, 0), (192, 0, 0), (64, 128, 0),# 11=dining table, 12=dog, 13=horse, 14=motorbike, 15=person(192, 128, 0), (64, 0, 128), (192, 0, 128), (64, 128, 128), (192, 128, 128),# 16=potted plant, 17=sheep, 18=sofa, 19=train, 20=tv/monitor(0, 64, 0), (128, 64, 0), (0, 192, 0), (128, 192, 0), (0, 64, 128)])r = np.zeros_like(image).astype(np.uint8)g = np.zeros_like(image).astype(np.uint8)b = np.zeros_like(image).astype(np.uint8)for l in range(0, nc):idx = image == lr[idx] = label_colors[l, 0]g[idx] = label_colors[l, 1]b[idx] = label_colors[l, 2]rgb = np.stack([r, g, b], axis=2)return rgb
让我们来看看这个函数的内部操作!
首先,变量 label_colors 存储了每个类别的颜色,按照索引顺序存储。因此,第一个类别(背景)的颜色存储在 label_colors 列表的第 0 个索引位置。第二个类别(飞机)存储在索引 1 处,依此类推。
现在,我们需要从我们拥有的 2D 图像创建一个 RGB 图像。我们创建了三个通道的空 2D 矩阵。
因此,r、g 和 b 是形成最终图像的 RGB 通道的数组。每个数组的形状都是 [H x W](与 2D 图像的形状相同)。
现在,我们循环遍历我们在 label_colors 中存储的每个类别颜色,并在图像中获取该特定类别标签存在的相应索引。然后,对于每个通道,我们将其对应的颜色放置在具有该类别标签的像素上。
最后,我们将三个单独的通道堆叠在一起,形成一个 RGB 图像。
现在,让我们使用这个函数来查看最终的分割输出!
rgb = decode_segmap(om)
plt.imshow(rgb); plt.show()
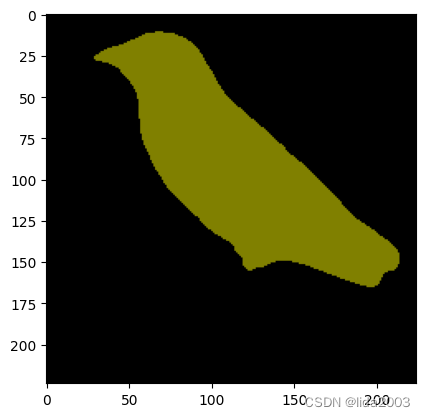
好了!我们已经对图像的输出进行了分割。
那就是那只鸟!
注意:分割后的图像比原始图像小,因为在预处理步骤中对图像进行了调整大小和裁剪。
3.1.6 最终结果
接下来,让我们将所有这些内容整合到一个单一的函数中,并尝试使用更多的图像!
def segment(net, path, show_orig=True, dev='cuda'):img = Image.open(path)if show_orig: plt.imshow(img); plt.axis('off'); plt.show()# Comment the Resize and CenterCrop for better inference resultstrf = T.Compose([T.Resize(640),#T.CenterCrop(224),T.ToTensor(),T.Normalize(mean = [0.485, 0.456, 0.406],std = [0.229, 0.224, 0.225])])inp = trf(img).unsqueeze(0).to(dev)out = net.to(dev)(inp)['out']om = torch.argmax(out.squeeze(), dim=0).detach().cpu().numpy()rgb = decode_segmap(om)plt.imshow(rgb); plt.axis('off'); plt.show()
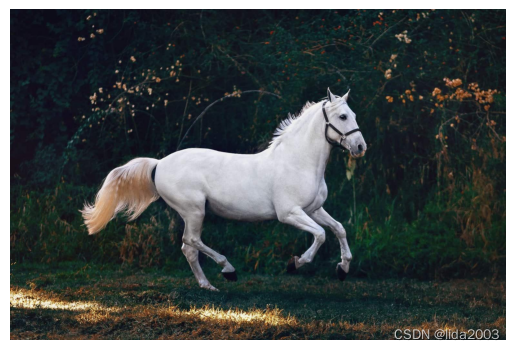
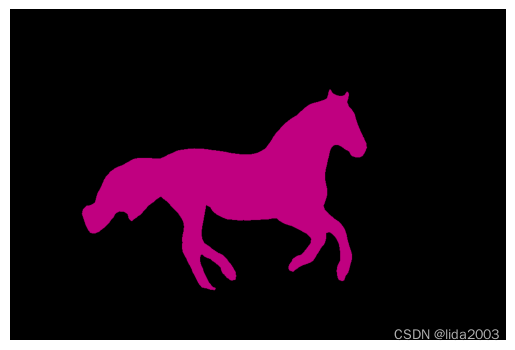
!wget -nv https://www.learnopencv.com/wp-content/uploads/2021/01/horse-segmentation.jpeg -O horse.png
segment(fcn, './horse.png')
2024-05-15 02:18:46 URL:http://learnopencv.com/wp-content/uploads/2021/01/horse-segmentation.jpeg [128686/128686] -> "horse.png" [1]
3.2 使用 DeepLab 语义分割
DeepLab 是一种语义分割架构,是由 Google Brain 提出的。让我们看看如何使用它。
dlab = models.segmentation.deeplabv3_resnet101(pretrained=1).eval()
/usr/local/lib/python3.10/dist-packages/torchvision/models/_utils.py:223: UserWarning: Arguments other than a weight enum or `None` for 'weights' are deprecated since 0.13 and may be removed in the future. The current behavior is equivalent to passing `weights=DeepLabV3_ResNet101_Weights.COCO_WITH_VOC_LABELS_V1`. You can also use `weights=DeepLabV3_ResNet101_Weights.DEFAULT` to get the most up-to-date weights.warnings.warn(msg)
Downloading: "https://download.pytorch.org/models/deeplabv3_resnet101_coco-586e9e4e.pth" to /root/.cache/torch/hub/checkpoints/deeplabv3_resnet101_coco-586e9e4e.pth
100%|██████████| 233M/233M [00:01<00:00, 154MB/s]
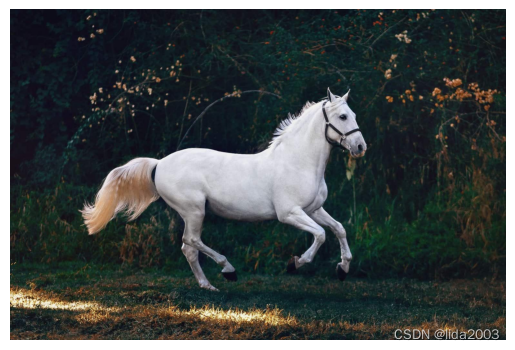
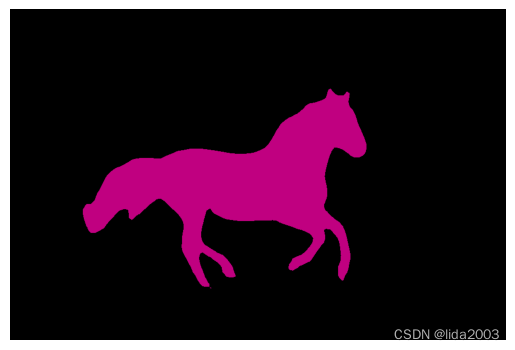
让我们看看如何使用这个模型对同一张图片进行语义分割!我们将使用我们上面定义的同一个函数。
segment(dlab, './horse.png')
3.3 多物体语义分割
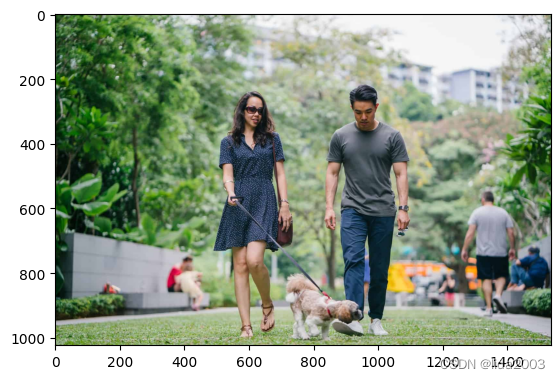
当我们使用具有多个对象的更复杂的图像时,我们可以开始看到使用这两个模型获得的结果之间的一些差异。
让我们来试试吧!
!wget -nv "https://www.learnopencv.com/wp-content/uploads/2021/01/person-segmentation.jpeg" -O person.png
img = Image.open('./person.png')
plt.imshow(img); plt.show()print ('Segmenatation Image on FCN')
segment(fcn, path='./person.png', show_orig=False)print ('Segmenatation Image on DeepLabv3')
segment(dlab, path='./person.png', show_orig=False)
-
Segmenatation Image on FCN
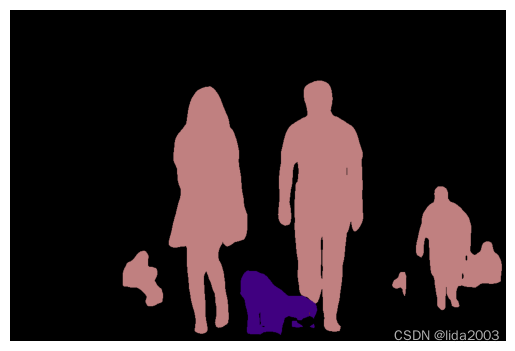
-
Segmenatation Image on DeepLabv3
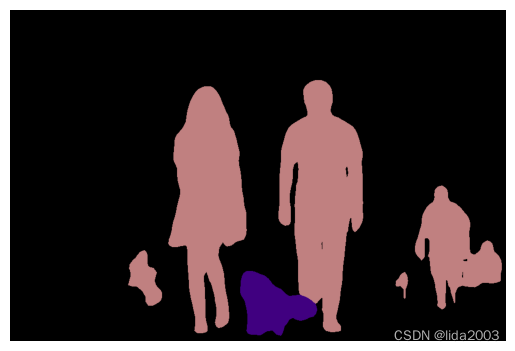
好的!现在你可以看到模型之间的差异了吧?
你可以看到 FCN 在捕捉牛腿的连续性方面失败了,而 DeepLabv3 能够捕捉到!
此外,如果我们更仔细地观察牛身上的人手,我们会发现 FCN 模型捕捉得还不错,虽然不是非常完美,但仍然可以,而 DeepLabv3 模型也捕捉到了,但不是那么好!
这些是肉眼可见的一些模型差异!
注意:正如我们之前看到的,输出图像的尺寸比原始图像小,因为原始图像在预处理步骤中被调整大小和裁剪。
尽情尝试一些更多的图像,看看这些模型在不同情况下的表现吧!
4. 总结
到目前为止,已经看到了代码的工作原理以及输出在质量上的表现。
我们将讨论模型的定量方面的特性:
在CPU和GPU上的推断时间
模型的大小。
推断时使用的GPU内存。
测试代码:004 Torchvision Semantic Segmentation
4.1 推理时间
import timedef infer_time(net, path='./horse.png', dev='cuda'):img = Image.open(path)trf = T.Compose([T.Resize(256),T.CenterCrop(224),T.ToTensor(),T.Normalize(mean = [0.485, 0.456, 0.406],std = [0.229, 0.224, 0.225])])inp = trf(img).unsqueeze(0).to(dev)st = time.time()out1 = net.to(dev)(inp)et = time.time()return et - st
avg_over = 100fcn_infer_time_list_cpu = [infer_time(fcn, dev='cpu') for _ in range(avg_over)]
fcn_infer_time_avg_cpu = sum(fcn_infer_time_list_cpu) / avg_overdlab_infer_time_list_cpu = [infer_time(dlab, dev='cpu') for _ in range(avg_over)]
dlab_infer_time_avg_cpu = sum(dlab_infer_time_list_cpu) / avg_overprint ('Inference time for first few calls for FCN      : {}'.format(fcn_infer_time_list_cpu[:10]))
print ('Inference time for first few calls for DeepLabv3: {}'.format(dlab_infer_time_list_cpu[:10]))print ('The Average Inference time on FCN is:     {:.2f}s'.format(fcn_infer_time_avg_cpu))
print ('The Average Inference time on DeepLab is: {:.2f}s'.format(dlab_infer_time_avg_cpu))
- On CPU
Inference time for first few calls for FCN      : [1.0962293148040771, 1.41335129737854, 1.4978973865509033, 1.1366255283355713, 0.994088888168335, 1.0438227653503418, 1.0235023498535156, 1.0187690258026123, 1.045358657836914, 1.0086448192596436]
Inference time for first few calls for DeepLabv3: [1.2838966846466064, 1.1889286041259766, 1.4854016304016113, 1.5590059757232666, 1.4725146293640137, 1.1244769096374512, 1.0172410011291504, 0.9699416160583496, 0.9643347263336182, 0.909754753112793]
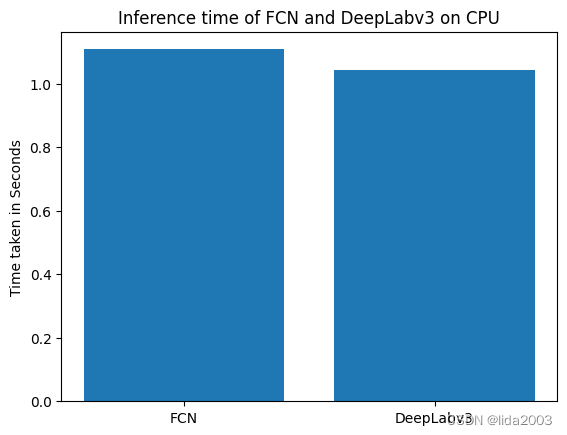
The Average Inference time on FCN is:     1.11s
The Average Inference time on DeepLab is: 1.04s
- On GPU
avg_over = 100fcn_infer_time_list_gpu = [infer_time(fcn) for _ in range(avg_over)]
fcn_infer_time_avg_gpu = sum(fcn_infer_time_list_gpu) / avg_overdlab_infer_time_list_gpu = [infer_time(dlab) for _ in range(avg_over)]
dlab_infer_time_avg_gpu = sum(dlab_infer_time_list_gpu) / avg_overprint ('Inference time for first few calls for FCN      : {}'.format(fcn_infer_time_list_gpu[:10]))
print ('Inference time for first few calls for DeepLabv3: {}'.format(dlab_infer_time_list_gpu[:10]))print ('The Average Inference time on FCN is:     {:.3f}s'.format(fcn_infer_time_avg_gpu))
print ('The Average Inference time on DeepLab is: {:.3f}s'.format(dlab_infer_time_avg_gpu))
Inference time for first few calls for FCN      : [0.16111516952514648, 0.018294334411621094, 0.01825737953186035, 0.01937079429626465, 0.018789291381835938, 0.01917719841003418, 0.018662691116333008, 0.01843094825744629, 0.018068552017211914, 0.018398046493530273]
Inference time for first few calls for DeepLabv3: [0.11033177375793457, 0.020525217056274414, 0.020010948181152344, 0.020022869110107422, 0.0229949951171875, 0.022975921630859375, 0.01997232437133789, 0.02288365364074707, 0.02026224136352539, 0.019922971725463867]
The Average Inference time on FCN is:     0.025s
The Average Inference time on DeepLab is: 0.022s
plt.bar([0.1, 0.2], [fcn_infer_time_avg_cpu, dlab_infer_time_avg_cpu], width=0.08)
plt.ylabel('Time taken in Seconds')
plt.xticks([0.1, 0.2], ['FCN', 'DeepLabv3'])
plt.title('Inference time of FCN and DeepLabv3 on CPU')
plt.show()
plt.bar([0.1, 0.2], [fcn_infer_time_avg_gpu, dlab_infer_time_avg_gpu], width=0.08)
plt.ylabel('Time taken in Seconds')
plt.xticks([0.1, 0.2], ['FCN', 'DeepLabv3'])
plt.title('Inference time of FCN and DeepLabv3 on GPU')
plt.show()
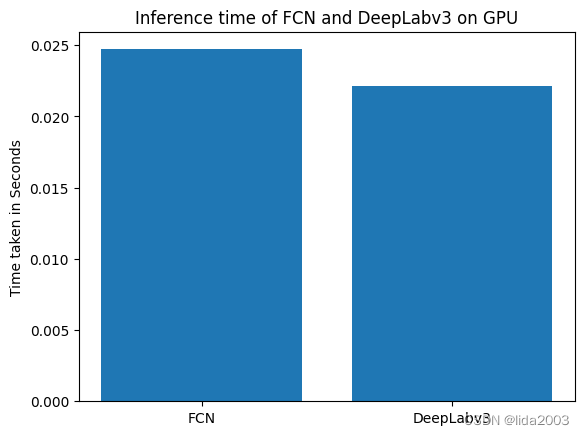
我们可以看到 DeepLab 模型比 FCN 更快一些。
4.2 模型大小
import os#/root/.cache/torch/hub/checkpoints/fcn_resnet101_coco-7ecb50ca.pth
#/root/.cache/torch/hub/checkpoints/deeplabv3_resnet101_coco-586e9e4e.pth
#resnet101_size = os.path.getsize('/root/.cache/torch/hub/checkpoints/resnet101-5d3b4d8f.pth')fcn_size = os.path.getsize('/root/.cache/torch/hub/checkpoints/fcn_resnet101_coco-7ecb50ca.pth')
dlab_size = os.path.getsize('/root/.cache/torch/hub/checkpoints/deeplabv3_resnet101_coco-586e9e4e.pth')fcn_total = fcn_size # + resnet101_size
dlab_total = dlab_size # + resnet101_sizeprint ('Size of the FCN model with Resnet101 backbone is:       {:.2f} MB'.format(fcn_total /  (1024 * 1024)))
print ('Size of the DeepLabv3 model with Resnet101 backbone is: {:.2f} MB'.format(dlab_total / (1024 * 1024)))
Size of the FCN model with Resnet101 backbone is:       207.71 MB
Size of the DeepLabv3 model with Resnet101 backbone is: 233.22 MB
plt.bar([0, 1], [fcn_total / (1024 * 1024), dlab_total / (1024 * 1024)])
plt.ylabel('Size of the model in MegaBytes')
plt.xticks([0, 1], ['FCN', 'DeepLabv3'])
plt.title('Comparison of the model size of FCN and DeepLabv3')
plt.show()
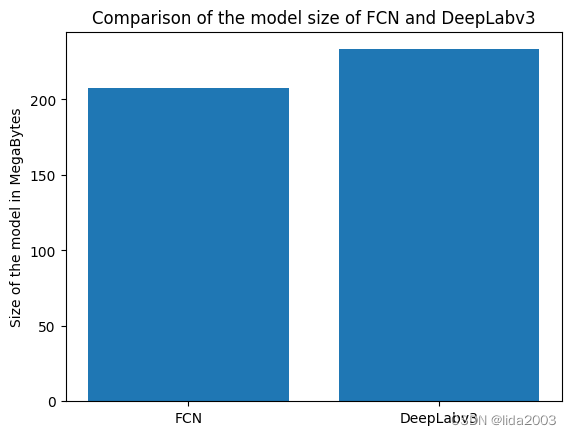
模型大小是指模型的权重文件的大小。DeepLab 模型比 FCN 模型稍微大一些。
5. 参考资料
【1】Colab/PyTorch - Getting Started with PyTorch
这篇关于Colab/PyTorch - 004 Torchvision Semantic Segmentation的文章就介绍到这儿,希望我们推荐的文章对编程师们有所帮助!


