本文主要是介绍Colab - Introduction to Object Detection using TensorFlow Hub,希望对大家解决编程问题提供一定的参考价值,需要的开发者们随着小编来一起学习吧!
Colab - Introduction to Object Detection using TensorFlow Hub
- 1. 源由
- 2. TensorFlow Hub
- 3. 目标检测
- 3.1 举例 - EfficientDet/D4 COCO 2017
- 3.2 下载示例图像
- 3.2.1 显示部分样本
- 3.2.2 定义一个将类别ID映射到类别名称和颜色的字典
- 3.3 加载模型
- 3.4 单张照片执行推理
- 3.4.1 推理第一张照片
- 3.4.2 检查结果
- 3.4.3 后处理和显示检测结果
- 3.4.3.1 显示结果(min_det_thresh=0)
- 3.4.3.1.2 显示结果(min_det_thresh=0.3)
- 3.5 完整代码实现
- 3.5.1 run_inference()
- 3.5.2 对示例图像进行预测
- 3.5.3 展示示例图像预测结果
- 4. 总结
- 5. 参考资料
1. 源由
如《Colab - Tensorflow & Keras Get Started: 005 Keras Fine Tune Pre-Trained Models GTSRB》存在类似内存资源不足的问题,仍然采用Colab来进行研读。
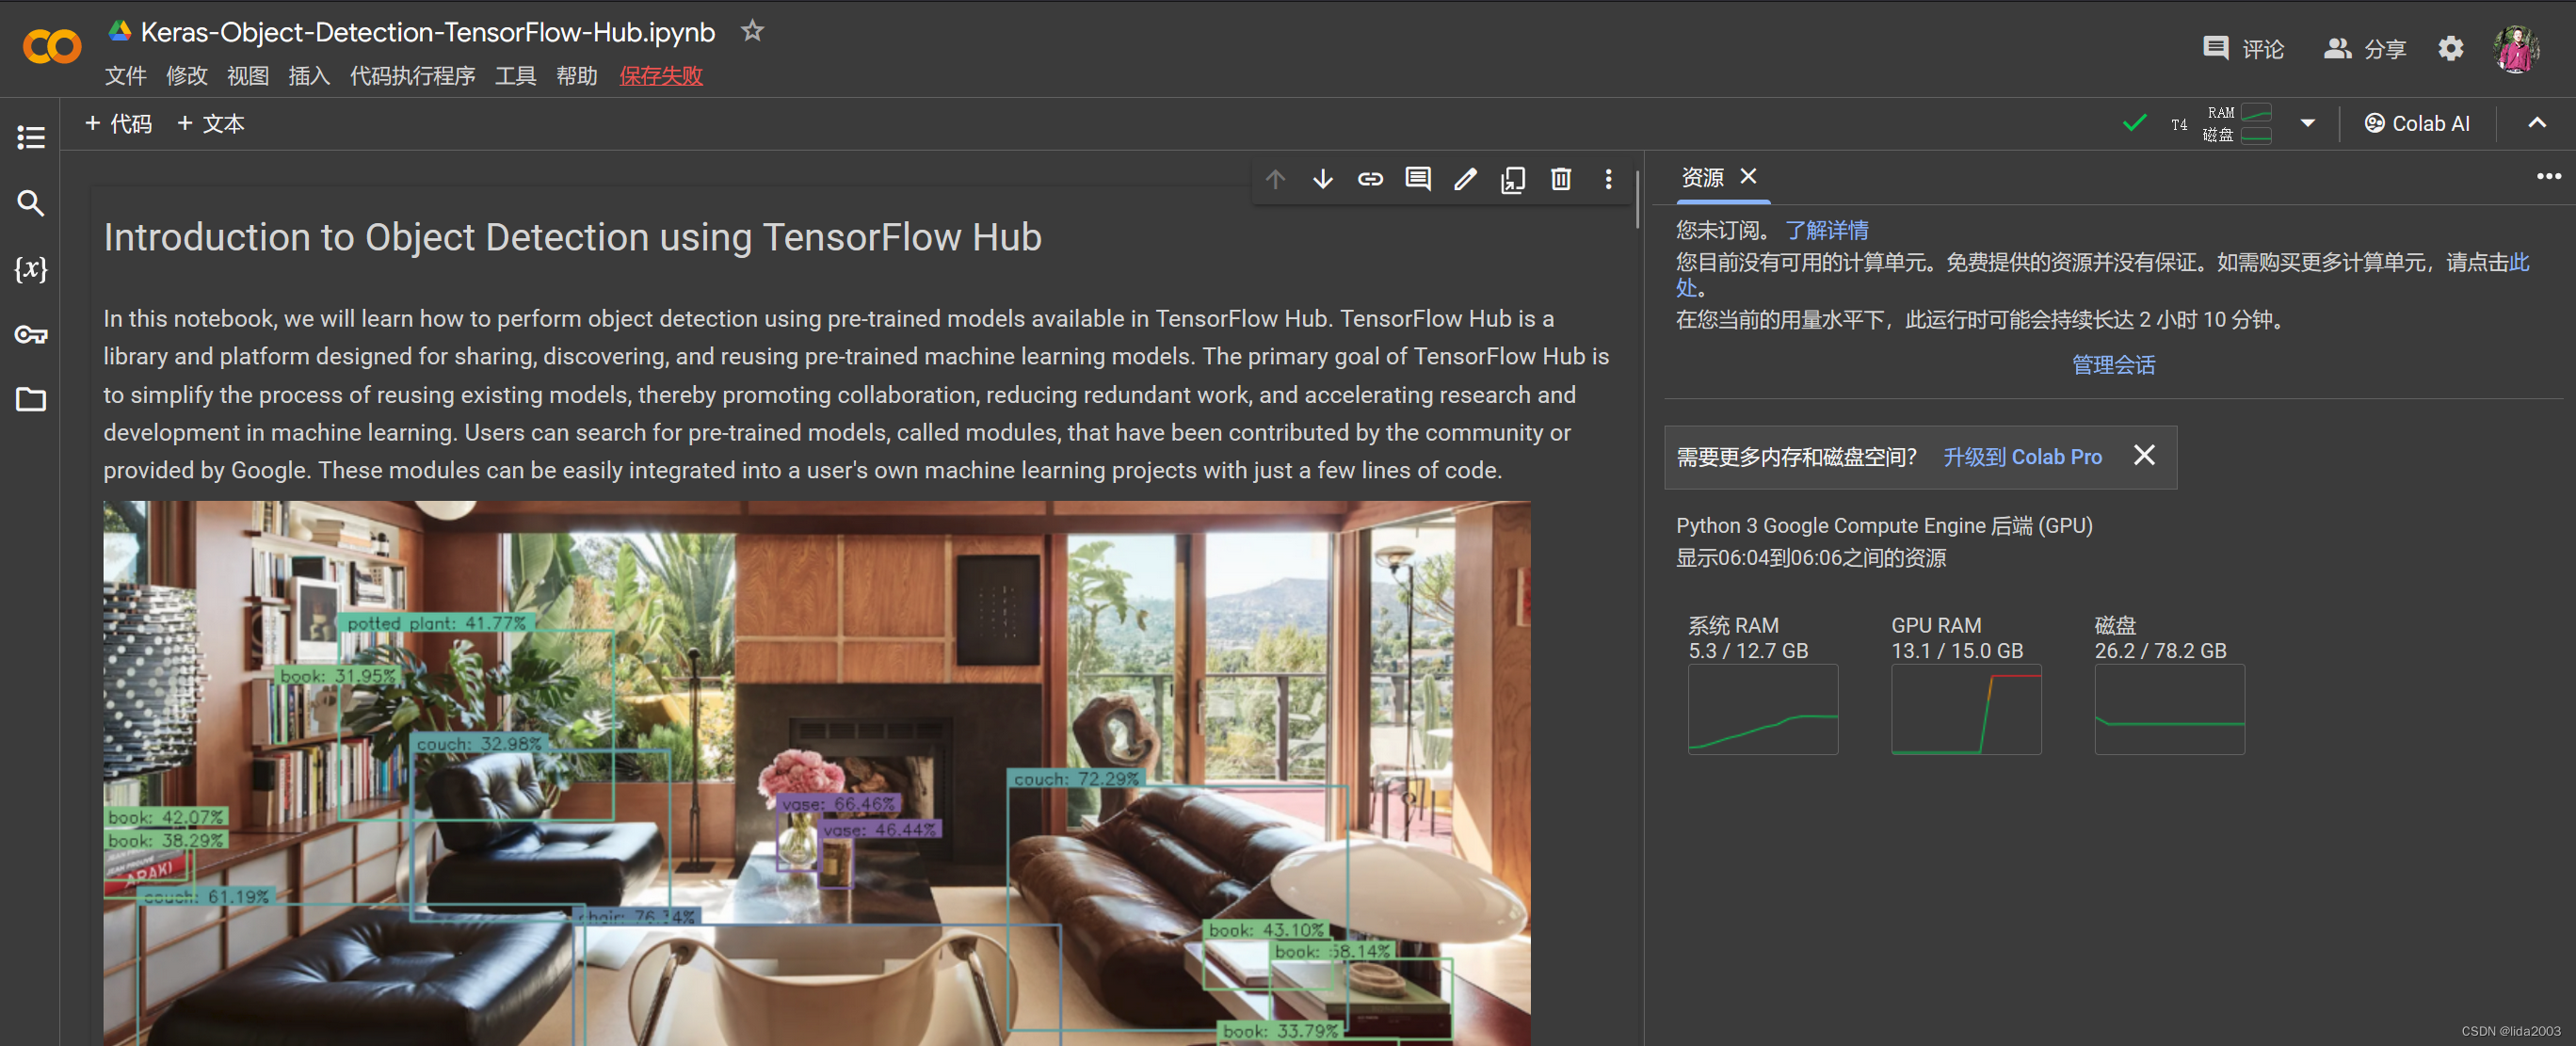 接下来,将学习如何使用TensorFlow Hub预训练模型进行目标检测,这也是当下行业里面最热门的计算机视觉应用基础。
但是从应用的角度,其实不然,更多偏向物理世界规律的多因素预测其实当前的一些算力已经能够解决很多现实问题,尤其是对于多维因素空间下一种部件生命期监测方法的应用。
2. TensorFlow Hub
- TensorFlow Hub, tensorflow是一个存储着经过训练的机器学习模型的仓库,可以随时进行微调,并可在任何地方部署。只需几行代码就可以重用像 BERT 和 Faster R-CNN 这样的经过训练的模型。
- TensorFlow Hub, kaggle 也是一个用于共享、发现和重用预训练机器学习模型的库和平台。
TensorFlow Hub 的主要目标是简化重用现有模型的过程,从而促进协作、减少重复工作,并加速机器学习领域的研究和开发。
用户可以搜索由社区贡献或由谷歌提供的预训练模型,称为模块。这些模块可以轻松地集成到用户自己的机器学习项目中,只需几行代码。
3. 目标检测
目标检测是计算机视觉的一个子领域,专注于识别和定位数字图像或视频中特定的对象。它不仅涉及对图像中存在的对象进行分类,还通过在它们周围放置边界框或其他空间编码来确定它们的精确位置和大小。请注意几个关键词:
- 对象分类
- 边界框
- 位置 //在三维空间是一个坐标,在四维空间是一个预测
- 大小
3.1 举例 - EfficientDet/D4 COCO 2017
在这个例子中,将使用 EfficientDet/d4 模型,它是 EfficientDet 模型系列中的一员。
这个系列在 TensorFlow Hub 上可用的预训练模型都是在 COCO 2017 数据集上训练的。该系列中的不同模型,从 D0 到 D7,根据复杂性和输入图像尺寸的不同而异。最紧凑的模型是 D0,接受 512×512 像素的输入尺寸,并提供最快的推理速度。在另一端,我们有 D7,它需要 1536×1536 的输入尺寸,并且执行推理需要相对较长的时间。
import os
import numpy as np
import cv2
import zipfile
import requests
import glob as globimport tensorflow_hub as hub
import matplotlib
import matplotlib.pyplot as plt
import warnings
import logging
import absl# Filter absl warnings
warnings.filterwarnings("ignore", module="absl")# Capture all warnings in the logging system
logging.captureWarnings(True)# Set the absl logger level to 'error' to suppress warnings
absl_logger = logging.getLogger("absl")
absl_logger.setLevel(logging.ERROR)os.environ['TF_CPP_MIN_LOG_LEVEL'] = '2'
3.2 下载示例图像
def download_file(url, save_name):url = urlfile = requests.get(url)open(save_name, 'wb').write(file.content)
def unzip(zip_file=None):try:with zipfile.ZipFile(zip_file) as z:z.extractall("./")print("Extracted all")except:print("Invalid file")
download_file( 'https://www.dropbox.com/s/h7l1lmhvga6miyo/object_detection_images.zip?dl=1','object_detection_images.zip'
)unzip(zip_file='object_detection_images.zip')
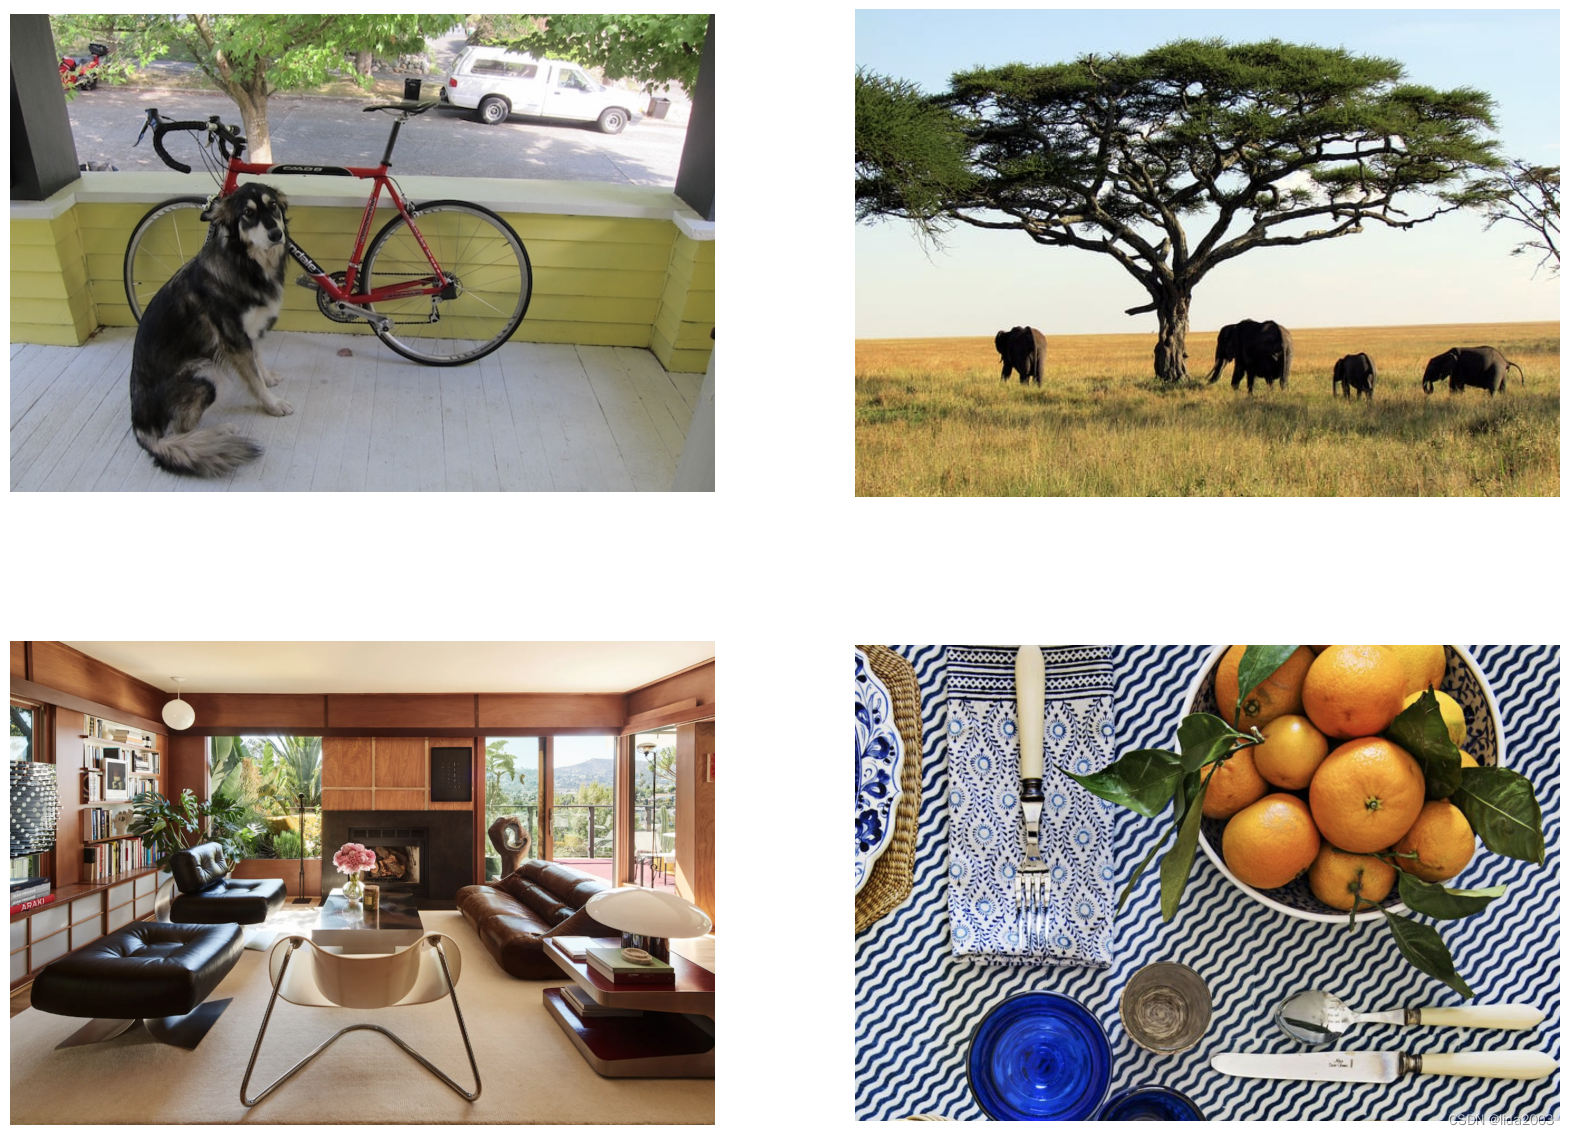
3.2.1 显示部分样本
image_paths = sorted(glob.glob('object_detection_images' + '/*.png'))for idx in range(len(image_paths)):print(image_paths[idx])
def load_image(path):image = cv2.imread(path)# Convert image in BGR format to RGB.image = cv2.cvtColor(image, cv2.COLOR_BGR2RGB)# Add a batch dimension which is required by the model.image = np.expand_dims(image, axis=0)return image
images = []
fig, ax = plt.subplots(nrows=2, ncols=2, figsize=(20, 15))idx=0
for axis in ax.flat:image = load_image(image_paths[idx])images.append(image)axis.imshow(image[0])axis.axis('off')idx+=1
3.2.2 定义一个将类别ID映射到类别名称和颜色的字典
class_index 是一个字典,将 COCO 数据集中的 90 个类别的类别 ID 映射到类别名称。
class_index =  \
{1: 'person',2: 'bicycle',3: 'car',4: 'motorcycle',5: 'airplane',6: 'bus',7: 'train',8: 'truck',9: 'boat',10: 'traffic light',11: 'fire hydrant',13: 'stop sign',14: 'parking meter',15: 'bench',16: 'bird',17: 'cat',18: 'dog',19: 'horse',20: 'sheep',21: 'cow',22: 'elephant',23: 'bear',24: 'zebra',25: 'giraffe',27: 'backpack',28: 'umbrella',31: 'handbag',32: 'tie',33: 'suitcase',34: 'frisbee',35: 'skis',36: 'snowboard',37: 'sports ball',38: 'kite',39: 'baseball bat',40: 'baseball glove',41: 'skateboard',42: 'surfboard',43: 'tennis racket',44: 'bottle',46: 'wine glass',47: 'cup',48: 'fork',49: 'knife',50: 'spoon',51: 'bowl',52: 'banana',53: 'apple',54: 'sandwich',55: 'orange',56: 'broccoli',57: 'carrot',58: 'hot dog',59: 'pizza',60: 'donut',61: 'cake',62: 'chair',63: 'couch',64: 'potted plant',65: 'bed',67: 'dining table',70: 'toilet',72: 'tv',73: 'laptop',74: 'mouse',75: 'remote',76: 'keyboard',77: 'cell phone',78: 'microwave',79: 'oven',80: 'toaster',81: 'sink',82: 'refrigerator',84: 'book',85: 'clock',86: 'vase',87: 'scissors',88: 'teddy bear',89: 'hair drier',90: 'toothbrush'
}
在这里,我们将使用 COLOR_IDS 将每个类别映射到一个唯一的 RGB 颜色。
R = np.array(np.arange(96, 256, 32))
G = np.roll(R, 1)
B = np.roll(R, 2)COLOR_IDS = np.array(np.meshgrid(R, G, B)).T.reshape(-1, 3)
3.3 加载模型
TensorFlow Hub 包含许多不同的预训练目标检测模型。在这里,我们将使用在 COCO 2017 数据集上训练的 EfficientDet 类目标检测模型。
EfficientDet 模型有几个版本。EfficientDet 类目标检测器系列包括几个不同复杂度和性能水平的模型,从 D0 到 D7 不等。EfficientDet 家族中各种模型之间的区别主要在于它们的架构、输入图像大小、计算需求和性能。
EfficientDet = {'EfficientDet D0 512x512' : 'https://tfhub.dev/tensorflow/efficientdet/d0/1','EfficientDet D1 640x640' : 'https://tfhub.dev/tensorflow/efficientdet/d1/1','EfficientDet D2 768x768' : 'https://tfhub.dev/tensorflow/efficientdet/d2/1','EfficientDet D3 896x896' : 'https://tfhub.dev/tensorflow/efficientdet/d3/1','EfficientDet D4 1024x1024' : 'https://tfhub.dev/tensorflow/efficientdet/d4/1','EfficientDet D5 1280x1280' : 'https://tfhub.dev/tensorflow/efficientdet/d5/1','EfficientDet D6 1280x1280' : 'https://tfhub.dev/tensorflow/efficientdet/d6/1','EfficientDet D7 1536x1536' : 'https://tfhub.dev/tensorflow/efficientdet/d7/1'}
这里使用D4模型:
model_url = EfficientDet['EfficientDet D4 1024x1024' ]print('loading model: ', model_url)
od_model = hub.load(model_url)print('\nmodel loaded!')
3.4 单张照片执行推理
正式编写代码处理多个图像并对结果进行后处理之前,让我们先看看如何对单个图像进行推理,并研究模型的输出。
3.4.1 推理第一张照片
# Call the model. # The model returns the detection results in the form of a dictionary.
results = od_model(images[0])
3.4.2 检查结果
目标检测模型以字典形式返回检测结果,其中包含几种不同的类型。
# Convert the dictionary values to numpy arrays.
results = {key:value.numpy() for key, value in results.items()}
# Print the keys from the results dictionary.
for key in results:print(key)
raw_detection_scores
raw_detection_boxes
num_detections
detection_scores
detection_classes
detection_anchor_indices
detection_boxes
detection_multiclass_scores
原始检测结果包含大量多余的、重叠的或具有低置信度分数目标。为了获得有意义的结果,在模型内部应用了后处理技术来过滤和精炼这些原始检测结果。
在接下来的代码单元中,展示了数千个原始检测结果,而最终检测结果只有 16 个。这些最终检测结果中的每一个都有一个关联的置信度分数,我们可能根据我们的应用程序的性质进一步进行过滤。
print('Num Raw Detections: ', (len(results['raw_detection_scores'][0])))
print('Num Detections:     ', (results['num_detections'][0]).astype(int))
现在让我们检查所有 16 个检测结果的一些检测数据。请注意,检测结果按置信度从高到低排序。
# Print the Scores, Classes and Bounding Boxes for the detections.
num_dets = (results['num_detections'][0]).astype(int)print('\nDetection Scores: \n\n', results['detection_scores'][0][0:num_dets])
print('\nDetection Classes: \n\n', results['detection_classes'][0][0:num_dets])
print('\nDetection Boxes: \n\n', results['detection_boxes'][0][0:num_dets])
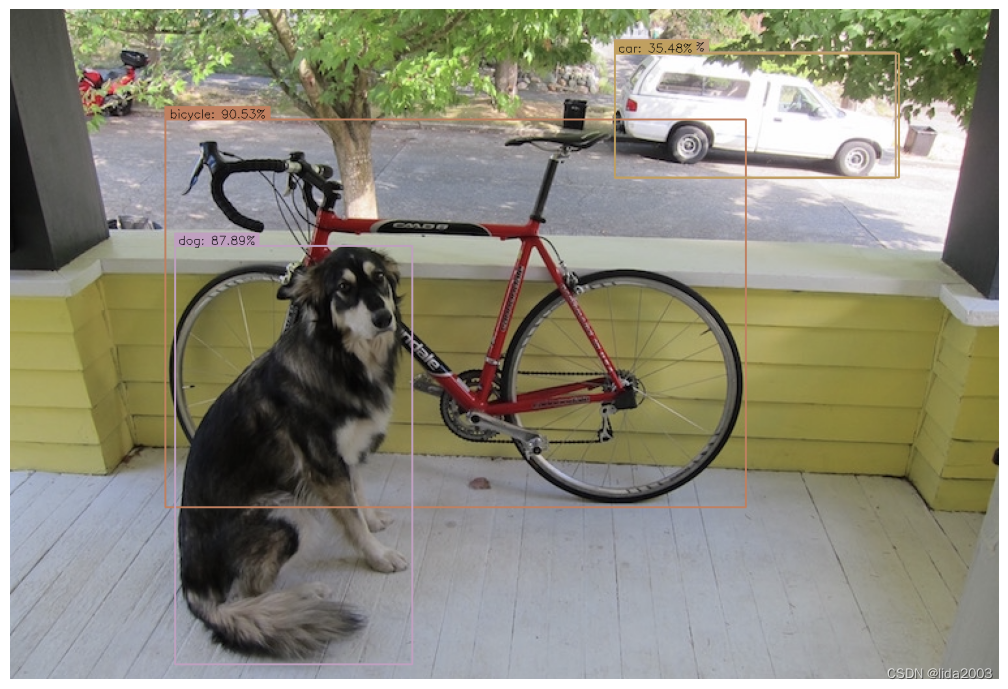
Detection Scores: [0.9053347 0.87894064 0.72029626 0.35475957 0.280573 0.178516910.15169649 0.14905997 0.1445412 0.13583934 0.1268262 0.117451030.10781787 0.10152435 0.10052282 0.09746176 0.09339274 0.093286320.09095493 0.08784384 0.0829455 0.08292609 0.08103823 0.078693780.07779253 0.07525648 0.07296266 0.07162358 0.07000387 0.068783560.06795825 0.06612433 0.06536039 0.06445681 0.06108232 0.059569810.05944339 0.05919976 0.05844869 0.05824129 0.05798095 0.057831090.05774955 0.05753423 0.057473 0.05707671 0.05703654 0.055828170.05510496 0.05509546 0.05461833 0.05444406 0.05370587 0.053354380.05323494 0.05099036 0.05098379 0.04960342 0.04953238 0.047812050.04760257 0.04725712 0.04687678 0.0467659 0.04627746 0.045824010.04572169 0.04525106 0.04518513 0.0449252 0.04447877 0.043266330.04299332 0.04221777 0.04141288 0.04104272 0.04087303 0.040615420.04059404 0.04027912 0.0401063 0.03926978 0.03919847 0.038588480.03826131 0.03815732 0.03803976 0.03789702 0.03788551 0.03751240.0373402 0.03672962 0.0366619 0.03631061 0.03627428 0.035950080.03587668 0.03499278 0.0349467 0.0348866 ]Detection Classes: [ 2. 18. 8. 3. 64. 64. 2. 18. 64. 64. 64. 4. 64. 44. 64. 77. 64. 15.6. 3. 64. 15. 64. 17. 28. 64. 64. 64. 64. 3. 64. 1. 64. 1. 34. 44.64. 44. 15. 3. 47. 1. 43. 14. 2. 64. 3. 64. 64. 41. 44. 64. 9. 3.47. 44. 64. 51. 3. 3. 3. 72. 64. 20. 64. 64. 64. 11. 64. 15. 72. 44.64. 3. 85. 33. 44. 64. 33. 64. 64. 64. 64. 19. 64. 64. 64. 4. 44. 64.64. 21. 64. 64. 44. 64. 3. 3. 41. 18.]Detection Boxes: [[1.64872468e-01 1.57030821e-01 7.44122684e-01 7.44292676e-01][3.53599966e-01 1.66687638e-01 9.77678120e-01 4.06754047e-01][6.44268319e-02 6.11664593e-01 2.52094895e-01 8.95661056e-01][6.63066134e-02 6.11912012e-01 2.51467615e-01 8.98775935e-01][8.41052532e-02 6.99530840e-02 1.81532562e-01 1.31785527e-01][1.37546375e-01 8.97510648e-01 2.21870631e-01 9.40171123e-01][3.45106423e-01 1.68578252e-01 9.71659541e-01 4.09179568e-01][1.80238336e-01 1.55317247e-01 7.69674718e-01 7.74034619e-01][8.78890008e-02 6.87568486e-02 1.87820852e-01 1.03662342e-01][8.96975677e-03 1.10131532e-01 8.94228965e-02 1.57099128e-01][8.78244117e-02 8.89956504e-02 1.61299452e-01 1.39885262e-01][1.64561838e-01 1.70814097e-01 7.29829729e-01 7.55293548e-01][6.90699667e-02 8.94493699e-01 2.21749574e-01 9.60544229e-01][3.02217782e-01 1.09277435e-01 3.30914080e-01 1.51607603e-01][1.11322552e-01 9.43266004e-02 1.63035363e-01 1.29377097e-01][1.33766994e-01 5.59260726e-01 1.81785822e-01 5.84418297e-01][1.69360042e-01 9.05158639e-01 2.20974877e-01 9.38509583e-01][1.67536631e-01 1.60059541e-01 7.52878010e-01 7.50257134e-01][6.34177104e-02 6.11119270e-01 2.52539754e-01 8.96613955e-01][8.30912441e-02 5.53367317e-01 1.26330957e-01 5.95886171e-01][8.78340676e-02 1.08522616e-01 1.64300382e-01 1.76131040e-01][6.55938685e-02 6.11329556e-01 2.51263857e-01 8.96704316e-01][5.78486025e-02 1.11252695e-01 9.05974433e-02 1.43568069e-01][3.45106423e-01 1.68578252e-01 9.71659541e-01 4.09179568e-01][1.64561838e-01 1.70814097e-01 7.29829729e-01 7.55293548e-01][1.36894956e-01 8.91270101e-01 2.14785576e-01 9.16019142e-01][1.74802095e-02 5.26435673e-04 4.01396424e-01 1.02759115e-01][1.24034390e-01 7.39476532e-02 1.86334699e-01 1.00527301e-01][1.63804311e-02 9.00249243e-01 2.26505056e-01 9.86810207e-01][5.93338683e-02 1.11474507e-01 8.95349160e-02 1.42564982e-01][5.75893894e-02 9.44942892e-01 1.88199267e-01 9.80552971e-01][1.25466585e-01 7.87266195e-01 1.57683328e-01 8.13043892e-01][8.36775899e-02 1.21865049e-02 1.99123383e-01 1.27721667e-01][1.19268894e-01 7.82504976e-01 1.53899118e-01 8.05798113e-01][1.64561838e-01 1.70814097e-01 7.29829729e-01 7.55293548e-01][2.91318387e-01 1.11356884e-01 3.28983605e-01 1.34163916e-01][6.54594824e-02 6.89840317e-02 1.74558565e-01 1.78287789e-01][2.70692766e-01 1.10364988e-01 3.29678982e-01 1.47175804e-01][5.81662506e-02 1.11311868e-01 8.91821533e-02 1.43789485e-01][9.53361765e-02 1.95676565e-01 1.28487736e-01 2.68072605e-01][1.33766994e-01 5.59260726e-01 1.81785822e-01 5.84418297e-01][1.29232541e-01 7.88466334e-01 1.54698476e-01 8.04546356e-01][1.64561838e-01 1.70814097e-01 7.29829729e-01 7.55293548e-01][1.32084399e-01 5.58603346e-01 1.82824224e-01 5.85762322e-01][1.97583944e-01 1.73898876e-01 3.45296204e-01 3.29735219e-01][9.58986953e-02 1.22943275e-01 1.53478786e-01 1.67262658e-01][1.43826336e-01 8.37410629e-01 2.17136309e-01 8.97402942e-01][1.97423846e-02 9.15301740e-01 4.17055339e-01 9.97946799e-01][1.54386023e-02 8.48747551e-01 2.16598883e-01 9.61028039e-01][1.64561838e-01 1.70814097e-01 7.29829729e-01 7.55293548e-01][3.10323000e-01 1.00097544e-01 3.30266923e-01 1.13031082e-01][1.18318260e-01 8.25858340e-02 1.77379444e-01 1.25782013e-01][1.64561838e-01 1.70814097e-01 7.29829729e-01 7.55293548e-01][1.12383544e-01 6.10164046e-01 1.88168332e-01 6.28713846e-01][3.05876464e-01 1.08968809e-01 3.30649525e-01 1.45296082e-01][2.90190130e-01 1.20972842e-01 3.30591053e-01 1.55480236e-01][8.72497633e-02 6.93231225e-02 1.34429961e-01 9.59156454e-02][5.93338683e-02 1.11474507e-01 8.95349160e-02 1.42564982e-01][1.39585942e-01 6.10274732e-01 1.84828877e-01 6.22814715e-01][9.29178968e-02 5.13639927e-01 1.23643354e-01 5.44009447e-01][9.59800482e-02 5.08866668e-01 1.22083634e-01 5.29584408e-01][4.01576646e-02 0.00000000e+00 3.95416975e-01 1.03089206e-01][8.98193792e-02 1.35473967e-01 1.59401804e-01 1.87099367e-01][3.45106423e-01 1.68578252e-01 9.71659541e-01 4.09179568e-01][4.53225970e-02 1.11479618e-01 1.05331413e-01 1.56691015e-01][1.57827780e-01 8.98793697e-01 2.18541548e-01 9.25692916e-01][5.82250394e-02 2.86231697e-01 3.17502648e-01 3.81842673e-01][3.45106423e-01 1.68578252e-01 9.71659541e-01 4.09179568e-01][7.84504041e-02 1.05156288e-01 1.55611336e-01 1.48619071e-01][3.23234797e-02 1.10831708e-01 8.94218907e-02 1.54622853e-01][1.33766994e-01 5.59260726e-01 1.81785822e-01 5.84418297e-01][3.07980508e-01 1.09241381e-01 3.29170287e-01 1.20673895e-01][1.64561838e-01 1.70814097e-01 7.29829729e-01 7.55293548e-01][9.87112299e-02 5.43558896e-01 1.22093461e-01 5.60232580e-01][1.33766994e-01 5.59260726e-01 1.81785822e-01 5.84418297e-01][6.55938685e-02 6.11329556e-01 2.51263857e-01 8.96704316e-01][2.97420114e-01 1.28319323e-01 3.27704251e-01 1.44253701e-01][3.64893563e-02 6.67656511e-02 1.64101094e-01 1.39753684e-01][1.64907873e-01 1.56999767e-01 7.47540116e-01 7.41400898e-01][5.84709197e-02 9.18762147e-01 2.00678051e-01 9.75903094e-01][3.53834294e-02 1.32890970e-01 8.96973014e-02 1.54766202e-01][8.71308893e-02 8.78557503e-01 2.17836186e-01 9.37938273e-01][3.14090177e-02 0.00000000e+00 2.71784872e-01 1.43777996e-01][6.34177104e-02 6.11119270e-01 2.52539754e-01 8.96613955e-01][0.00000000e+00 8.18094909e-02 9.15636867e-02 1.64138213e-01][1.05832808e-03 1.23680338e-01 1.10894613e-01 2.55682230e-01][4.87464387e-03 6.55749664e-02 1.18604109e-01 1.46144748e-01][6.55938685e-02 6.11329556e-01 2.51263857e-01 8.96704316e-01][3.08386505e-01 1.06262662e-01 3.30590278e-01 1.36533350e-01][9.58888978e-02 1.13962032e-01 1.52433887e-01 1.42586708e-01][1.34968966e-01 9.13233101e-01 2.26271749e-01 9.62688386e-01][3.45106423e-01 1.68578252e-01 9.71659541e-01 4.09179568e-01][1.69809069e-03 1.10684238e-01 9.64165926e-02 1.96017563e-01][7.35746250e-02 3.10681835e-02 3.31526279e-01 1.67747080e-01][3.08449388e-01 1.39392763e-01 3.29580367e-01 1.52594984e-01][7.35872164e-02 6.91096112e-02 3.16760093e-01 1.35739923e-01][9.68379453e-02 5.48292518e-01 1.22824632e-01 5.68545938e-01][3.23234797e-02 1.10831708e-01 8.94218907e-02 1.54622853e-01][3.45106423e-01 1.68578252e-01 9.71659541e-01 4.09179568e-01][3.37914348e-01 9.60409939e-02 8.65746975e-01 5.68797350e-01]]
3.4.3 后处理和显示检测结果
模型返回了 16 个检测结果,然而,许多检测结果具有较低的置信度分数,因此需要进一步通过使用最小检测阈值进行筛选。
- 从结果字典中检索检测结果
- 应用最小检测阈值以筛选检测结果
- 对于每个经过阈值筛选的检测结果,显示边界框和一个标签,指示检测到的类别和检测的置信度。
def process_detection(image, results, min_det_thresh=.3):# Extract the detection results from the results dictionary.scores = results['detection_scores'][0]boxes = results['detection_boxes'][0]classes = (results['detection_classes'][0]).astype(int)# Set a minimum detection threshold to post-process the detection results.min_det_thresh = min_det_thresh# Get the detections whose scores exceed the minimum detection threshold.det_indices = np.where(scores >= min_det_thresh)[0]scores_thresh = scores[det_indices]boxes_thresh = boxes[det_indices]classes_thresh = classes[det_indices]# Make a copy of the image to annotate.img_bbox = image.copy()im_height, im_width = image.shape[:2]font_scale = .6box_thickness = 2# Loop over all thresholded detections.for box, class_id, score in zip(boxes_thresh, classes_thresh, scores_thresh):# Get bounding box normalized coordiantes.ymin, xmin, ymax, xmax = boxclass_name = class_index[class_id]# Convert normalized bounding box coordinates to pixel coordinates.(left, right, top, bottom) = (int(xmin * im_width), int(xmax * im_width), int(ymin * im_height), int(ymax * im_height))# Annotate the image with the bounding box.color = tuple(COLOR_IDS[class_id % len(COLOR_IDS)].tolist())[::-1]img_bbox = cv2.rectangle(img_bbox, (left, top), (right, bottom), color, thickness=box_thickness)#-------------------------------------------------------------------# Annotate bounding box with detection data (class name and score).#-------------------------------------------------------------------# Build the text string that contains the class name and score associated with this detection.display_txt = '{}: {:.2f}%'.format(class_name, 100 * score)((text_width, text_height), _) = cv2.getTextSize(display_txt, cv2.FONT_HERSHEY_SIMPLEX, font_scale, 1)# Handle case when the label is above the image frame.if top < text_height:shift_down = int(2*(1.3*text_height))else:shift_down = 0# Draw a filled rectangle on which the detection results will be displayed.img_bbox = cv2.rectangle(img_bbox, (left-1, top-box_thickness - int(1.3*text_height) + shift_down), (left-1 + int(1.1 * text_width), top), color, thickness=-1)# Annotate the filled rectangle with text (class label and score).img_bbox = cv2.putText(img_bbox, display_txt,(left + int(.05*text_width), top - int(0.2*text_height) + int(shift_down/2)),cv2.FONT_HERSHEY_SIMPLEX, font_scale, (0, 0, 0), 1)return img_bbox
3.4.3.1 显示结果(min_det_thresh=0)
首先,使用最小检测阈值为零来处理一张图像,只是为了查看模型返回的所有 16 个检测结果。由于我们没有对结果进行过滤,我们预计可能会有一些多余和/或错误的检测结果。
# Call the model.
results = od_model(images[0])# Convert the dictionary values to numpy arrays.
results = {key:value.numpy() for key, value in results.items()}# Remove the batch dimension from the first image.
image = np.squeeze(images[0])# Process the first sample image.
img_bbox = process_detection(image, results, min_det_thresh=0)plt.figure(figsize=[15, 10])
plt.imshow(img_bbox)
plt.axis('off');
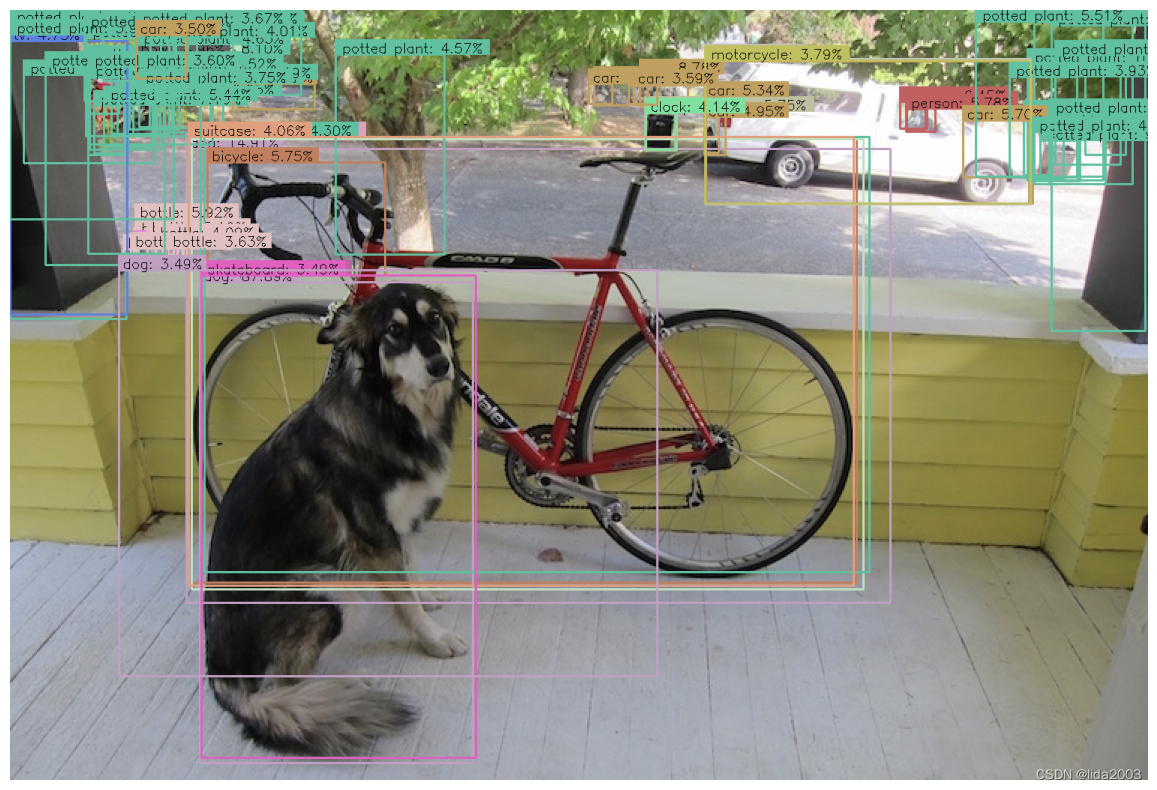
由于我们没有应用检测阈值来过滤结果,上述结果显示了模型返回的所有检测结果。然而,请注意,所有错误标记的检测结果也具有非常低的置信度。因此,始终建议对模型生成的结果应用最小检测阈值。
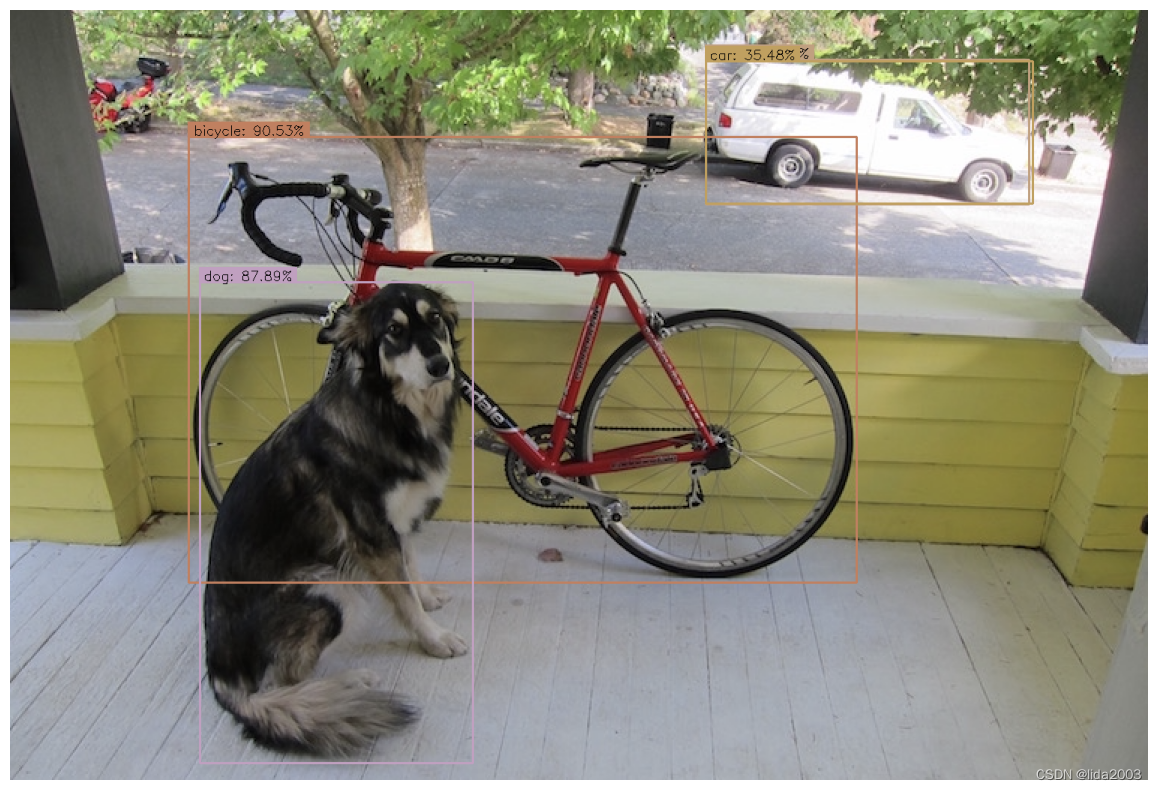
3.4.3.1.2 显示结果(min_det_thresh=0.3)
阈值的值取决于数据和应用程序,但通常,介于 0.3 和 0.5 之间是一个不错的经验法则。现在让我们应用一个检测阈值来过滤结果。
img_bbox = process_detection(image, results, min_det_thresh=.3)plt.figure(figsize=[15, 10])
plt.imshow(img_bbox)
plt.axis('off');
3.5 完整代码实现
现在正式实现并创建一个方便的函数来在图像列表上迭代执行模型预测。
3.5.1 run_inference()
def run_inference(images, model):results_list = []for img in images:result = model(img)result = {key:value.numpy() for key,value in result.items()}results_list.append(result)return results_list
3.5.2 对示例图像进行预测
# Perform inference on each image and store the results in a list.
results_list = run_inference(images, od_model)
3.5.3 展示示例图像预测结果
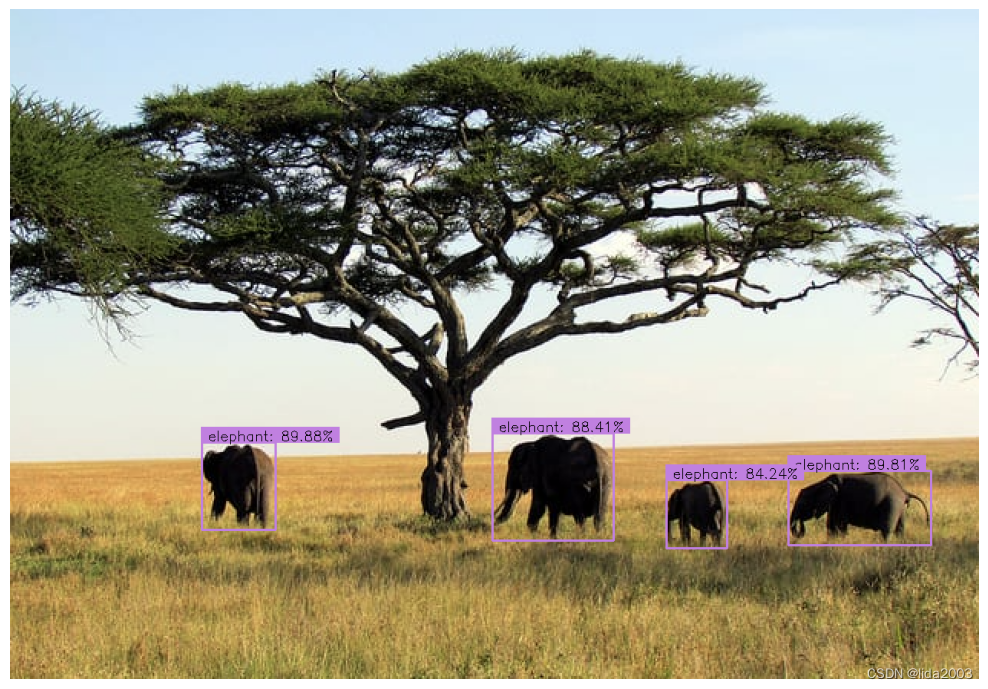
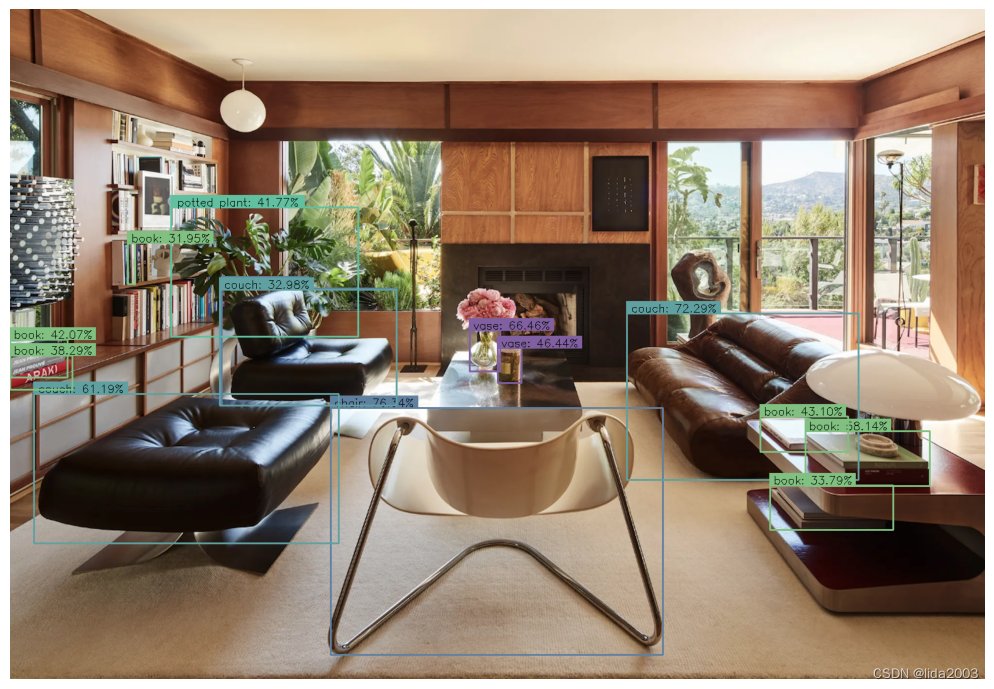
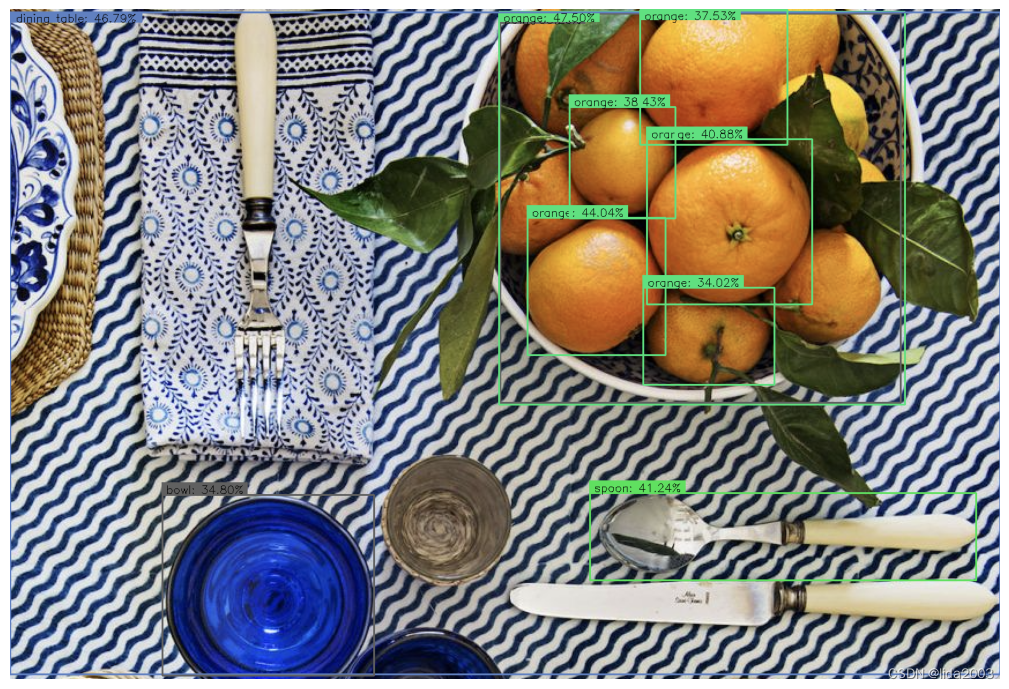
for idx in range(len(images)):# Remove the batch dimension.image = np.squeeze(images[idx])# Generate the annotated image.image_bbox = process_detection(image, results_list[idx], min_det_thresh=.31)# Display annotated image.plt.figure(figsize=[20,10*len(images)])plt.subplot(len(images),1,idx+1)plt.imshow(image_bbox)plt.axis('off')
4. 总结
本篇使用了 EfficienDet 家族的 D4 模型进行目标识别,如果应用程序需要更快的推理速度,可以考虑使用较小的模型(从 D0 到 D3)。
测试代码:Keras-Object-Detection-TensorFlow-Hub
5. 参考资料
【1】Jammy@Jetson Orin - Tensorflow & Keras Get Started
这篇关于Colab - Introduction to Object Detection using TensorFlow Hub的文章就介绍到这儿,希望我们推荐的文章对编程师们有所帮助!


