本文主要是介绍前端开发攻略---封装calendar日历组件,实现日期多选。可根据您的需求任意调整,可玩性强。,希望对大家解决编程问题提供一定的参考价值,需要的开发者们随着小编来一起学习吧!
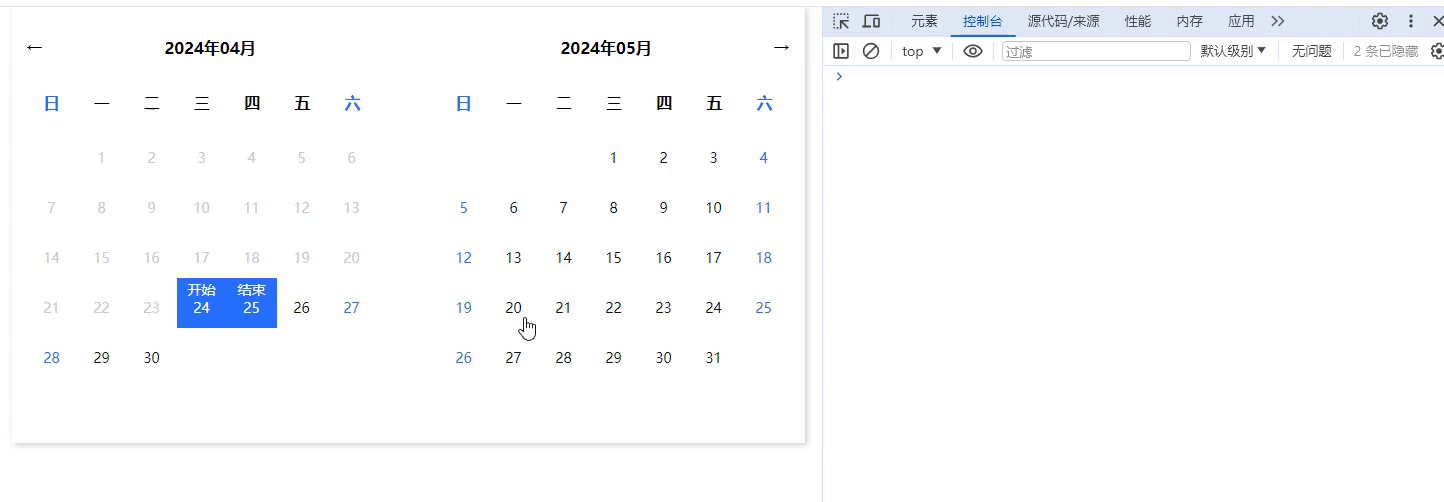
1、演示
2、简介
1、该日历组件是纯手搓出来的,没依赖任何组件库,因此您可以随意又轻松的改变代码,以实现您的需求。
2、代码清爽干净,逻辑精妙,您可以好好品尝。
3、好戏开场。
3、代码(Vue3写法)
1、子组件
您可以在components文件夹下创建一个干净的组件,直接将代码复制粘贴即可。
src/components/py-calendar/index.vue
<template><div class="box"><div class="left"><div class="top"><div><span class="iconfont" @click="changeMonth(-1)">←</span></div><span>{{ startMonth.year }}年{{ startMonth.month }}月</span><span></span></div><div class="calendarMain"><div class="weekDays"><span>日</span><span>一</span><span>二</span><span>三</span><span>四</span><span>五</span><span>六</span></div><div class="days"><divclass="day"v-for="item in startMonth.dates":class="dayClass(item)":style="dayStyle(item)"@mouseenter="dayMouseMove(item)"@click="dayMouseClick(item)">{{ item.day }}<span v-if="item.yymmdd == selectDate[0]?.yymmdd">开始</span><span v-if="item.yymmdd == selectDate[1]?.yymmdd">结束</span></div></div></div></div><div class="right"><div class="top"><span></span><span>{{ endMonth.year }}年{{ endMonth.month }}月</span><div><span class="iconfont" @click="changeMonth(1)">→</span></div></div><div class="calendarMain"><div class="weekDays"><span>日</span><span>一</span><span>二</span><span>三</span><span>四</span><span>五</span><span>六</span></div><div class="days"><divclass="day"v-for="item in endMonth.dates":class="dayClass(item)":style="dayStyle(item)"@mouseenter="dayMouseMove(item)"@click="dayMouseClick(item)">{{ item.day }}<span v-if="item.yymmdd == selectDate[0]?.yymmdd">开始</span><span v-if="item.yymmdd == selectDate[1]?.yymmdd">结束</span></div></div></div></div></div>
</template><script setup>
import { ref, reactive, onMounted, computed } from 'vue'
import { getMonthDates } from './index.js'
const currentMonthIndex = ref(0)
const startMonth = ref({})
const endMonth = ref({})
const selectDate = ref([])
const isMove = ref(false)
const emits = defineEmits(['change'])onMounted(() => {initCalendar()
})const initCalendar = () => {getCalendarData()const startIndex = startMonth.value.dates.findIndex(item => !item.isTodayBefore)if (startIndex == startMonth.value.dates.length - 1) {selectDate.value[0] = startMonth.value.dates[startIndex]selectDate.value[1] = endMonth.value.dates[0]} else {selectDate.value[0] = startMonth.value.dates[startIndex]selectDate.value[1] = startMonth.value.dates[startIndex + 1]}
}
const getCalendarData = () => {startMonth.value = getMonthDates(currentMonthIndex.value)endMonth.value = getMonthDates(currentMonthIndex.value + 1)
}
const changeMonth = num => {currentMonthIndex.value += numgetCalendarData()
}
const dayClass = item => {if (item.isTodayBefore) return 'disabled'if (item.yymmdd == selectDate.value[0]?.yymmdd) return 'active'if (item.yymmdd == selectDate.value[1]?.yymmdd) return 'active'if (getDatesBetween(selectDate.value[0]?.yymmdd, selectDate.value[1]?.yymmdd).includes(item.yymmdd)) return 'middle'
}
const dayStyle = item => {if (item.day == 1) return { marginLeft: item.week * 50 + 'px' }if (!item.isTodayBefore && (item.week == 0 || item.week == 6)) return { color: '#266fff' }
}
const dayMouseClick = item => {if (item.isTodayBefore) returnlet arr = [...selectDate.value]if (arr[0] && arr[1] && !isMove.value) {arr = []arr[0] = itemisMove.value = true} else if (arr[0] && arr[1] && isMove.value) {isMove.value = falsearr[1] = item} else if (arr[0] && !arr[1] && !isMove.value) {arr[0] = itemisMove.value = false} else if (arr[0] && !arr[1] && isMove.value) {arr[0] = itemisMove.value = true}selectDate.value = arrif (arr[0] && arr[1]) {emits('change', getDatesBetween(arr[0].yymmdd, arr[1].yymmdd))}
}
const dayMouseMove = item => {if (item.isTodayBefore) returnif (!isMove.value) returnif (item.yymmdd <= selectDate.value[0]?.yymmdd) {selectDate.value[1] = ''} else {selectDate.value[1] = item}
}const getDatesBetween = (date1, date2) => {let dates = []let currentDate = new Date(date1)let endDate = new Date(date2)while (currentDate <= endDate) {let dateString = currentDate.toISOString().substr(0, 10)dates.push(dateString)currentDate.setDate(currentDate.getDate() + 1)}return dates
}
</script><style scoped lang="scss">
.box {width: 793px;height: 436px;box-shadow: 2px 2px 6px #0003;display: flex;justify-content: space-between;flex-wrap: wrap;padding: 30px 15px;.left,.right {width: 46%;height: 95%;.top {display: flex;justify-content: space-between;font-weight: bold;.iconfont {cursor: pointer;user-select: none;}}.calendarMain {.weekDays {font-weight: bold;margin-top: 20px;display: flex;justify-content: space-between;& > span {display: inline-block;width: 50px;height: 50px;line-height: 50px;text-align: center;}& > span:first-child,& > span:last-child {color: #266fff;}}.days {display: flex;flex-wrap: wrap;cursor: pointer;.day {width: 50px;height: 50px;height: 50px;text-align: center;line-height: 60px;color: #111;font-size: 14px;position: relative;& > span {position: absolute;left: 11px;top: -18px;}}.disabled {color: #ccc;cursor: not-allowed;}.active {background-color: #266fff;color: #fff !important;}.middle {background-color: rgba(38, 111, 255, 0.3);color: #fff !important;}}}}.bottom {width: 100%;text-align: center;color: #111;}
}
</style>
src/components/py-calendar/index.js
export function getMonthDates(monthOffset) {const today = new Date()const targetDate = new Date(today.getFullYear(), today.getMonth() + monthOffset, 1)const year = targetDate.getFullYear()let month = targetDate.getMonth() + 1 // 月份是从0开始的,所以要加1month = month >= 10 ? month : '0' + monthconst firstDay = new Date(year, targetDate.getMonth(), 1)const lastDay = new Date(year, targetDate.getMonth() + 1, 0)const monthDates = []for (let d = firstDay; d <= lastDay; d.setDate(d.getDate() + 1)) {const day = d.getDate()const dayOfWeek = d.getDay() // 返回0到6,0代表星期日const isTodayBefore = d.getTime() < today.setHours(0, 0, 0, 0) // 判断是否是今天之前的日期monthDates.push({day,week: dayOfWeek,isTodayBefore,yymmdd: `${year}-${month}-${day >= 10 ? day : '0' + day}`,})}return { year, month, dates: monthDates }
}
2、父组件
随便在一个文件夹下使用日历组件
<template><div><PYCalendar @change="change"></PYCalendar></div>
</template><script setup>
import { ref, reactive, computed } from 'vue'
import PYCalendar from '@/components/py-calendar/index.vue'const change = dateArr => {console.log(dateArr, '父组件获取到的数据')
}
</script><style scoped lang="scss"></style>
4、代码(Vue2写法 )
1、子组件
您可以在components文件夹下创建一个干净的组件,直接将代码复制粘贴即可。
src/components/py-calendar/index.vue
<template><div class="box"><div class="left"><div class="top"><div><span class="iconfont" @click="changeMonth(-1)">←</span></div><span>{{ startMonth.year }}年{{ startMonth.month }}月</span><span></span></div><div class="calendarMain"><div class="weekDays"><span>日</span><span>一</span><span>二</span><span>三</span><span>四</span><span>五</span><span>六</span></div><div class="days"><divclass="day"v-for="item in startMonth.dates":class="dayClass(item)":style="dayStyle(item)"@mouseenter="dayMouseMove(item)"@click="dayMouseClick(item)">{{ item.day }}<span v-if="item.yymmdd == selectDate[0]?.yymmdd">开始</span><span v-if="item.yymmdd == selectDate[1]?.yymmdd">结束</span></div></div></div></div><div class="right"><div class="top"><span></span><span>{{ endMonth.year }}年{{ endMonth.month }}月</span><div><span class="iconfont" @click="changeMonth(1)">→</span></div></div><div class="calendarMain"><div class="weekDays"><span>日</span><span>一</span><span>二</span><span>三</span><span>四</span><span>五</span><span>六</span></div><div class="days"><divclass="day"v-for="item in endMonth.dates":class="dayClass(item)":style="dayStyle(item)"@mouseenter="dayMouseMove(item)"@click="dayMouseClick(item)">{{ item.day }}<span v-if="item.yymmdd == selectDate[0]?.yymmdd">开始</span><span v-if="item.yymmdd == selectDate[1]?.yymmdd">结束</span></div></div></div></div></div>
</template>
<script>
import { getMonthDates } from './index.js'
export default {data() {return {currentMonthIndex: 0,startMonth: {},endMonth: {},selectDate: [],isMove: false,}},mounted() {this.initCalendar()},methods: {initCalendar() {this.getCalendarData()const startIndex = this.startMonth.dates.findIndex(item => !item.isTodayBefore)if (startIndex == this.startMonth.dates.length - 1) {this.selectDate[0] = this.startMonth.dates[startIndex]this.selectDate[1] = this.endMonth.dates[0]} else {this.selectDate[0] = this.startMonth.dates[startIndex]this.selectDate[1] = this.startMonth.dates[startIndex + 1]}},getCalendarData() {this.startMonth = getMonthDates(this.currentMonthIndex)this.endMonth = getMonthDates(this.currentMonthIndex + 1)},changeMonth(num) {this.currentMonthIndex += numthis.getCalendarData()},dayClass(item) {if (item.isTodayBefore) return 'disabled'if (item.yymmdd == this.selectDate[0]?.yymmdd) return 'active'if (item.yymmdd == this.selectDate[1]?.yymmdd) return 'active'if (this.getDatesBetween(this.selectDate[0]?.yymmdd, this.selectDate[1]?.yymmdd).includes(item.yymmdd)) return 'middle'},dayStyle(item) {if (item.day == 1) return { marginLeft: item.week * 50 + 'px' }if (!item.isTodayBefore && (item.week == 0 || item.week == 6)) return { color: '#266fff' }},dayMouseClick(item) {if (item.isTodayBefore) returnlet arr = [...this.selectDate]if (arr[0] && arr[1] && !this.isMove) {arr = []arr[0] = itemthis.isMove = true} else if (arr[0] && arr[1] && this.isMove) {this.isMove = falsearr[1] = item} else if (arr[0] && !arr[1] && !this.isMove) {arr[0] = itemthis.isMove = false} else if (arr[0] && !arr[1] && this.isMove) {arr[0] = itemthis.isMove = true}this.selectDate = arrif (arr[0] && arr[1]) {this.$emit('change', this.getDatesBetween(arr[0].yymmdd, arr[1].yymmdd))}},dayMouseMove(item) {if (item.isTodayBefore) returnif (!this.isMove) returnif (item.yymmdd <= this.selectDate[0]?.yymmdd) {this.selectDate[1] = ''} else {this.selectDate[1] = item}},getDatesBetween(date1, date2) {let dates = []let currentDate = new Date(date1)let endDate = new Date(date2)while (currentDate <= endDate) {let dateString = currentDate.toISOString().substr(0, 10)dates.push(dateString)currentDate.setDate(currentDate.getDate() + 1)}return dates},},
}
</script><style scoped lang="scss">
.box {width: 793px;height: 436px;box-shadow: 2px 2px 6px #0003;display: flex;justify-content: space-between;flex-wrap: wrap;padding: 30px 15px;.left,.right {width: 46%;height: 95%;.top {display: flex;justify-content: space-between;font-weight: bold;.iconfont {cursor: pointer;user-select: none;}}.calendarMain {.weekDays {font-weight: bold;margin-top: 20px;display: flex;justify-content: space-between;& > span {display: inline-block;width: 50px;height: 50px;line-height: 50px;text-align: center;}& > span:first-child,& > span:last-child {color: #266fff;}}.days {display: flex;flex-wrap: wrap;cursor: pointer;.day {width: 50px;height: 50px;height: 50px;text-align: center;line-height: 60px;color: #111;font-size: 14px;position: relative;& > span {position: absolute;left: 11px;top: -18px;}}.disabled {color: #ccc;cursor: not-allowed;}.active {background-color: #266fff;color: #fff !important;}.middle {background-color: rgba(38, 111, 255, 0.3);color: #fff !important;}}}}.bottom {width: 100%;text-align: center;color: #111;}
}
</style>
src/components/py-calendar/index.js
export function getMonthDates(monthOffset) {const today = new Date()const targetDate = new Date(today.getFullYear(), today.getMonth() + monthOffset, 1)const year = targetDate.getFullYear()let month = targetDate.getMonth() + 1 // 月份是从0开始的,所以要加1month = month >= 10 ? month : '0' + monthconst firstDay = new Date(year, targetDate.getMonth(), 1)const lastDay = new Date(year, targetDate.getMonth() + 1, 0)const monthDates = []for (let d = firstDay; d <= lastDay; d.setDate(d.getDate() + 1)) {const day = d.getDate()const dayOfWeek = d.getDay() // 返回0到6,0代表星期日const isTodayBefore = d.getTime() < today.setHours(0, 0, 0, 0) // 判断是否是今天之前的日期monthDates.push({day,week: dayOfWeek,isTodayBefore,yymmdd: `${year}-${month}-${day >= 10 ? day : '0' + day}`,})}return { year, month, dates: monthDates }
}
2、父组件
随便在一个文件夹下使用日历组件
<template><div><PYCalendar @change="change"></PYCalendar></div>
</template><script>
import PYCalendar from '@/components/py-calendar/index.vue'
export default {data() {return {}},methods: {change(e) {console.log(e, '父组件')},},
}
</script><style scoped lang="scss"></style>
5、代码解析
代码解析(子组件中的函数):
initCalendar: 初始化日历,通过调用getCalendarData()获取日历的初始数据。然后找到第一个不在过去的日期的索引(isTodayBefore),并根据该索引设置初始选定的日期范围(selectDate)。如果起始索引是起始月份中的最后一个日期,则将结束日期设置为下个月的第一个日期。
getCalendarData: 通过调用getMonthDates获取当前月份和下个月份的日历数据,分别为currentMonthIndex.value和currentMonthIndex.value + 1。
changeMonth: 通过给定的偏移量(num)改变当前月份,更新currentMonthIndex,然后调用getCalendarData()刷新日历数据。
dayClass: 确定给定日期(item)的 CSS 类。如果日期在过去,则返回 ‘disabled’;如果日期与选定日期之一匹配,则返回 ‘active’;如果日期在两个选定日期之间,则返回 ‘middle’。
dayStyle: 确定给定日期(item)的内联样式。为每个月的第一天设置左边距,并将周末的文字颜色设置为蓝色。
dayMouseClick: 处理日期(item)的鼠标单击事件。根据单击的日期和选择的位置更新选定的日期范围(selectDate),并根据是否同时选择了两个日期来触发 ‘change’ 事件。
dayMouseMove: 处理日期(item)的鼠标移动事件。如果日期选择正在进行中(isMove.value为 true),则更新选定范围的结束日期。代码解析(外部导入的函数):
export function getMonthDates(monthOffset) {: 这是一个导出函数的声明,函数名为getMonthDates,它接受一个参数monthOffset,表示要获取的月份相对于当前月份的偏移量。
const today = new Date(): 创建了一个当前日期的Date对象。
const targetDate = new Date(today.getFullYear(), today.getMonth() + monthOffset, 1): 创建了一个目标日期的Date对象,该日期是当前日期加上指定的月份偏移量,月份从0开始计数,因此today.getMonth()返回的是当前月份的索引,例如1月是0,2月是1,以此类推。
const year = targetDate.getFullYear(): 获取目标日期的年份。
let month = targetDate.getMonth() + 1: 获取目标日期的月份,并加1,因为月份是从0开始计数的,需要进行修正。
month = month >= 10 ? month : '0' + month: 如果月份小于10,就在前面补0,确保月份是两位数的字符串格式。
const firstDay = new Date(year, targetDate.getMonth(), 1): 获取目标月份的第一天的日期对象。
const lastDay = new Date(year, targetDate.getMonth() + 1, 0): 获取目标月份的最后一天的日期对象。这里将月份加1,然后日期设为0,相当于得到了目标月份的最后一天。
const monthDates = []: 创建一个空数组,用于存储该月份的日期信息。
for (let d = firstDay; d <= lastDay; d.setDate(d.getDate() + 1)) {: 使用for循环遍历从第一天到最后一天的日期。
const day = d.getDate(): 获取当前日期的日份。
const dayOfWeek = d.getDay(): 获取当前日期是星期几,返回值是一个从0到6的整数,0 代表星期日。
const isTodayBefore = d.getTime() < today.setHours(0, 0, 0, 0): 判断当前日期是否在今天之前。getTime()返回日期的毫秒数,通过比较毫秒数可以确定日期的先后顺序。
monthDates.push({ day, week: dayOfWeek, isTodayBefore, yymmdd:����−year−{month}-${day >= 10 ? day : ‘0’ + day}}): 将当前日期的信息以对象的形式添加到monthDates数组中,包括日期、星期几、是否在今天之前以及日期的格式化字符串(年-月-日)。
return { year, month, dates: monthDates }: 返回包含年份、月份和该月份日期信息的对象。
这篇关于前端开发攻略---封装calendar日历组件,实现日期多选。可根据您的需求任意调整,可玩性强。的文章就介绍到这儿,希望我们推荐的文章对编程师们有所帮助!


