本文主要是介绍使用 vue3-sfc-loader 加载远程Vue文件, 在运行时动态加载 .vue 文件。无需 Node.js 环境,无需 (webpack) 构建步骤,希望对大家解决编程问题提供一定的参考价值,需要的开发者们随着小编来一起学习吧!
加载远程Vue文件
vue3-sfc-loader
vue3-sfc-loader ,它是Vue3/Vue2 单文件组件加载器。
在运行时从 html/js 动态加载 .vue 文件。无需 Node.js 环境,无需 (webpack) 构建步骤。
主要特征
- 支持 Vue 3 和 Vue 2(参见dist/)
- 仅需要 Vue 仅运行时构建
- 提供esm和umd捆绑包(示例)
- 嵌入式ES6模块支持(含
import()) - TypeScript 支持、JSX 支持
- 自定义 CSS、HTML 和脚本语言支持,请参阅pug和stylus示例
- SFC 自定义块支持
- 通过日志回调正确报告模板、样式或脚本错误
- 专注于组件编译。网络、样式注入和缓存由您决定(参见下面的示例)
- 轻松构建您自己的版本并自定义您需要支持的浏览器
编写Node接口
编写Node接口提供服务,用于返回vue文件
项目初始化和安装
mkdir nodeServe
cd nodeServe
npm iniy -y
npm install express cors
项目完整结构
nodeServer
├── index.js
├── loaderVue2.vue
├── loaderVue3.vue
├── package-lock.json
└── package.json
添加 index.js
// express 基于Node.js平台,快速、开放、极简的 Web 开发框架 https://www.expressjs.com.cn/
const express = require("express")
const app = express()
const cors = require("cors")
const fs = require('fs');// 配置cors中间件,允许跨域
app.use(cors())app.get("/getVue2Str", (req, res) => {// 服务端读取文件,并变成字符串。传递给前端const data = fs.readFileSync('./loaderVue2.vue', 'utf8');res.send({code:200,fileStr:data,fileName:"loaderVue2.vue"});
})app.get("/getVue3Str", (req, res) => {// 服务端读取文件,并变成字符串。传递给前端const data = fs.readFileSync('./loaderVue3.vue', 'utf8');res.send({code:200,fileStr:data,fileName:"loaderVue2.vue"});
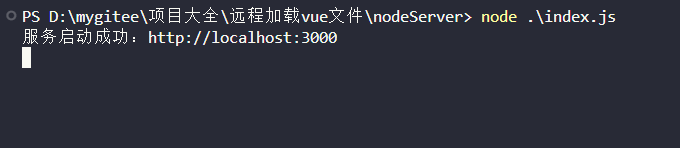
})app.listen(3000, () => {console.log("服务启动成功:http://localhost:3000")
})
这里用到的两个vue文件代码如下
loaderVue2.vue
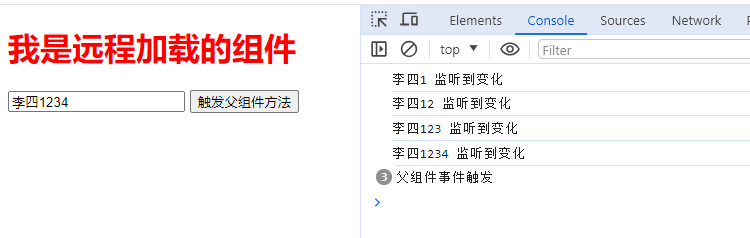
<template><div><h1>我是远程加载的组件</h1><input :value="value" @input="changeName" /><button @click="patchParentEvent">触发父组件方法</button></div>
</template>
<script>
export default {props: ["value"],methods: {changeName(e) {this.$emit("input", e.target.value);},patchParentEvent() {this.$emit("parentEvent");},},
};
</script><style scoped>
h1 {color: red;
}
</style>
loaderVue3.vue
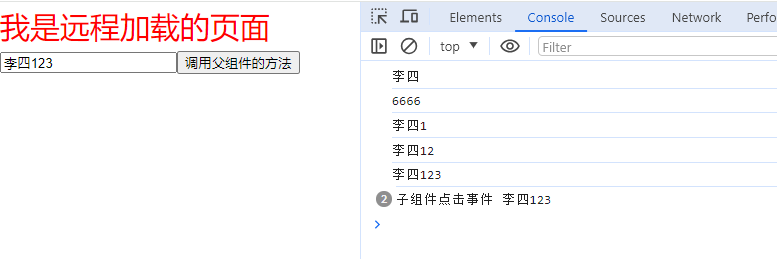
<template><div><h1 class="text-red">我是远程加载的页面</h1><input v-model="input" placeholder="placeholder" @input="changeValue"/><button @click="emitParentFun">调用父组件的方法</button></div>
</template><script setup>
import {defineProps,defineEmits,ref,onMounted} from "vue"const props = defineProps(['modelValue'])
// 更新model绑定的值固定写法: update:modelValue
const emit = defineEmits(['update:modelValue',"childClick"])let input = ref("")onMounted(()=>{input.value = props.modelValue// window环境指向的是接收方的window环境console.log(window.testName);
})const changeValue = (e) => {// 修改父组件的值emit('update:modelValue',e.target.value)
}const emitParentFun = ()=>{emit('childClick',input.value)
}
</script><style scope>
.text-red{color: red;
}
</style>
运行
node index.js
接口返回的格式如下
http://localhost:3000/getVue2Str
{"code": 200,"fileStr": "<template>\r\n  <div>\r\n    <h1>我是远程加载的组件</h1>\r\n    <input :value=\"value\" @input=\"changeName\" />\r\n    <button @click=\"patchParentEvent\">触发父组件方法</button>\r\n  </div>\r\n</template>\r\n<script>\r\nexport default {\r\n  props: [\"value\"],\r\n  methods: {\r\n    changeName(e) {\r\n      this.$emit(\"input\", e.target.value);\r\n    },\r\n    patchParentEvent() {\r\n      this.$emit(\"parentEvent\");\r\n    },\r\n  },\r\n};\r\n</script>\r\n\r\n<style scoped>\r\nh1 {\r\n  color: red;\r\n}\r\n</style>\r\n","fileName": "loaderVue2.vue"
}
Vue2项目使用
安装 vue3-sfc-loader
npm install vue3-sfc-loader
使用
注意:
vue2要从dist/vue2-sfc-loader这个目录下引入loadModule使用
vue2要从dist/vue3-sfc-loader这个目录下引入loadModule使用
<template><div><component :is="remote" v-bind="$attrs" v-if="remote" v-model="name" @parentEvent="parentEvent"></component></div>
</template><script>
import * as Vue from "vue"
import {loadModule} from "vue3-sfc-loader/dist/vue2-sfc-loader"export default {name: 'App',data() {return {name: "李四",remote: null,url: "http://localhost:3000/getVue2Str",}},mounted() {this.load(this.url)},watch: {name(newName) {console.log(newName, "监听到变化")}},methods: {// 加载async load(url) {let res = await fetch(url).then(res => res.json());const options = {moduleCache: {vue: Vue},async getFile() {return res.fileStr},addStyle(textContent) {const style = Object.assign(document.createElement('style'), {textContent})const ref = document.head.getElementsByTagName('style')[0] || nulldocument.head.insertBefore(style, ref)},};// 加载远程组件this.remote = await loadModule(res.fileName || "loader.vue", options)},// 子组件调用parentEvent() {console.log("父组件事件触发")}}
}
</script>
效果显示
Vue3项目使用
安装
npm install vue3-sfc-loader
使用
注意:
vue2要从dist/vue2-sfc-loader这个目录下引入loadModule使用
vue2要从dist/vue3-sfc-loader这个目录下引入loadModule使用
<template><div><component :is="remote" v-if="remote" v-model="name" @childClick="childClick"/></div>
</template><script setup>
import {loadModule} from "vue3-sfc-loader/dist/vue3-sfc-loader"
import * as Vue from 'vue'
import {onMounted, defineAsyncComponent, ref, watchEffect} from "vue"let remote = ref()
let name = ref("李四")
let url = "http://localhost:3000/getVue3Str"onMounted(() => {load(url)
})watchEffect(() => {console.log(name.value)
})const childClick = (newVal) => {console.log("子组件点击事件", newVal)
}// 加载远程文件
const load = async (url) => {let res = await fetch(url).then(res => res.json());const options = {moduleCache: {vue: Vue},async getFile() {return res.fileStr},addStyle(textContent) {const style = Object.assign(document.createElement('style'), {textContent})const ref = document.head.getElementsByTagName('style')[0] || nulldocument.head.insertBefore(style, ref)},};// 加载远程组件remote.value = defineAsyncComponent(() => loadModule(res.fileName || "loader.vue", options))
}
</script>
完整源码
https://gitee.com/szxio/load-remote-vue-components
😆 求Start
这篇关于使用 vue3-sfc-loader 加载远程Vue文件, 在运行时动态加载 .vue 文件。无需 Node.js 环境,无需 (webpack) 构建步骤的文章就介绍到这儿,希望我们推荐的文章对编程师们有所帮助!


