本文主要是介绍人像抠图HumanSeg——基于大规模电话会议视频数据集的连接感知人像分割,希望对大家解决编程问题提供一定的参考价值,需要的开发者们随着小编来一起学习吧!
前言
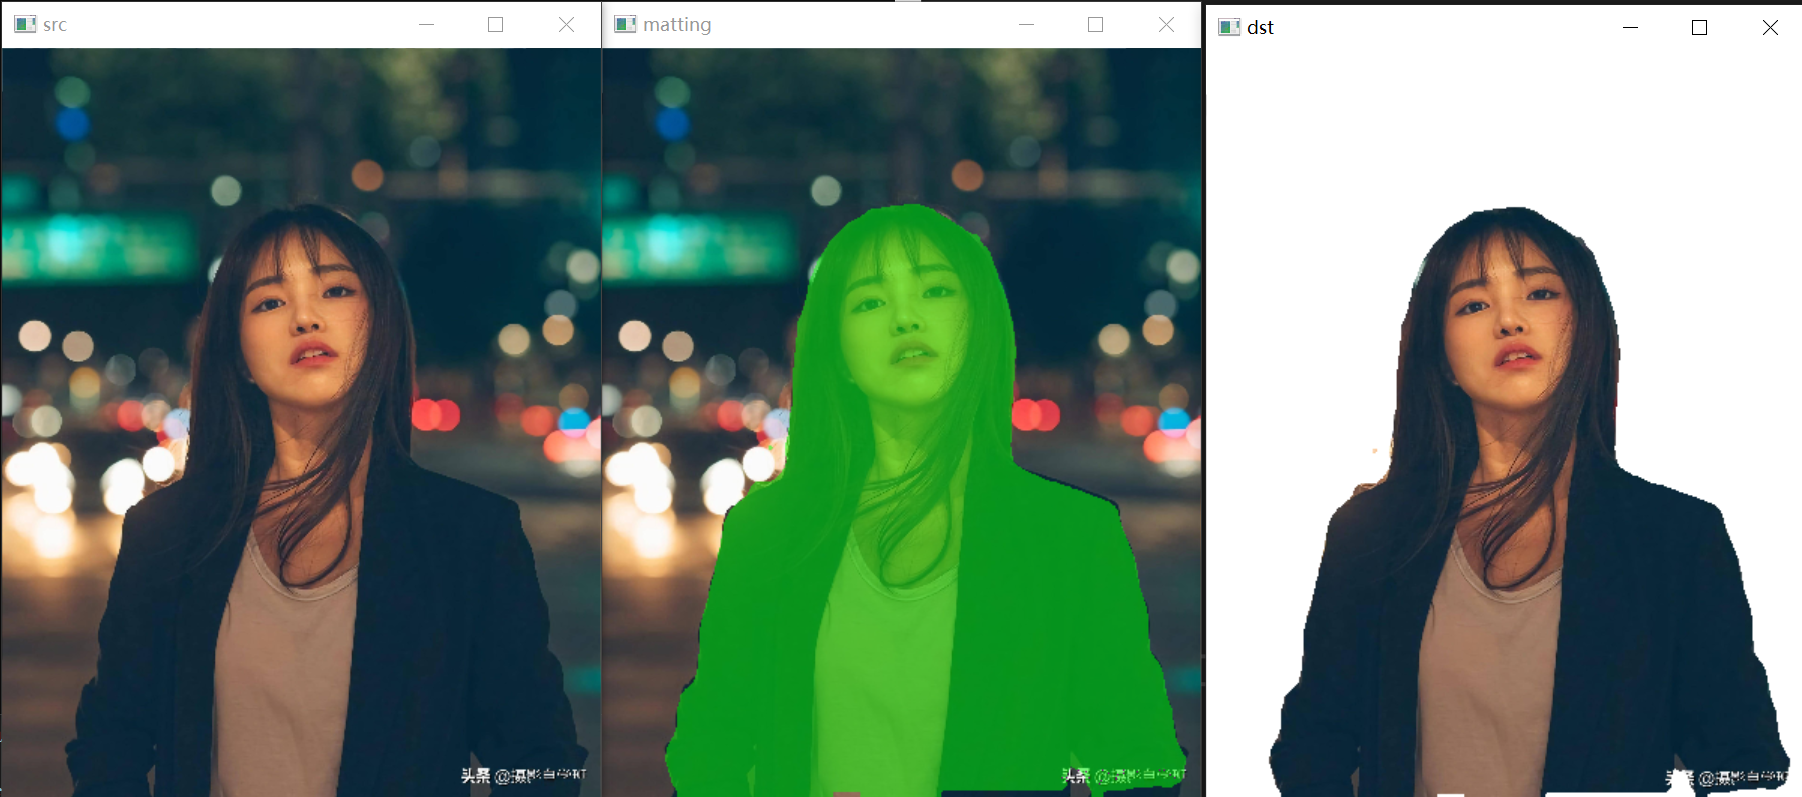
人像抠图将图像中的人物与背景进行像素级别的区分的技术。通过人像分割,可以实现诸如背景虚化、弹幕穿人等各种有趣的功能,为视频通话和影音观看提供更加优质和丰富的体验。由于广泛部署到Web、手机和边缘设备,肖像分割在兼顾分割精度的前提下,需要具有极快的推理速度。
PP-HumanSeg v2人像分割方案是一项重要的突破,采用了深度学习技术,以96.63%的mIoU精度和仅15.86ms的推理耗时,在人像分割领域刷新了SOTA指标。该方案不仅支持商业应用,而且可零成本、开箱即用。
相比于之前的版本,PP-HumanSeg v2在推理速度和精度上都有显著提升,肖像分割模型推理速度提升45.5%,mIoU精度提升3.03%。通用人像分割模型推理速度提升5.7%,mIoU精度提升6.5%。
网络结构
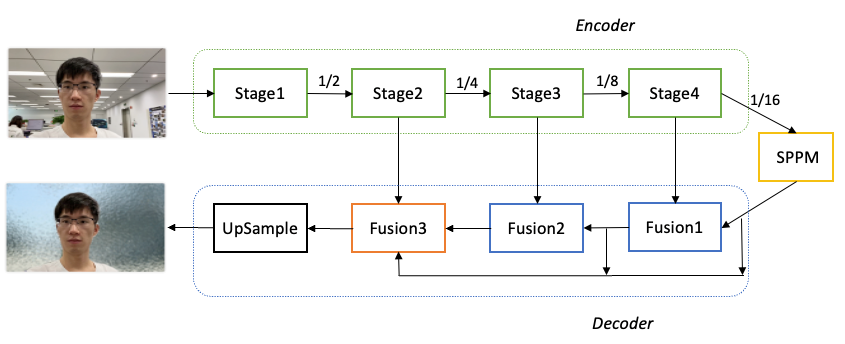
PaddleSeg整体结构如下图所示。具体优化过程如下:
-
骨干网络选择: 为了降低模型的算量要求,选择了MobileNetV3作为骨干网络,用于提取多层特征。
-
参数量优化: 对MobileNetV3进行参数量优化。分析发现MobileNetV3的参数主要集中在最后一个Stage,在不影响分割精度的前提下,保留了MobileNetV3的前四个Stage,成功减少了68.6%的参数量。
-
全局上下文信息汇集: 对于16倍下采样特征图,使用了SPPM(Spatial Pyramid Pooling Module)模块来汇集全局上下文信息,以提高模型对背景和环境的理解能力。
-
特征融合: 使用三个Fusion模块来不断融合深层语义特征和浅层细节特征。这些Fusion模块的作用是将不同层次的特征图进行融合,以获取更加丰富和准确的语义信息。
-
分割结果输出: 最后一个Fusion模块再次汇集不同层次的特征图,并将最终的分割结果输出。
通过以上优化措施,PaddleSeg的肖像分割模型在保证分割精度的情况下,大幅减少了参数量,提高了模型的轻量化程度,并且通过全局上下文信息的汇集和特征融合,进一步提升了模型的语义理解能力和分割效果。
针对肖像分割任务,数据量不足是影响分割精度的一个重要因素。为了解决这一问题,PaddleSeg开源了PP-HumanSeg-14K数据集,其中包含14000张室内场景半身人像的图片,从一定程度上缓解了数据不足的问题。为了进一步提高模型的分割精度和泛化能力,采用了迁移学习的方法。具体来说,首先在大规模的通用人像分割数据集上进行预训练,然后再针对PP-HumanSeg-14K数据集进行微调。
在调整模型的深度和宽度以平衡分割精度和推理速度方面,模型的输入尺寸也是一个需要重视的变量。针对手机和电脑端常见的拍摄尺寸为1028x720的情况,PP-HumanSeg v1肖像分割模型建议将图片缩放为398x224进行预测。为了进一步追求极致的推理速度,PP-HumanSeg v2肖像分割模型将最佳输入尺寸进一步缩小为256x144,从而将推理速度提升了52%(相比输入尺寸398x224)。虽然较小的输入尺寸会减少输入信息量,但由于PP-HumanSeg v2模型具有更强的学习能力,最终也能获得不错的分割效果。
综合考虑上述改进,与PP-HumanSeg v1相比,PP-HumanSeg v2肖像分割模型在推理速度(手机端)提升了45.5%,mIoU精度提升了3.03%,同时具有更佳的可视化效果。此外,该模型还支持手机拍摄的横屏和竖屏输入图像,针对室内场景可以开箱即用,为用户提供了更加便捷和高效的人像分割解决方案。

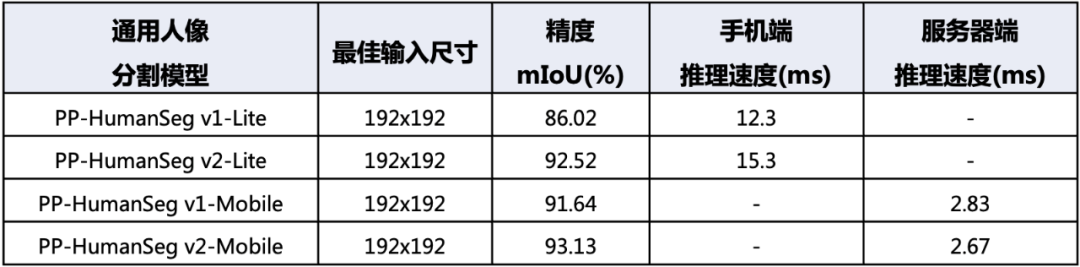
通用人像分割模型
针对通用人像分割任务,我们在PaddleSeg平台上使用了领先的模型,在大规模数据集上进行了训练,并发布了两个型号的PP-HumanSeg v2通用人像分割模型。
首先是PP-HumanSeg v2-Lite通用人像分割模型,它采用了类似于肖像分割模型的结构,并且特别适合在手机端的ARM CPU上进行部署。相比PP-HumanSeg v1-Lite模型,PP-HumanSeg v2-Lite在精度上提升了6.5%的mIoU。这个模型可以有效地应用于移动端的人像分割场景,提供更高质量的分割效果。
其次是PP-HumanSeg v2-Mobile通用人像分割模型,它采用了PaddleSeg自研的PP-LiteSeg模型结构,更适合在服务器端的GPU上进行部署。相比PP-HumanSeg v1-Mobile模型,PP-HumanSeg v2-Mobile在精度上提升了1.49%的mIoU,同时推理速度也提升了5.7%。这个模型适用于对分割精度和推理速度都有要求的场景,为用户提供了更高效和准确的人像分割解决方案。
由于通用人像分割任务的场景变化很大,我们建议用户在实际应用中评估PP-HumanSeg通用人像分割模型的精度。如果模型符合业务要求,用户可以直接使用。如果需要进一步优化,用户也可以基于PP-HumanSeg通用人像分割模型进行定制化优化,以获得更好的效果。
模型部署
PP-HumanSeg 分割模型提供了最终模型和二次训练以其部署的功能代码。使用提供的肖像分割和通用人像分割配置文件,用户只需准备好数据即可开始训练。该模型支持在多种硬件上进行应用部署,包括NVIDIA GPU、X86 CPU、ARM CPU以及浏览器Web。
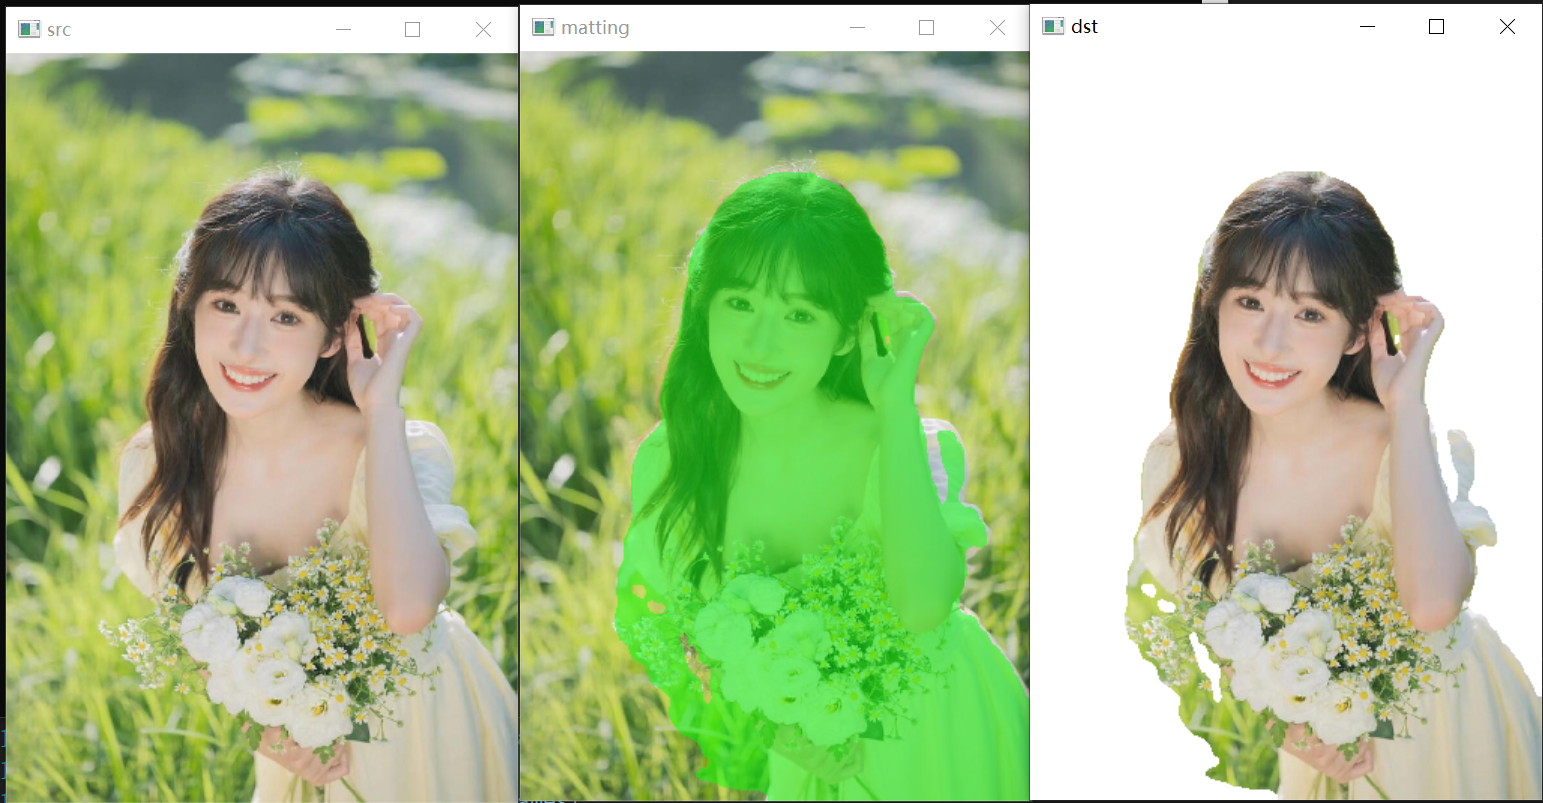
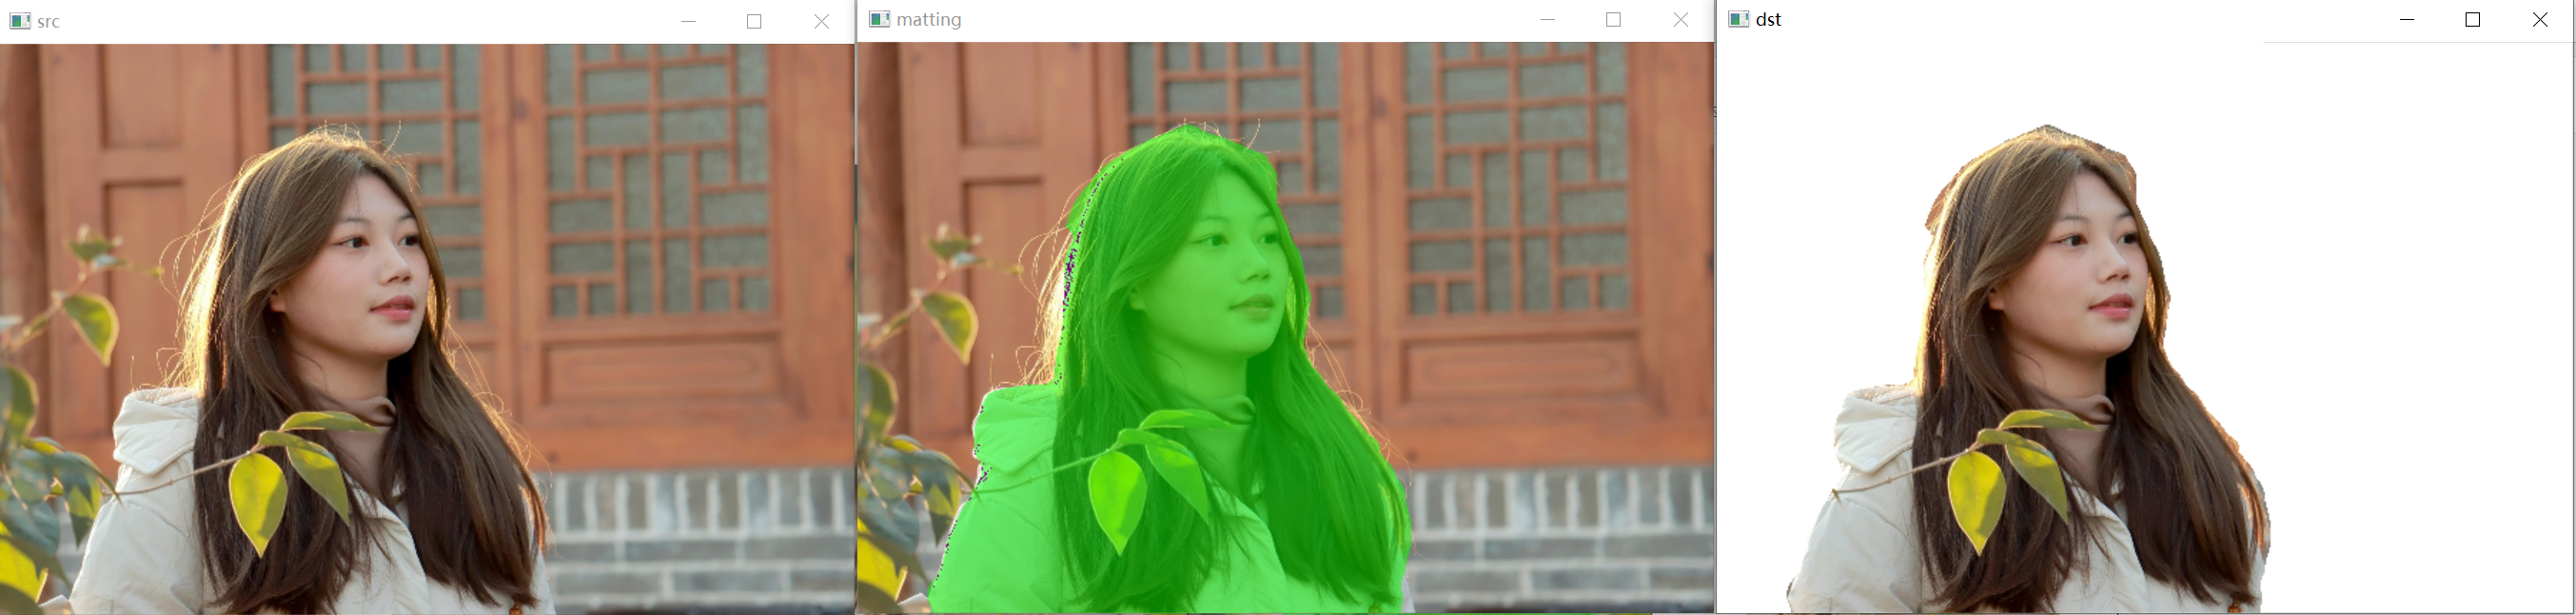
另外,还对模型预测结果进行了形态学后处理操作,以过滤掉背景干扰,保留人像主体。具体流程如下图所示:原始预测图像中每个像素的数值表示其为前景的概率。首先,使用阈值操作来过滤掉概率较小的像素,然后通过腐蚀和膨胀操作来消除细小的噪点。腐蚀操作的核尺寸小于膨胀操作,然后将掩码图像应用于原始预测结果上,得到最终的预测结果。通过形态学后处理,可以有效地提升人像分割的可视化效果,从而使分割结果更加清晰和准确。
C++ onnxruntime推理:
#define _CRT_SECURE_NO_WARNINGS
#include <iostream>
#include <fstream>
#include <string>
#include <opencv2/imgproc.hpp>
#include <opencv2/highgui.hpp>
//#include <cuda_provider_factory.h>  ///使用cuda加速
#include <onnxruntime_cxx_api.h>class pphuman_seg
{
public:pphuman_seg(std::string model_path);void inference(cv::Mat &cv_src, std::vector<cv::Mat>& cv_dsts);
private:void preprocess(cv::Mat &cv_src);int inpWidth;int inpHeight;std::vector<float> input_image_;const float conf_threshold = 0.5;Ort::Env env = Ort::Env(ORT_LOGGING_LEVEL_ERROR, "pphuman");Ort::Session *ort_session = nullptr;Ort::SessionOptions sessionOptions = Ort::SessionOptions();std::vector<char*> input_names;std::vector<char*> output_names;std::vector<std::vector<int64_t>> input_node_dims; // >=1 outputsstd::vector<std::vector<int64_t>> output_node_dims; // >=1 outputs
};pphuman_seg::pphuman_seg(std::string model_path)
{std::wstring widestr = std::wstring(model_path.begin(), model_path.end());  //windows写法//OrtStatus* status = OrtSessionOptionsAppendExecutionProvider_CUDA(sessionOptions, 0);   //使用cuda加速sessionOptions.SetGraphOptimizationLevel(ORT_ENABLE_BASIC);ort_session = new Ort::Session(env, widestr.c_str(), sessionOptions); //windows写法//ort_session = new Session(env, model_path.c_str(), sessionOptions); //linux写法size_t numInputNodes = ort_session->GetInputCount();size_t numOutputNodes = ort_session->GetOutputCount();Ort::AllocatorWithDefaultOptions allocator;for (int i = 0; i < numInputNodes; i++){input_names.push_back(ort_session->GetInputName(i, allocator));Ort::TypeInfo input_type_info = ort_session->GetInputTypeInfo(i);auto input_tensor_info = input_type_info.GetTensorTypeAndShapeInfo();auto input_dims = input_tensor_info.GetShape();input_node_dims.push_back(input_dims);}for (int i = 0; i < numOutputNodes; i++){output_names.push_back(ort_session->GetOutputName(i, allocator));Ort::TypeInfo output_type_info = ort_session->GetOutputTypeInfo(i);auto output_tensor_info = output_type_info.GetTensorTypeAndShapeInfo();auto output_dims = output_tensor_info.GetShape();output_node_dims.push_back(output_dims);}this->inpHeight = input_node_dims[0][2];this->inpWidth = input_node_dims[0][3];
}void pphuman_seg::preprocess(cv::Mat &cv_src)
{cv::Mat dstimg;resize(cv_src, dstimg, cv::Size(this->inpWidth, this->inpHeight), cv::INTER_LINEAR);int row = dstimg.rows;int col = dstimg.cols;this->input_image_.resize(row * col * dstimg.channels());for (int c = 0; c < 3; c++){for (int i = 0; i < row; i++){for (int j = 0; j < col; j++){float pix = dstimg.ptr<uchar>(i)[j * 3 + c];this->input_image_[c * row * col + i * col + j] = (pix / 255.0 - 0.5) / 0.5;}}}
}void pphuman_seg::inference(cv::Mat &cv_src,std::vector<cv::Mat> &cv_dsts)
{this->preprocess(cv_src);std::array<int64_t, 4> input_shape_{1, 3, this->inpHeight, this->inpWidth};auto allocator_info = Ort::MemoryInfo::CreateCpu(OrtDeviceAllocator, OrtMemTypeCPU);Ort::Value input_tensor_ = Ort::Value::CreateTensor<float>(allocator_info, input_image_.data(),input_image_.size(), input_shape_.data(), input_shape_.size());std::vector<Ort::Value> ort_outputs = ort_session->Run(Ort::RunOptions{ nullptr }, input_names.data(),&input_tensor_, 1, output_names.data(), output_names.size());   // 开始推理// post process.																																					Ort::Value &mask_pred = ort_outputs.at(0);const int out_h = this->output_node_dims[0][1];const int out_w = this->output_node_dims[0][2];float *mask_ptr = mask_pred.GetTensorMutableData<float>();cv::Mat segmentation_map;cv::Mat mask_out(out_h, out_w, CV_32FC2, mask_ptr);cv::resize(mask_out, segmentation_map, cv::Size(cv_src.cols, cv_src.rows));cv::Mat cv_dst = cv_src.clone();for (int h = 0; h < cv_src.rows; h++){for (int w = 0; w < cv_src.cols; w++){float pix = segmentation_map.ptr<float>(h)[w * 2 + 1];if (pix > this->conf_threshold){float b = (float)cv_dst.at<cv::Vec3b>(h, w)[0];cv_dst.at<cv::Vec3b>(h, w)[0] = uchar(b * 0.5 + 1);float g = (float)cv_dst.at<cv::Vec3b>(h, w)[1] + 255.0;cv_dst.at<cv::Vec3b>(h, w)[1] = uchar(g * 0.5 + 1);float r = (float)cv_dst.at<cv::Vec3b>(h, w)[2];cv_dst.at<cv::Vec3b>(h, w)[2] = uchar(r * 0.5 + 1);}}}cv_dsts.push_back(cv_dst);cv::Mat cv_matting = cv_src.clone();for (int h = 0; h < cv_src.rows; h++){for (int w = 0; w < cv_src.cols; w++){float pix = segmentation_map.ptr<float>(h)[w * 2 + 1];if (pix > this->conf_threshold){cv_matting.at<cv::Vec3b>(h, w)[0] = (float)cv_src.at<cv::Vec3b>(h, w)[0];cv_matting.at<cv::Vec3b>(h, w)[1] = (float)cv_src.at<cv::Vec3b>(h, w)[1];cv_matting.at<cv::Vec3b>(h, w)[2] = (float)cv_src.at<cv::Vec3b>(h, w)[2];}else{cv_matting.at<cv::Vec3b>(h, w)[0] = 255;cv_matting.at<cv::Vec3b>(h, w)[1] = 255;cv_matting.at<cv::Vec3b>(h, w)[2] = 255;}}}cv_dsts.push_back(cv_matting);
}void show_img(std::string name, const cv::Mat& img)
{cv::namedWindow(name, 0);int max_rows = 500;int max_cols = 600;if (img.rows >= img.cols && img.rows > max_rows) {cv::resizeWindow(name, cv::Size(img.cols * max_rows / img.rows, max_rows));}else if (img.cols >= img.rows && img.cols > max_cols) {cv::resizeWindow(name, cv::Size(max_cols, img.rows * max_cols / img.cols));}cv::imshow(name, img);
}cv::Mat replaceBG(const cv::Mat cv_src, cv::Mat& alpha, std::vector<int>& bg_color)
{int width = cv_src.cols;int height = cv_src.rows;cv::Mat cv_matting = cv::Mat::zeros(cv::Size(width, height), CV_8UC3);float* alpha_data = (float*)alpha.data;for (int i = 0; i < height; i++){for (int j = 0; j < width; j++){float alpha_ = alpha_data[i * width + j];cv_matting.at < cv::Vec3b>(i, j)[0] = cv_src.at < cv::Vec3b>(i, j)[0] * alpha_ + (1 - alpha_) * bg_color[0];cv_matting.at < cv::Vec3b>(i, j)[1] = cv_src.at < cv::Vec3b>(i, j)[1] * alpha_ + (1 - alpha_) * bg_color[1];cv_matting.at < cv::Vec3b>(i, j)[2] = cv_src.at < cv::Vec3b>(i, j)[2] * alpha_ + (1 - alpha_) * bg_color[2];}}return cv_matting;
}int main()
{pphuman_seg pp_net("model_float32.onnx");std::string path = "images";std::vector<std::string> filenames;cv::glob(path, filenames, false);for (auto file_name : filenames){cv::Mat cv_src = cv::imread(file_name);std::vector<cv::Mat> cv_dsts;pp_net.inference(cv_src,cv_dsts);show_img("src", cv_src);show_img("matting", cv_dsts[0]);show_img("dst", cv_dsts[1]);cv::waitKey(0);}
}
python onnxruntimer推理:
#!/usr/bin/env python
# -*- coding: utf-8 -*-
import copy
import argparse
import cv2
import numpy as np
import onnxruntimeclass pphumanseg:def __init__(self, conf_thres=0.5):self.conf_threshold = conf_thres# Initialize modelself.onnx_session = onnxruntime.InferenceSession("model_float32.onnx")self.input_name = self.onnx_session.get_inputs()[0].nameself.output_name = self.onnx_session.get_outputs()[0].nameself.input_shape = self.onnx_session.get_inputs()[0].shapeself.input_height = self.input_shape[2]self.input_width = self.input_shape[3]self.mean = np.array([0.5, 0.5, 0.5], dtype=np.float32).reshape(1,1,3)self.std = np.array([0.5, 0.5, 0.5], dtype=np.float32).reshape(1,1,3)def prepare_input(self, image):input_image = cv2.resize(image, dsize=(self.input_width, self.input_height))input_image = (input_image.astype(np.float32) / 255.0 - self.mean) / self.stdinput_image = input_image.transpose(2, 0, 1)input_image = np.expand_dims(input_image, axis=0)return input_imagedef detect(self, image):input_image = self.prepare_input(image)# Perform inference on the imageresult = self.onnx_session.run([self.output_name], {self.input_name: input_image})# Post process:squeezesegmentation_map = result[0]segmentation_map = np.squeeze(segmentation_map)image_width, image_height = image.shape[1], image.shape[0]dst_image = copy.deepcopy(image)segmentation_map = cv2.resize(segmentation_map,dsize=(image_width, image_height),interpolation=cv2.INTER_LINEAR,)# color listcolor_image_list = []# ID 0:BackGroundbg_image = np.zeros(image.shape, dtype=np.uint8)bg_image[:] = (0, 0, 0)color_image_list.append(bg_image)# ID 1:Humanbg_image = np.zeros(image.shape, dtype=np.uint8)bg_image[:] = (0, 255, 0)color_image_list.append(bg_image)# Overlay segmentation mapmasks = segmentation_map.transpose(2, 0, 1)for index, mask in enumerate(masks):# Threshold check by scoremask = np.where(mask > self.conf_threshold, 0, 1)# Overlaymask = np.stack((mask,) * 3, axis=-1).astype('uint8')mask_image = np.where(mask, dst_image, color_image_list[index])dst_image = cv2.addWeighted(dst_image, 0.5, mask_image, 0.5, 1.0)return dst_imageif __name__ == '__main__':parser = argparse.ArgumentParser()parser.add_argument('--imgpath', type=str, default='images/person.jpg', help="image path")parser.add_argument('--confThreshold', default=0.5, type=float, help='class confidence')parser.add_argument('--use_video', type=int, default=1, help="if use video")args = parser.parse_args()segmentor = pphumanseg(conf_thres=args.confThreshold)if args.use_video != 1:srcimg = cv2.imread(args.imgpath)# Detect Objectsdstimg = segmentor.detect(srcimg)winName = 'pphumanseg in ONNXRuntime'cv2.namedWindow(winName, 0)cv2.imshow(winName, dstimg)cv2.waitKey(0)cv2.destroyAllWindows()else:cap = cv2.VideoCapture(0) while True:ret, frame = cap.read()if not ret:breakdstimg = segmentor.detect(frame)key = cv2.waitKey(1)if key == 27:  # ESCbreakcv2.imshow('pphumanseg Demo', dstimg)cap.release()cv2.destroyAllWindows()
这篇关于人像抠图HumanSeg——基于大规模电话会议视频数据集的连接感知人像分割的文章就介绍到这儿,希望我们推荐的文章对编程师们有所帮助!


