本文主要是介绍Tensorflow下VAE(变分自动编码器)在MNIST数据集下的实验,希望对大家解决编程问题提供一定的参考价值,需要的开发者们随着小编来一起学习吧!
首先简单介绍一下AE和VAE然后在完成代码实践
一、什么是自编码器(Auto-encoder)
自动编码器是一种数据的压缩算法,其中数据的压缩和解压缩函数是数据相关的、有损的、从样本中自动学习的。在大部分提到自动编码器的场合,压缩和解压缩的函数是通过神经网络实现的。
这种算法的大致思想是:将神经网络的隐含层看成是一个编码器和解码器,输入数据经过隐含层的编码和解码,到达输出层时,确保输出的结果尽量与输入数据保持一致。也就是说,隐含层是尽量保证输出数据等于输入数据的。 这样做的一个好处是,隐含层能够抓住输入数据的特点,使其特征保持不变。例如,假设输入层有100个神经元,隐含层只有50个神经元,输出层有100个神经元,通过自动编码器算法,我们只用隐含层的50个神经元就找到了100个输入层数据的特点,能够保证输出数据和输入数据大致一致,就大大降低了隐含层的维度。
既然隐含层的任务是尽量找输入数据的特征,也就是说,尽量用最少的维度来代表输入数据,因此,我们可以想象,隐含层各层之间的参数构成的参数矩阵,应该尽量是个稀疏矩阵,即各层之间有越多的参数为0就越好。1)自动编码器是数据相关的(data-specific 或 data-dependent),这意味着自动编码器只能压缩那些与训练数据类似的数据。比如,使用人脸训练出来的自动编码器在压缩别的图片,比如树木时性能很差,因为它学习到的特征是与人脸相关的。
2)自动编码器是有损的,意思是解压缩的输出与原来的输入相比是退化的,MP3,JPEG等压缩算法也是如此。这与无损压缩算法不同。
3)自动编码器是从数据样本中自动学习的,这意味着很容易对指定类的输入训练出一种特定的编码器,而不需要完成任何新工作。
搭建一个自动编码器需要完成下面三样工作:搭建编码器,搭建解码器,设定一个损失函数,用以衡量由于压缩而损失掉的信息。编码器和解码器一般都是参数化的方程,并关于损失函数可导,典型情况是使用神经网络。编码器和解码器的参数可以通过最小化损失函数而优化,例如SGD。
自编码器是一个自监督的算法,并不是一个无监督算法。自监督学习是监督学习的一个实例,其标签产生自输入数据。要获得一个自监督的模型,你需要一个靠谱的目标跟一个损失函数,仅仅把目标设定为重构输入可能不是正确的选项。基本上,要求模型在像素级上精确重构输入不是机器学习的兴趣所在,学习到高级的抽象特征才是。事实上,当主要任务是分类、定位之类的任务时,那些对这类任务而言的最好的特征基本上都是重构输入时的最差的那种特征。
目前自编码器的应用主要有两个方面,第一是数据去噪,第二是为进行可视化而降维。配合适当的维度和稀疏约束,自编码器可以学习到比PCA等技术更有意思的数据投影。
二、什么是变分自编码器(Variational Auto-Encoder)
VAEs简介
变分自编码器(Variational auto-encoder,VAE)是一类重要的生成模型(generative model),它于2013年由Diederik P.Kingma和Max Welling提出[1]。2016年Carl Doersch写了一篇VAEs的tutorial[2],对VAEs做了更详细的介绍,比文献[1]更易懂。这篇读书笔记基于文献[1]。
除了VAEs,还有一类重要的生成模型GANs(对GANs感兴趣可以去我的微信公众号看介绍文章:学术兴趣小组)。
我们来看一下VAE是怎样设计的。

上图是VAE的图模型。我们能观测到的数据是,而
由隐变量
产生,由
是生成模型
,从自编码器(auto-encoder)的角度来看,就是解码器;而由
是识别模型(recognition model)
,类似于自编码器的编码器。
VAEs现在广泛地用于生成图像,当生成模型训练好了以后,我们就可以用它来生成图像了。与GANs不同的是,我们是知道图像的密度函数(PDF)的(或者说,是我们设定的),而GANs我们并不知道图像的分布。
VAEs模型的理论推导
以下的推导参考了文献[1]和[3],文献[3]是变分推理的课件。
首先,假定所有的数据都是独立同分布的(i.i.d),两个观测不会相互影响。我们要对生成模型做参数估计,利用对数最大似然法,就是要最大化下面的对数似然函数:
VAEs用识别模型去逼近真实的后验概率
,衡量两个分布的相似程度,我们一般采用KL散度,即
于是
其中,
由于KL散度非负,当两个分布一致时(允许在一个零测集上不一致),KL散度为0。于是。
称为对数似然函数的变分下界。
直接优化是不可行的,因此一般转而优化它的下界
。对应的,优化对数似然函数转化为优化
。
作者指出,对
的梯度方差很大,不适于用于数值计算。为了解决这个问题,假定识别模型
可以写成可微函数
,其中,
为噪声,
。于是,
可以做如下估计(利用蒙特卡罗方法估计期望):
其中,。
此外,还可以改写为
由此可以得到另外一个估计
其中,。
实际试验时,如果样本量很大,我们一般采用minibatch的方法进行学习,对数似然函数的下界可以通过minibatch来估计:
可以看到,为了计算,我们用了两层估计。当
较大时,内层估计可以由外层估计来完成,也就是说,取
即可。实际计算中,作者取
。由上述推导得到AEVB算法:

VAEs模型
上面给的AEVB算法是一个算法框架,只有给定了分布的形式以及
,我们才能启动算法。实际应用中,作者取
而根据样本是实值还是二元数据进行选择,若样本为二元数据,则选择
若样本是实值数据,则选择
实验中,作者选择多层感知器(MLP)对进行拟合,具体来说,
对,参数为
,若样本为二元数据,则
若样本为实值数据,则
对,参数为
,
根据以上假设的分布,不难计算
其中,。
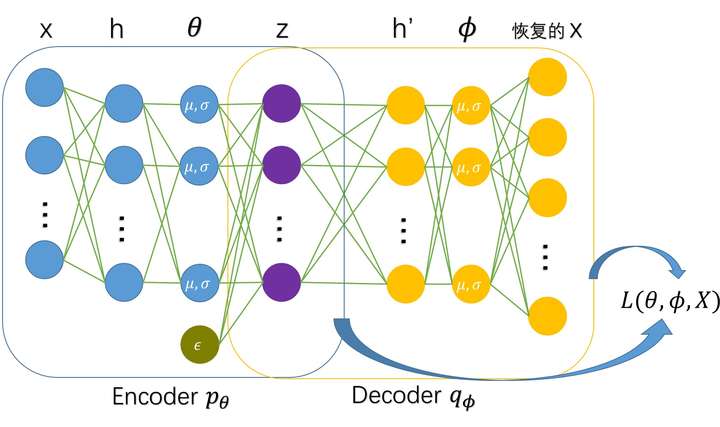
最后,我们从auto-encoder的角度来理解VAE,下图给出了VAE训练的时候的网络结构(以实值样本为例,注意下面两个图中的节点并不是bias!而是噪声变量,它的维数与
相同。):

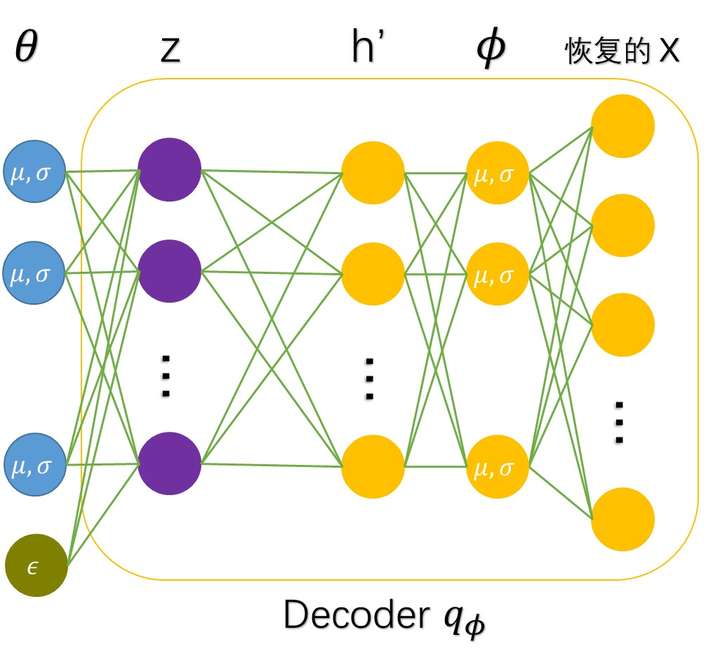
训练好了以后,生成样本采用下面的网络结构:

VAE实验效果
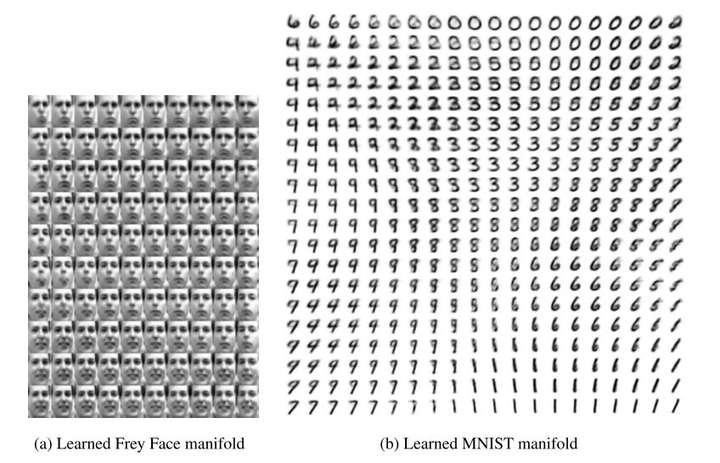
作者在Frey face数据集和MNIST数据集上进行实验,实验得到的数据流形分布如下图所示,可以看出,VAE能够捕捉到图像的结构变化(倾斜角度、圈的位置、形状变化、表情变化等)。这也是VAE的一个好处,它有显式的分布,能够容易地可视化图像的分布。GANs虽然不具有显式的图像分布,但是可以通过对隐变量的插值变化来可视化图像的分布(参见DCGAN)。

VAE在不同维数的隐变量空间()下生成手写数字的效果如下:

可以看出,采用MLP也能产生效果还不错的数字,有趣的是,隐变量维数较低时,生成的图像笔画清晰,但是带有较大的噪声(模糊);隐变量维数高时,生成的数字部分笔画不清晰,但噪声小。
三、VAE在Tensorflow下的代码实现
第一种代码import tensorflow as tf import numpy as np import matplotlib.pyplot as plt from tensorflow.examples.tutorials.mnist import input_data mnist = input_data.read_data_sets('MNIST_data') tf.reset_default_graph() batch_size = 64 X_in = tf.placeholder(dtype=tf.float32, shape=[None, 28, 28], name='X') Y = tf.placeholder(dtype=tf.float32, shape=[None, 28, 28], name='Y') Y_flat = tf.reshape(Y, shape=[-1, 28 * 28]) keep_prob = tf.placeholder(dtype=tf.float32, shape=(), name='keep_prob') dec_in_channels = 1 n_latent = 8 reshaped_dim = [-1, 7, 7, dec_in_channels] inputs_decoder = 49 * dec_in_channels / 2 def lrelu(x, alpha=0.3): return tf.maximum(x, tf.multiply(x, alpha)) def encoder(X_in, keep_prob): activation = lreluwith tf.variable_scope("encoder", reuse=None): X = tf.reshape(X_in, shape=[-1, 28, 28, 1]) x = tf.layers.conv2d(X, filters=64, kernel_size=4, strides=2, padding='same', activation=activation) x = tf.nn.dropout(x, keep_prob) x = tf.layers.conv2d(x, filters=64, kernel_size=4, strides=2, padding='same', activation=activation) x = tf.nn.dropout(x, keep_prob) x = tf.layers.conv2d(x, filters=64, kernel_size=4, strides=1, padding='same', activation=activation) x = tf.nn.dropout(x, keep_prob) x = tf.contrib.layers.flatten(x) mn = tf.layers.dense(x, units=n_latent) sd = 0.5 * tf.layers.dense(x, units=n_latent) epsilon = tf.random_normal(tf.stack([tf.shape(x)[0], n_latent])) z = mn + tf.multiply(epsilon, tf.exp(sd)) return z, mn, sddef decoder(sampled_z, keep_prob): with tf.variable_scope("decoder", reuse=None): x = tf.layers.dense(sampled_z, units=inputs_decoder, activation=lrelu) x = tf.layers.dense(x, units=inputs_decoder * 2 + 1, activation=lrelu) x = tf.reshape(x, reshaped_dim) x = tf.layers.conv2d_transpose(x, filters=64, kernel_size=4, strides=2, padding='same', activation=tf.nn.relu) x = tf.nn.dropout(x, keep_prob) x = tf.layers.conv2d_transpose(x, filters=64, kernel_size=4, strides=1, padding='same', activation=tf.nn.relu) x = tf.nn.dropout(x, keep_prob) x = tf.layers.conv2d_transpose(x, filters=64, kernel_size=4, strides=1, padding='same', activation=tf.nn.relu) x = tf.contrib.layers.flatten(x) x = tf.layers.dense(x, units=28 * 28, activation=tf.nn.sigmoid) img = tf.reshape(x, shape=[-1, 28, 28]) return imgsampled, mn, sd = encoder(X_in, keep_prob) dec = decoder(sampled, keep_prob) unreshaped = tf.reshape(dec, [-1, 28*28]) img_loss = tf.reduce_sum(tf.squared_difference(unreshaped, Y_flat), 1) latent_loss = -0.5 * tf.reduce_sum(1.0 + 2.0 * sd - tf.square(mn) - tf.exp(2.0 * sd), 1) loss = tf.reduce_mean(img_loss + latent_loss) optimizer = tf.train.AdamOptimizer(0.0005).minimize(loss) sess = tf.Session() sess.run(tf.global_variables_initializer()) for i in range(30000): batch = [np.reshape(b, [28, 28]) for b in mnist.train.next_batch(batch_size=batch_size)[0]] sess.run(optimizer, feed_dict = {X_in: batch, Y: batch, keep_prob: 0.8}) if not i % 200: ls, d, i_ls, d_ls, mu, sigm = sess.run([loss, dec, img_loss, dst_loss, mn, sd], feed_dict = {X_in: batch, Y: batch, keep_prob: 1.0}) plt.imshow(np.reshape(batch[0], [28, 28]), cmap='gray') plt.show() plt.imshow(d[0], cmap='gray') plt.show() print(i, ls, np.mean(i_ls), np.mean(d_ls)) randoms = [np.random.normal(0, 1, n_latent) for _ in range(10)] imgs = sess.run(dec, feed_dict = {sampled: randoms, keep_prob: 1.0}) imgs = [np.reshape(imgs[i], [28, 28]) for i in range(len(imgs))] for img in imgs: plt.figure(figsize=(1,1)) plt.axis('off') plt.imshow(img, cmap='gray')
第一步加载训练数据
首先我们来执行一些基本的导入操作。TensorFlow 具有非常便利的函数来让我们能够很容易地访问 MNIST 数据集。
import tensorflow as tf
import numpy as np
import matplotlib.pyplot as plt
from tensorflow.examples.tutorials.mnist import input_data
mnist = input_data.read_data_sets('MNIST_data')
定义输入数据和输出数据
MNIST 图像的维度是 28*28 像素,只有单色通道。我们的输入数据 X_in 是一批一批的 MNIST 字符,网络会学习如何重建它们。然后在一个占位符 Y 中输出它们,输出和输入具有相同的维度。
Y_flat 将会在后面计算损失函数的时候用到,keep_prob 将会在应用 dropout 的时候用到(作为一种正则化的方法)。在训练的过程中,它的值会设为 0.8,当生成新数据的时候,我们不使用 dropout,所以它的值会变成 1。
lrelu 函数需要自及定义,因为 TensorFlow 中并没有预定义一个 Leaky ReLU 函数
tf.reset_default_graph()

batch_size = 64
X_in = tf.placeholder(dtype=tf.float32, shape=[None, 28, 28], name='X')
Y = tf.placeholder(dtype=tf.float32, shape=[None, 28, 28], name='Y')
Y_flat = tf.reshape(Y, shape=[-1, 28 * 28])
keep_prob = tf.placeholder(dtype=tf.float32, shape=(), name='keep_prob')

dec_in_channels = 1
n_latent = 8
reshaped_dim = [-1, 7, 7, dec_in_channels]
inputs_decoder = 49 * dec_in_channels / 2


def lrelu(x, alpha=0.3):
    return tf.maximum(x, tf.multiply(x, alpha))
定义编码器
因为我们的输入是图像,所以使用一些卷积变换会更加合理。最值得注意的是我们在编码器中创建了两个向量,因为编码器应该创建服从高斯分布的对象。
- 一个是均值向量
- 一个是标准差向量
在后面你会看到,我们是如何「强制」编码器来保证它确实生成 了服从正态分布的数据点,我们可以把将会被输入到解码器中的编码值表示为 z。在计算损失函数的时候,我们会需要我们所选分布的均值和标准差
def encoder(X_in, keep_prob):
    activation = lreluwith tf.variable_scope("encoder", reuse=None):
        X = tf.reshape(X_in, shape=[-1, 28, 28, 1])
        x = tf.layers.conv2d(X, filters=64, kernel_size=4, strides=2, padding='same', activation=activation)
        x = tf.nn.dropout(x, keep_prob)
        x = tf.layers.conv2d(x, filters=64, kernel_size=4, strides=2, padding='same', activation=activation)
        x = tf.nn.dropout(x, keep_prob)
        x = tf.layers.conv2d(x, filters=64, kernel_size=4, strides=1, padding='same', activation=activation)
        x = tf.nn.dropout(x, keep_prob)
        x = tf.contrib.layers.flatten(x)
        mn = tf.layers.dense(x, units=n_latent)
        sd       = 0.5 * tf.layers.dense(x, units=n_latent)
        epsilon = tf.random_normal(tf.stack([tf.shape(x)[0], n_latent]))
        z  = mn + tf.multiply(epsilon, tf.exp(sd))
        return z, mn, sd
定义解码器
解码器不会关心输入值是不是从我们定义的某个特定分布中采样得到的。它仅仅会尝试重建输入图像。最后,我们使用了一系列的转置卷积(transpose convolution)。
def decoder(sampled_z, keep_prob):
    with tf.variable_scope("decoder", reuse=None):
        x = tf.layers.dense(sampled_z, units=inputs_decoder, activation=lrelu)
        x = tf.layers.dense(x, units=inputs_decoder * 2 + 1, activation=lrelu)
        x = tf.reshape(x, reshaped_dim)
        x = tf.layers.conv2d_transpose(x, filters=64, kernel_size=4, strides=2, padding='same', activation=tf.nn.relu)
        x = tf.nn.dropout(x, keep_prob)
        x = tf.layers.conv2d_transpose(x, filters=64, kernel_size=4, strides=1, padding='same', activation=tf.nn.relu)
        x = tf.nn.dropout(x, keep_prob)
        x = tf.layers.conv2d_transpose(x, filters=64, kernel_size=4, strides=1, padding='same', activation=tf.nn.relu)

        x = tf.contrib.layers.flatten(x)
        x = tf.layers.dense(x, units=28 * 28, activation=tf.nn.sigmoid)
        img = tf.reshape(x, shape=[-1, 28, 28])
        return img
现在,我们将两部分连在一起。
sampled, mn, sd = encoder(X_in, keep_prob)
dec = decoder(sampled, keep_prob)
计算损失函数,并隐藏一个分布
为了计算图像重构的损失函数,我们简单地使用了平方差(这有时候会使图像变得有些模糊)。这个损失函数还结合了 KL 散度,这确保了我们的隐藏值将会从一个标准分布中采样。关于这个主题,如果想要了解更多,可以看一下这篇文章(https://jaan.io/what-is-variational-autoencoder-vae-tutorial/)。
unreshaped = tf.reshape(dec, [-1, 28*28])
img_loss = tf.reduce_sum(tf.squared_difference(unreshaped, Y_flat), 1)
latent_loss = -0.5 * tf.reduce_sum(1.0 + 2.0 * sd - tf.square(mn) - tf.exp(2.0 * sd), 1)
loss = tf.reduce_mean(img_loss + latent_loss)
optimizer = tf.train.AdamOptimizer(0.0005).minimize(loss)
sess = tf.Session()
sess.run(tf.global_variables_initializer())
训练网络
现在我们终于可以训练我们的 VAE 了!
每隔 200 步,我们会看一下当前的重建是什么样子的。大约在处理了 2000 次迭代后,大多数重建看上去是挺合理的。
for i in range(30000):
    batch = [np.reshape(b, [28, 28]) for b in mnist.train.next_batch(batch_size=batch_size)[0]]
    sess.run(optimizer, feed_dict = {X_in: batch, Y: batch, keep_prob: 0.8})
    if not i % 200:
        ls, d, i_ls, d_ls, mu, sigm = sess.run([loss, dec, img_loss, dst_loss, mn, sd], feed_dict = {X_in: batch, Y: batch, keep_prob: 1.0})
        plt.imshow(np.reshape(batch[0], [28, 28]), cmap='gray')
        plt.show()
        plt.imshow(d[0], cmap='gray')
        plt.show()
        print(i, ls, np.mean(i_ls), np.mean(d_ls)
生成新数据
最惊人的是我们现在可以生成新的字符了。最后,我们仅仅是从一个单位正态分布里面采集了一个值,输入到解码器。生成的大多数字符都和人类手写的是一样的。
randoms = [np.random.normal(0, 1, n_latent) for _ in range(10)]
imgs = sess.run(dec, feed_dict = {sampled: randoms, keep_prob: 1.0})
imgs = [np.reshape(imgs[i], [28, 28]) for i in range(len(imgs))]
for img in imgs:
    plt.figure(figsize=(1,1))
    plt.axis('off')
    plt.imshow(img, cmap='gray')

一些自动生成的字符。
from __future__ import division
from __future__ import print_function
import os.pathimport tensorflow as tf
from tensorflow.examples.tutorials.mnist import input_datamnist = input_data.read_data_sets('MNIST')

input_dim = 784
hidden_encoder_dim = 400
hidden_decoder_dim = 400
latent_dim = 20
lam = 0

def weight_variable(shape):
  initial = tf.truncated_normal(shape, stddev=0.001)
  return tf.Variable(initial)

def bias_variable(shape):
  initial = tf.constant(0., shape=shape)
  return tf.Variable(initial)

x = tf.placeholder("float", shape=[None, input_dim])
l2_loss = tf.constant(0.0)

W_encoder_input_hidden = weight_variable([input_dim,hidden_encoder_dim])
b_encoder_input_hidden = bias_variable([hidden_encoder_dim])
l2_loss += tf.nn.l2_loss(W_encoder_input_hidden)

# Hidden layer encoder
hidden_encoder = tf.nn.relu(tf.matmul(x, W_encoder_input_hidden) + b_encoder_input_hidden)

W_encoder_hidden_mu = weight_variable([hidden_encoder_dim,latent_dim])
b_encoder_hidden_mu = bias_variable([latent_dim])
l2_loss += tf.nn.l2_loss(W_encoder_hidden_mu)

# Mu encoder
mu_encoder = tf.matmul(hidden_encoder, W_encoder_hidden_mu) + b_encoder_hidden_muW_encoder_hidden_logvar = weight_variable([hidden_encoder_dim,latent_dim])
b_encoder_hidden_logvar = bias_variable([latent_dim])
l2_loss += tf.nn.l2_loss(W_encoder_hidden_logvar)

# Sigma encoder
logvar_encoder = tf.matmul(hidden_encoder, W_encoder_hidden_logvar) + b_encoder_hidden_logvar# Sample epsilon
epsilon = tf.random_normal(tf.shape(logvar_encoder), name='epsilon')

# Sample latent variable
std_encoder = tf.exp(0.5 * logvar_encoder)
z = mu_encoder + tf.multiply(std_encoder, epsilon)

W_decoder_z_hidden = weight_variable([latent_dim,hidden_decoder_dim])
b_decoder_z_hidden = bias_variable([hidden_decoder_dim])
l2_loss += tf.nn.l2_loss(W_decoder_z_hidden)

# Hidden layer decoder
hidden_decoder = tf.nn.relu(tf.matmul(z, W_decoder_z_hidden) + b_decoder_z_hidden)

W_decoder_hidden_reconstruction = weight_variable([hidden_decoder_dim, input_dim])
b_decoder_hidden_reconstruction = bias_variable([input_dim])
l2_loss += tf.nn.l2_loss(W_decoder_hidden_reconstruction)

KLD = -0.5 * tf.reduce_sum(1 + logvar_encoder - tf.pow(mu_encoder, 2) - tf.exp(logvar_encoder), reduction_indices=1)

x_hat = tf.matmul(hidden_decoder, W_decoder_hidden_reconstruction) + b_decoder_hidden_reconstruction
BCE = tf.reduce_sum(tf.nn.sigmoid_cross_entropy_with_logits(logits=x_hat, labels=x), reduction_indices=1)

loss = tf.reduce_mean(BCE + KLD)

regularized_loss = loss + lam * l2_lossloss_summ = tf.summary.scalar("lowerbound", loss)
train_step = tf.train.AdamOptimizer(0.01).minimize(regularized_loss)

# add op for merging summary
summary_op = tf.summary.merge_all()

# add Saver ops
saver = tf.train.Saver()

n_steps = int(1e6)
batch_size = 100

with tf.Session() as sess:
  summary_writer = tf.summary.FileWriter('experiment',
                                          graph=sess.graph)
  if os.path.isfile("save/model.ckpt"):
    print("Restoring saved parameters")
    saver.restore(sess, "save/model.ckpt")
  else:
    print("Initializing parameters")
    sess.run(tf.global_variables_initializer())

  for step in range(1, n_steps):
    batch = mnist.train.next_batch(batch_size)
    feed_dict = {x: batch[0]}
    _, cur_loss, summary_str = sess.run([train_step, loss, summary_op], feed_dict=feed_dict)
    summary_writer.add_summary(summary_str, step)

    if step % 50 == 0:
      save_path = saver.save(sess, "save/model.ckpt")
      print("Step {0} | Loss: {1}".format(step, cur_loss))
这篇关于Tensorflow下VAE(变分自动编码器)在MNIST数据集下的实验的文章就介绍到这儿,希望我们推荐的文章对编程师们有所帮助!


