本文主要是介绍【Kuiperinfer】笔记03 张量(Tensor)类设计与实现,单元测试解析,希望对大家解决编程问题提供一定的参考价值,需要的开发者们随着小编来一起学习吧!

文章目录
- Tensor类的组成
- Tensor类设计
- 数据顺序(行主序/列主序)
- 使用单元测试
- Tensor类方法描述
- C++中的类模板
- 张量创建
- 单元测试
- 返回维度信息
- 单元测试
- 返回张量中的数据
- 单元测试
- 张量填充
- 单元测试
- reshape
- 单元测试
- 逐元素处理
- 单元测试
- 其他辅助函数
- 判空
- 返回数据存储的起始位置
- 返回张量的shape
- 练习
- Flatten
- Padding
- 参考
Tensor类的组成
张量的数据按照channels,rows,cols的顺序排放,主要包含以下部分:
- 数据,可以是double,float或int
- shape信息
- 各种类方法,例如返回张量的形状、填充张量数据和reshape等。
Tensor类设计
Tensor类需要提供高效的矩阵计算算法,同时也应该在软件工程的层面上优化接口。
Kuiperinfer中的张量是以arma::fcube为基础进行开发的,三维的arma::fcube是由多个二维的matrix在channel维度叠加形成的。
fcube即Cube<float>的简写,是armadillo做的typedef。其constructor形式为
cube(n_rows, n_cols, n_slices),分别对应行、列、通道数。
对这样的一个Tensor类,需要进行以下工作:
- 提供对外接口,在
fcube类的基础上进行; - 封装矩阵计算,提供更友好的数据访问和使用接口。
类定义:
template <>
class Tensor<float> {
public:uint32_t rows() const;uint32_t cols() const;uint32_t channels const;uint32_t size() const;void set_data(const arma::fcube& data);...
private:std::vector<uint32_t> raw_shapes_; // 数据的shapearma::fcube data_; // 数据存储// 在变量名后面加下划线是c++中常见的一种命名规范,用于说明该变量为类的数据成员,而不是方法成员;另一种常见的命名方法为m_data
}
数据顺序(行主序/列主序)
矩阵存储有两种形式:行主序和列主序。行主序先填行,列主序先填列。
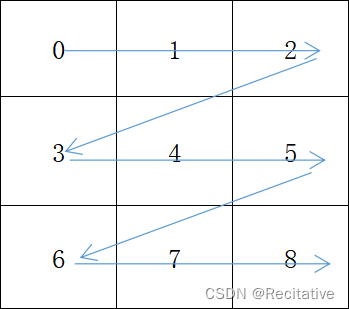
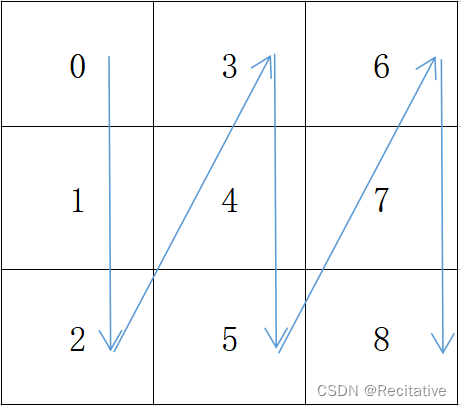
armadillo是默认列主序的,而PyTorch是行主序的,想要和PyTorch对齐,应当做出一些调整。
使用单元测试
在VS中配置单元测试的方法:
-
打开CourseLists.txt文件,在文件的最后一行添加
gtest_discover_tests(kuiper_datawhale_course2) // 参数对应前面add_executable中的项目名称 -
在CMake设置中,设置
将生成输出复制回本地计算机为true;或者编辑CMakeSettings.json,在对应的配置字典中添加"remoteCopySources": true, -
生成项目,此时项目文件夹中应该会多出一个out/build文件夹。
-
测试 > 测试资源管理器,可以看到项目中所有的测试
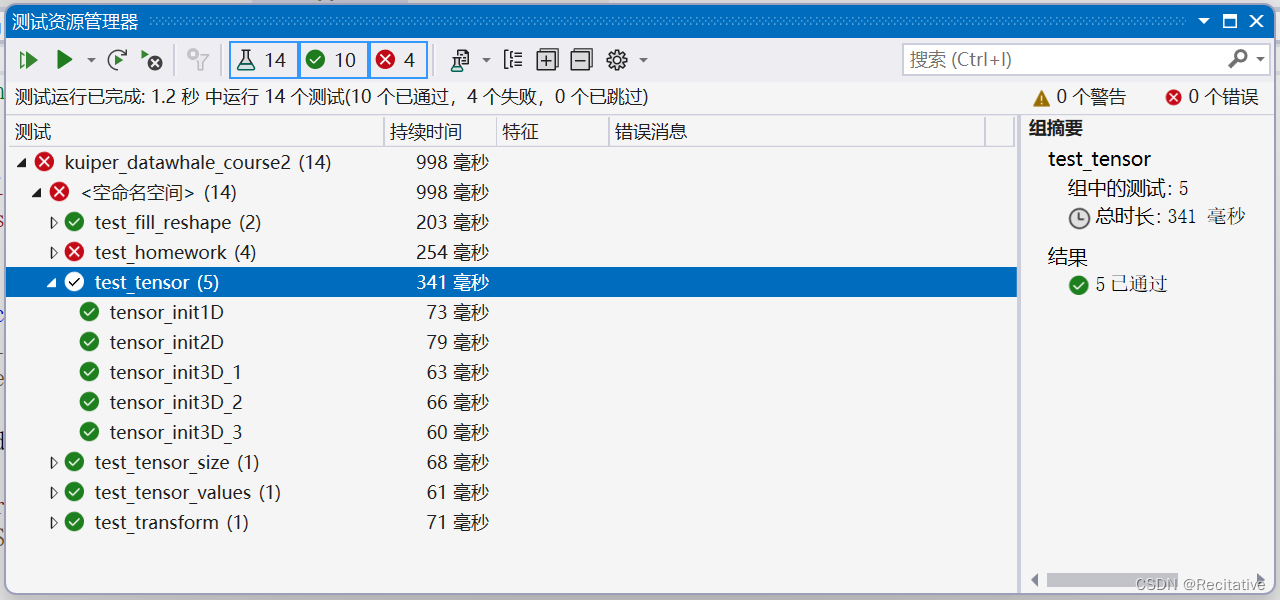
可以顺带在选项 > 适用于Google Test的测试适配器 > 并行化中,设置并行测试执行为True,可以加快多个测试的运行速度
Tensor类方法描述
主要包含下面几类方法:
- 张量创建(constructor)
- 返回维度信息
- 获取张量数据
- 填充数据
- element-wise处理
- reshape
- 辅助函数:判空、返回地址、shape
- Flatten
- Padding
C++中的类模板
C++中的模板类以下面的代码开头
template <typename Type>
此时,类外类方法成员的限定符也应该从ClassName::改为ClassName<Type>::。
在Kuiperinfer的代码实现中,Tensor模板类的定义如下:
template <typename T = float>
class Tensor; // 模板类声明,T为模板参数,float为模板参数默认值template <>
class Tensor<float>{}; // template specialization,模板具体化,使用具体的类型(这里是float)给出对应的类定义
张量创建
张量创建方法通过构造函数(constructor)来实现;当程序声明对象时,会自动调用符合传入参数的构造函数;在对象被销毁时,会调用析构函数。
在Tensor类中,需要实现以下几种传参的构造函数:
- 一维张量
- 二维张量
- 三维张量
为方便起见,在底层都使用三维的arma::fcube来表示,因此需要在不需要的维度填1。设shapes的参数顺序为rows, cols, channels,实现如下:
Tensor<float>::Tensor(uint32_t size){data_ = arma::fcube(1, size, 1); // 默认为列向量this->raw_shapes_ = std::vector<uint32_t>{size};
}
Tensor<float>::Tensor(uint32_t rows, uint32_t cols){data_ = arma::fcube(rows, cols, 1);this->raw_shapes_ = std::vector<uint32_t>{rows, cols};
}
Tensor<float>::Tensor(uint32_t channels, uint32_t rows, uint32_t cols){data_ = arma::fcube(rows, cols, channels);this->raw_shapes_ = std::vector<uint32_t>{channels, rows, cols};
}
在头文件的声明中,这些方法都标了explicit,从而避免错误传参导致隐式类型转换。
单元测试
在test_create_tensor.cpp中,进行张量创建的测试
- 测试对应张量的fcube形状
- 测试shapes的值
kuiperinfer源码中给出的测试代码为在LOG中输出相关信息,这里尝试用ASSERT_EQ和ASSERT_TRUE进行判别。
TEST(test_tensor, tensor_init1DEQ) {using namespace kuiper_infer;Tensor<float> f1(4);f1.Fill(1.0f); // this->data_.fill(value)const auto& shapes = f1.raw_shapes(); // return this->raw_shapes_;std::vector<uint32_t> shapes_should_be = std::vector<uint32_t>{ 4 };ASSERT_EQ(shapes, shapes_should_be);const auto& data = f1.data(); // return this->data_;arma::fcube data_should_be = arma::fcube(1, 4, 1, arma::fill::value(1.0f));ASSERT_TRUE(approx_equal(data, data_should_be, "absdiff", 1e-6));
}
TEST(test_tensor, tensor_inti2DEQ) {using namespace kuiper_infer;Tensor<float> f1(4, 4);f1.Fill(1.0f);const auto& shapes = f1.raw_shapes();const auto& data = f1.data();std::vector<uint32_t> shapes_s = std::vector<uint32_t>{ 4, 4 };arma::fcube data_s = arma::fcube(4, 4, 1, arma::fill::value(1.0f));ASSERT_EQ(shapes, shapes_s);ASSERT_TRUE(arma::approx_equal(data, data_s, "absdiff", 1e-6));
}
TEST(test_tensor, tensor_init3DEQ) {using namespace kuiper_infer;Tensor<float> f1(2, 3, 4);f1.Fill(1.0f);const auto& shapes = f1.raw_shapes();const auto& data = f1.data();std::vector<uint32_t> shapes_s = std::vector<uint32_t>{ 2, 3, 4 };arma::fcube data_s = arma::fcube(3, 4, 2, arma::fill::value(1.0f));ASSERT_EQ(shapes, shapes_s);ASSERT_TRUE(arma::approx_equal(data, data_s, "absdiff", 1e-6));
}
返回维度信息
实现以下方法:
rows()cols()channels()size()
其实直接返回shapes里存储的值也可以
uint32_t Tensor<float>::rows const{CHECK(!this->data_.empty()); // CHECK dies with a fatal error if the condition not truereturn this->data_.n_rows;
}
uint32_t Tensor<float>::cols const{CHECK(!this->data_.empty());return this->data_.n_cols;
}
uint32_t Tensor<float>::channels const{CHECK(!this->data_.empty());return this->data_.n_slices;
}
uint32_t Tensor<float>::size() const{CHECK(!this->data_.empty());return this->data_.size();
}
单元测试
TEST(test_tensor_size, tensor_size1) {using namespace kuiper_infer;Tensor<float> f1(2, 3, 4);ASSERT_EQ(f1.channels(), 2);ASSERT_EQ(f1.rows(), 3);ASSERT_EQ(f1.cols(), 4);
}
返回张量中的数据
实现以下方法:
slice(uint32_t channel),返回对应channel的数据,返回类型为arma::fmatat(uint32_t channel, uint32_t row, uint32_t col),返回对应(channel, row, col)的数据
const arma::fmat Tensor<float>::slice(uint32_t channel) const{CHECK_LT(channel, this->channels());return this->data_.slice(channel);
}
float Tensor<float>::at(uint32_t channel, uint32_t row, uint32_t col) const{CHECK_LT(channel, this->channels());CHECK_LT(row, this->rows());CHECK_LT(col, this->cols());return this->data_.at(row, col, channel);
}
arma::fcube Tensor<float>::data() const{return this->data_;
}
单元测试
TEST(test_tensor_values, tensor_values1) {using namespace kuiper_infer;Tensor<float> f1(2, 3, 4);f1.Fill(1.0f);ASSERT_EQ(1, f1.at(1, 1, 1));const auto& mat = f1.slice(0);arma::fmat mat_s = arma::fmat(3, 4, arma::fill::value(1.0f));ASSERT_TRUE(arma::approx_equal(mat, mat_s, "absdiff", 1e-6));
}
张量填充
实现以下方法:
Fill(float value)Fill(const std::vector<float>& values, bool row_major)Rand()Ones()values(bool row_major):返回特定顺序的值
第二个参数用于控制填充顺序,如果为true则按行主序填充
void Tensor<float>::Fill(float value){CHECK(!this->data_.empty());this->data_.fill(value)
}
void Tensor<float>::Rand(){CHECK(!this->data_.empty());this->data_.randn();
}
void Tensor<float>::Ones(){CHECK(!this->data_.empty());this->Fill(1.0f);
}
void Tensor<float>::Fill(const std::vector<float>& values, bool row_major){CHECK(!this->data_.empty());const uint32_t total_elems = this->data_size();CHECK_EQ(values.size(), total_elems);if(row_major){const uint32_t rows = this->rows();const uint32_t cols = this->cols();const uint32_t planes = rows * cols;const uint32_t channels = this->data_n_slices();for (uint32_t i = 0; i < channels; ++i){auto& channel_data = this->data_slice(i);const arma::fmat& channel_data_t = arma::fmat(values.data() + i * planes, this->cols(), this->rows());channel_data = channel_data_t.t();}}else{std::copy(values.begin(), values.end(), this-data_.memptr());// fcube本来就是列主序,所以直接copy}
}
std::vector<float> Tensor<float>::values(bool row_major){CHECK_EQ(this->data_.empty(), false);std::vector<float> values(this->data_.size()); // values length shapesif(!row_major){std::copy(this->data_.mem, this->data_.mem + this->data_.size(), values.begin()); // 列主序直接copy}else{uint32_t index = 0;for (uint32_t c = 0; c < this->data_.n_slices; ++c){ // 转序每个channelconst arma::fmat& channel = this->data_.slice(c).t();std::copy(channel.begin(), channel.end(), values.begin() + index);index += channel.size();}CHECK_EQ(index, values.size());}return values;
}
单元测试
直接输出每个channel更加直观
TEST(test_fill_reshape, fill1) {using namespace kuiper_infer;Tensor<float> f1(2, 3, 4);std::vector<float> values(2 * 3 * 4);// 将1到24填充到values中for (int i = 0; i < 24; ++i) {values.at(i) = float(i + 1);}f1.Fill(values, true);f1.Show();
}
I20240229 05:25:13.321183  2142 tensor.cpp:199] Channel: 0
I20240229 05:25:13.321188  2142 tensor.cpp:200]1.0000    4.0000    7.0000   10.00002.0000    5.0000    8.0000   11.00003.0000    6.0000    9.0000   12.0000
I20240229 05:25:13.321225  2142 tensor.cpp:199] Channel: 0
I20240229 05:25:13.321230  2142 tensor.cpp:200]1.0000    2.0000    3.0000    4.00005.0000    6.0000    7.0000    8.00009.0000   10.0000   11.0000   12.0000
reshape
实现reshape方法:
Reshape(const std::vector<uint32_t>& shapes, bool row_major)
void Tensor<float>::Reshape(const std::vector<uint32_t>& shapes, bool row_major){/*shapes {channels, rows, cols}data_ {rows, cols, channels}*/CHECK(!this->data_.empty());CHECK(!shapes.empty());const uint32_t origin_size = this->size();const uint32_t current_size = std::accumulate(shapes.begin(), shapes.end(), 1, std::multiplies()); // std::accumulate(first, last, initial value, op)CHECK(shapes.size() <= 3);CHECK(cruuent_size == orgin_size);std::vector<float> values;if(row_major){ // 行主序需要重排values = this->values(true); // std::vector<float> Tensor<float>::values(bool row_major)}if(shapes.size == 3){this->data_.reshape(shapes.at(1), shapes.at(2), shapes.at(0));this->raw_shapes_ = {shapes.at(0), shapes.at(1), shapes.at(2)};} else if(shapes.size() == 2){this->data_.reshape(shapes.at(0), shapes.at(1), 1);this->raw_shapes_ = {shapes.at(0), shapes.at(1)};} else{ // shapes.size() == 1this->data_.reshape(shapes.at(0));this->raw_shapes_ = {shapes.at(0)};}if (row_major){this->Fill(values, true)}
}
单元测试
TEST(test_fill_reshape, reshape1) {using namespace kuiper_infer;LOG(INFO) << "-------------------Reshape-------------------";Tensor<float> f1(2, 3, 4);std::vector<float> values(2 * 3 * 4);// 将1到24填充到values中for (int i = 0; i < 24; ++i) {values.at(i) = float(i + 1);}f1.Fill(values);f1.Show();/// 将大小调整为(4, 3, 2)f1.Reshape({4, 3, 2}, true);LOG(INFO) << "-------------------After Reshape-------------------";f1.Show();
}
I20240229 05:25:13.321269  2142 test_fill_reshape.cpp:23] -------------------Reshape-------------------
I20240229 05:25:13.321276  2142 tensor.cpp:199] Channel: 0
I20240229 05:25:13.321281  2142 tensor.cpp:200]1.0000    2.0000    3.0000    4.00005.0000    6.0000    7.0000    8.00009.0000   10.0000   11.0000   12.0000
I20240229 05:25:13.321295  2142 tensor.cpp:199] Channel: 1
I20240229 05:25:13.321300  2142 tensor.cpp:200]13.0000   14.0000   15.0000   16.000017.0000   18.0000   19.0000   20.000021.0000   22.0000   23.0000   24.0000
I20240229 05:25:13.321339  2142 test_fill_reshape.cpp:34] -------------------After Reshape-------------------
I20240229 05:25:13.321346  2142 tensor.cpp:199] Channel: 0
I20240229 05:25:13.321352  2142 tensor.cpp:200]1.0000   2.00003.0000   4.00005.0000   6.0000
I20240229 05:25:13.321362  2142 tensor.cpp:199] Channel: 1
I20240229 05:25:13.321368  2142 tensor.cpp:200]7.0000    8.00009.0000   10.000011.0000   12.0000
I20240229 05:25:13.321377  2142 tensor.cpp:199] Channel: 2
I20240229 05:25:13.321383  2142 tensor.cpp:200]13.0000   14.000015.0000   16.000017.0000   18.0000
I20240229 05:25:13.321393  2142 tensor.cpp:199] Channel: 3
I20240229 05:25:13.321399  2142 tensor.cpp:200]19.0000   20.000021.0000   22.000023.0000   24.0000
逐元素处理
实现Transform方法
Tensor<float>::Transform(const std::function<float(float)>& filter)
void Tensor<float>::Transform(const std::function<float(float)>& filter){CHECK(!this->data_.empty());this->data_.transform(filter);
}
armadillo的
.transform()方法可以传入functor或者lambda函数。
std::function是C++11的新特性,是一个函数包装器,可以包装任意类型的可调用实体,如普通函数、函数对象、lambda表达式。
单元测试
首先定义一个处理函数
float MinusOne(float value) {return value - 1.0f};
使用这个处理函数处理每个数据
TEST(test_transform, transform2) {using namespace kuiper_infer;Tensor<float> f1(2, 3, 4);f1.Fill(1.0f);f1.Show();f1.Transform(MinusOne);f1.Show();
}
I20240229 05:39:12.326036  2720 tensor.cpp:199] Channel: 0
I20240229 05:39:12.326052  2720 tensor.cpp:200]1.0000   1.0000   1.0000   1.00001.0000   1.0000   1.0000   1.00001.0000   1.0000   1.0000   1.0000
I20240229 05:39:12.326097  2720 tensor.cpp:199] Channel: 1
I20240229 05:39:12.326140  2720 tensor.cpp:200]1.0000   1.0000   1.0000   1.00001.0000   1.0000   1.0000   1.00001.0000   1.0000   1.0000   1.0000
I20240229 05:39:12.326174  2720 tensor.cpp:199] Channel: 0
I20240229 05:39:12.326187  2720 tensor.cpp:200]0        0        0        00        0        0        00        0        0        0
I20240229 05:39:12.326207  2720 tensor.cpp:199] Channel: 1
I20240229 05:39:12.326243  2720 tensor.cpp:200]0        0        0        00        0        0        00        0        0        0
其他辅助函数
判空
bool Tensor<float>::empty() const{return this->data_.empty()};
返回数据存储的起始位置
调用.memptr()
const float* Tensor<float>::raw_ptr() const{CHECK(!this->data_.empty());return this->data_.memptr();
}
返回张量的shape
const std::vector<uint32_t>& Tensor<float>::raw_shapes() const {CHECK(!this->raw_shapes_.empty());CHECK_LE(this->raw_shapes_.size(), 3);CHECK_GE(this->raw_shapes_.size(), 1);return this->raw_shapes_;
}
练习
Flatten
编写Tensor::Flatten方法,将多维展开成一维。

观察函数声明和单元测试
void Tensor<float>::Flatten(bool row_major) {CHECK(!this->data_.empty());// 请补充代码
}
TEST(test_homework, homework1_flatten1) {using namespace kuiper_infer;Tensor<float> f1(2, 3, 4);f1.Flatten(true);ASSERT_EQ(f1.raw_shapes().size(), 1);ASSERT_EQ(f1.raw_shapes().at(0), 24);
}TEST(test_homework, homework1_flatten2) {using namespace kuiper_infer;Tensor<float> f1(12, 24);f1.Flatten(true);ASSERT_EQ(f1.raw_shapes().size(), 1);ASSERT_EQ(f1.raw_shapes().at(0), 24 * 12);
方法实现,调用Reshape即可
void Tensor<float>::Flatten(bool row_major) {CHECK(!this->data_.empty());// 请补充代码std::vector<uint32_t> new_shapes = std::vector<uint32_t>{ this->size() };this->Reshape(new_shapes, row_major);
}
Padding
编写Tensor::Padding函数,在张量周围做填充

观察函数声明和单元测试
/*** 填充张量* @param pads 填充张量的尺寸* @param padding_value 填充张量
*/
void Tensor<float>::Padding(const std::vector<uint32_t>& pads,float padding_value) {CHECK(!this->data_.empty());CHECK_EQ(pads.size(), 4);// 四周填充的维度uint32_t pad_rows1 = pads.at(0);  // upuint32_t pad_rows2 = pads.at(1);  // bottomuint32_t pad_cols1 = pads.at(2);  // leftuint32_t pad_cols2 = pads.at(3);  // right// 请补充代码}
TEST(test_homework, homework2_padding1) {using namespace kuiper_infer;Tensor<float> tensor(3, 4, 5);ASSERT_EQ(tensor.channels(), 3);ASSERT_EQ(tensor.rows(), 4);ASSERT_EQ(tensor.cols(), 5);tensor.Fill(1.f);tensor.Padding({1, 2, 3, 4}, 0);ASSERT_EQ(tensor.rows(), 7);ASSERT_EQ(tensor.cols(), 12);int index = 0;for (int c = 0; c < tensor.channels(); ++c) {for (int r = 0; r < tensor.rows(); ++r) {for (int c_ = 0; c_ < tensor.cols(); ++c_) {if ((r >= 2 && r <= 4) && (c_ >= 3 && c_ <= 7)) {ASSERT_EQ(tensor.at(c, r, c_), 1.f) << c << " "<< " " << r << " " << c_;}index += 1;}}}
}TEST(test_homework, homework2_padding2) {using namespace kuiper_infer;ftensor tensor(3, 4, 5);ASSERT_EQ(tensor.channels(), 3);ASSERT_EQ(tensor.rows(), 4);ASSERT_EQ(tensor.cols(), 5);tensor.Fill(1.f);tensor.Padding({2, 2, 2, 2}, 3.14f);ASSERT_EQ(tensor.rows(), 8);ASSERT_EQ(tensor.cols(), 9);int index = 0;for (int c = 0; c < tensor.channels(); ++c) {for (int r = 0; r < tensor.rows(); ++r) {for (int c_ = 0; c_ < tensor.cols(); ++c_) {if (c_ <= 1 || r <= 1) {ASSERT_EQ(tensor.at(c, r, c_), 3.14f);} else if (c >= tensor.cols() - 1 || r >= tensor.rows() - 1) {ASSERT_EQ(tensor.at(c, r, c_), 3.14f);}if ((r >= 2 && r <= 5) && (c_ >= 2 && c_ <= 6)) {ASSERT_EQ(tensor.at(c, r, c_), 1.f);}index += 1;}}}
}
首先考虑一维的padding
std::copy(ori.begin(), ori.end(), aim.begin() + pad_cols1)
二维
for(uint32_t row = 0; row < ori_rows; ++row){aim_row = row + pad_rows1;copy(ori.begin() + row * ori_rowsize, ori.begin() + (row+1) * ori_rowsize, aim.begin() + aim_row * aim_rowsize + pad_cols1);
}
三维
ori_channelsize = ori_rowsize * ori_colsize;
aim_channelsize = aim_rowsize * aim_colsize;
for (uint32_t channel = 0; channel < channels; ++channel) {for(uint32_t row = 0; row < ori_rows; ++row){aim_row = row + pad_rows1;copy(ori.begin() + row * ori_rowsize + channel * ori_channelsize, ori.begin() + (row+1) * ori_rowsize + channel * ori_channelsize, aim.begin() + aim_row * aim_rowsize + pad_cols1 + channel * aim_channelsize);}
}
实现
void Tensor<float>::Padding(const std::vector<uint32_t>& pads,float padding_value) {CHECK(!this->data_.empty());CHECK_EQ(pads.size(), 4);// 四周填充的维度uint32_t pad_rows1 = pads.at(0);  // upuint32_t pad_rows2 = pads.at(1);  // bottomuint32_t pad_cols1 = pads.at(2);  // leftuint32_t pad_cols2 = pads.at(3);  // right// 请补充代码// params neededuint32_t ori_rows = this->rows();uint32_t ori_cols = this->cols();uint32_t new_rows = this->rows() + pad_rows1 + pad_rows2;uint32_t new_cols = this->cols() + pad_cols1 + pad_cols2;uint32_t channels = this->channels();const std::vector<float>& ori_values = this->values();// new data membersthis->data_ = arma::fcube(new_rows, new_cols, channels);this->raw_shapes_ = std::vector<uint32_t>{ channels, new_rows, new_cols };// fill pad values, row_majorCHECK_EQ(this->size(), new_rows * new_cols * channels);std::vector<float> pad_values = std::vector<float>(this->size());std::fill(pad_values.begin(), pad_values.end(), padding_value);uint32_t ori_channelsize = ori_rows * ori_cols;uint32_t pad_channelsize = new_cols * new_rows;for (uint32_t channel = 0; channel < channels; ++channel) {for (uint32_t row = 0; row < ori_rows; ++row) {uint32_t pad_row = row + pad_rows1;std::copy(ori_values.begin() + channel * ori_channelsize + row * ori_cols,ori_values.begin() + channel * ori_channelsize + (row + 1) * ori_cols,pad_values.begin() + channel * pad_channelsize + pad_row * new_cols + pad_cols1);}}CHECK_EQ(this->size(), pad_values.size());this->Fill(pad_values);
}
参考
- 【Kuiperinfer】:https://github.com/zjhellofss/kuiperdatawhale
- 作者B站主页:https://space.bilibili.com/1822828582?spm_id_from=333.337.search-card.all.click
- 【Armadillo Docs】:https://arma.sourceforge.net/docs.html
- 【CMake file for integrated Visual Studio unit testing】:https://stackoverflow.com/questions/53583286/cmake-file-for-integrated-visual-studio-unit-testing/53585782#53585782
这篇关于【Kuiperinfer】笔记03 张量(Tensor)类设计与实现,单元测试解析的文章就介绍到这儿,希望我们推荐的文章对编程师们有所帮助!


