本文主要是介绍OpenGL简易图像库SOIL在VS2013下的配置,希望对大家解决编程问题提供一定的参考价值,需要的开发者们随着小编来一起学习吧!
- SOIL简介
- 在VS2013上配置SOIL遇到的问题以及解决方案
SOIL简介
笔者学习OpenGL时主要参考一个学习网站:LearnOpenGL;在我看来这是一个OpenGL学习最好的网站之一,另外两个比较好的有Scratchapixel 2.0以及github上面的opengl-tutorial;在参考LearnOpengl学习纹理这一部分的时候,遇到了SOIL库,SOIL(Simple OpenGL Imagine Library)是简易的OpenGL图像库,他支持大多流行的图像格式,用起来很简单,可以在其主页上下载;至于为什么OpenGL中要加载纹理,这其中涉及到纹理映射,纹理映射是怎样把纹理坐标映射到纹理像素中;读者可以参看LearnOpenGL中纹理的相关教程。下面讲述怎样把在VS2013环境下配置SOIL并且运行LearnopenGL纹理这一部分的相关程序。
在VS2013上配置SOIL遇到的问题以及解决方案
对下载的SOIL文件解压得到lib这一文件夹,但是里面的文件是.a文件的格式,官网上面这样说:SOIL is meant to be used as a static library (as it’s tiny and in the public domain). You can use the static library file included in the zip (libSOIL.a works for MinGW and Microsoft compilers…feel free to rename it to SOIL.lib if that makes you happy), or compile the library yourself.
意思就是文件的后缀可以更改为.lib的文件格式,与配置opengl的其他库一样,我们需要把lib文件拷贝到path\Microsoft Visual Studio 12.0\VC\lib中,同样的需要把src文件夹中的SIOL.h拷贝到path\Microsoft Visual Studio 12.0\VC\include中去,并且在项目解决方案中的项目的属性要添加一下soil.lib文件:
运行下面程序,注意前提是已经安装了OpenGL相关的库文件GLEW与GLFW;注意文件相关的路径需要修改,程序有点儿长,很多语法都是OpenGL的基础,在后面的学习笔记中将会着重对于这些语法以及格式进行解释。
#include <iostream>// GLEW
//#define GLEW_STATIC
#include <GL/glew.h>// GLFW
#include <GL/glfw3.h>// Other Libs
#include <SOIL.h>// Other includes
#include "Shader.h"// Function prototypes
void key_callback(GLFWwindow* window, int key, int scancode, int action, int mode);// Window dimensions
const GLuint WIDTH = 800, HEIGHT = 600;// The MAIN function, from here we start the application and run the game loop
int main()
{// Init GLFWglfwInit();// Set all the required options for GLFWglfwWindowHint(GLFW_CONTEXT_VERSION_MAJOR, 3);glfwWindowHint(GLFW_CONTEXT_VERSION_MINOR, 3);glfwWindowHint(GLFW_OPENGL_PROFILE, GLFW_OPENGL_CORE_PROFILE);glfwWindowHint(GLFW_RESIZABLE, GL_FALSE);// Create a GLFWwindow object that we can use for GLFW's functionsGLFWwindow* window = glfwCreateWindow(WIDTH, HEIGHT, "LearnOpenGL", nullptr, nullptr);glfwMakeContextCurrent(window);// Set the required callback functionsglfwSetKeyCallback(window, key_callback);// Set this to true so GLEW knows to use a modern approach to retrieving function pointers and extensionsglewExperimental = GL_TRUE;// Initialize GLEW to setup the OpenGL Function pointersglewInit();// Define the viewport dimensionsglViewport(0, 0, WIDTH, HEIGHT);// Build and compile our shader programShader ourShader("F:/OpenGL/project/test1/test_textures/test_textures/shader.vs","F:/OpenGL/project/test1/test_textures/test_textures/shader.frag");// Set up vertex data (and buffer(s)) and attribute pointersGLfloat vertices[] = {// Positions          // Colors           // Texture Coords0.5f, 0.5f, 0.0f, 1.0f, 0.0f, 0.0f, 1.0f, 1.0f, // Top Right0.5f, -0.5f, 0.0f, 0.0f, 1.0f, 0.0f, 1.0f, 0.0f, // Bottom Right-0.5f, -0.5f, 0.0f, 0.0f, 0.0f, 1.0f, 0.0f, 0.0f, // Bottom Left-0.5f, 0.5f, 0.0f, 1.0f, 1.0f, 0.0f, 0.0f, 1.0f  // Top Left };GLuint indices[] = {  // Note that we start from 0!0, 1, 3, // First Triangle1, 2, 3  // Second Triangle};GLuint VBO, VAO, EBO;glGenVertexArrays(1, &VAO);glGenBuffers(1, &VBO);glGenBuffers(1, &EBO);glBindVertexArray(VAO);glBindBuffer(GL_ARRAY_BUFFER, VBO);glBufferData(GL_ARRAY_BUFFER, sizeof(vertices), vertices, GL_STATIC_DRAW);glBindBuffer(GL_ELEMENT_ARRAY_BUFFER, EBO);glBufferData(GL_ELEMENT_ARRAY_BUFFER, sizeof(indices), indices, GL_STATIC_DRAW);// Position attributeglVertexAttribPointer(0, 3, GL_FLOAT, GL_FALSE, 8 * sizeof(GLfloat), (GLvoid*)0);glEnableVertexAttribArray(0);// Color attributeglVertexAttribPointer(1, 3, GL_FLOAT, GL_FALSE, 8 * sizeof(GLfloat), (GLvoid*)(3 * sizeof(GLfloat)));glEnableVertexAttribArray(1);// TexCoord attributeglVertexAttribPointer(2, 2, GL_FLOAT, GL_FALSE, 8 * sizeof(GLfloat), (GLvoid*)(6 * sizeof(GLfloat)));glEnableVertexAttribArray(2);glBindVertexArray(0); // Unbind VAO// Load and create a texture GLuint texture;glGenTextures(1, &texture);glBindTexture(GL_TEXTURE_2D, texture); // All upcoming GL_TEXTURE_2D operations now have effect on this texture object// Set the texture wrapping parametersglTexParameteri(GL_TEXTURE_2D, GL_TEXTURE_WRAP_S, GL_REPEAT);   // Set texture wrapping to GL_REPEAT (usually basic wrapping method)glTexParameteri(GL_TEXTURE_2D, GL_TEXTURE_WRAP_T, GL_REPEAT);// Set texture filtering parametersglTexParameteri(GL_TEXTURE_2D, GL_TEXTURE_MIN_FILTER, GL_LINEAR);glTexParameteri(GL_TEXTURE_2D, GL_TEXTURE_MAG_FILTER, GL_LINEAR);// Load image, create texture and generate mipmapsint width, height;unsigned char* image = SOIL_load_image("container.jpg", &width, &height, 0, SOIL_LOAD_RGB);glTexImage2D(GL_TEXTURE_2D, 0, GL_RGB, width, height, 0, GL_RGB, GL_UNSIGNED_BYTE, image);glGenerateMipmap(GL_TEXTURE_2D);SOIL_free_image_data(image);glBindTexture(GL_TEXTURE_2D, 0); // Unbind texture when done, so we won't accidentily mess up our texture.// Game loopwhile (!glfwWindowShouldClose(window)){// Check if any events have been activiated (key pressed, mouse moved etc.) and call corresponding response functionsglfwPollEvents();// Render// Clear the colorbufferglClearColor(0.2f, 0.3f, 0.3f, 1.0f);glClear(GL_COLOR_BUFFER_BIT);// Bind TextureglBindTexture(GL_TEXTURE_2D, texture);// Activate shaderourShader.Use();// Draw containerglBindVertexArray(VAO);glDrawElements(GL_TRIANGLES, 6, GL_UNSIGNED_INT, 0);glBindVertexArray(0);// Swap the screen buffersglfwSwapBuffers(window);}// Properly de-allocate all resources once they've outlived their purposeglDeleteVertexArrays(1, &VAO);glDeleteBuffers(1, &VBO);glDeleteBuffers(1, &EBO);// Terminate GLFW, clearing any resources allocated by GLFW.glfwTerminate();return 0;
}// Is called whenever a key is pressed/released via GLFW
void key_callback(GLFWwindow* window, int key, int scancode, int action, int mode)
{if (key == GLFW_KEY_ESCAPE && action == GLFW_PRESS)glfwSetWindowShouldClose(window, GL_TRUE);
}
其中shader.h头文件如下:
#ifndef SHADER_H
#define SHADER_H#include <string>
#include <fstream>
#include <sstream>
#include <iostream>#include <GL/glew.h>
#include <SOIL.h>class Shader
{
public:GLuint Program;// Constructor generates the shader on the flyShader(const GLchar* vertexPath, const GLchar* fragmentPath){// 1. Retrieve the vertex/fragment source code from filePathstd::string vertexCode;std::string fragmentCode;std::ifstream vShaderFile;std::ifstream fShaderFile;// ensures ifstream objects can throw exceptions:vShaderFile.exceptions(std::ifstream::badbit);fShaderFile.exceptions(std::ifstream::badbit);try{// Open filesvShaderFile.open(vertexPath);fShaderFile.open(fragmentPath);std::stringstream vShaderStream, fShaderStream;// Read file's buffer contents into streamsvShaderStream << vShaderFile.rdbuf();fShaderStream << fShaderFile.rdbuf();// close file handlersvShaderFile.close();fShaderFile.close();// Convert stream into stringvertexCode = vShaderStream.str();fragmentCode = fShaderStream.str();}catch (std::ifstream::failure e){std::cout << "ERROR::SHADER::FILE_NOT_SUCCESFULLY_READ" << std::endl;}const GLchar* vShaderCode = vertexCode.c_str();const GLchar * fShaderCode = fragmentCode.c_str();// 2. Compile shadersGLuint vertex, fragment;GLint success;GLchar infoLog[512];// Vertex Shadervertex = glCreateShader(GL_VERTEX_SHADER);glShaderSource(vertex, 1, &vShaderCode, NULL);glCompileShader(vertex);// Print compile errors if anyglGetShaderiv(vertex, GL_COMPILE_STATUS, &success);if (!success){glGetShaderInfoLog(vertex, 512, NULL, infoLog);std::cout << "ERROR::SHADER::VERTEX::COMPILATION_FAILED\n" << infoLog << std::endl;}// Fragment Shaderfragment = glCreateShader(GL_FRAGMENT_SHADER);glShaderSource(fragment, 1, &fShaderCode, NULL);glCompileShader(fragment);// Print compile errors if anyglGetShaderiv(fragment, GL_COMPILE_STATUS, &success);if (!success){glGetShaderInfoLog(fragment, 512, NULL, infoLog);std::cout << "ERROR::SHADER::FRAGMENT::COMPILATION_FAILED\n" << infoLog << std::endl;}// Shader Programthis->Program = glCreateProgram();glAttachShader(this->Program, vertex);glAttachShader(this->Program, fragment);glLinkProgram(this->Program);// Print linking errors if anyglGetProgramiv(this->Program, GL_LINK_STATUS, &success);if (!success){glGetProgramInfoLog(this->Program, 512, NULL, infoLog);std::cout << "ERROR::SHADER::PROGRAM::LINKING_FAILED\n" << infoLog << std::endl;}// Delete the shaders as they're linked into our program now and no longer necesseryglDeleteShader(vertex);glDeleteShader(fragment);}// Uses the current shadervoid Use(){glUseProgram(this->Program);}
};#endif
程序中的另外的两个文件的内容shader.vs与shader.frag的内容如下:
#version 330 core
layout (location = 0) in vec3 position;
layout (location = 1) in vec3 color;
layout (location = 2) in vec2 texCoord;out vec3 ourColor;
out vec2 TexCoord;void main()
{gl_Position = vec4(position, 1.0f);ourColor = color;TexCoord = texCoord;
}
#version 330 core
in vec3 ourColor;
in vec2 TexCoord;out vec4 color;uniform sampler2D ourTexture;void main()
{color = texture(ourTexture, TexCoord);
}把上述文件保存为记事本文件之后更改后缀即文件名改为:shader.vs与shader.frag。上面两个程序的内容是着色器的程序内容。
在按照上述方法配置完SOIL后,运行上面的程序,会出现:
错误 3 error LNK2019: 无法解析的外部符号 _sqrtf,该符号在函数 _RGBE_to_RGBdivA2 中被引用 F:\OpenGL\project\test1\test_textures\test_textures\SOIL.lib(image_helper.o) test_textures这样的错误,参考博文配置SOIL库,实现纹理加载,发现需要重新编译生成lib文件,下载的SOIL文件夹中已经有对应的VC重新编译lib文件的工程,由于系统是windows,用VS打开即可,但是由于VS2013对应的版本是是VC12,而文件夹中对应的最高的版本是VC9,所以就用VS2013打开了VC9的解决方案,VS出现了升级的提示,并且在解决方案中运行的时候会出现错误的提示:
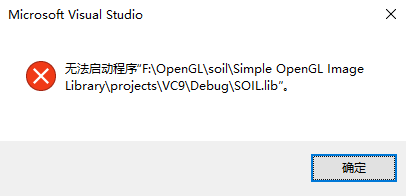
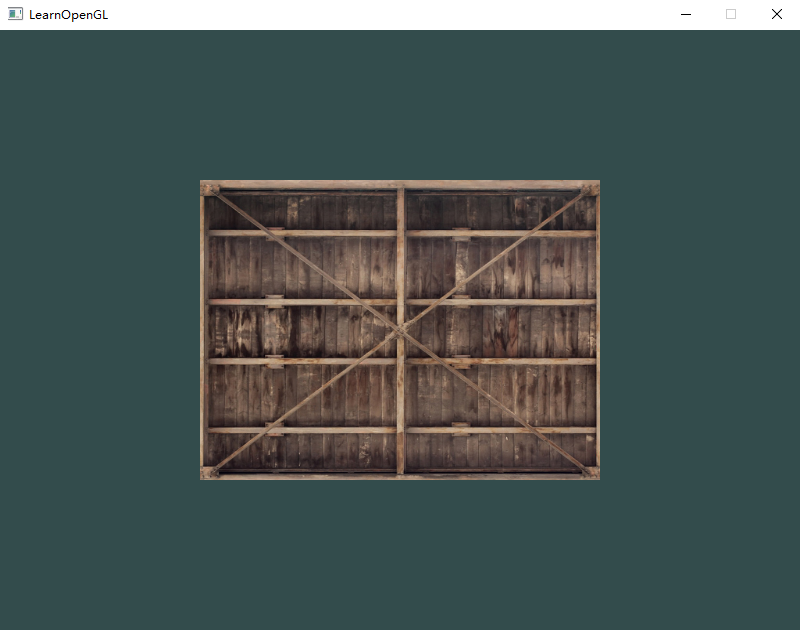
很郁闷,没有搜索出现这个问题的原因,但是却在debug文件夹下面找到了生成的SOIL.lib的文件,所以重新把生成的这个SOIL.lib文件拷贝替换在path\Microsoft Visual Studio 12.0\VC\lib中,重新编译通过,下图为运行的结果:
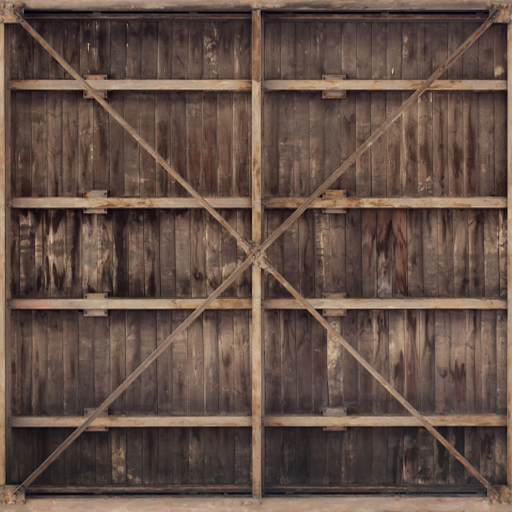
这里附上木箱纹理的图片:
过程中出现了两个关键点:
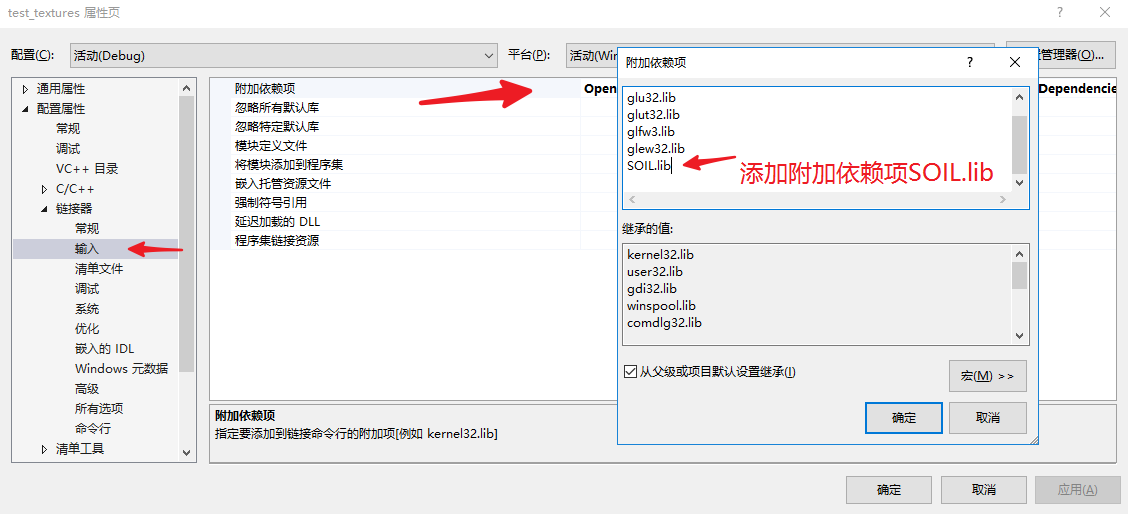
-在安装完库以及对应的头文件时,要注意在解决方案的项目中的属性中的链接器的输入中的附加依赖项中添加SOIL.lib
-用VS2013可以打开VC9的文件时候出现了升级的提示,所以成功进行编译
这篇关于OpenGL简易图像库SOIL在VS2013下的配置的文章就介绍到这儿,希望我们推荐的文章对编程师们有所帮助!


