本文主要是介绍《Mastering Opencv ...读书笔记系列》车牌识别(II),希望对大家解决编程问题提供一定的参考价值,需要的开发者们随着小编来一起学习吧!
继上一篇文章后,现在要做的就是从车牌图像上使用optical character recognition算法将字符提取出来。对于每一块被检测的车牌,使用带监督的神经网络机器学习算法来识别字符。
本文内容:
1.字符分割
2.神经网络训练方法
3.使用神经网络预测字符
一、字符分割【OCR Segment】
在使用神经网络对每个字符进行预测之前,我们必须从车牌图像中扣取改字符图片,因此有如下步骤:
本文的输入图像为上一篇文章的车牌:
a.二值化车牌
b.求轮廓
c.求最小外接矩形
d.用纵横比及面积,筛选外接矩形
e.调整统一矩形大小并保存每个字符的图片【注意:分割得到顺序和车牌字符顺序无关,可能不同】
代码:
- // car_plate_ann.cpp : 定义控制台应用程序的入口点。
- //
- #include "stdafx.h"
- #include <cv.h>
- #include <highgui.h>
- #include <cvaux.h>
- #include <ml.h>
- #define HORIZONTAL 1
- #define VERTICAL 0
- using namespace std;
- using namespace cv;
- //typedef struct CharSegment{
- // Mat img;
- // Rect mr;
- // CharSegment(Mat a,Rect b){
- // img=a;
- // mr=b;
- // }
- //};
- bool verifySizes(Mat r){
- //Char sizes 45x77
- float aspect=45.0f/77.0f;
- float charAspect= (float)r.cols/(float)r.rows;
- float error=0.35;
- float minHeight=15;
- float maxHeight=28;
- //We have a different aspect ratio for number 1, and it can be ~0.2
- float minAspect=0.2;
- float maxAspect=aspect+aspect*error;
- //area of pixels
- float area=countNonZero(r);
- //bb area
- float bbArea=r.cols*r.rows;
- //% of pixel in area
- float percPixels=area/bbArea;
- /*if(DEBUG)
- cout << "Aspect: "<< aspect << " ["<< minAspect << "," << maxAspect << "] " << "Area "<< percPixels <<" Char aspect " << charAspect << " Height char "<< r.rows << "\n";*/
- if(percPixels < 0.8 && charAspect > minAspect && charAspect < maxAspect && r.rows >= minHeight && r.rows < maxHeight)
- return true;
- else
- return false;
- }
- Mat preprocessChar(Mat in){
- //Remap image
- int h=in.rows;
- int w=in.cols;
- int charSize=20; //统一每个字符的大小
- Mat transformMat=Mat::eye(2,3,CV_32F);
- int m=max(w,h);
- transformMat.at<float>(0,2)=m/2 - w/2;
- transformMat.at<float>(1,2)=m/2 - h/2;
- Mat warpImage(m,m, in.type());
- warpAffine(in, warpImage, transformMat, warpImage.size(), INTER_LINEAR, BORDER_CONSTANT, Scalar(0) );
- Mat out;
- resize(warpImage, out, Size(charSize, charSize) );
- return out;
- }
- //create the accumulation histograms,img is a binary image, t is 水平或垂直
- Mat ProjectedHistogram(Mat img, int t)
- {
- int sz=(t)?img.rows:img.cols;
- Mat mhist=Mat::zeros(1,sz,CV_32F);
- for(int j=0; j<sz; j++){
- Mat data=(t)?img.row(j):img.col(j);
- mhist.at<float>(j)=countNonZero(data); //统计这一行或一列中,非零元素的个数,并保存到mhist中
- }
- //Normalize histogram
- double min, max;
- minMaxLoc(mhist, &min, &max);
- if(max>0)
- mhist.convertTo(mhist,-1 , 1.0f/max, 0);//用mhist直方图中的最大值,归一化直方图
- return mhist;
- }
- Mat getVisualHistogram(Mat *hist, int type)
- {
- int size=100;
- Mat imHist;
- if(type==HORIZONTAL){
- imHist.create(Size(size,hist->cols), CV_8UC3);
- }else{
- imHist.create(Size(hist->cols, size), CV_8UC3);
- }
- imHist=Scalar(55,55,55);
- for(int i=0;i<hist->cols;i++){
- float value=hist->at<float>(i);
- int maxval=(int)(value*size);
- Point pt1;
- Point pt2, pt3, pt4;
- if(type==HORIZONTAL){
- pt1.x=pt3.x=0;
- pt2.x=pt4.x=maxval;
- pt1.y=pt2.y=i;
- pt3.y=pt4.y=i+1;
- line(imHist, pt1, pt2, CV_RGB(220,220,220),1,8,0);
- line(imHist, pt3, pt4, CV_RGB(34,34,34),1,8,0);
- pt3.y=pt4.y=i+2;
- line(imHist, pt3, pt4, CV_RGB(44,44,44),1,8,0);
- pt3.y=pt4.y=i+3;
- line(imHist, pt3, pt4, CV_RGB(50,50,50),1,8,0);
- }else{
- pt1.x=pt2.x=i;
- pt3.x=pt4.x=i+1;
- pt1.y=pt3.y=100;
- pt2.y=pt4.y=100-maxval;
- line(imHist, pt1, pt2, CV_RGB(220,220,220),1,8,0);
- line(imHist, pt3, pt4, CV_RGB(34,34,34),1,8,0);
- pt3.x=pt4.x=i+2;
- line(imHist, pt3, pt4, CV_RGB(44,44,44),1,8,0);
- pt3.x=pt4.x=i+3;
- line(imHist, pt3, pt4, CV_RGB(50,50,50),1,8,0);
- }
- }
- return imHist ;
- }
- void drawVisualFeatures(Mat character, Mat hhist, Mat vhist, Mat lowData,int count){
- Mat img(121, 121, CV_8UC3, Scalar(0,0,0));
- Mat ch;
- Mat ld;
- char res[20];
- cvtColor(character, ch, CV_GRAY2RGB);
- resize(lowData, ld, Size(100, 100), 0, 0, INTER_NEAREST );//将ld从15*15扩大到100*100
- cvtColor(ld,ld,CV_GRAY2RGB);
- Mat hh=getVisualHistogram(&hhist, HORIZONTAL);
- Mat hv=getVisualHistogram(&vhist, VERTICAL);
- //Rect_(_Tp _x, _Tp _y, _Tp _width, _Tp _height)
- Mat subImg=img(Rect(0,101,20,20));//ch:20*20
- ch.copyTo(subImg);
- subImg=img(Rect(21,101,100,20));//hh:100*hist.cols
- hh.copyTo(subImg);
- subImg=img(Rect(0,0,20,100));//hv:hist.cols*100
- hv.copyTo(subImg);
- subImg=img(Rect(21,0,100,100));//ld:100*100
- ld.copyTo(subImg);
- line(img, Point(0,100), Point(121,100), Scalar(0,0,255));
- line(img, Point(20,0), Point(20,121), Scalar(0,0,255));
- sprintf(res,"hist%d.jpg",count);
- imwrite(res,img);
- //imshow("Visual Features", img);
- cvWaitKey(0);
- }
- Mat features(Mat in, int sizeData,int count){
- //Histogram features
- Mat vhist=ProjectedHistogram(in,VERTICAL);
- Mat hhist=ProjectedHistogram(in,HORIZONTAL);
- //Low data feature
- Mat lowData;
- resize(in, lowData, Size(sizeData, sizeData) );
- //画出直方图
- drawVisualFeatures(in, hhist, vhist, lowData,count);
- //Last 10 is the number of moments components
- int numCols=vhist.cols+hhist.cols+lowData.cols*lowData.cols;
- Mat out=Mat::zeros(1,numCols,CV_32F);
- //Asign values to feature,ANN的样本特征为水平、垂直直方图和低分辨率图像所组成的矢量
- int j=0;
- for(int i=0; i<vhist.cols; i++)
- {
- out.at<float>(j)=vhist.at<float>(i);
- j++;
- }
- for(int i=0; i<hhist.cols; i++)
- {
- out.at<float>(j)=hhist.at<float>(i);
- j++;
- }
- for(int x=0; x<lowData.cols; x++)
- {
- for(int y=0; y<lowData.rows; y++){
- out.at<float>(j)=(float)lowData.at<unsigned char>(x,y);
- j++;
- }
- }
- //if(DEBUG)
- // cout << out << "\n===========================================\n";
- return out;
- }
- int _tmain(int argc, _TCHAR* argv[])
- {
- Mat input = imread("haha_1.jpg",CV_LOAD_IMAGE_GRAYSCALE);
- char res[20];
- int i = 0;
- //vector<CharSegment> output;
- //Threshold input image
- Mat img_threshold;
- threshold(input, img_threshold, 60, 255, CV_THRESH_BINARY_INV);
- Mat img_contours;
- img_threshold.copyTo(img_contours);
- //Find contours of possibles characters
- vector< vector< Point> > contours;
- findContours(img_contours,
- contours, // a vector of contours
- CV_RETR_EXTERNAL, // retrieve the external contours
- CV_CHAIN_APPROX_NONE); // all pixels of each contours
- // Draw blue contours on a white image
- cv::Mat result;
- input.copyTo(result);
- cvtColor(result, result, CV_GRAY2RGB);
- //cv::drawContours(result,contours,
- // -1, // draw all contours
- // cv::Scalar(0,0,255), // in blue
- // 1); // with a thickness of 1
- //Start to iterate to each contour founded
- vector<vector<Point> >::iterator itc= contours.begin();
- //Remove patch that are no inside limits of aspect ratio and area.
- while (itc!=contours.end()) {
- //Create bounding rect of object
- Rect mr= boundingRect(Mat(*itc));
- //rectangle(result, mr, Scalar(255,0,0),2);
- //Crop image
- Mat auxRoi(img_threshold, mr);
- if(verifySizes(auxRoi)){
- auxRoi=preprocessChar(auxRoi);
- //output.push_back(CharSegment(auxRoi, mr));
- //保存每个字符图片
- sprintf(res,"train_data_%d.jpg",i);
- i++;
- imwrite(res,auxRoi);
- rectangle(result, mr, Scalar(0,0,255),2);
- //对每一个小方块,提取直方图特征
- Mat f=features(auxRoi,15,i);
- }
- ++itc;
- }
- imwrite("result1.jpg",result);
- imshow("car_plate",result);
- waitKey(0);
- return 0;
- }
图片显示可以自己边注释边显示,另外提前给出了第二部分的累计水平垂直直方图和低分辨率采样的方法,并把这种特征的图像保存下来了。
二、神经网络训练
1.多层感知机简介:
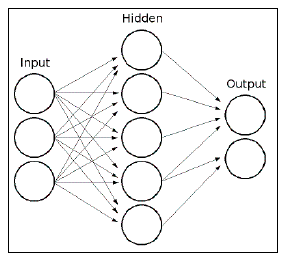
多层感知机结构:【隐层数量为1层或多层,实际上自从引入了深度学习后,才有多层】
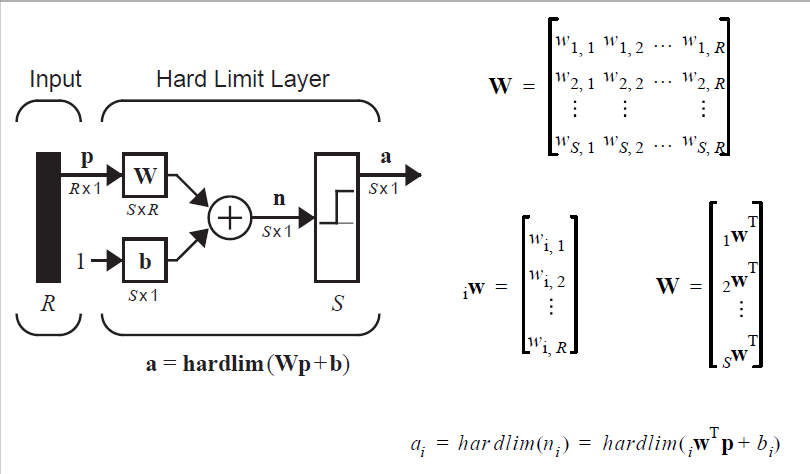
其中,每个神经元结构如下:
每个神经元都是相似的且每个神经元都有自己的判定边界,有多个输入和多个输出。不同权重的输入结合激励函数得到不同的输出。常见的激励函数有S型、高斯型、上图的hadrlim型。单层的单个神经元可以将输入向量分为两类,而一个有S个神经元的感知机,可以将输入向量分为2^S类
2.获取训练数据
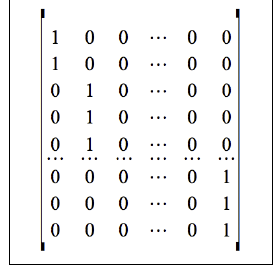
和上一篇训练SVM所使用的特征不同,现在使用每个字符的累计直方图和低分辨率采样图像构成的高维向量作为训练神经网络的特征。训练的样本矩阵P为N*M,其中N(行)代表各个样本图片的融合特征,M(列)为类别。从书中给的已经训练好的orc.xml看,N有675行,M有30列,30列代表西班牙车牌有30种字符0-9和20个英文字母组成,675是这么来的,比如字符0有35张图片样本,对应产生35行高维向量,字符1有40张样本图片,对应产生40行高维向量,然后按照不同分辨率5*5、10*10、15*15、20*20采样【书中ocr.xml只有675,只采用5*5分辨率】。矩阵P实际上是对每一种高维向量的类别标注:
在OpenCV中使用多层感知机需要配置training data矩阵、classes矩阵、隐层神经元数量。其中,训练数据矩阵和列别标识矩阵均从ocr.xml文件获取【下文会介绍】,这里只采用单隐层,包含10个神经元,输入层为675行,输出层为30行。
计算ocr.xml文件具体步骤:
a.将上一步分割得到的每个字符进行人工分类【可放在不同目录下】,比如最终字符0有35张图片,字符a有30张图片并定义数组【这些数字之和为675】:
- const int numFilesChars[]={35, 40, 42, 41, 42, 33, 30, 31, 49, 44, 30, 24, 21, 20, 34, 9, 10, 3, 11, 3, 15, 4, 9, 12, 10, 21, 18, 8, 15, 7};
(1)统计水平、垂直方向直方图,比如水平直方图,扫描图像每一行,统计每行非零元素的个数,这样就构成1*row矩阵,然后用该矩阵的最大值,规范化该矩阵。
(2)使用resize函数,按照不同分辨率得到图像矩阵
(3)将垂直直方图,水平直方图,低分辨率图像【按行读取】,都存进一个1*(vcol+hcol+h*w)的矩阵
(4)将上述矩阵连同标记一起写入xml文件中
累计直方图及低分辨率图像效果如下:【左下角为字符图像原始大小20*20,由上角为低分辨率采样后放大的图像100*100,右下角为水平直方图,左上角为垂直直方图】
具体训练代码为:
- // Main entry code OpenCV
- #include <cv.h>
- #include <highgui.h>
- #include <cvaux.h>
- #include <iostream>
- #include <vector>
- #define HORIZONTAL 1
- #define VERTICAL 0
- using namespace std;
- using namespace cv;
- //西班牙车牌共30种字符,下面为每个字符的图片个数【没给,需人工挑选】
- const int numFilesChars[]={35, 40, 42, 41, 42, 33, 30, 31, 49, 44, 30, 24, 21, 20, 34, 9, 10, 3, 11, 3, 15, 4, 9, 12, 10, 21, 18, 8, 15, 7};
- const char strCharacters[] = {'0','1','2','3','4','5','6','7','8','9','B', 'C', 'D', 'F', 'G', 'H', 'J', 'K', 'L', 'M', 'N', 'P', 'R', 'S', 'T', 'V', 'W', 'X', 'Y', 'Z'};
- const int numCharacters=30;
- Mat features(Mat in, int sizeData,int count){
- //Histogram features
- Mat vhist=ProjectedHistogram(in,VERTICAL);
- Mat hhist=ProjectedHistogram(in,HORIZONTAL);
- //Low data feature
- Mat lowData;
- resize(in, lowData, Size(sizeData, sizeData) );
- //Last 10 is the number of moments components
- int numCols=vhist.cols+hhist.cols+lowData.cols*lowData.cols;
- Mat out=Mat::zeros(1,numCols,CV_32F);
- //Asign values to feature,ANN的样本特征为水平、垂直直方图和低分辨率图像所组成的矢量
- int j=0;
- for(int i=0; i<vhist.cols; i++)
- {
- out.at<float>(j)=vhist.at<float>(i);
- j++;
- }
- for(int i=0; i<hhist.cols; i++)
- {
- out.at<float>(j)=hhist.at<float>(i);
- j++;
- }
- for(int x=0; x<lowData.cols; x++)
- {
- for(int y=0; y<lowData.rows; y++){
- out.at<float>(j)=(float)lowData.at<unsigned char>(x,y);
- j++;
- }
- }
- //if(DEBUG)
- // cout << out << "\n===========================================\n";
- return out;
- }
- int main ( int argc, char** argv )
- {
- cout << "OpenCV Training OCR Automatic Number Plate Recognition\n";
- cout << "\n";
- char* path;
- //Check if user specify image to process
- if(argc >= 1 )
- {
- path= argv[1];
- }else{
- cout << "Usage:\n" << argv[0] << " <path to chars folders files> \n";
- return 0;
- }
- Mat classes;
- Mat trainingDataf5;
- Mat trainingDataf10;
- Mat trainingDataf15;
- Mat trainingDataf20;
- vector<int> trainingLabels;
- OCR ocr;
- for(int i=0; i< numCharacters; i++)
- {
- int numFiles=numFilesChars[i];
- for(int j=0; j< numFiles; j++){
- cout << "Character "<< strCharacters[i] << " file: " << j << "\n";
- stringstream ss(stringstream::in | stringstream::out);
- ss << path << strCharacters[i] << "/" << j << ".jpg";
- Mat img=imread(ss.str(), 0);
- Mat f5=features(img, 5);
- Mat f10=features(img, 10);
- Mat f15=features(img, 15);
- Mat f20=features(img, 20);
- trainingDataf5.push_back(f5);
- trainingDataf10.push_back(f10);
- trainingDataf15.push_back(f15);
- trainingDataf20.push_back(f20);
- trainingLabels.push_back(i); //每一幅字符图片所对应的字符类别索引下标
- }
- }
- trainingDataf5.convertTo(trainingDataf5, CV_32FC1);
- trainingDataf10.convertTo(trainingDataf10, CV_32FC1);
- trainingDataf15.convertTo(trainingDataf15, CV_32FC1);
- trainingDataf20.convertTo(trainingDataf20, CV_32FC1);
- Mat(trainingLabels).copyTo(classes);
- FileStorage fs("OCR.xml", FileStorage::WRITE);
- fs << "TrainingDataF5" << trainingDataf5;
- fs << "TrainingDataF10" << trainingDataf10;
- fs << "TrainingDataF15" << trainingDataf15;
- fs << "TrainingDataF20" << trainingDataf20;
- fs << "classes" << classes;
- fs.release();
- return 0;
- }
三、使用神经网络检测字符
a.读取一张车牌图像
b.配置神经网络参数,并使用xml文件训练神经网络【参数配置上述已经说过了】
c.提取该车牌图像的累计直方图和低分辨率图像特征矩阵
d.将该特征矩阵作为神经网络输入,经网络计算,得到预测结果【字符索引】
e.按照每个字符图像的相对位置,进行字符重新排序
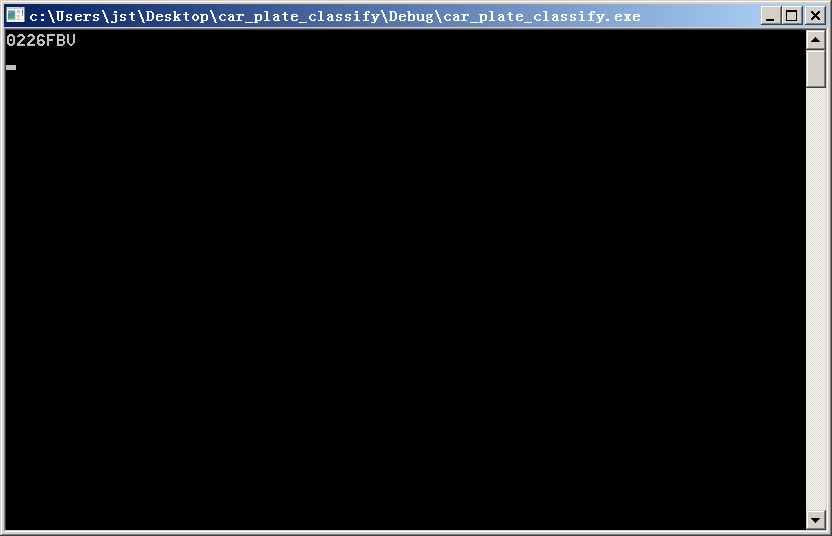
f.得到最终字符【和书中不同的是,我的输入图像是车牌而不是整幅图像,因此绝对坐标是不同的,但字符间的相对位置还是对的,只是不能在车牌照片上显示数字而已,我直接答应到控制台上】
具体代码:
又用到了车牌类,这里面有车牌字符相对位置调整的函数,都给出来吧:
Plate.h:
- #ifndef Plate_h
- #define Plate_h
- #include <string.h>
- #include <vector>
- #include <cv.h>
- #include <highgui.h>
- #include <cvaux.h>
- using namespace std;
- using namespace cv;
- class Plate{
- public:
- Plate();
- Plate(Mat img, Rect pos);
- string str();
- Rect position;
- Mat plateImg;
- vector<char> chars;
- vector<Rect> charsPos;
- };
- #endif
Plate.cpp:
- /*****************************************************************************
- * Number Plate Recognition using SVM and Neural Networks
- ******************************************************************************
- * by David Mill醤 Escriv? 5th Dec 2012
- * http://blog.damiles.com
- ******************************************************************************
- * Ch5 of the book "Mastering OpenCV with Practical Computer Vision Projects"
- * Copyright Packt Publishing 2012.
- * http://www.packtpub.com/cool-projects-with-opencv/book
- *****************************************************************************/
- #include "Plate.h"
- Plate::Plate(){
- }
- Plate::Plate(Mat img, Rect pos){
- plateImg=img;
- position=pos;
- }
- string Plate::str(){
- string result="";
- //Order numbers
- vector<int> orderIndex;
- vector<int> xpositions;
- for(int i=0; i< charsPos.size(); i++){
- orderIndex.push_back(i);
- xpositions.push_back(charsPos[i].x);
- }
- float min=xpositions[0];
- int minIdx=0;
- for(int i=0; i< xpositions.size(); i++){
- min=xpositions[i];
- minIdx=i;
- for(int j=i; j<xpositions.size(); j++){
- if(xpositions[j]<min){
- min=xpositions[j];
- minIdx=j;
- }
- }
- int aux_i=orderIndex[i];
- int aux_min=orderIndex[minIdx];
- orderIndex[i]=aux_min;
- orderIndex[minIdx]=aux_i;
- float aux_xi=xpositions[i];
- float aux_xmin=xpositions[minIdx];
- xpositions[i]=aux_xmin;
- xpositions[minIdx]=aux_xi;
- }
- for(int i=0; i<orderIndex.size(); i++){
- result=result+chars[orderIndex[i]];
- }
- return result;
- }
主要处理的函数:
- // car_plate_classify.cpp : 定义控制台应用程序的入口点。
- //
- #include "stdafx.h"
- #include <cv.h>
- #include <highgui.h>
- #include <cvaux.h>
- #include <ml.h>
- #include <iostream>
- #include <vector>
- #include "Plate.h"
- #define HORIZONTAL 1
- #define VERTICAL 0
- using namespace std;
- using namespace cv;
- CvANN_MLP ann;
- const char strCharacters[] = {'0','1','2','3','4','5','6','7','8','9','B', 'C', 'D', 'F', 'G', 'H', 'J', 'K', 'L', 'M', 'N', 'P', 'R', 'S', 'T', 'V', 'W', 'X', 'Y', 'Z'};
- const int numCharacters=30;
- bool verifySizes(Mat r){
- //Char sizes 45x77
- float aspect=45.0f/77.0f;
- float charAspect= (float)r.cols/(float)r.rows;
- float error=0.35;
- float minHeight=15;
- float maxHeight=28;
- //We have a different aspect ratio for number 1, and it can be ~0.2
- float minAspect=0.2;
- float maxAspect=aspect+aspect*error;
- //area of pixels
- float area=countNonZero(r);
- //bb area
- float bbArea=r.cols*r.rows;
- //% of pixel in area
- float percPixels=area/bbArea;
- /*if(DEBUG)
- cout << "Aspect: "<< aspect << " ["<< minAspect << "," << maxAspect << "] " << "Area "<< percPixels <<" Char aspect " << charAspect << " Height char "<< r.rows << "\n";*/
- if(percPixels < 0.8 && charAspect > minAspect && charAspect < maxAspect && r.rows >= minHeight && r.rows < maxHeight)
- return true;
- else
- return false;
- }
- Mat preprocessChar(Mat in){
- //Remap image
- int h=in.rows;
- int w=in.cols;
- int charSize=20; //统一每个字符的大小
- Mat transformMat=Mat::eye(2,3,CV_32F);
- int m=max(w,h);
- transformMat.at<float>(0,2)=m/2 - w/2;
- transformMat.at<float>(1,2)=m/2 - h/2;
- Mat warpImage(m,m, in.type());
- warpAffine(in, warpImage, transformMat, warpImage.size(), INTER_LINEAR, BORDER_CONSTANT, Scalar(0) );
- Mat out;
- resize(warpImage, out, Size(charSize, charSize) );
- return out;
- }
- //create the accumulation histograms,img is a binary image, t is 水平或垂直
- Mat ProjectedHistogram(Mat img, int t)
- {
- int sz=(t)?img.rows:img.cols;
- Mat mhist=Mat::zeros(1,sz,CV_32F);
- for(int j=0; j<sz; j++){
- Mat data=(t)?img.row(j):img.col(j);
- mhist.at<float>(j)=countNonZero(data); //统计这一行或一列中,非零元素的个数,并保存到mhist中
- }
- //Normalize histogram
- double min, max;
- minMaxLoc(mhist, &min, &max);
- if(max>0)
- mhist.convertTo(mhist,-1 , 1.0f/max, 0);//用mhist直方图中的最大值,归一化直方图
- return mhist;
- }
- Mat features(Mat in, int sizeData){
- //Histogram features
- Mat vhist=ProjectedHistogram(in,VERTICAL);
- Mat hhist=ProjectedHistogram(in,HORIZONTAL);
- //Low data feature
- Mat lowData;
- resize(in, lowData, Size(sizeData, sizeData) );
- //Last 10 is the number of moments components
- int numCols=vhist.cols+hhist.cols+lowData.cols*lowData.cols;
- Mat out=Mat::zeros(1,numCols,CV_32F);
- //Asign values to feature,ANN的样本特征为水平、垂直直方图和低分辨率图像所组成的矢量
- int j=0;
- for(int i=0; i<vhist.cols; i++)
- {
- out.at<float>(j)=vhist.at<float>(i);
- j++;
- }
- for(int i=0; i<hhist.cols; i++)
- {
- out.at<float>(j)=hhist.at<float>(i);
- j++;
- }
- for(int x=0; x<lowData.cols; x++)
- {
- for(int y=0; y<lowData.rows; y++){
- out.at<float>(j)=(float)lowData.at<unsigned char>(x,y);
- j++;
- }
- }
- return out;
- }
- int classify(Mat f){
- int result=-1;
- Mat output(1, 30, CV_32FC1); //西班牙车牌只有30种字符
- ann.predict(f, output);
- Point maxLoc;
- double maxVal;
- minMaxLoc(output, 0, &maxVal, 0, &maxLoc);
- //We need know where in output is the max val, the x (cols) is the class.
- return maxLoc.x;
- }
- void train(Mat TrainData, Mat classes, int nlayers){
- Mat layers(1,3,CV_32SC1);
- layers.at<int>(0)= TrainData.cols;
- layers.at<int>(1)= nlayers;
- layers.at<int>(2)= 30;
- ann.create(layers, CvANN_MLP::SIGMOID_SYM, 1, 1);
- //Prepare trainClases
- //Create a mat with n trained data by m classes
- Mat trainClasses;
- trainClasses.create( TrainData.rows, 30, CV_32FC1 );
- for( int i = 0; i < trainClasses.rows; i++ )
- {
- for( int k = 0; k < trainClasses.cols; k++ )
- {
- //If class of data i is same than a k class
- if( k == classes.at<int>(i) )
- trainClasses.at<float>(i,k) = 1;
- else
- trainClasses.at<float>(i,k) = 0;
- }
- }
- Mat weights( 1, TrainData.rows, CV_32FC1, Scalar::all(1) );
- //Learn classifier
- ann.train( TrainData, trainClasses, weights );
- }
- int _tmain(int argc, _TCHAR* argv[])
- {
- Mat input = imread("test.jpg",CV_LOAD_IMAGE_GRAYSCALE);
- Plate mplate;
- //Read file storage.
- FileStorage fs;
- fs.open("OCR.xml", FileStorage::READ);
- Mat TrainingData;
- Mat Classes;
- fs["TrainingDataF15"] >> TrainingData;
- fs["classes"] >> Classes;
- //训练神经网络
- train(TrainingData, Classes, 10);
- //dealing image and save each character image into vector<CharSegment>
- //Threshold input image
- Mat img_threshold;
- threshold(input, img_threshold, 60, 255, CV_THRESH_BINARY_INV);
- Mat img_contours;
- img_threshold.copyTo(img_contours);
- //Find contours of possibles characters
- vector< vector< Point> > contours;
- findContours(img_contours,
- contours, // a vector of contours
- CV_RETR_EXTERNAL, // retrieve the external contours
- CV_CHAIN_APPROX_NONE); // all pixels of each contours
- //Start to iterate to each contour founded
- vector<vector<Point> >::iterator itc= contours.begin();
- //Remove patch that are no inside limits of aspect ratio and area.
- while (itc!=contours.end()) {
- //Create bounding rect of object
- Rect mr= boundingRect(Mat(*itc));
- //rectangle(result, mr, Scalar(255,0,0),2);
- //Crop image
- Mat auxRoi(img_threshold, mr);
- if(verifySizes(auxRoi)){
- auxRoi=preprocessChar(auxRoi);
- //对每一个小方块,提取直方图特征
- Mat f=features(auxRoi,15);
- //For each segment feature Classify
- int character=classify(f);
- mplate.chars.push_back(strCharacters[character]);
- mplate.charsPos.push_back(mr);
- //printf("%c ",strCharacters[character]);
- }
- ++itc;
- }
- string licensePlate=mplate.str();
- cout<<licensePlate<<endl;
- return 0;
- }
这边运行时间略长,大概10s以下吧。这就是Android不能做太多图像处理的原因,运行速度不给力啊。
上上后面做的评估是对隐层神经元数量和不同分辨率的一种统计,没多大花头,以后要用再看吧。而且车牌识别已经做烂了,没什么动力了~~
好吧,下一篇尝试将车牌检测与识别都移植到android上试试。
- 顶
- 1
- 踩
- 0
这篇关于《Mastering Opencv ...读书笔记系列》车牌识别(II)的文章就介绍到这儿,希望我们推荐的文章对编程师们有所帮助!


7楼 raceyan 6天前 12:28发表 [回复]-

- 能分享下源代码?附上OCR.xml, 谢谢 邮箱854657981@qq.com
6楼 chen1955 2016-07-01 17:12发表 [回复]-

- 楼主 为毛我这里编译有错误啊
错误 41 error C3861: “ProjectedHistogram”: 找不到标识符 e:\czx\015\015.cpp 77 1 015
错误 42 error C3861: “ProjectedHistogram”: 找不到标识符 e:\czx\015\015.cpp 78 1 015
43 IntelliSense: 未定义标识符 "ProjectedHistogram" e:\czx\015\015.cpp 77 14 015
5楼 ZaCks雪 2016-04-07 16:49发表 [回复]-

- 楼主 为毛我这里编译有错误啊
4楼 captaineven 2016-03-10 11:13发表 [回复]-

- 请问亲爱的作者能否给出训练的数据集和训练模型文件的链接?
3楼 z815825527 2014-04-28 12:40发表 [回复]-

- 请问一下:训练生成OCR.xml的图片文件种类和规格分别是什么?为什么我训练出来的OCR.xml拿到main.cpp去运行会出现读入的矩阵不匹配?帮帮忙,谢谢了!
2楼 木头杭 2014-04-13 17:00发表 [回复]-

- 同问,如果要自己找样本,这些样本有什么要求吗?谢谢!
1楼 woshicuit 2014-03-17 20:48发表 [回复] [引用] [举报]-

- 你这些训练样本从哪儿来的,貌似网上配套的图片只有12张,根本凑不够那么多的训练样本,特别是字符训练的时候,完全没那么多样本。
Re: 木头杭 2014-04-13 17:01发表 [回复]-

- 回复woshicuit:想问下您的问题解决没?是怎么解决的,我也在训练样本上遇到麻烦了,不知道怎么找样本。谢谢!
Re: taotao1233 2014-03-17 21:32发表 [回复] [引用] [举报]-

- 回复woshicuit:是不够的,所以我直接用他的xml文件了。
Re: ZaCks雪 2016-04-07 16:50发表 [回复] [引用] [举报]-

- 回复jinshengtao:你这个编译成功了吗