本文主要是介绍学习OpenCV2——MeanShift之图形分割,希望对大家解决编程问题提供一定的参考价值,需要的开发者们随着小编来一起学习吧!
1. 原理
用meanshift做图像平滑和分割,其实是一回事。其本质是经过迭代,将收敛点的像素值代替原来的像素值,从而去除了局部相似的纹理,同时保留了边缘等差异较大的特征。
OpenCV中自带有基于meanshift的分割方法pyrMeanShiftFiltering()。由函数名pyrMeanShiftFiltering可知,这里是将meanshift算法和图像金字塔相结合用来分割的。
-
<span style="font-size:18px;">void PyrMeanShiftFiltering( const CvArr* srcarr, //输入图像 -
CvArr* dstarr, //输出图像 -
double sp, //颜色域半径 -
double sr, //空间域半径 -
int max_level, //金字塔最大层数 -
CvTermCriteria termcrit ) //迭代终止条件</span>
要求输入和输出图像都是CV_8UC3类型,而且两者尺寸一样。实际上并不需要去先定义dstarr,因为程序里会将srcarr的格式赋值给dstarr。
termcrit有三种情况,迭代次数、迭代精度和两者同时满足。默认为迭代次数为5同时迭代精度为1。termcrit是个结构体,其结构如下
-
<span style="font-size:18px;">typedef struct CvTermCriteria -
{ -
int type; /*CV_TERMCRIT_ITER或CV_TERMCRIT_EPS 或二者都是*/ -
int max_iter; /* 最大迭代次数 */ -
double epsilon; /* 结果的精确性 */ -
} -
CvTermCriteria;</span>
使用pyrMeanShiftFiltering()进行图像分割非常简单,只需要定义sp0,sr,max_level和termrit,然后调用pyrMeanShiftFiltering()就行了。
在实际操作时,为了使分割的结果显示得更明显,经常用floodFill( )将不同连通域涂上不同的颜色。具体情况参看下 面的实例。
2. 程序实例
来看看OpenCV自带的一个用meanshift进行分割的例子
原程序见 “ .\OpenCV249\sources\samples\cpp\meanshift_segmentation.cpp”
-
<span style="font-size:18px;">#include "opencv2/highgui/highgui.hpp" -
#include "opencv2/core/core.hpp" -
#include "opencv2/imgproc/imgproc.hpp" -
#include <iostream> -
using namespace cv; -
using namespace std; -
static void help(char** argv) -
{ -
cout << "\nDemonstrate mean-shift based color segmentation in spatial pyramid.\n" -
<< "Call:\n " << argv[0] << " image\n" -
<< "This program allows you to set the spatial and color radius\n" -
<< "of the mean shift window as well as the number of pyramid reduction levels explored\n" -
<< endl; -
} -
//This colors the segmentations -
static void floodFillPostprocess( Mat& img, const Scalar& colorDiff=Scalar::all(1) ) -
{ -
CV_Assert( !img.empty() ); -
RNG rng = theRNG(); -
Mat mask( img.rows+2, img.cols+2, CV_8UC1, Scalar::all(0) ); -
for( int y = 0; y < img.rows; y++ ) -
{ -
for( int x = 0; x < img.cols; x++ ) -
{ -
if( mask.at<uchar>(y+1, x+1) == 0 ) -
{ -
Scalar newVal( rng(256), rng(256), rng(256) ); -
floodFill( img, mask, Point(x,y), newVal, 0, colorDiff, colorDiff ); -
} -
} -
} -
} -
string winName = "meanshift"; -
int spatialRad, colorRad, maxPyrLevel; -
Mat img, res; -
static void meanShiftSegmentation( int, void* ) -
{ -
cout << "spatialRad=" << spatialRad << "; " -
<< "colorRad=" << colorRad << "; " -
<< "maxPyrLevel=" << maxPyrLevel << endl; -
pyrMeanShiftFiltering( img, res, spatialRad, colorRad, maxPyrLevel ); -
//Mat imgGray; -
//cvtColor(res,imgGray,CV_RGB2GRAY); -
//imshow("res",res); -
floodFillPostprocess( res, Scalar::all(2) ); -
imshow( winName, res ); -
} -
int main(int argc, char** argv) -
{ -
img = imread("rubberwhale1.png"); -
//img = imread("pic2.png"); -
if( img.empty() ) -
return -1; -
spatialRad = 10; -
colorRad = 10; -
maxPyrLevel = 1; -
namedWindow( winName, WINDOW_AUTOSIZE ); -
//imshow("img",img); -
createTrackbar( "spatialRad", winName, &spatialRad, 80, meanShiftSegmentation ); -
createTrackbar( "colorRad", winName, &colorRad, 60, meanShiftSegmentation ); -
createTrackbar( "maxPyrLevel", winName, &maxPyrLevel, 5, meanShiftSegmentation ); -
meanShiftSegmentation(0, 0); -
//floodFillPostprocess( img, Scalar::all(2) ); -
//imshow("img2",img); -
waitKey(); -
return 0; -
}</span>
程序很简单,来看看floodFill()函数,有两种形式
int floodFill( InputOutputArray image, Point seedPoint, Scalar newVal, CV_OUT Rect* rect=0, Scalar loDiff=Scalar(), Scalar upDiff=Scalar(), int flags=4 );
int floodFill( InputOutputArray image, InputOutputArray mask, Point seedPoint, Scalar newVal, CV_OUT Rect* rect=0, Scalar loDiff=Scalar(), Scalar upDiff=Scalar(), int flags=4 );
InputOutputArray image 输入输出图像,要求格式为1通道或3通道,8位或浮点
InputOutputArray mask 掩膜,比image的宽和高各大两像素点
Point seedPoint 填充的起始点
Scalar newVal 像素点被染色的值
CV_OUT Rect* rect=0 可选参数,设置floodFill()要重绘区域的最小边界矩形区域
Scalar loDiff=Scalar() 定义当前像素值与起始点像素值的亮度或颜色负差的最大值
Scalar upDiff=Scalar() 定义当前像素值与起始点像素值的亮度或颜色正差的最大值
flags 操作标志符
程序结果
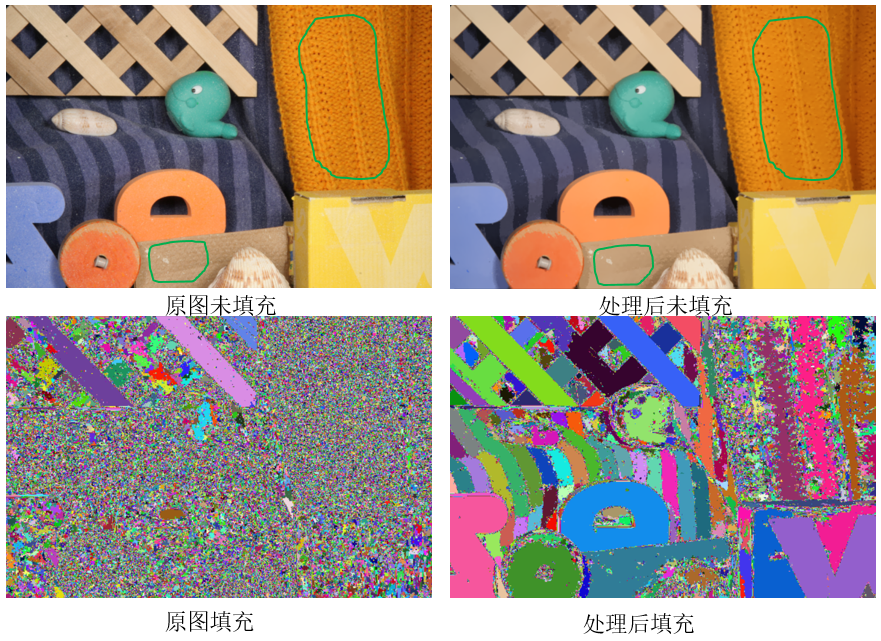
处理后一些细小的纹理都平滑掉了,例如图中绿色线条所指示的区域。未填充时,很多地方看得并不明显,填充后就能明显看出差别来了。填充后的图很好地体现了meanshift聚类的思想!
再来看一组更“夸张”的效果图

使用meanshift方法进行处理后,原来的三个矩形区域消失了!平滑掉了!
meanshift算法的两个关键参数是空间域半径sr和颜色域半径sp,别说max_level,那是构建图像金字塔的参数好吧。最后,我们来看看sr和sp对结果的影响。
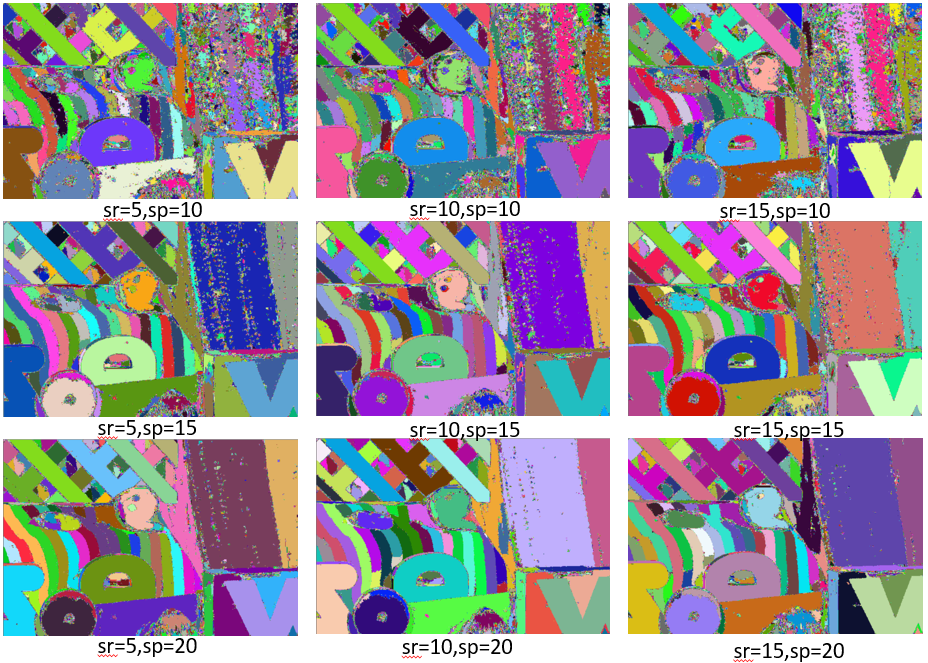
显然颜色域半径sp对结果的影响比空间域半径sr对结果的影响大。sp和sr越小,细节保留得越多,sp和sr越大,平滑力度越大。边缘和颜色突变的区域的特征保留的较好。因为meanshift要对每个像素点进行操作,所以算法的时间花销很大。
3. 深入代码
-
<span style="font-size:14px;">/****************************************************************************************\ -
* Meanshift * -
\****************************************************************************************/ -
CV_IMPL void -
cvPyrMeanShiftFiltering( const CvArr* srcarr, CvArr* dstarr, -
double sp0, double sr, int max_level, -
CvTermCriteria termcrit ) -
{ -
const int cn = 3; -
const int MAX_LEVELS = 8; -
if( (unsigned)max_level > (unsigned)MAX_LEVELS ) -
CV_Error( CV_StsOutOfRange, "The number of pyramid levels is too large or negative" ); //限定max_level不超过8 -
std::vector<cv::Mat> src_pyramid(max_level+1); //+1是因为原始图和最终图都定义为图像金字塔的第0层 -
std::vector<cv::Mat> dst_pyramid(max_level+1); -
cv::Mat mask0; -
int i, j, level; -
//uchar* submask = 0; -
#define cdiff(ofs0) (tab[c0-dptr[ofs0]+255] + \ -
tab[c1-dptr[(ofs0)+1]+255] + tab[c2-dptr[(ofs0)+2]+255] >= isr22) -
double sr2 = sr * sr; -
int isr2 = cvRound(sr2), isr22 = MAX(isr2,16); -
int tab[768]; -
cv::Mat src0 = cv::cvarrToMat(srcarr); //arr转Mat -
cv::Mat dst0 = cv::cvarrToMat(dstarr); -
//确保src和dst都是CV_8UC3,且同尺寸 -
if( src0.type() != CV_8UC3 ) -
CV_Error( CV_StsUnsupportedFormat, "Only 8-bit, 3-channel images are supported" ); -
if( src0.type() != dst0.type() ) -
CV_Error( CV_StsUnmatchedFormats, "The input and output images must have the same type" ); -
if( src0.size() != dst0.size() ) -
CV_Error( CV_StsUnmatchedSizes, "The input and output images must have the same size" ); -
//确保迭代次数在1到100次,默认则为5;迭代精度默认为1. -
if( !(termcrit.type & CV_TERMCRIT_ITER) ) -
termcrit.max_iter = 5; -
termcrit.max_iter = MAX(termcrit.max_iter,1); -
termcrit.max_iter = MIN(termcrit.max_iter,100); -
if( !(termcrit.type & CV_TERMCRIT_EPS) ) -
termcrit.epsilon = 1.f; -
termcrit.epsilon = MAX(termcrit.epsilon, 0.f); -
for( i = 0; i < 768; i++ ) -
tab[i] = (i - 255)*(i - 255); //tab[]存的是(-255)^2到512^2 -
// 1. 构造金字塔 -
src_pyramid[0] = src0; -
dst_pyramid[0] = dst0; -
for( level = 1; level <= max_level; level++ ) -
{ -
//src_pyramid和dst_pyramid尺寸一样,下一层是上一层尺寸的一半 -
src_pyramid[level].create( (src_pyramid[level-1].rows+1)/2, -
(src_pyramid[level-1].cols+1)/2, src_pyramid[level-1].type() ); -
dst_pyramid[level].create( src_pyramid[level].rows, -
src_pyramid[level].cols, src_pyramid[level].type() ); -
//对src_pyramid[level-1]下采样,结果存入src_pyramid[level] -
cv::pyrDown( src_pyramid[level-1], src_pyramid[level], src_pyramid[level].size() ); -
//CV_CALL( cvResize( src_pyramid[level-1], src_pyramid[level], CV_INTER_AREA )); -
} -
mask0.create(src0.rows, src0.cols, CV_8UC1); -
//CV_CALL( submask = (uchar*)cvAlloc( (sp+2)*(sp+2) )); -
// 2. 从顶层(最小层)开始应用meanshift算法。 -
for( level = max_level; level >= 0; level-- ) -
{ -
cv::Mat src = src_pyramid[level]; -
cv::Size size = src.size(); -
uchar* sptr = src.data; //sptr指向图像矩阵的起始地址,也就是第一行的起始地址 -
int sstep = (int)src.step; //sstep是图像矩阵每一行的长度(以字节为单位),以便后面计算地址 -
uchar* mask = 0; -
int mstep = 0; -
uchar* dptr; -
int dstep; -
float sp = (float)(sp0 / (1 << level)); -
sp = MAX( sp, 1 ); //这里保证了sp≥1,那么窗口最小是3×3 -
//这段语句主要作用1、通过上采样得到dst_pyramid[level];2、得到掩码mask -
if( level < max_level ) -
{ -
cv::Size size1 = dst_pyramid[level+1].size(); -
cv::Mat m( size.height, size.width, CV_8UC1, mask0.data ); -
dstep = (int)dst_pyramid[level+1].step; -
dptr = dst_pyramid[level+1].data + dstep + cn; -
mstep = (int)m.step; -
mask = m.data + mstep; -
//cvResize( dst_pyramid[level+1], dst_pyramid[level], CV_INTER_CUBIC ); -
cv::pyrUp( dst_pyramid[level+1], dst_pyramid[level], dst_pyramid[level].size() ); //上采样 -
m.setTo(cv::Scalar::all(0)); -
for( i = 1; i < size1.height-1; i++, dptr += dstep - (size1.width-2)*3, mask += mstep*2 ) -
{ -
for( j = 1; j < size1.width-1; j++, dptr += cn ) -
{ -
int c0 = dptr[0], c1 = dptr[1], c2 = dptr[2]; -
mask[j*2 - 1] = cdiff(-3) || cdiff(3) || cdiff(-dstep-3) || cdiff(-dstep) || -
cdiff(-dstep+3) || cdiff(dstep-3) || cdiff(dstep) || cdiff(dstep+3); -
} -
} -
cv::dilate( m, m, cv::Mat() ); //对m膨胀 -
mask = m.data; -
} -
dptr = dst_pyramid[level].data; //dptr指向图像矩阵起始地址 -
dstep = (int)dst_pyramid[level].step; //dstep表示图像矩阵每一行的占内存的字节数 -
for( i = 0; i < size.height; i++, sptr += sstep - size.width*3, -
dptr += dstep - size.width*3, //每处理完一行,sptr和dptr都指向下一行的起始地址 -
mask += mstep ) -
{ -
for( j = 0; j < size.width; j++, sptr += 3, dptr += 3 ) //每处理完一列,sptr和dptr都指向同行下一列像素的起始地址,所以sptr和dptr实际就是每个像素点的地址 -
{ -
int x0 = j, y0 = i, x1, y1, iter; -
int c0, c1, c2; -
if( mask && !mask[j] ) -
continue; -
c0 = sptr[0], c1 = sptr[1], c2 = sptr[2]; //分别对应像素点三通道的地址 -
// iterate meanshift procedure -
for( iter = 0; iter < termcrit.max_iter; iter++ ) -
{ -
uchar* ptr; -
int x, y, count = 0; -
int minx, miny, maxx, maxy; -
int s0 = 0, s1 = 0, s2 = 0, sx = 0, sy = 0; //(x,y)的迭代的坐标值,(s0,s1,s2)是迭代的3通道分量值 -
double icount; -
int stop_flag; -
//mean shift: process pixels in window (p-sigmaSp)x(p+sigmaSp) -
minx = cvRound(x0 - sp); minx = MAX(minx, 0); //若j-sp>=0,则minx=(j-sp),否则,minx=0; -
miny = cvRound(y0 - sp); miny = MAX(miny, 0); //若i-sp>=0,则miny=(i-sp),否则,miny=0; -
maxx = cvRound(x0 + sp); maxx = MIN(maxx, size.width-1); //若j+sp<=width+1,则maxx=j+sp,否则,maxx=width-1; -
maxy = cvRound(y0 + sp); maxy = MIN(maxy, size.height-1); //若i+sp<=height+1,则maxy=i+sp,否则,maxy=height-1; -
ptr = sptr + (miny - i)*sstep + (minx - j)*3; //sptr指向(i,j),ptr则指向当前窗口第一个像素点 -
for( y = miny; y <= maxy; y++, ptr += sstep - (maxx-minx+1)*3 ) //窗口内,每处理完一行,ptr指向下一行首地址 -
{ -
int row_count = 0; -
x = minx; -
#if CV_ENABLE_UNROLLED -
for( ; x + 3 <= maxx; x += 4, ptr += 12 ) //这两次for循环是什么意思?颜色限定和空间限定? -
{ -
int t0 = ptr[0], t1 = ptr[1], t2 = ptr[2]; -
if( tab[t0-c0+255] + tab[t1-c1+255] + tab[t2-c2+255] <= isr2 ) -
{ -
s0 += t0; s1 += t1; s2 += t2; -
sx += x; row_count++; -
} -
t0 = ptr[3], t1 = ptr[4], t2 = ptr[5]; -
if( tab[t0-c0+255] + tab[t1-c1+255] + tab[t2-c2+255] <= isr2 ) -
{ -
s0 += t0; s1 += t1; s2 += t2; -
sx += x+1; row_count++; -
} -
t0 = ptr[6], t1 = ptr[7], t2 = ptr[8]; -
if( tab[t0-c0+255] + tab[t1-c1+255] + tab[t2-c2+255] <= isr2 ) -
{ -
s0 += t0; s1 += t1; s2 += t2; -
sx += x+2; row_count++; -
} -
t0 = ptr[9], t1 = ptr[10], t2 = ptr[11]; -
if( tab[t0-c0+255] + tab[t1-c1+255] + tab[t2-c2+255] <= isr2 ) -
{ -
s0 += t0; s1 += t1; s2 += t2; -
sx += x+3; row_count++; -
} -
} -
#endif -
for( ; x <= maxx; x++, ptr += 3 ) -
{ -
int t0 = ptr[0], t1 = ptr[1], t2 = ptr[2]; -
if( tab[t0-c0+255] + tab[t1-c1+255] + tab[t2-c2+255] <= isr2 ) -
{ -
s0 += t0; s1 += t1; s2 += t2; -
sx += x; row_count++; -
} -
} -
count += row_count; -
sy += y*row_count; -
} -
if( count == 0 ) -
break; -
icount = 1./count; -
x1 = cvRound(sx*icount); -
y1 = cvRound(sy*icount); -
s0 = cvRound(s0*icount); -
s1 = cvRound(s1*icount); -
s2 = cvRound(s2*icount); -
stop_flag = (x0 == x1 && y0 == y1) || abs(x1-x0) + abs(y1-y0) + -
tab[s0 - c0 + 255] + tab[s1 - c1 + 255] + -
tab[s2 - c2 + 255] <= termcrit.epsilon; -
x0 = x1; y0 = y1; -
c0 = s0; c1 = s1; c2 = s2; -
if( stop_flag ) -
break; -
} -
dptr[0] = (uchar)c0; -
dptr[1] = (uchar)c1; -
dptr[2] = (uchar)c2; -
} -
} -
} -
} -
void cv::pyrMeanShiftFiltering( InputArray _src, OutputArray _dst, -
double sp, double sr, int maxLevel, -
TermCriteria termcrit ) -
{ -
Mat src = _src.getMat(); -
if( src.empty() ) -
return; -
_dst.create( src.size(), src.type() ); -
CvMat c_src = src, c_dst = _dst.getMat(); -
cvPyrMeanShiftFiltering( &c_src, &c_dst, sp, sr, maxLevel, termcrit ); -
}</span><span style="font-size:18px;">
这篇关于学习OpenCV2——MeanShift之图形分割的文章就介绍到这儿,希望我们推荐的文章对编程师们有所帮助!


