本文主要是介绍chisel入门初步1——基4的booth编码的单周期有符号乘法器实现,希望对大家解决编程问题提供一定的参考价值,需要的开发者们随着小编来一起学习吧!
基4的booth编码乘法器原理说明
基2的booth编码
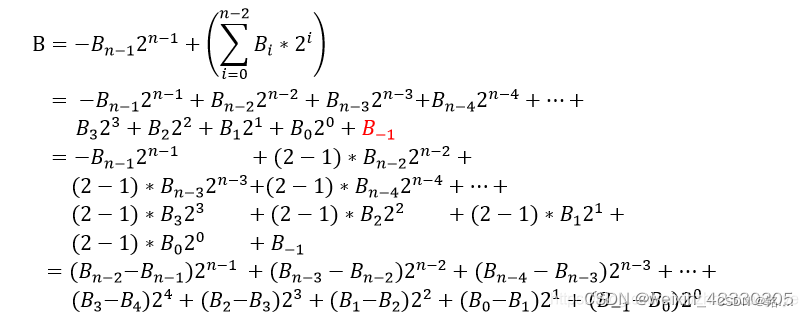
本质来说就是一个裂项重组,乘法器最重要的设计是改变部分积的数量,另外在考虑有符号数的情况下,最高位符号位有特别的意义。
(注:部分积是指需要最后一起加和的所有部分乘积的项)
下面直接套用其他人图片进行展示,来源如下
https://blog.csdn.net/weixin_42330305/article/details/122868294

其中 B − 1 = 0 B_{-1}=0 B−1=0
可以看到,基2的booth编码并没有改变部分积的数量,在实际运行时,基2的booth编码在某些情况下无法提速,甚至可能降速,所以引入基4的booth编码
基4的booth编码
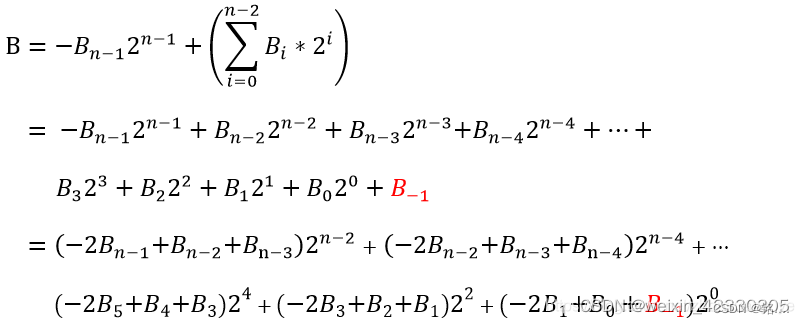
为应对上面问题,这里引入基4的booth编码,将部分积的数量缩小了一半,大大加快了处理速度,具体如下
图片来源与上面相同

所以

其中 B − 1 = 0 B_{-1}=0 B−1=0
在实际处理时,为保证形式统一且数组访问时不越界,可以这样处理
b = {B, 0};
通过在末尾拼接一个0,整个式子可以写成下述形式
A ⋅ B = ∑ i = 0 n 2 − 1 ( − 2 ⋅ b 2 i + 2 + b 2 i + 1 + b 2 i ) ⋅ 2 2 i ⋅ A A\cdot B=\sum_{i=0}^{\frac{n}{2}-1} (-2 \cdot b_{2i+2} + b_{2i+1} + b_{2i})\cdot2^{2i}\cdot A A⋅B=∑i=02n−1(−2⋅b2i+2+b2i+1+b2i)⋅22i⋅A
可以看出,部分积的数量减少到原来的一半,乘法器速度大大加快
基4的booth编码的单周期有符号乘法器Verilog实现
直接丢出Verilog代码
/*
* 基4的booth编码的单周期有符号乘法器
*/module booth_multiplier_base4 #(parameter DATA_WIDTH = 8       // 数据位宽应该为2的指数
)(  input [DATA_WIDTH-1 : 0] a,  input [DATA_WIDTH-1 : 0] b,  output reg [2*DATA_WIDTH-1 : 0] product,input clk
);  integer i;  reg [2:0] booth_bits [DATA_WIDTH/2-1:0];  reg [DATA_WIDTH:0] b_extended;reg [2*DATA_WIDTH:0] partial_product [DATA_WIDTH/2-1:0];  reg [2*DATA_WIDTH-1:0] a_pos, a_neg, a_extend; always @(posedge clk) begin  b_extended = {b, 1'b0}; // 这里我补了个0,防止索引超出界限a_extend = {{DATA_WIDTH{a[DATA_WIDTH-1]}}, a};    // 符号位扩展 ,之前忘记扩展找了好久a_pos = a_extend;a_neg = ~a_extend + 1'b1;  // 补码运算product = 0;for (i = 0; i < DATA_WIDTH/2; i = i + 1) begin  booth_bits[i] = {b_extended[2*i+2], b_extended[2*i+1], b_extended[2*i]};  case (booth_bits[i])/*$\sum_{i=0}^{\frac{n}{2}-1} (-2 \cdot b_{2i+2} + b_{2i+1} + b_{2i})$  // LaTex{ b(2i+2), b(2i+1), b(2i) } :=000:    0;001:    1;010:    1;011:    2;100:    -2;101:    -1;110:    -1;111:    0;*/  3'b000, 3'b111: partial_product[i] = 9'd0;  3'b001, 3'b010: partial_product[i] = a_pos;3'b011:         partial_product[i] = a_pos << 1;3'b100:         partial_product[i] = a_neg << 1;3'b101, 3'b110: partial_product[i] = a_neg; endcase  endfor (i = 0; i < (DATA_WIDTH/2-1); i = i + 1) beginproduct = product + (partial_product[i] << (2*i)); // Shift and accumulateendend  endmodule
testbench如下
`timescale 1ns/1nsmodule sim_booth_multiplier_base4 ();parameter DATA_WIDTH = 8;    reg [DATA_WIDTH-1:0] a;
reg [DATA_WIDTH-1:0] b;
wire [2*DATA_WIDTH-1:0] product;
reg [2*DATA_WIDTH-1:0] expected_product;
reg test_passed;
reg clk;booth_multiplier_base4 #(.DATA_WIDTH(DATA_WIDTH)) booth_multiplier_base4_0
(.a(a),.b(b),.product(product),.clk(clk)
);initial begin  // 初始化  $display("Time, a, b, Expected Product, Actual Product, Test Result\n");  clk = 0;// 第一个样例  a <= 8'b01111111; // 127  b <= 8'b00000010; // 2  expected_product <= 16'd254; // 254  #10; // 等待一些时间以便观察波形  test_passed = (product == expected_product) ? 1 : 0;  $display("%d, %b, %b, %b, %b, %s\n", $time, a, b, expected_product, product, (test_passed ? "PASSED" : "FAILED"));  // 第二个样例 (注意:在实际八位乘法中这是不可能的,因为会溢出)  // 我们可以故意让它失败,或者用一个能够处理溢出的乘法器  a <= 8'b10000000; // -128 (补码表示)  b <= 8'b10000000; // -128 (补码表示)  // 由于这个乘法实际上会溢出,所以设置expected_product为一个不可能的值  expected_product <= 16'bx0000000000000000; // 'x'表示不关心这些位  #10;  // 这里我们检查乘法器是否设置了溢出标志位(如果有的话),或者检查最高位是否设置正确  // 由于我们没有具体的乘法器实现细节,这里只能做一个假设性的检查  // 假设乘法器在溢出时将最高位设置为1  test_passed = (product == expected_product) ? 1 : 0;  $display("%d, %b, %b, %b, %b, %s (Overflow Expected)\n", $time, a, b, expected_product, product, test_passed ? "PASSED" : "FAILED");  // 第三个样例  a <= 8'b11111111; // -1  b <= 8'b11111111; // -1  expected_product <= 16'b0000000000000001; // 1  #10;  test_passed = (product == expected_product) ? 1 : 0;  $display("%d, %b, %b, %b, %b, %s\n", $time, a, b, expected_product, product, test_passed ? "PASSED" : "FAILED");  // 结束仿真  $finish;
end  always begin#2;clk = ~clk;
end
endmodule
代码不详细讲了,应该还比较清楚,没有进行性能的优化,仅完成功能的实现
基4的booth编码单周期有符号乘法器chisel实现
和Verilog代码逻辑相同,这里直接撇出来
模块代码
import chisel3._
import chisel3.util._  class BoothMultiplierBase4(val DATA_WIDTH: Int = 8) extends Module {  val io = IO(new Bundle {  val a = Input(SInt(DATA_WIDTH.W))  // Signed input a  val b = Input(SInt(DATA_WIDTH.W))  // Signed input b  val product = Output(SInt((2 * DATA_WIDTH).W)) // Signed output product  })  val booth_bits = Wire(Vec((DATA_WIDTH / 2), UInt(3.W)))  val partial_products = RegInit(VecInit(Seq.fill(DATA_WIDTH / 2)(0.S((2 * DATA_WIDTH).W))))  // On every positive edge of the clock  val b_extended = io.b << 1.U // Sign-extend b with an extra 0  val a_neg = -io.a                    // Negation of a  val a_pos = io.a                     // Positive of aval regProduct = RegInit(0.S((2 * DATA_WIDTH).W))// Calculate Booth bits  for (i <- 0 until DATA_WIDTH / 2) {  booth_bits(i) := Cat(b_extended(2*i+2), b_extended(2*i+1), b_extended(2*i)) // Calculate partial products based on Booth encoding  partial_products(i) := MuxCase(0.S, Array(  (booth_bits(i) === 0.U || booth_bits(i) === 7.U) -> 0.S,  (booth_bits(i) === 1.U || booth_bits(i) === 2.U)  -> a_pos,  (booth_bits(i) === 3.U) -> (a_pos << 1.U),  (booth_bits(i) === 4.U) -> (a_neg << 1.U),                 // 此处自动进行符号位的扩展,下同(booth_bits(i) === 5.U || booth_bits(i) === 6.U) -> a_neg  ))  }  // Accumulate partial products to form the final product  io.product := partial_products.zipWithIndex.map{case (pp, i) => pp << ((2*i).U)}.reduce(_+_)}  /* An object extending App to generate the Verilog code*/
object BoothMultiplierBase4 extends App {(new chisel3.stage.ChiselStage).emitVerilog(new BoothMultiplierBase4(), Array("--target-dir", "./verilog/BoothMultiplier"))
}
测试代码
import org.scalatest.flatspec.AnyFlatSpec
import scala.util.Random
import chisel3._
import chisel3.tester._  // Booth乘法器的测试类  class BoothMultiplierBase4Test extends AnyFlatSpec with ChiselScalatestTester {  behavior of "BoothMultiplierBase4"  it should "multiply signed numbers correctly" in {  for (i <- 0 until 10) {  val a = Random.nextInt(256) - 128 // 生成-128到127之间的随机数  val b = Random.nextInt(256) - 128  test(new BoothMultiplierBase4) { c =>  c.io.a.poke(a.S) // 将随机数a作为有符号数输入  c.io.b.poke(b.S) // 将随机数b作为有符号数输入  c.clock.step(2) // 时钟前进一步以执行乘法  val expectedProduct = a.toLong * b.toLong // 计算预期乘积  val actualProduct = c.io.product.peek().litValue.toLong // 获取实际乘积  /* c: 这是测试环境中BoothMultiplierBase4模块的实例。c.io.product: 这是指向模块输出端口product的引用。peek(): 这是一个Chisel测试方法,用于在不推进时钟的情况下读取端口的当前值。litValue: 这是一个方法,用于从Chisel的Data类型中提取实际的Scala值(在这个例子中是BigInt) */println(s"Iteration: $i, A: $a, B: $b, Expected Product: $expectedProduct, Actual Product: $actualProduct")  assert(actualProduct === expectedProduct, s"Product is incorrect at iteration $i! Expected: $expectedProduct, Actual: $actualProduct")  }  }  }
}
测试结果
Iteration: 0, A: -70, B: 110, Expected Product: -7700, Actual Product: -7700
o		# 不知道这个o是哪里来的。。。
Iteration: 1, A: 105, B: 104, Expected Product: 10920, Actual Product: 10920
Iteration: 2, A: 69, B: -90, Expected Product: -6210, Actual Product: -6210
Iteration: 3, A: 62, B: -64, Expected Product: -3968, Actual Product: -3968
Iteration: 4, A: -34, B: -104, Expected Product: 3536, Actual Product: 3536
Iteration: 5, A: -49, B: 103, Expected Product: -5047, Actual Product: -5047
Iteration: 6, A: 57, B: 56, Expected Product: 3192, Actual Product: 3192
Iteration: 7, A: 32, B: 22, Expected Product: 704, Actual Product: 704
Iteration: 8, A: -51, B: -101, Expected Product: 5151, Actual Product: 5151
Iteration: 9, A: -94, B: 54, Expected Product: -5076, Actual Product: -5076
这篇关于chisel入门初步1——基4的booth编码的单周期有符号乘法器实现的文章就介绍到这儿,希望我们推荐的文章对编程师们有所帮助!


