本文主要是介绍基于EdgeBoard飞桨开发套件和PicoDet部署夜间场景检测模型,希望对大家解决编程问题提供一定的参考价值,需要的开发者们随着小编来一起学习吧!
基于EdgeBoard飞浆开发套件和PicoDet部署夜间场景检测模型
在夜间微弱的灯光下,摄像头拍摄的画质非常差,基于夜间场景的识别模型训练有助于夜间安防。本项目基于ExDark数据集、PicoDet、EdgeBoard飞桨开发套件和PyQt5进行夜间场景特定物品检测模型的训练和部署。
材料准备
- ExDark数据集
- Aistudio在线运行环境
- EdgeBoard飞桨开发套件(一个板子,可以用本地CPU代替~)
- 摄像头(USB摄像头,尽可能便宜即可)
代码
训练PicoDet模型
基础环境准备
! unzip -oq data/data129450/ExDark.zip
# 克隆PaddleDetection仓库
import os
if not os.path.exists('PaddleDetection'):!git clone https://github.com/PaddlePaddle/PaddleDetection.git# 安装其他依赖
%cd PaddleDetection
! pip install -r requirements.txt# 编译安装paddledet
! python setup.py install
# 测试一下PaddleDet环境有没有准备好
! python ppdet/modeling/tests/test_architectures.py
调整数据格式
将数据格式调整为voc格式,并且准备paddledet需要的文件
正所谓是闻名不如见面吗,不熟悉voc格式的小伙伴可以通过以下语句查看一个voc格式的示例~
%cd ~
! wget https://paddlemodels.bj.bcebos.com/object_detection/roadsign_voc.tar
! tar -xvf /home/aistudio/roadsign_voc.tar
# ExDark转voc
%cd ~# thanks to https://blog.csdn.net/hu694028833/article/details/81089959
import xml.dom.minidom as minidom
import cv2def convert2xml(img_dir,annotation_dir,save_dir):img = cv2.imread(img_dir)h,w,c = img.shapedom = minidom.getDOMImplementation().createDocument(None,'annotations',None)root = dom.documentElementelement = dom.createElement('filename')element.appendChild(dom.createTextNode(img_dir.split('/')[-1]))root.appendChild(element)element = dom.createElement('size')element_c = dom.createElement('width')element_c.appendChild(dom.createTextNode(str(w)))element.appendChild(element_c)element_c = dom.createElement('height')element_c.appendChild(dom.createTextNode(str(h)))element.appendChild(element_c)element_c = dom.createElement('depth')element_c.appendChild(dom.createTextNode(str(c)))element.appendChild(element_c)root.appendChild(element)with open(annotation_dir) as f:for line in f.readlines():if '% bbGt' in line:continueelse:element = dom.createElement('object')name = line.split(' ')[0]xmin = int(line.split(' ')[1])ymin = int(line.split(' ')[2])xlen = int(line.split(' ')[3])ylen = int(line.split(' ')[4])element_c = dom.createElement('name')element_c.appendChild(dom.createTextNode(name))element.appendChild(element_c)element_c = dom.createElement('bndbox')element.appendChild(element_c)element_cc = dom.createElement('xmin')element_cc.appendChild(dom.createTextNode(str(xmin)))element_c.appendChild(element_cc)element_cc = dom.createElement('ymin')element_cc.appendChild(dom.createTextNode(str(ymin)))element_c.appendChild(element_cc)element_cc = dom.createElement('xmax')element_cc.appendChild(dom.createTextNode(str(xmin+xlen)))element_c.appendChild(element_cc)element_cc = dom.createElement('ymax')element_cc.appendChild(dom.createTextNode(str(ymin+ylen)))element_c.appendChild(element_cc)root.appendChild(element)with open(save_dir, 'w', encoding='utf-8') as f:dom.writexml(f, addindent='\t', newl='\n',encoding='utf-8')convert2xml('ExDark/images/Bicycle/2015_00001.png','ExDark/Annnotations/Bicycle/2015_00001.png.txt','test.xml')
/home/aistudio
# thanks to https://www.runoob.com/python/os-walk.html
# 用一个train.txt记录数据
%cd ~
import os
! mkdir -p ExDark/annotations
with open('train.txt','w') as f:for root, dirs, files in os.walk("ExDark/images", topdown=False):for name in files:img_dir = os.path.join(root, name)if 'ipynb_checkpoints' in img_dir:continueannotation_dir = img_dir.replace('images','Annnotations')+'.txt'save_dir = 'ExDark/annotations/'+img_dir.split('/')[-1]+'.xml'try:convert2xml(img_dir,annotation_dir,save_dir)except:continuef.write(img_dir+' '+save_dir+'\n')
# 准备标签文件
%cd ~
with open('label_list.txt','w') as f:for item in os.listdir("ExDark/images"):f.write(item+'\n')
/home/aistudio
准备yml文件
在PaddleDetection/configs/picodet/目录下准备一个名为myPicodetXsVoc.yml的文件,内容为
_BASE_: ['../datasets/voc.yml','../runtime.yml','_base_/picodet_v2.yml','_base_/optimizer_300e.yml','_base_/picodet_320_reader.yml',
]pretrain_weights: https://paddledet.bj.bcebos.com/models/pretrained/LCNet_x0_35_pretrained.pdparams
weights: output/picodet_xs_320_coco/best_model
find_unused_parameters: True
use_ema: true
epoch: 8
snapshot_epoch: 2LCNet:scale: 0.35feature_maps: [3, 4, 5]LCPAN:out_channels: 96PicoHeadV2:conv_feat:name: PicoFeatfeat_in: 96feat_out: 96num_convs: 2num_fpn_stride: 4norm_type: bnshare_cls_reg: Trueuse_se: Truefeat_in_chan: 96TrainReader:batch_size: 64LearningRate:base_lr: 0.32schedulers:- !CosineDecaymax_epochs: 300- !LinearWarmupstart_factor: 0.1steps: 300
将PaddleDetection/configs/datasets/voc.yml修改为如下内容
metric: VOC
map_type: 11point
num_classes: 12TrainDataset:!VOCDataSetdataset_dir: /home/aistudioanno_path: /home/aistudio/train.txtlabel_list: /home/aistudio/label_list.txtdata_fields: ['image', 'gt_bbox', 'gt_class', 'difficult']EvalDataset:!VOCDataSetdataset_dir: /home/aistudioanno_path: /home/aistudio/train.txtlabel_list: /home/aistudio/label_list.txtdata_fields: ['image', 'gt_bbox', 'gt_class', 'difficult']TestDataset:!ImageFolderanno_path: /home/aistudio/label_list.txt
训练
10 epoch 24 min
%cd ~/PaddleDetection
! export CUDA_VISIBLE_DEVICES=0 #windows和Mac下不需要执行该命令
! python tools/train.py -c configs/picodet/myPicodetXsVoc.yml
预测
预测一下看看结果吧,如果啥也没检测到就修改threshold,毕竟是黑暗场景~调低一点就能看到了。
结果展示:

# 预测代码
%cd ~/PaddleDetection
! export CUDA_VISIBLE_DEVICES=0 #windows和Mac下不需要执行该命令
! python tools/infer.py -c configs/picodet/myPicodetXsVoc.yml \--infer_img=/home/aistudio/ExDark/images/Bicycle/2015_00001.png \--output_dir=infer_output/ \--draw_threshold=0.5 \-o weights=output/myPicodetXsVoc/model_final \--use_vdl=False
/home/aistudio/PaddleDetection
W0910 18:38:48.325160 14436 gpu_resources.cc:61] Please NOTE: device: 0, GPU Compute Capability: 7.0, Driver API Version: 11.2, Runtime API Version: 11.2
W0910 18:38:48.328585 14436 gpu_resources.cc:91] device: 0, cuDNN Version: 8.2.
[09/10 18:38:48] ppdet.utils.checkpoint INFO: Finish loading model weights: output/myPicodetXsVoc/model_final.pdparams
100%|█████████████████████████████████████████████| 1/1 [00:01<00:00,  1.99s/it]
[09/10 18:38:50] ppdet.engine INFO: Detection bbox results save in infer_output/2015_00001.png
模型导出
%cd ~/PaddleDetection
! python tools/export_model.py -c configs/picodet/myPicodetXsVoc.yml \--output_dir=./inference_model \-o weights=output/myPicodetXsVoc/model_final \TestReader.inputs_def.image_shape=[3,320,320]
/home/aistudio/PaddleDetection
[09/06 20:38:43] ppdet.utils.checkpoint INFO: Finish loading model weights: output/myPicodetXsVoc/model_final.pdparams
[09/06 20:38:43] ppdet.engine INFO: Export inference config file to ./inference_model/myPicodetXsVoc/infer_cfg.yml
[09/06 20:38:48] ppdet.engine INFO: Export model and saved in ./inference_model/myPicodetXsVoc
部署
模型转化
Fork项目EdgeBoard飞桨开发套件,根据项目内说明,执行即可。
需要注意以下两点:
- EdgeBoard飞桨开发套件中除章节“模型推理”外,均可以在Aistudio上执行
- 如果Fork上述项目,在执行过程中不顺利,可以尝试在Terminal中运行。
部署
转化后的模型为一个tar文件。
将转化后的.tar文件放在EdgeBoard指定路径下,并修改对应Config信息即可(具体参考EdgeBoard飞桨开发套件)。
具体的EB推理代码如下(由于使用了pyqt5和摄像头需要在本地运行):
#!/usr/bin/python3
# -*- coding: utf-8 -*-"""
Thanks to
zetcode.com
https://blog.csdn.net/u014453898/article/details/88083173
https://github.com/maicss/PyQt-Chinese-tutorial
https://maicss.gitbooks.io/pyqt5/content/
https://blog.csdn.net/m0_37811342/article/details/108741505
"""import sys
import cv2
import numpy as np
import math
import time
import collections
import os
import sys
from PyQt5.QtWidgets import QWidget, QDesktopWidget, QApplication, QPushButton, QFileDialog, QLabel, QTextEdit, \QGridLayout, QFrame, QColorDialog
from PyQt5.QtCore import QTimer, QUrl
from PyQt5.QtGui import QColor, QImage, QPixmap"""Demo for ppnc runtime on board"""
import json# add python path of ppnc/python to sys.path
parent_path = os.path.abspath(os.path.join(__file__, *(['..'] * 2)))
sys.path.insert(0, parent_path + '/python')from ppnc import PPNCPredictordef parse_config(config_file):"""parse config"""with open(config_file, "r") as f:config = json.load(f)return configdef preprocess(img, input_size=(320, 320)):"""parse imageArgs:img_path (str): pathinput_size (tuple, optional): h x w. Defaults to (320, 320)."""input = {}# img = cv2.imread(img_path)img = cv2.cvtColor(img, cv2.COLOR_BGR2RGB)scale_factor = [input_size[0] / img.shape[0], input_size[1] / img.shape[1]]factor = np.array(scale_factor, dtype=np.float32)input['scale_factor'] = factor.reshape((1, 2))img = cv2.resize(img, input_size, interpolation=2)mean = np.array([0.485, 0.456, 0.406])[np.newaxis, np.newaxis, :]std = np.array([0.229, 0.224, 0.225])[np.newaxis, np.newaxis, :]img = img / 255img -= meanimg /= stdimg = img.astype(np.float32, copy=False)img = img.transpose((2, 0, 1))img = img[np.newaxis, :]input['image'] = imgreturn inputdef draw_box(img, res, threshold=0.35):"""draw boxArgs:img_path (str): image pathres (numpy): outputthreshold (float, optional): . Defaults to 0.2."""# img = cv2.imread(img_path)label_list = ['Boat','People','bottle','Chair','Table','Cat','Dog','Motorbike','Bicycle','Cup','Car','Bus']for i in res:label = int(i[0])score = i[1]if score < threshold:continueprint("Something exists! It is ", end="")print(label_list[label])xmin, ymin, xmax, ymax = i[2:]cv2.rectangle(img, (int(xmin), int(ymin)), (int(xmax), int(ymax)), (0, 255, 0))return imgclass Example(QWidget):def __init__(self,config):super().__init__()self.config = configself.img_width, self.img_height = [120 * x for x in [4, 3]]self.initCamera()self.initUI()self.initModel()def initCamera(self):# 开启视频通道self.camera_id = 0 # 为0时表示视频流来自摄像头self.camera = cv2.VideoCapture()  # 视频流self.camera.open(self.camera_id)# 通过定时器读取数据self.flush_clock = QTimer()  # 定义定时器,用于控制显示视频的帧率self.flush_clock.start(60)   # 定时器开始计时30ms,结果是每过30ms从摄像头中取一帧显示self.flush_clock.timeout.connect(self.show_frame)  # 若定时器结束,show_frame()def initModel(self):# Step 2: initialize ppnc predictorself.predictor = PPNCPredictor(self.config)self.predictor.load()def initUI(self):grid = QGridLayout()self.setLayout(grid)self.Img_Box = QLabel()  # 定义显示视频的Labelself.Img_Box.setFixedSize(self.img_width, self.img_height)grid.addWidget(self.Img_Box, 0, 0, 20, 20)self.setWindowTitle('test')self.show()def show_frame(self):# self.player.play()_, img = self.camera.read()  # 从视频流中读取# print(img.shape)try:feeds = preprocess(img)self.predictor.set_inputs(feeds)self.predictor.run()res = self.predictor.get_output(0)img = draw_box(img, res)except:print('infer error')img = cv2.resize(img, (self.img_width, self.img_height))  # 把读到的帧的大小重新设置为 640x480showImage = QImage(img, img.shape[1], img.shape[0], QImage.Format_RGB888)self.Img_Box.setPixmap(QPixmap.fromImage(showImage))if __name__ == '__main__':# Step 1: parse config fileassert len(sys.argv) >= 3, "config and image file must be provided"config_file = sys.argv[1]image_file = sys.argv[2]config = parse_config(config_file)app = QApplication(sys.argv)ex = Example(config)sys.exit(app.exec_())
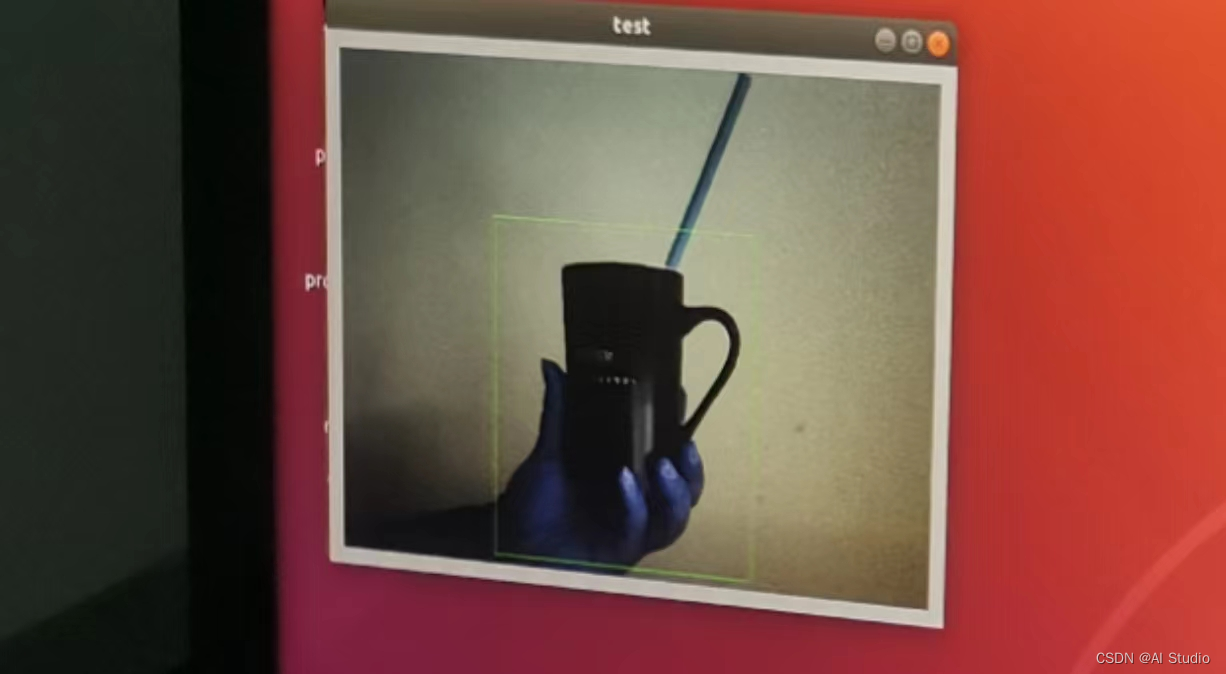
最后简单展示一下部署效果:
| 检测环境 | 检测结果 |
|---|---|
 |  |
检测环境看着可能比较亮,但实际上很暗,除了屏幕和开发板的指示灯外,没有太多光源。可以看到确实能够检测到水杯的出现~
请点击此处查看本环境基本用法.
Please click here for more detailed instructions.
此文章为搬运
原项目链接
这篇关于基于EdgeBoard飞桨开发套件和PicoDet部署夜间场景检测模型的文章就介绍到这儿,希望我们推荐的文章对编程师们有所帮助!


