本文主要是介绍Lab6_Network Driver,希望对大家解决编程问题提供一定的参考价值,需要的开发者们随着小编来一起学习吧!
简介
在本实验中,我们将为 NIC(Network Interface Card, 网络接口卡)编写驱动程序。这个网卡基于Intel 82540EM芯片,也称为E1000。
除了编写驱动程序之外,我们还需要创建一个system call 来访问我们的驱动程序。我们将实现缺失的网络服务器代码,以在网络堆栈和驱动程序之间传输数据包。我们还可以通过完成Web服务器将所有内容绑定在一起。使用新的Web服务器,我们将能够从文件系统中提供文件。
这个 lab 比之前的都要难,因为 there are no skeleton files, no system call interfaces written in stone, and many design decisions are left up to you.
QEMU’s virtual network
QEMU’s documentation has more about user-net here
QEMU 默认提供一个运行在 IP 10.0.2.2上的虚拟路由,并且为 JOS 分配IP 10.0.2.15。To keep things simple, we hard-code these defaults into the network server in net/ns.h. 为了解决连接内网问题(host 无法连接运行在QEMU上的Web server),我们配置QEMU在主机某个端口上运行服务。该端口只需连接到JOS中的某个端口,并在真实主机和虚拟网络之间来回传送数据。
To find out what ports QEMU is forwarding to on your development host, run make which-ports. For convenience, the makefile also provides make nc-7 and make nc-80, which allow you to interact directly with servers running on these ports in your terminal.
~/workspaces/MIT6.828/lab$ make which-ports
Local port 26001 forwards to JOS port 7 (echo server)
Local port 26002 forwards to JOS port 80 (web server)
Packet Inspection
Makefile 配置了QEMU的网络栈,将进出的网络包记录到 qemu.pcap中。我们可以使用图形化的 wireshark,或是使用命令行获得网络包的hex/ASCII信息。
tcpdump -XXnr qemu.pcap
Debugging the E1000
The E1000 can produce a lot of debug output, so you have to enable specific logging channels. Some channels you might find useful are:
| Flag | Meaning |
|---|---|
| tx | Log packet transmit operations |
| txerr | Log transmit ring errors |
| rx | Log changes to RCTL |
| rxfilter | Log filtering of incoming packets |
| rxerr | Log receive ring errors |
| unknown | Log reads and writes of unknown registers |
| eeprom | Log reads from the EEPROM |
| interrupt | Log interrupts and changes to interrupt registers. |
2.2. The Network Server
从零开始写一个网络栈是十分困难的,因此我们使用lwIP, 其是一个开源的轻量级TCP/IP协议套件,其中包含网络栈。You can find more information on lwIP here。
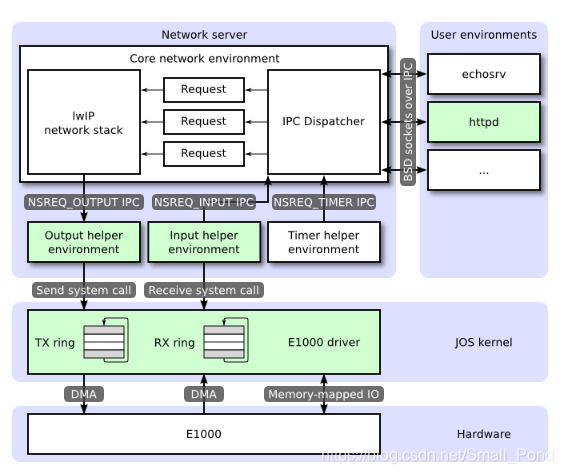
The network server is actually a combination of four environments:
- core network server environment (includes socket call dispatcher and lwIP)
- input environment
- output environment
- timer environment
我们将实现图中标记为绿色的部分。

2.3. The Core Network Server Environment
For each user environment IPC, the dispatcher in the network server calls the appropriate BSD socket interface function provided by lwIP on behalf of the user.
Regular user environments do not use the nsipc_* calls directly. Instead, they use the functions in lib/sockets.c, which provides a file descriptor-based sockets API.
there is a key difference between file server and network server. BSD socket calls like accept and recv can block indefinitely. Since this is unacceptable, the network server uses user-level threading to avoid blocking the entire server environment.
In addition to the core network environment there are three helper environments. Besides accepting messages from user applications, the core network environment’s dispatcher also accepts messages from the input and timer environments.
Part A: Initialization and transmitting packets
我们需要为我们的内核添加时间概念。使用时钟中断,并用一个变量进行计数。
Exercise 1
Add a call to time_tick for every clock interrupt in
kern/trap.c(inkern/time.c). Implementsys_time_msecand add it to syscall inkern/syscall.cso that user space has access to the time.
只是添加一个系统调用,很简单。
// 1
// LAB 4: Your code here.case (IRQ_OFFSET + IRQ_TIMER):// 回应8259A 接收中断。lapic_eoi();time_tick();sched_yield();break;
// 2
static int
sys_time_msec(void)
{// LAB 6: Your code here.return time_msec();// panic("sys_time_msec not implemented");
}
// 3
case SYS_time_msec:return sys_time_msec();
The Network Interface Card
Exercise 2
Browse Intel’s Software Developer’s Manual for the E1000. This manual covers several closely related Ethernet controllers. QEMU emulates the 82540EM.
我们应该浏览第2章以了解设备。 要编写驱动程序,还需要熟悉第3章和第14章以及4.1(尽管不是4.1的小节)。还要参考第13章。

Receive and Transmit Description
- Packet Reception
- recognizing the presence of a packet on the wire,
- performing address filtering,
- storing the packet in the receive data FIFO,
- transferring the data to a receive buffer in host memory,
- buffer size
RCTL.BSIZE & RCTL.BSEX
- buffer size
- updating the state of a receive descriptor.
- Status
- Errors
- Special
PCI Interface
PCI是外围设备互连(Peripheral Component Interconnect)的简称,是在目前计算机系统中得到广泛应用的通用总线接口标准:
- 在一个PCI系统中,最多可以有256根PCI总线,一般主机上只会用到其中很少的几条。
- 在一根PCI总线上可以连接多个物理设备,可以是一个网卡、显卡或者声卡等,最多不超过32个。
- 一个PCI物理设备可以有多个功能,比如同时提供视频解析和声音解析,最多可提供8个功能。
- 每个功能对应1个256字节的PCI配置空间
为了在引导期间执行PCI初始化,PCI代码遍历PCI总线以寻找设备。 当它找到设备时,它会读取其供应商ID和设备ID,并使用这两个值作为搜索pci_attach_vendor数组的键。 该数组由struct pci_driver条目组成,如下所示:
struct pci_driver {uint32_t key1, key2;int (*attachfn) (struct pci_func *pcif);
};
如果发现的设备的供应商ID和设备ID与数组中的条目匹配,则PCI代码会调用该条目的attachfn来执行设备初始化。
struct pci_func {struct pci_bus *bus;uint32_t dev;uint32_t func;uint32_t dev_id;uint32_t dev_class;uint32_t reg_base[6];uint32_t reg_size[6];uint8_t irq_line;
};
我们重点关注struct pci_func的最后三个成员,因为它们记录了设备的negotiated memory,I/O 和中断资源。 reg_base和reg_size数组包含最多六个基址寄存器或BAR的信息。reg_base存储内存映射 I/O 区域的基地址(或 I/O 端口资源的基本 I/O 端口),reg_size包含reg_base中相应基值的大小(以字节为单位)或 I/O 端口数, 和irq_line包含分配给设备的 IRQ line 以进行中断。
pci_func_enable将会使能设备,协调资源,并将其填入struct pci_func。
Exercise 3
Implement an attach function to initialize the E1000.
查看手册以及根据内核启动时的打印信息,我们可以知道 E1000 的 Vender ID = 0x8086, Device ID = 0x100E。
PCI: 00:00.0: 8086:1237: class: 6.0 (Bridge device) irq: 0
PCI: 00:01.0: 8086:7000: class: 6.1 (Bridge device) irq: 0
PCI: 00:01.1: 8086:7010: class: 1.1 (Storage controller) irq: 0
PCI: 00:01.3: 8086:7113: class: 6.80 (Bridge device) irq: 9
PCI: 00:02.0: 1234:1111: class: 3.0 (Display controller) irq: 0
PCI: 00:03.0: 8086:100e: class: 2.0 (Network controller) irq: 11
Add an entry to the pci_attach_vendor array in kern/pci.c to trigger your function if a matching PCI device is found,将E1000加入数组中,
struct pci_driver pci_attach_vendor[] = {{ PCI_E1000_VENDOR_ID, PCI_E1000_DEVICE_ID, &pci_e1000_attach},{ 0, 0, 0 },
};
编写 e1000.c and e1000.h文件。.c文件写 attach函数, 在.h 文件中定义其 PCI ID等信息。
just enable the E1000 device via pci_func_enable.
// .c
#include <kern/e1000.h>
#include <kern/pmap.h>
#include <kern/pci.h>
#include <kern/pcireg.h>// LAB 6: Your driver code hereint
pci_e1000_attach(struct pci_func * pcif)
{pci_func_enable(pcif);return 0;
}// .h
#define PCI_E1000_VENDOR_ID 0x8086
#define PCI_E1000_DEVICE_ID 0x100E运行OS后打印出一行信息。PCI function 00:03.0 (8086:100e) enabled。
Memory-mapped I/O
软件通过 Memory-mapped I/O 与 E1000 进行通信。之前我们已经两次接触过 MMIO这个概念了,分别在 CGA控制台和 lapic。 我们通过内存地址对设备进行读写。这些以内存地址为基础的读写目标并不是 DRAM,而是设备。
pci_func_enable 为 E1000分配了一个 MMIO 区域并且在 BAR0 中存储了它的 base and size。这是分配给设备的一系列物理内存地址,这意味着我们必须通过虚拟地址访问它。 由于MMIO区域被分配了非常高的物理地址(通常高于3GB),因为JOS的256MB限制,我们无法使用KADDR(内核地址)访问它。所以我们将创建一个新的映射。我们还是使用mmio_map_region分配MMIOBASE以上的区域,其保证了我们不会修改到之前创建的 LAPIC 映射。Since PCI device initialization happens before JOS creates user environments, you can create the mapping in kern_pgdir and it will always be available.
Exercise 4
In your attach function, create a virtual memory mapping for the E1000’s BAR 0 by calling mmio_map_region (which you wrote in lab 4 to support memory-mapping the LAPIC).
将E1000的物理地址映射到虚拟地址十分简单,在Lab4已经非常熟悉了。添加一条语句即可。同时记录映射的虚拟地址,方便之后对 E1000 设备的访问。If you do use a pointer to the device register mapping, be sure to declare it volatile; otherwise, the compiler is allowed to cache values and reorder accesses to this memory.
// 映射,并保存其虚拟地址,方便访问。
e1000 = mmio_map_region(pcif->reg_base[0], pcif->reg_size[0]);
To test your mapping, try printing out the device status register (section 13.4.2).
要访问设备的状态寄存器,首先要找到该寄存器的编译地址。通过查手册,table13-2,对寄存器偏移地址进行了说明。General 00008h STATUS Device Status R 229

在.h文件中定义一个偏移地址的宏,在.c中添加一行代码。注意其中涉及到指针的运算,e1000 定义为uint32_t 的指针,所以应该采用以下写法,若不明白,应该复习一下C语言指针的知识。
cprintf("device status:[%08x]\n", *(uint32_t *)((uint8_t *)e1000 + E1000_DEVICE_STATUS));
// 或者写为 e1000[E1000_DEVICE_STATUS >> 2];
#define E1000_LOCATE(offset)  (offset >> 2)
cprintf("device status:[%08x]\n", e1000[E1000_LOCATE(E1000_DEVICE_STATUS)]);// 结果
PCI function 00:03.0 (8086:100e) enabled
device status:[80080783]
DMA
通过读写 E1000 寄存器来传输接收数据包是十分低效的做法,并且还需要E1000 缓存数据包。因此考虑到各个方面的因素,我们采用 DMA 的方式直接访问内存。驱动程序负责为发送和接收队列分配内存,设置DMA描述符,并使E1000定位到这些队列,但之后的所有内容都会变成异步的。
从抽象层来看,接收和发送队列非常相似。 两者都由一系列描述符组成。 虽然这些描述符的确切结构各不相同,但每个描述符包含一些标志和数据包数据缓冲区的物理地址(要发送的网卡的数据包数据,或者操作系统为网卡写入接收数据包而分配的缓冲区)。
其发送接收队列采用循环队列。For the receive queue, the descriptors in the queue are free descriptors that the card can receive packets into (hence, in the steady state, the receive queue consists of all available receive descriptors). Correctly updating the tail register without confusing the E1000 is tricky; be careful!
The pointers to these arrays as well as the addresses of the packet buffers in the descriptors must all be physical addresses because hardware performs DMA directly to and from physical RAM without going through the MMU.
Transmitting Packets
首先,我们要按照第14.5节中描述的步骤初始化要发送的网卡。传输初始化的第一步是设置传输队列。 队列的精确结构在3.4节中描述,描述符的结构在3.3.3节中描述。 我们不会使用E1000的TCP卸载功能,因此我们可以专注于“传统发送描述符格式”。

写成结构体如下:
/* Transmit Descriptor */
struct E1000TxDesc {uint64_t buffer_addr;       /* Address of the descriptor's data buffer */uint16_t length;    /* Data buffer length */uint8_t cso;        /* Checksum offset */uint8_t cmd;        /* Descriptor control */uint8_t status;     /* Descriptor status */uint8_t css;        /* Checksum start */uint16_t special;}__attribute__((packed));
我们驱动程序必须为发送描述符数组和发送描述符指向的数据包缓冲区保留内存。 有几种方法可以做到这一点,从动态分配页面到简单地在全局变量中声明它们。一定要记住 E1000 直接访问物理内存,这意味着它访问的任何缓冲区必须在物理内存中是连续的。
还有多种方法来处理数据包缓冲区。 我们建议从最简单的开始,是在驱动程序初始化期间为每个描述符保留数据包缓冲区的空间,并简单地将数据包数据复制到这些预分配的缓冲区中。
Exercise 5
Perform the initialization steps described in section 14.5 (but not its subsections). Use section 13 as a reference for the registers the initialization process refers to and sections 3.3.3 and 3.4 for reference to the transmit descriptors and transmit descriptor array.
For the TCTL.COLD, you can assume full-duplex operation. For TIPG, refer to the default values described in table 13-77 of section 13.4.34 for the IEEE 802.3 standard IPG (don’t use the values in the table in section 14.5).s
在对各寄存器进行初始化时,要不断得在第13章找到其偏移地址和详细定义。最后按照要求写入地址。
我们必须将要传输的数据包添加到传输队列的尾部,这意味着需要将数据包数据复制到下一个数据包缓冲区,然后更新TDT(传输描述符尾部)寄存器以通知网卡在传输队列中有另一个数据包。[Note] TDT 是传输描述符数组的索引而不是偏移地址。
如果在发送描述符的命令字段中设置RS(Report Status)位,则当网卡在该描述符中发送了数据包时,网卡将在描述符的状态字段中设置DD(Descriptor Done)位。 如果设置了描述符的DD位,我们就能回收该描述符并使用它来传输另一个数据包。
如果用户调用传输系统调用,但下一个描述符的DD位未置位,表明传输队列已满,该怎么办? 你必须决定在这种情况下该做什么。你可以简单地丢弃数据包。网络协议对此具有弹性,但如果丢弃大量数据包,协议可能无法恢复。我们可以告诉用户环境它必须重试,就像我们对sys_ipc_try_send所做的那样。This has the advantage of pushing back on the environment generating the data.。
对 E1000 进行初始化时,一定要注意细节部分。 我因为一个字段的名字写了两次,导致初始化失败,然而一直在别的地方找问题(捂脸)。
void
e1000_transmit_init()
{size_t i;memset(tx_desc_list, 0 , sizeof(struct E1000TxDesc) * TX_DESC_SIZE);for (i = 0; i < TX_DESC_SIZE; i++) {tx_desc_list[i].buffer_addr = PADDR(pbuf[i]);tx_desc_list[i].status = E1000_TXD_STAT_DD;tx_desc_list[i].cmd    =  E1000_TXD_CMD_RS | E1000_TXD_CMD_EOP;}e1000[E1000_LOCATE(E1000_TDBAL)] = PADDR(tx_desc_list);e1000[E1000_LOCATE(E1000_TDBAH)] = 0;e1000[E1000_LOCATE(E1000_TDLEN)] = sizeof(struct E1000TxDesc) * TX_DESC_SIZE;// ensure that TDH and TDT are 0 index not offsete1000[E1000_LOCATE(E1000_TDH)] = 0;e1000[E1000_LOCATE(E1000_TDT)] = 0;// Initialize the Transmit Control Register (TCTL)e1000[E1000_LOCATE(E1000_TCTL)] = E1000_TCTL_EN | E1000_TCTL_PSP |(E1000_TCTL_CT & (0x10 << 4)) |(E1000_TCTL_COLD & (0x40 << 12));// 10 8 6 // 10 8 12e1000[E1000_LOCATE(E1000_TIPG)] = 10 | (8 << 10) | (12 << 20);
}
Exercise 6
Write a function to transmit a packet by checking that the next descriptor is free, copying the packet data into the next descriptor, and updating TDT. Make sure you handle the transmit queue being full.
int
e1000_transmit(void *addr, size_t len)
{size_t tdt = e1000[E1000_LOCATE(E1000_TDT)];struct E1000TxDesc *tail_desc = &tx_desc_list[tdt];if ( !(tail_desc->status & E1000_TXD_STAT_DD )) {// Status is not DDreturn -1;}memmove(pbuf[tdt], addr, len);tail_desc->length = (uint16_t )len;// clear DD tail_desc->status &= (~E1000_TXD_STAT_DD);e1000[E1000_LOCATE(E1000_TDT)] = (tdt+1) % TX_DESC_SIZE;return 0;}
Exercise 7
Add a system call that lets you transmit packets from user space. The exact interface is up to you. Don’t forget to check any pointers passed to the kernel from user space.
系统调用的添加我们已经进行过好几次了,这里就不再详细说明,直接给出代码。
int
sys_pkt_try_send(void * buf, size_t len)
{user_mem_assert(curenv, buf, len, PTE_U);return e1000_transmit(buf, len);
}case SYS_pkt_try_send:return sys_pkt_try_send((void *) a1, (size_t) a2);
Transmitting Packets: Network Server
既然我们已经有了 packet send 的系统调用,也是时候发送数据包了。output helper environment 运行在一个循环中:从 core network server 接收 NSREQ_OUTPUT IPC 信息,使用 system call 将伴随 IPC 发送过来的 Packet 发送到设备驱动中。 NSREQ_OUTPUT由在net/lwip/jos/jif/jif.c文件中的low_level_output 函数发送 , which glues the lwIP stack to JOS’s network system. 每个IPC 都包含一个由 union Nsipc构成的页,packet 存在于 struct kif_pkt字段。struct jif_pkt looks like:
struct jif_pkt {int jp_len;char jp_data[0];
};
在结构的末尾使用像jp_data这样的零长度数组是用于表示没有预定长度的缓冲区的常见C技巧(有些人会说是恶心)。 由于C不进行数组边界检查,只要确保结构后面有足够的未使用内存,就可以使用jp_data,就好像它是一个任意大小的数组一样。
Exercise 8
Implement net/output.c.
在/net/serv.c中创建了一个相当于守护进程output,在output 中我们需要接收 ipc, 解析信息然后调用 system call 发送数据包。
void
output(envid_t ns_envid)
{binaryname = "ns_output";// LAB 6: Your code here:// 	- read a packet from the network server//	- send the packet to the device driveruint32_t whom;int perm;int32_t req;while (1) {req = ipc_recv((envid_t *)&whom, &nsipcbuf, &perm);if (req != NSREQ_OUTPUT) {continue;}while (sys_pkt_try_send(nsipcbuf.pkt.jp_data, nsipcbuf.pkt.jp_len) < 0) {sys_yield();}}
}
Question
- 当传输队列满时,你时如何处理的?
在output中检测数据包是否发送成功,若未成功,则sched_yeild让出控制器sleep 一会儿。
Part B: Receiving packets and the web server
Receiving Packets
像发送过程一样,我们还需要配置 E1000 去接收收据包,同时提供一个接收描述符队列,接收缓冲区。3.2节描述了数据包接收的工作原理,包括接收队列结构和接收描述符,初始化过程详见14.4节。
Exercise 9
Read section 3.2.
阅读文档,我们可以写出接收描述符的结构。
/* Receive Descriptor */
struct E1000RxDesc {uint64_t buffer_addr;uint16_t length;    /* Data buffer length */uint8_t cso;        /* Checksum offset */uint8_t status;uint8_t err;uint16_t special; }__attribute__((packed));
当E1000收到数据包时,它首先检查它是否与卡配置的过滤器匹配(例如,查看数据包中MAC地址于网卡是否匹配),如果数据包与任意一个过滤器不匹配,则忽略该数据包。 否则,E1000尝试从接收队列的头部检索下一个接收描述符。 如果头部(RDH)已经赶上尾部(RDT),则接收队列没有自由描述符,卡将会丢弃数据包。 如果存在空闲接收描述符,则将分组数据复制到描述符指向的缓冲区中,设置描述符的DD(描述符完成)和EOP(包结束)状态位,并递增RDH。
如果E1000接收到一个大于数据包缓冲区大小的数据包,它将从接收队列中检索所需数量的描述符以完整存储数据包。 为了表明发生这种情况,它将在所有这些描述符上设置DD状态位,但仅在最后一个描述符上设置EOP状态位。 我们可以选择在驱动程序中处理这种可能性,或者只是将卡配置为不接受“长数据包”(也称为巨型帧)并确保接收缓冲区足够大以存储最大可能的标准以太网数据包(1518字节)。
Exercise 10
Set up the receive queue and configure the E1000 by following the process in section 14.4.
这部分与发送部分代码编写流程是类似的,查文档,为接收描述符、接收buffer 分配静态内存等,然后对接收描述符、E1000 RCTL等寄存器进行初始化。
uint32_t E1000_MAC[6] = {0x52, 0x54, 0x00, 0x12, 0x34, 0x56};void
e1000_set_mac_addr(uint32_t mac[])
{uint32_t low = 0, high = 0;int i;for (i = 0; i < 4; i++) {low |= mac[i] << (8 * i);}for (i = 4; i < 6; i++) {high |= mac[i] << (8 * i);}e1000[E1000_LOCATE(E1000_RA)] = low;e1000[E1000_LOCATE(E1000_RA) + 1] = high | E1000_RAH_AV;
}void
e1000_receive_init()
{size_t i;memset(rx_desc_list, 0 , sizeof(struct E1000RxDesc) * RX_DESC_SIZE);for (i = 0; i < RX_DESC_SIZE; i++) {rx_desc_list[i].buffer_addr = PADDR(rx_pbuf[i]);}// cprintf("mac addr %x:%x", e1000[E1000_LOCATE(E1000_RA)], e1000[E1000_LOCATE(E1000_RA) + 1]  );e1000[E1000_LOCATE(E1000_ICS)] = 0;e1000[E1000_LOCATE(E1000_IMS)] = 0;e1000[E1000_LOCATE(E1000_RDBAL)] = PADDR(rx_desc_list);e1000[E1000_LOCATE(E1000_RDBAH)] = 0;e1000[E1000_LOCATE(E1000_RDLEN)] = sizeof(struct E1000RxDesc) * RX_DESC_SIZE;e1000[E1000_LOCATE(E1000_RDT)] = RX_DESC_SIZE - 1;// 写了两遍 RDH,查了好久的BUG。e1000[E1000_LOCATE(E1000_RDH)] = 0;e1000[E1000_LOCATE(E1000_RCTL)] = E1000_RCTL_EN | E1000_RCTL_SECRC | E1000_RCTL_BAM | E1000_RCTL_SZ_2048;e1000_set_mac_addr(E1000_MAC);
}
现在我们已经准备好开始接收数据包。要接收数据包,我们的驱动程序必须跟踪希望被保留下来接收数据包的下一个描述符。 与发送类似,文档指出无法从软件中可靠地读取RDH寄存器(这句话什么意思,有点不太理解),因此为了确定数据包是否已传送到此描述符的数据包缓冲区,我们必须读取描述符中的DD状态位。 如果DD位已经置位(此由硬件完成),则可以将数据包数据从该描述符的数据包缓冲区中复制出来,然后通过更新队列的尾部索引RDT告诉卡该描述符是空闲的。
如果DD位未置位,则表示此时此刻未收到任何数据包。 在这种情况下我们可以只需返回“try again”错误,并要求调用者重试。
Exercise 11
Write a function to receive a packet from the E1000 and expose it to user space by adding a system call. Make sure you handle the receive queue being empty.
receive 的实现,最重要的一点是理解硬件接收数据包的过程:当硬件接收到数据包时,首先会进行一次过滤(对比MAC地址等),若符合接收标准,硬件会将数据包存储到我们分配的 buffer中,并同时设置描述符的DD位已经执行RDH加1操作。 所以当我们编写receive 函数时,可以选择定义一个 static 变量,用来指向第一个可接收的描述符。系统调用的实现不再详细给出,如有问题可以参看github上的源码,receive 具体实现如下.
int e1000_receive(void *buf, size_t *len)
{static size_t next = 0;size_t tail = e1000[E1000_LOCATE(E1000_RDT)];if ( !(rx_desc_list[next].status & E1000_RXD_STAT_DD) ) {// cprintf("no packet\n");return -1;}*len = rx_desc_list[next].length;memcpy(buf, rx_pbuf[next], *len);rx_desc_list[next].status &= ~E1000_RXD_STAT_DD; next = (next + 1) % RX_DESC_SIZE;e1000[E1000_LOCATE(E1000_RDT)] = (tail + 1 ) % RX_DESC_SIZE;cprintf("e1000_receive return 0\n");return 0;
}
Receiving Packets: Network Server
在网络服务器输入环境中,您将需要使用新的接收系统调用来接收数据包,并使用NSREQ_INPUT IPC消息将它们传递到核心网络服务器环境。 这些IPC输入消息应该有一个页面附加一个 union Nsipc,其struct jif_pkt pkt字段填入从网络接收的数据包。
Exercise 12
Implement net/input.c.
void
sleep(int msec)
{unsigned now = sys_time_msec();unsigned end = now + msec;if ((int)now < 0 && (int)now > -MAXERROR)panic("sys_time_msec: %e", (int)now);if (end < now)panic("sleep: wrap");while (sys_time_msec() < end)sys_yield();
}void
input(envid_t ns_envid)
{binaryname = "ns_input";size_t len;char rev_buf[RX_PACKET_SIZE];size_t i = 0;while(1) {// 阻塞式读while ( sys_pkt_try_receive(rev_buf, &len) < 0) {sys_yield(); }memcpy(nsipcbuf.pkt.jp_data, rev_buf, len);nsipcbuf.pkt.jp_len = len;ipc_send(ns_envid, NSREQ_INPUT, &nsipcbuf, PTE_P|PTE_U);sleep(50);}}为了更彻底地测试我们的网络代码,源码已经提供了一个名为echosrv的守护进程,它设置一个在 port 7上运行的echo服务器,它将回显通过TCP连接发送的任何内容。我们在一个终端执行make E1000_DEBUG=TX,TXERR,RX,RXERR,RXFILTER run-echosrv 开启 echo 服务器, 在另一个终端执行 make nc-7连接 echo 服务器。可以看到 nc 端的消息回显。
Question
- 你是如何构建接收实现的? 特别是,如果接收队列为空并且用户环境请求下一个传入数据包,你会怎么做?
用户请求接收时,若接受不成功(队列为空),则sched暂时让出控制权。接收成功,发送IPC,通知网络核心环境已经获得数据包,并简单sleep 50 ms,因为 网络核心环境需要时间对当前 shared 页的数据包进行处理。 当然,这样效率十分低下,我们可以考虑在Input环境中申请一定数量的页,轮流使用这个页向网络核心环境传递网络数据包。
The Web Server
在 user/httpd.c中的框架代码处理到达的连接并解析消息头部。
Exercise 13
The web server is missing the code that deals with sending the contents of a file back to the client. Finish the web server by implementing
send_fileandsend_data.
http_request 是一个比较重要的结构体。其包含了 socket, 也就是数据发送接收的接口。
struct http_request {int sock;char *url;char *version;
};
如何判断打开的 fd 是一个目录, 要使用到fd.c中的fstat函数。其返回一个Stat 的结构体。
struct Stat {char st_name[MAXNAMELEN];off_t st_size;int st_isdir;struct Dev *st_dev;
};
- 首先编写
send_file,根据提示,在原有的代码前添加以下代码。
// LAB 6: Your code here.// panic("send_file not implemented");struct Stat st;if ( (r = open(req->url, O_RDONLY) )< 0 ) {return send_error(req, 404);}fd = r;// 怎么判断一个fd 是目录, 没有 num2fdif ( (r = fstat(fd, &st)) < 0)return send_error(req, 404);if (st.st_isdir)return send_error(req, 404);file_size = st.st_size;
send_data函数编写。
static int
send_data(struct http_request *req, int fd)
{// LAB 6: Your code here.// panic("send_data not implemented");// 从fd 中读size大小数据,并发送int r;size_t len;char buf[BUFFSIZE];if ( (r = read(fd, buf, BUFFSIZE)) < 0 )return -1;len = r;if ( write(req->sock, buf, len) != len) {die("Failed to send bytes to client");}return 0;
}
最后 run make run-httpd-nox,然后在虚拟机的浏览器中输入http://localhost:26002,浏览器会显示404, 然后输入http://localhost:26002/index.html,Web将会返回内容cheesy web page。
Question
- What does the web page served by JOS’s web server say?
cheesy web page, 我们可以进一步美化?
至此 Lab6全部完成, 也意味着6.828课程全部完成。完结撒花!!痛哭流涕!!
总结
Lab6 网卡驱动,其整体框架为:用户环境通过IPC向网络核心环境发送请求,网络核心环境中的IPC Dispatcher 根据请求号派发任务。网络核心环境再经由Input/Ouput helper 环境调用相应的system call 向内核中维护的buffer写入和读取packet。
在此之前,OS需要对网卡进行初始化(CPU与NIC通过PCI总线连接,kernel可以直接使用MMIO对其进行访问),在内核中为描述符和buffer(循环队列)申请一定的空间,并向 NIC 指定其物理地址。
package 发送过程涉及到将data拷贝到相应的buffer中,清除其DD位表示此buf内容待发送,再自增描述符尾部索引。package 接收时,硬件在根据规则过滤数据包后,通过DMA将数据传送到相应的buffer中,并设定其DD位表示数据包接收完成,同时自增描述符头部索引。软件只需通过检查尾部下一个描述符DD位,即可判断是否可读取数据包。
这个Lab的复杂性体现在其需要自行查阅硬件文档,查找各寄存器的offset以及根据文档编写各控制器的初始化过程,并且不再像之前的Lab给出一个框架来填写代码。尽管在本科时接触单片机较多,且大多数时间都在写硬件驱动,但在硬件初始化时一些细节还是没有注意到。不过有单片机开发的经验,Lab6实现的整个思路还是比较清晰,对比如像MMIO、DMA、PCI总线、寄存器操作这些概念还是比较理解的。
这篇关于Lab6_Network Driver的文章就介绍到这儿,希望我们推荐的文章对编程师们有所帮助!


