本文主要是介绍云原生场景下如何实现k8s集群灾备,希望对大家解决编程问题提供一定的参考价值,需要的开发者们随着小编来一起学习吧!
背景
Kubernetes已经成为容器编排和管理的事实标准,但随之而来的挑战之一是如何有效地备份和恢复集群中的应用程序和数据。运维工程师通常需要处理不可预测的故障、数据丢失或误操作,因此实现快速、可靠的备份和恢复解决方案至关重要。
痛点
相比于传统备份,在Kubernetes集群中,数据分布在多个Pod和持久存储卷之间,而且运维任务可能需要升级、迁移或应对硬件故障。在这些情况下,数据的备份和恢复变得更加复杂,传统备份工具通常无法灵活满足Kubernetes环境各粒度的备份需求。
Velero备份与恢复
Velero是一个开源工具,专门为Kubernetes集群提供备份和恢复解决方案。它能够捕获集群中的所有相关资源,包括Pod、配置、存储卷等,并以可移植的方式进行备份。Velero支持多云提供商和本地集群,并具有以下核心功能:
- 集群备份和恢复
- 增量备份
- 跨集群迁移
它的基本原理就是将集群的数据,例如集群资源和持久化数据卷备份到对象存储中,在恢复的时候将数据从对象存储中拉取下来。
Github:开源地址
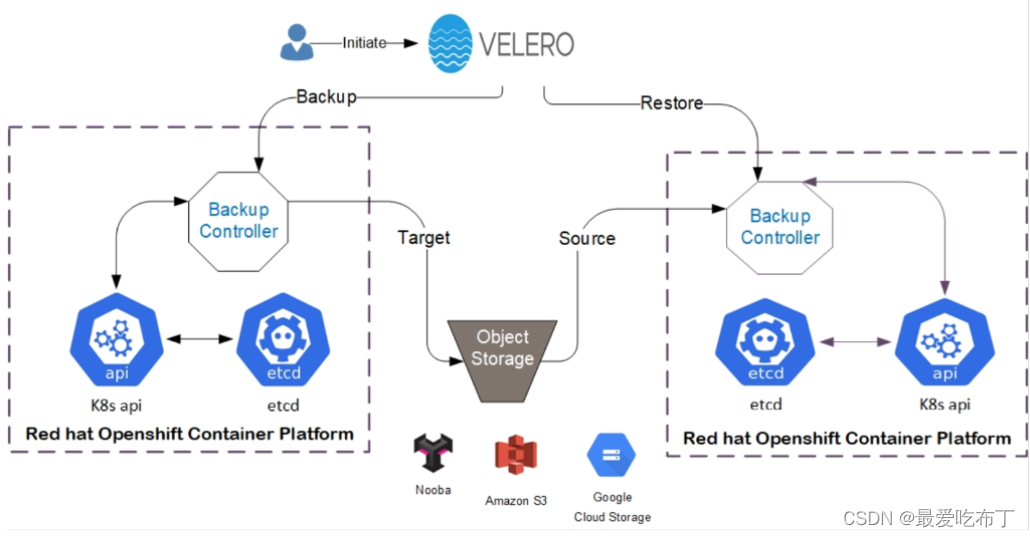
架构总览
Velero 主要包括两个个核心组件,分别为服务端和客户端。服务端运行在具体的 Kubernetes 集群中,客户端是运行在本地的命令行工具,只要配置好 kubectl 及 kubeconfig 即可使用,非常简单。
工作流程
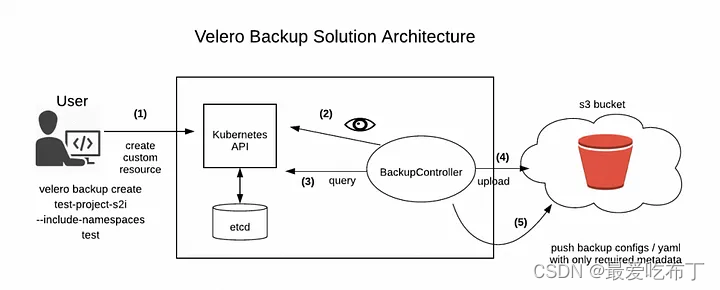
以核心的数据备份为例,当执行 velero backup create my-backup 时:
1、Velero 客户端首先调用 Kubernetes API 服务器以创建 Backup 对象;
2、BackupController 将收到通知有新的 Backup 对象被创建并执行验证;
3、BackupController 开始备份过程,它通过查询 API 服务器以获取资源来收集数据以进行备份;
4、BackupController 将调用对象存储服务,例如,AWS S3 -上传备份文件。默认情况下,velero backup create 支持任何持久卷的磁盘快照,可以通过指定其他标志来调整快照,运行 velero backup create --help 可以查看可用的标志,也可以使用–snapshot-volumes=false 选项禁用快照。
关于备份存储位置和卷快照,Velero 有两个自定义资源 BackupStorageLocation 和 VolumeSnapshotLocation,用于配置 Velero 备份及其关联的持久卷快照的存储位置。
1、BackupStorageLocation 主要支持的后端存储是 S3 兼容的存储,存储所有 Velero 数据的存储区中的前缀以及一组其他特定于提供程序的字段。比如:Minio 和阿里云 OSS 等 ;
2、VolumeSnapshotLocation(pv 数据),主要用来给 PV 做快照,需要云提供商提供插件,完全由提供程序提供的特定的字段(例如 AWS 区域,Azure 资源组,Portworx 快照类型等)定义。以对数据一致性最为敏感的数据库和中间件为例,开源存储插件 Carina 也即将提供数据库感知的 velero 卷快照功能,可以实现中间件数据的快速备份及恢复。
安装使用
安装前务必查看官方文档,确认k8s版本是否与velero兼容:https://github.com/vmware-tanzu/velero
可以通过如下命令查看k8s版本
$ kubectl version
......
Server Version: version.Info{Major:"1", Minor:"25+", GitVersion:"v1.25.7", GitCommit:"83c5ca7e7090c29cf61da89dbd49b341d267ee76", GitTreeState:"clean", BuildDate:"2023-09-20T14:37:47Z", GoVersion:"go1.20.6", Compiler:"gc", Platform:"linux/amd64"}
安装velero客户端(非必须)
$ wget https://github.com/vmware-tanzu/velero/releases/download/v1.12.1/velero-v1.12.1-linux-amd64.tar.gz$ tar -zxvf velero-v1.12.1-linux-amd64.tar.gz && cd velero-v1.12.1-linux-amd64/$ velero /usr/bin && chmod +x /usr/bin/velero# Velero命令自动补全,需要安装 bash_completion
$ echo 'source <(velero completion bash)' >>~/.bashrc$ velero completion bash >/etc/bash_completion.d/velero$ source ~/.bashrc
安装velero服务端
velero 服务端有两种安装方式,一种是velero cli客户端安装,一种是基于helm安装。这里以helm 安装为例:
1、添加repo源,并下载velero chart文件
# 添加repo源:github地址(https://github.com/vmware-tanzu/helm-charts/tree/main/charts/velero)
$ helm repo add vmware-tanzu https://vmware-tanzu.github.io/helm-charts
"vmware-tanzu" has been added to your repositories# 搜索velero chart是否存在
$ helm search repo|grep velero
vmware-tanzu/velero	5.1.3        	1.12.1     	A Helm chart for velero# 下载chart
$ helm fetch vmware-tanzu/velero  --version 5.1.3# 查看是否下载成功
$ ls -al velero-5.1.3.tgz
-rw-r--r-- 1 root root 33247 Nov  8 16:30 velero-5.1.3.tgz$ tar xf velero-5.1.3.tgz
$ tree
.
....
.....
└── values.yaml5 directories, 42 files
2、按需配置服务端参数
# 备份默认配置文件
$ cp values.yaml values-prod.yaml# 按需编辑配置信息
$ vim values-prod.yaml
...
# 配置对象存储认证信息,这里使用minio作为对象存储
secretContents: {}cloud: |[default]aws_access_key_id=minioaws_secret_access_key=minio-xxxxx# 启用快照备份,默认会创建volumesnapshotlocation crd 资源
snapshotsEnabled: false# 是否部署node-agent daemonset。需开启
deployNodeAgent: true# 配置备份存储信息
configuration:# See https://velero.io/docs/v1.6/api-types/backupstoragelocation/backupStorageLocation:# a backup storage location will be created with the name "default". Optional.- name: default# 指定对象存储的桶信息,注意事先在minio创建velero这个bucketbucket: veleroconfig: region: minios3Url: http://<minio-api地址>s3ForcePathStyle: true# velero服务端启动至少需要提供一个插件,这里启用S3 API兼容插件
initContainers:- name: velero-plugin-for-awsimage: velero/velero-plugin-for-aws:v1.8.0imagePullPolicy: IfNotPresentvolumeMounts:- mountPath: /targetname: plugins
...
3、基于本地chart安装velero服务端
$ helm install velero ../velero --values values.yaml
# 出现如下显示,表示安装成功
NAME: velero
LAST DEPLOYED: Wed Nov  8 17:23:07 2023
NAMESPACE: default
STATUS: deployed
REVISION: 1
TEST SUITE: None
NOTES:
Check that the velero is up and running:kubectl get deployment/velero -n defaultCheck that the secret has been created:kubectl get secret/velero -n defaultOnce velero server is up and running you need the client before you can use it
1. wget https://github.com/vmware-tanzu/velero/releases/download/v1.12.1/velero-v1.12.1-darwin-amd64.tar.gz
2. tar -xvf velero-v1.12.1-darwin-amd64.tar.gz -C velero-clientMore info on the official site: https://velero.io/docs# 查看velero CRD对象是否创建成功
$ kubectl api-resources|grep velero
backuprepositories                                 velero.io                      true         BackupRepository
backups                                            velero.io                      true         Backup
backupstoragelocations            bsl              velero.io                      true         BackupStorageLocation
datadownloads                                      velero.io                      true         DataDownload
datauploads                                        velero.io                      true         DataUpload
deletebackuprequests                               velero.io                      true         DeleteBackupRequest
downloadrequests                                   velero.io                      true         DownloadRequest
podvolumebackups                                   velero.io                      true         PodVolumeBackup
podvolumerestores                                  velero.io                      true         PodVolumeRestore
restores                                           velero.io                      true         Restore
schedules                                          velero.io                      true         Schedule
serverstatusrequests              ssr              velero.io                      true         ServerStatusRequest
volumesnapshotlocations           vsl              velero.io                      true         VolumeSnapshotLocation
4、CRD对象简介
| CRD资源名 | 备注 |
|---|---|
| backups | 用于实现单次备份功能 |
| restores | 用于实现还原功能 |
| schedules | 用于实现定时备份功能 |
| backupstoragelocations | 用于存储velero存储备份数据时所依赖的的OSS信息 |
| podvolumebackups | 存储各个pod所挂载的存储卷信息,在备份时会产生,产生后对应资源的controller会调用restic相关命令去备份pv数据,有记录volume在restic的repo与snapshot信息 |
| podvolumerestores | 功能与作用与上面的类似,对应的controller会调用restic相关命令去恢复pv数据 |
| resticrepositories | 存储restic的repo信息,一个pod为一个repo |
| volumesnapshotlocations | 存储存储卷的快照信息 |
| deletebackuprequests | 定义了此CR,CR对应的controller会将CR中指定的备份信息删除,CR也作为记录参数操作之用 |
| downloadrequests | 定义了此CR,CR对应的controller会将给CR中指定的备份信息生成下载URL,存储回CR中,供CR创建方获取地址发起下载请求 |
应用场景
执行操作时,有两种可选方式:
1、基于velero 客户端创建:使用简单,管理方面
2、基于CRD创建:适合平台化集成。(这里选择这种方式演示)
灾备场景
这里以k8s集群备份与恢复为例。
备份
备份各组件工作流程
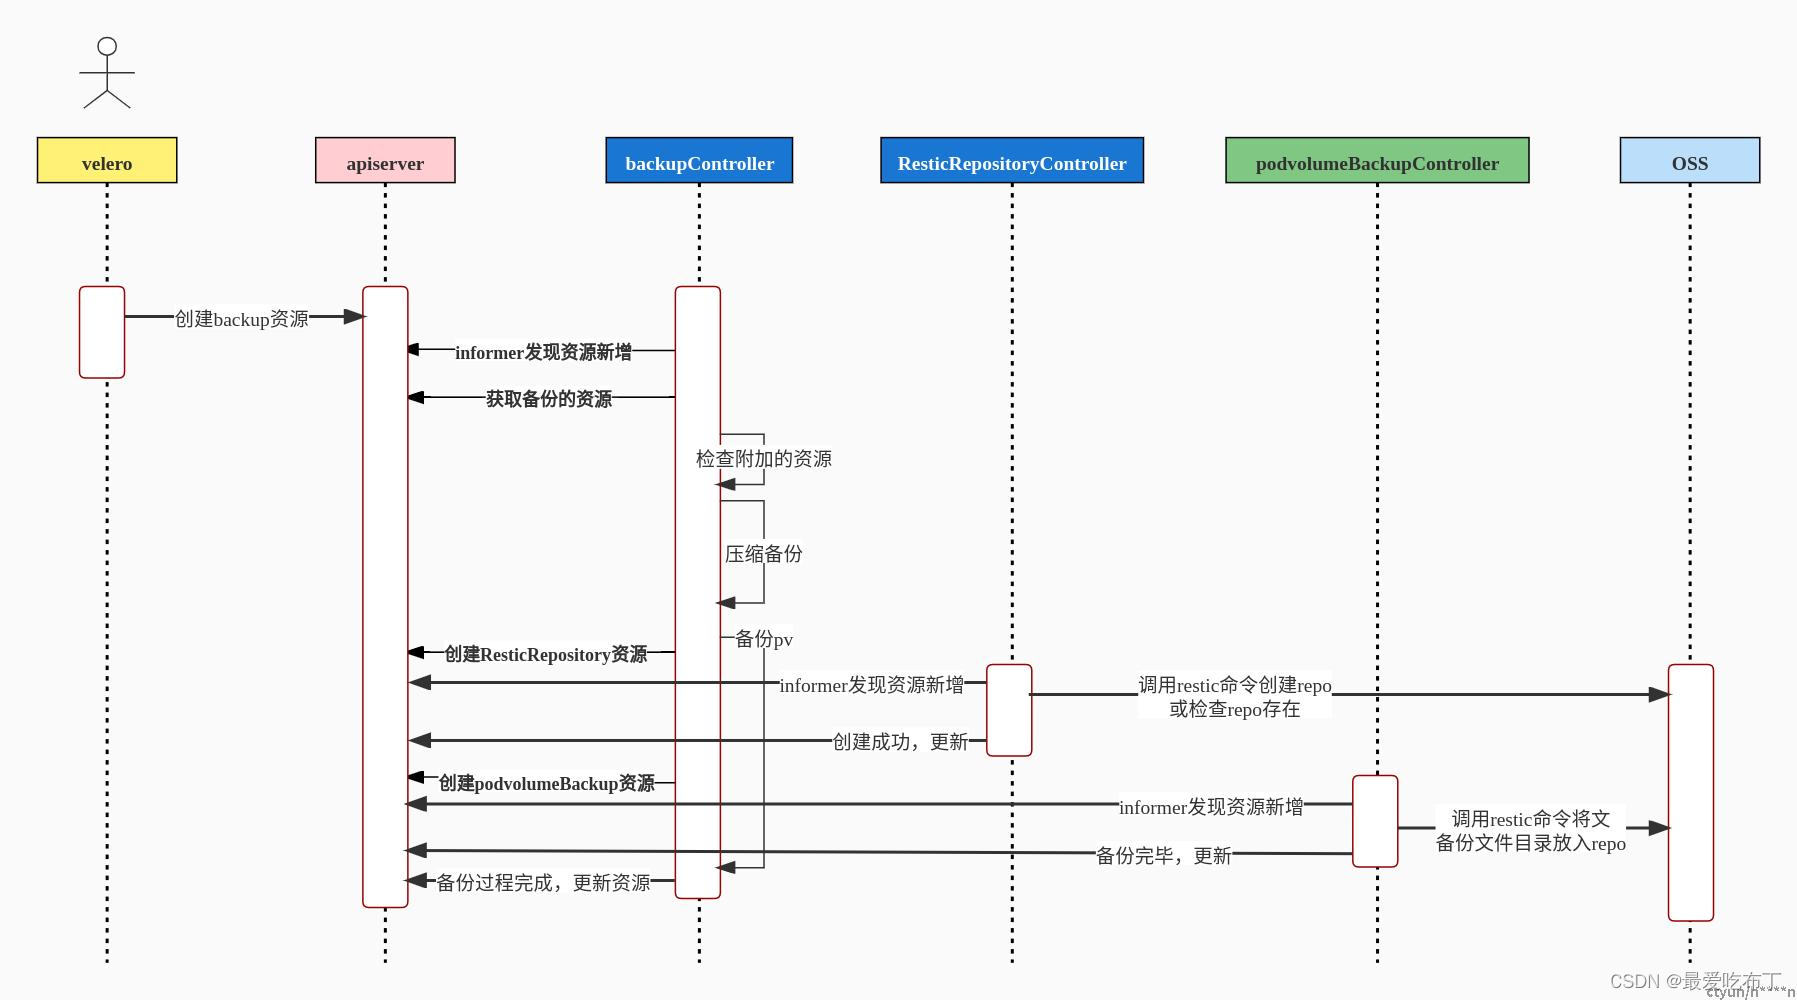
1、比如需要创建一个备份任务,备份指定命名空间下的所有资源,包括pvc。
apiVersion: velero.io/v1
# Standard Kubernetes Kind declaration. Required.
kind: Backup
# Standard Kubernetes metadata. Required.
metadata:# Backup name. May be any valid Kubernetes object name. Required.name: lwtest-71# Backup namespace. Must be the namespace of the Velero server. Required.namespace: default
# Parameters about the backup. Required.
spec:# CSI VolumeSnapshot status turns to ReadyToUse during creation, before# ItemOperationTimeout specifies the time used to wait for# asynchronous BackupItemAction operations# The default value is 1 hour.defaultVolumesToFsBackup: true includedNamespaces:- lwtest
2、查看备份结果
$ $ kubectl get backup
NAME        AGE
lwtest-71   4m53s$ kubectl get backup minio-new -o yaml
.......
status:completionTimestamp: "2023-11-08T10:04:32Z"expiration: "2023-12-08T10:04:28Z"formatVersion: 1.1.0phase: Completed   # 表示已完成progress:itemsBackedUp: 7totalItems: 7startTimestamp: "2023-11-08T10:04:31Z"version: 1
3、在minio velero桶上,可以看到备份的资源结果

恢复
恢复操作各组件工作流

1、创建restore对象用于恢复
apiVersion: velero.io/v1
# Standard Kubernetes Kind declaration. Required.
kind: Restore
# Standard Kubernetes metadata. Required.
metadata:# 指定restore名称,name: lwtest-71# Restore namespace. Must be the namespace of the Velero server. Required.namespace: default
# Parameters about the restore. Required.
spec:# 指定backup资源名称backupName: lwtest-71includedNamespaces:- '*'includedResources:- '*'restoreStatus:# 映射恢复的命名空间,velero采用非破坏性恢复,当集群中存在已有资源时,不会覆盖namespaceMapping:namespace-backup-from: lwtest# 是否恢复pv restorePVs: true
2、查看恢复结果
.....
status:completionTimestamp: "2023-11-09T09:32:59Z"phase: Completed   # 表示恢复成功progress:itemsRestored: 1totalItems: 1startTimestamp: "2023-11-09T09:32:59Z"warnings: 1
......
迁移场景
1、在现有集群备份所有的资源并上传到minio。操作如上(备份),备份完成后,需将连接模式改为只读
kubectl patch backupstoragelocation default \--type merge \--patch '{"spec":{"accessMode":"ReadOnly"}}'
2、在新集群部署velero服务端,如上
3、创建restore资源对象,等待恢复完成。如上
总结
Kubernetes集群备份与恢复是关键的运维任务,确保应用程序和数据的可靠性和完整性。Velero作为一个强大的备份和恢复工具,可以帮助运维工程师轻松解决这一问题。通过Velero,我们能够快速备份和恢复Kubernetes集群中的应用程序和数据,保障业务的连续性。在实际应用中,结合Velero的工作流程和案例示例,我们可以更好地理解如何实现集群的快速备份与恢复,提高运维效率,降低风险。
思维扩展
1、velero备份主要有哪种方式,是如何实现的?
依赖于两款插件:
Restic(文件复制):https://restic.readthedocs.io/en/latest/100_references.html#terminology
Kopia(快照备份):https://kopia.io/docs/advanced/architecture
这篇关于云原生场景下如何实现k8s集群灾备的文章就介绍到这儿,希望我们推荐的文章对编程师们有所帮助!


