本文主要是介绍结合 AppRTC 源码分析 WebRTC 建立连接的过程,希望对大家解决编程问题提供一定的参考价值,需要的开发者们随着小编来一起学习吧!
1. 相关概念
我们首先来简单地了解几个概念:
1.1 NAT 穿越(NAT Traversal)
因为 WebRTC 是 P2P 的,很多时候 peer 是隐藏在 NAT 之后,没有外网的 IP 地址,如果两个 peer 都在 NAT 后面,都没有外网的 IP (或者说都不知道自己的外网 IP),是无法建立连接的。那么 NAT 穿越就是用来解决这个问题的,NAT 穿越也俗称 “P2P 打洞”。常见的两种穿越方式是 STUN 和 TURN。
1.2 STUN server
最新的 STUN 定义是 SessionTraversalUtilitiesforNAT,可以参考 RFC5389 (https://tools.ietf.org/html/rfc5389)。顾名思义,他是一个 NAT 穿越的工具,既然上面我们知道了 NAT 之后的 peer 可能不知道自己的外网 IP 是多少,那么 STUN 这个工具就可以帮助内网的主机拿到,并告诉他外网对应的 IP 地址。
1.3 TURN server
TURN 是 TraversalUsingRelaysaround NAT 的缩写,可以参考 RFC5766 (https://tools.ietf.org/html/rfc5766)。有些内网类型比较复杂,比如对称型的 NAT,STUN server 拿到的外网对应的 IP 之后,还是无法通信,这时候就需要一个服务器来做数据的中转 (也叫中继或者 relay),这个中转服务器就叫做 TURN server。
根据统计数据表明,STUN 可以解决 85% 左右情况下的 NAT 问题,剩余的就需要 TURN 来解决。这两种穿越方式对比来看,STUN 更简单,服务器的消耗和成本比较低,但是能解决问题的场景受限制;TURN 服务器可以解决几乎所有场景下的问题(包含 STUN 可以解决的场景),但是因为需要做数据中转,所以对服务器的性能要求比较高,成本也会比较高。一般情况下会两者兼用,首先尝试 STUN,STUN 解决不了的 case 用 TURN。
1.4 ICE
ICE 是 InteractiveConnectivityEstablishment 的缩写,可以参考最新的RFC8445 (https://tools.ietf.org/html/rfc8445) 规范。顾名思义,ICE 就是 交互式连接建立 的意思,ICE 描述了一种使用 STUN 和 TURN 来穿越 NAT 建立 P2P 连接的一种规范。
每个 peer 可以收集到 3 种服务器地址;一个是自己网卡上绑定的 IP 地址,也叫 LocalAddress; 第二个是 STUN server 告诉自己的外网的地址,比如路由器上绑定的外网IP地址,叫做 ServerReflexiveAddress;第三个是 TURN server 给自己创建的中转服务器 IP 地址,叫做 RelayedAddress。
在 ICE 标准里,每个 peer 收集所有上述三种种类的 IP 地址和端口,并发送到对方 peer(体现了“交互”),对方也收集所有三种类型的 IP 地址和端口,然后发送给自己。这样,自己和对方都有了彼此的所有 IP 地址和端口之后,开始按照优先级建立连通性检查,一旦找到一个可以互通的连接,就开始用该连接进行音视频数据传输。
1.5 ICE candidate
ICE 候选人,可以简单理解为就是上面所说的每个 peer 收集到的 IP 地址和端口(实际要比这个复杂,包含传输方式等等)。收集的过程,叫做 ICE candidate gathering.
1.6 SDP
然后我们说一下 SDP,SDP 是 Session Description Protocol 的缩写,可以参考 RFC4566 (https://tools.ietf.org/html/rfc4566) 规范。在介绍这个之前,我们来思考一个问题,如果我们要用 WebRTC 来进行 P2P 的视频通话,可能两端所支持的音视频格式集合不完全一致,比如一端支持 H264 和 VP8,另一端支持 VP8 和 VP9,那如何选择呢?SDP 就是来描述每个 peer 所支持的音视频格式,以及如何决定传输的音视频格式的。
1.7 Signaling Server
上面提到的 ICE candidate 和 SDP 都需要传给对方,因为没办法直接传给对方,所以一般通过服务器来中转,这个中转的过程,并不在 WebRTC 规范里,所以使用者可以自己来实现。一般来说,可以使用 WebSocket 服务器来实现。比如建立连接的A、B 双方都连接到同样一个 WebSocket 服务器,A 发到服务器的 ICE candidate 或者 SDP,服务器都直接转发给 B,同理也会把 B 的消息转发给 A,达到交换的目的。
2. 整体流程图
假设有两个人,我们姑且称作为 Alice 和 Bob,通过 AppRTC 这个 demo app,进入了同一个房间。下面这个序列图就是客户端上的整体流程,为了简化理解,这里只设定了 5 个参与者,首先是两端(Alice 和 Bob),然后是 Signaling server & webserver,最后是两个端的底层 SDK 或者所在的浏览器(浏览器场景和客户端很类似,所以放一起了)。
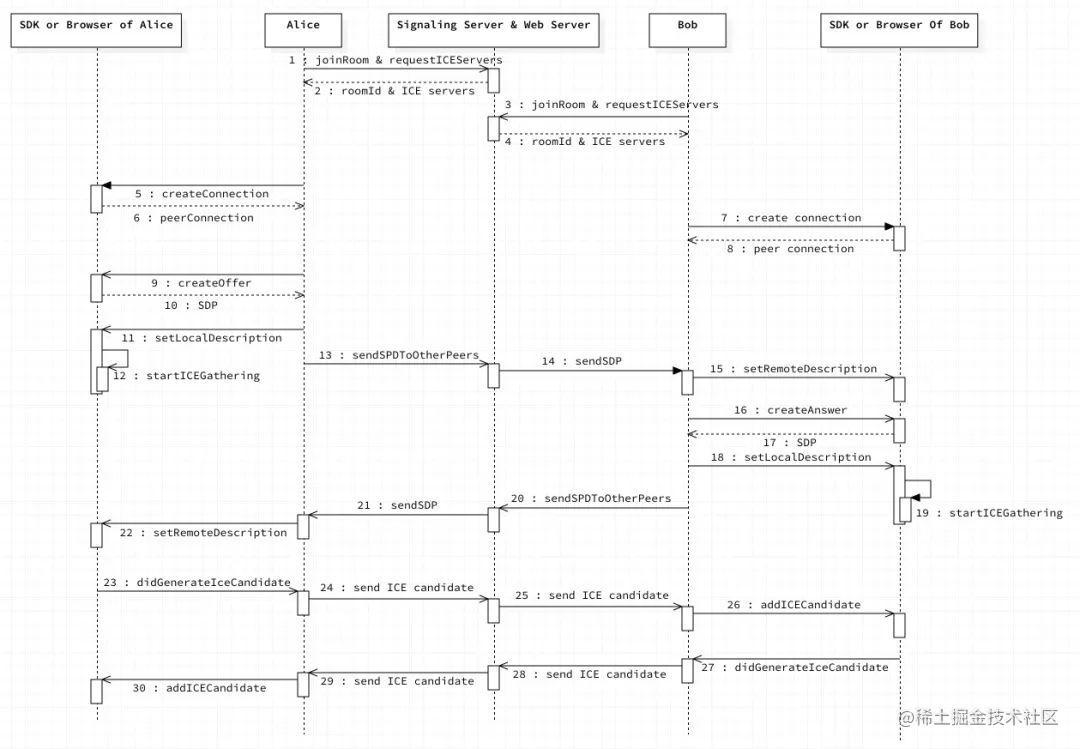
我们逐步的来说:
1-2, 3-4:Alice 和 Bob 都通过 API 进入房间,joinRoom 获得 roomId,并且通过requestIceServers 获得 Ice server (也就是 STUN 和 TURN server)的地址,然后连接到 WebSocket 服务器上。
5-6,7-8:Alice 和 Bob 都创建一个 PeerConnection,这个是个很重要的类,PeerConnection 负责编解码和传输的所有处理。
9-10:createOffer,创建 offer,通过创建 offer,底层会返回 SDP,就是自己所支持的音视频格式等描述信息。
10-12:createOffer 之后,把得到的 SDP,设置为 local description,同时会触发底层的 ICE candidate gathering,此时开始收集自己的 ICE candidate,也就前面提到的三种 IP 地址和端口。
13-14:把 SDP 通过 signaling server 发送给 Bob
15,16-17:Bob 收到 SDP 之后,设置为 remote description,之后 createAnswer,createAnswer 和 createOffer 很类似,也会收到底层返回的自己的 SDP。并设置为 local description。设置 local description 会触发底层 ICE candidate gathering. 此时,Bob 有了自己和对方的 SDP.
20-21:Bob 把自己的 SDP 通过 signaling server 发给 Alice
22: Alice 把收到的 Bob 的 SDP,并设置为 remote description,此时,Alice 也有了自己和对方的 SDP 了。
23-26:因为在 step 12 的时候开始了 ICE candidate gathering,当每收集到一个 candidate 之后,会触发 didGenerateIceCandidate 的回调, 此时 Alice 不做处理,直接通过 Signaling server 传递给 Bob,Bob 把 candidate 添加到 peer connection 里。
27-30: 同 23-26 ,Bob 把自己的 IP 地址告诉 Alice。
此后,Alice 和 Bob 的底层就开始进行连通性测试和协商,一旦找到一对互通的传输地址,就开始传输音视频数据,彼此就能看到对方了。
实际中的流程比这个要复杂,像 candidate gathering 是异步的,可能穿插在整个过程里面。所以有些状态需要判断。
3. 结合源码分析
OK, 既然大致的流程看完了,我们来看看具体的代码实现。AppRTC 源码可以在官网 (https://webrtc.org/native-code/ios/) 上找到,这里不详细地介绍如何下载源码了
PS: AppRTC 和 Web 端 Demo ( https://appr.tc) 是互通的。STUN 和 TURN server 默认用的都是 Google 提供的。
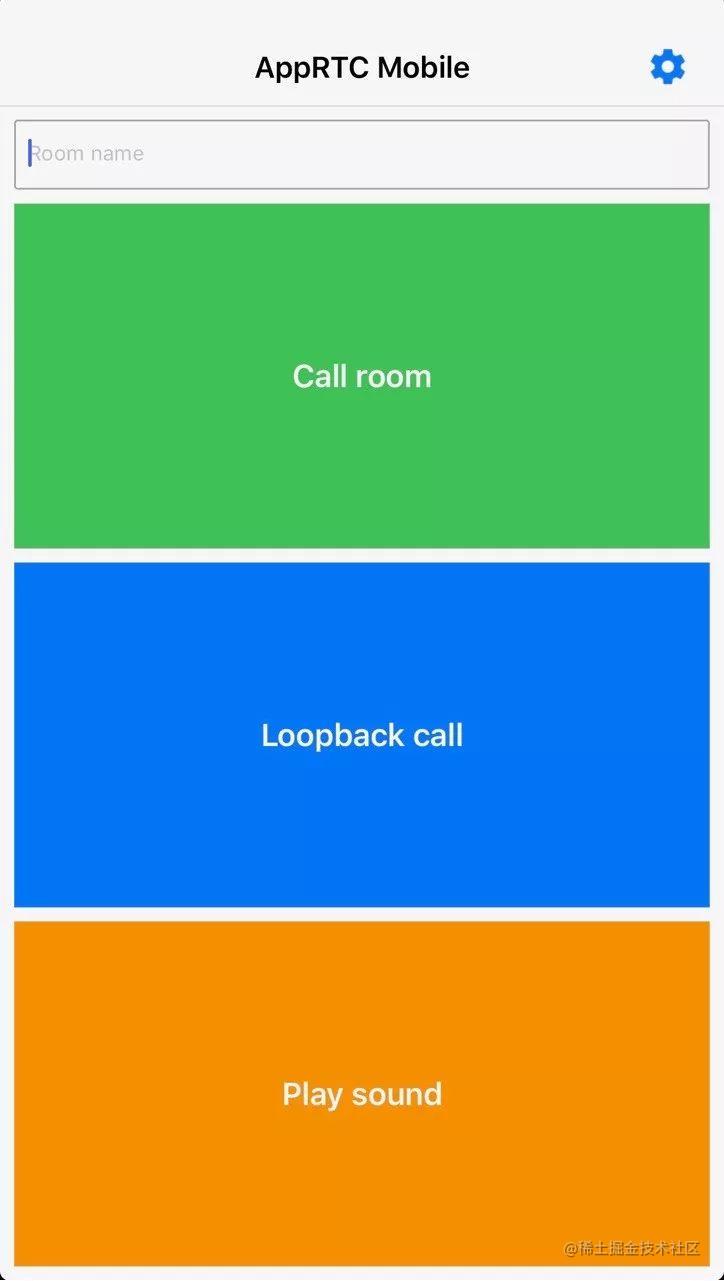
主要的逻辑集中在 ARDAppClient 这个类里面。当进入 app,输入房间号,点 Call Room 之后就执行到了 connectToRoomWithId:settings:isLoopback: 方法里。
下图是 AppRTC 的主界面
3.1 创建 RTCPeerConnectionFactory
ARDAppClient: connectToRoomWithId:settings:isLoopback:
//创建peerConnectionFactory,以及对应的 video codec factory
RTCDefaultVideoDecoderFactory *decoderFactory = [[RTCDefaultVideoDecoderFactory alloc] init];
RTCDefaultVideoEncoderFactory *encoderFactory = [[RTCDefaultVideoEncoderFactory alloc] init];
encoderFactory.preferredCodec = [settings currentVideoCodecSettingFromStore];
_factory = [[RTCPeerConnectionFactory alloc] initWithEncoderFactory:encoderFactory decoderFactory:decoderFactory];复制代码
在这里,首先初始化视频编解码器的工厂类,并通过他们创建出一个 RTCPeerConnectionFactory 的实例。
3.2 获得 TURN/STUN server 地址
随后,通过调用 appr.tc 的 API,获得 ICE server 地址,这个后面会用到。
// Request TURN.
__weak ARDAppClient *weakSelf = self;
[_turnClient requestServersWithCompletionHandler:^(NSArray *turnServers,
NSError *error) {
//此处省略错误检查代码
ARDAppClient *strongSelf = weakSelf;
[strongSelf.iceServers addObjectsFromArray:turnServers];
strongSelf.isTurnComplete = YES;
[strongSelf startSignalingIfReady];
}];复制代码
3.3 加入房间,并连接上 WebSocket
加入房间,获得 room id,有服务端返回自己是发起者还是接受者(先加入房间的是发起者,后加入的是非发起者),并连接 websocket. 这里发起者和接受者的逻辑是一样的。
// Join room on room server.
[_roomServerClient joinRoomWithRoomId:roomId
isLoopback:isLoopback
completionHandler:^(ARDJoinResponse *response, NSError *error) {
ARDAppClient *strongSelf = weakSelf;
// 此处省略错误检查代码
RTCLog(@"Joined room:%@ on room server.", roomId);
strongSelf.roomId = response.roomId; //获得roomId
strongSelf.clientId = response.clientId;
strongSelf.isInitiator = response.isInitiator; //服务器决定谁是发起者(先加入房间的是发起者,后加入的是非发起者)
for (ARDSignalingMessage *message in response.messages) {
if (message.type == kARDSignalingMessageTypeOffer ||
message.type == kARDSignalingMessageTypeAnswer) {
strongSelf.hasReceivedSdp = YES;
[strongSelf.messageQueue insertObject:message atIndex:0];
} else {
[strongSelf.messageQueue addObject:message];
}
}
//获得 WebSocket 地址
strongSelf.webSocketURL = response.webSocketURL;
strongSelf.webSocketRestURL = response.webSocketRestURL;
[strongSelf registerWithColliderIfReady]; // 连接WebSocket 服务器
[strongSelf startSignalingIfReady];
}];复制代码
3.4 创建 RTCPeerConnection 的实例
在上面的最后一个方法调用里,也就是 startSignalingIfReady 方法,开始主要的流程:
//RTCMediaConstraints 主要是描述音视频媒体的参数,比如分辨率大小,音频声道数等等
RTCMediaConstraints *constraints = [self defaultPeerConnectionConstraints];
RTCConfiguration *config = [[RTCConfiguration alloc] init];
RTCCertificate *pcert = [RTCCertificate generateCertificateWithParams:@{
@"expires" : @100000,
@"name" : @"RSASSA-PKCS1-v1_5"
}];
config.iceServers = _iceServers; //上面从服务器获得的 ICE server 地址
config.sdpSemantics = RTCSdpSemanticsUnifiedPlan; //这里使用 unified plan
config.certificate = pcert;
//创建 PeerConnection!!!
❶_peerConnection = [_factory peerConnectionWithConfiguration:config
constraints:constraints
delegate:self];
❷[self createMediaSenders];
if (_isInitiator) { //只有发起方创建 offer,接收方只需等待对方的offer,然后创建answer即可
// Send offer.
__weak ARDAppClient *weakSelf = self;
❸[_peerConnection offerForConstraints:[self defaultOfferConstraints]
completionHandler:^(RTCSessionDescription *sdp,
NSError *error) {
ARDAppClient *strongSelf = weakSelf;
[strongSelf peerConnection:strongSelf.peerConnection
didCreateSessionDescription:sdp
error:error];
}];
} else {
// Check if we've received an offer.
❹[self drainMessageQueueIfReady];
}复制代码
❶ 通过 RTCPeerConnectionFactory 创建 RTCPeerConnection 的实例,RTCPeerConnection 是核心类之一,把控从采集到发送这个流程。 ❷ createMediaSenders 方法的实现如下,首先根据 constraints 创建 source,接着用 source 创建 track,最后把创建好的 track 添加到 peer connection 里,到这一步,底层会自动创建 media sender,所以这个方法的名字叫 ‘createMediaSenders’
source 可以理解为音视频源,track 用来描述音视频轨道,sender 是用来发送音视频数据的类,这三个概念对于音视频是独立的。这里不多做描述,有兴趣的可以看一下源码。
RTCCameraVideoCapturer 类负责视频的采集,音频的采集是使用 SDK 默认的方法,这里没有单独创建。
- (void)createMediaSenders {
//创建 local audio track,并添加到 peerconnection 中
RTCMediaConstraints *constraints = [selfdefaultMediaAudioConstraints];
RTCAudioSource *source = [_factoryaudioSourceWithConstraints:constraints];
RTCAudioTrack *track = [_factoryaudioTrackWithSource:source trackId:kARDAudioTrackId];
[_peerConnectionaddTrack:trackstreamIds:@[ kARDMediaStreamId ]];
//创建 local video track 并添加到 peerconnection 中(最终会添加到 peerconnection.transceiver.sender 里)
_localVideoTrack = [selfcreateLocalVideoTrack];
if (_localVideoTrack) {
[_peerConnectionaddTrack:_localVideoTrackstreamIds:@[ kARDMediaStreamId ]];
[_delegateappClient:selfdidReceiveLocalVideoTrack:_localVideoTrack];
// We can set up rendering for the remote track right away since the transceiver already has an
// RTCRtpReceiver with a track. The track will automatically get unmuted and produce frames
// once RTP is received.
RTCVideoTrack *track = (RTCVideoTrack *)([selfvideoTransceiver].receiver.track);
[_delegateappClient:selfdidReceiveRemoteVideoTrack:track];
}
}
//只保留了核心逻辑,其他省略了
- (RTCVideoTrack *)createLocalVideoTrack {
//factory 创建一个新的 source
RTCVideoSource *source = [_factoryvideoSource];
//用 source 创建一个 RTCCameraVideoCapturer,RTCCameraVideoCapturer 负责 iOS 上的采集,
//采集到的视频帧发送给 delegate。RTCVideoSource 实现了 RTCVideoCapturerDelegate,
//所以可以接收到 RTCCameraVideoCapturer 采集到的视频帧
RTCCameraVideoCapturer *capturer = [[RTCCameraVideoCaptureralloc] initWithDelegate:source];
//这里的delegate 就是 ARDVideoCallViewController,它收到消息后,开始通过 capturer 进行视频采集
[_delegateappClient:selfdidCreateLocalCapturer:capturer];
return [_factoryvideoTrackWithSource:sourcetrackId:kARDVideoTrackId];
}复制代码
3.5 发起方,create offer,获得 SDP
❸ 发起方创建 offer,callback 里拿到 SDP,然后调 delegate 的 didCreateSessionDescription 回调方法,delegate 里 setLocalDescription,然后通过 signaling server(WebSocket)发送给 remote peer. setLocalDescription 之后,就启动了 ICE candidate gathering,gather 之后 delegate 就会收到 -(void)peerConnection:(RTCPeerConnection*)peerConnection didGenerateIceCandidate:(RTCIceCandidate*)candidate 方法的调用❺。
- (void)peerConnection:(RTCPeerConnection *)peerConnection
didCreateSessionDescription:(RTCSessionDescription *)sdp
error:(NSError *)error {
dispatch_async(dispatch_get_main_queue(), ^{
//...省略错误检查
__weak ARDAppClient *weakSelf = self;
//设置 setLocalDescription
[self.peerConnection setLocalDescription:sdp
completionHandler:^(NSError *error) {
ARDAppClient *strongSelf = weakSelf;
[strongSelf peerConnection:strongSelf.peerConnection
didSetSessionDescriptionWithError:error];
}];
ARDSessionDescriptionMessage *message =
[[ARDSessionDescriptionMessage alloc] initWithDescription:sdp];
//发送 SDP 到 remote peer
[self sendSignalingMessage:message];
//设置 video sender 的最大码率
[self setMaxBitrateForPeerConnectionVideoSender];
});
}复制代码
3.6 接收方 create answer,获得 SDP
❹ 接收方在 drainMessageQueueIfReady 方法里处理 WebSocket 的消息,如果有发起方发来的 Offer 消息的话,则创建 Answer 发给对方。
case kARDSignalingMessageTypeAnswer: {
ARDSessionDescriptionMessage *sdpMessage =
(ARDSessionDescriptionMessage *)message;
RTCSessionDescription *description = sdpMessage.sessionDescription;
__weak ARDAppClient *weakSelf = self;
//把对方的 SDP 设置为 remote SDP
[_peerConnection setRemoteDescription:description
completionHandler:^(NSError *error) {
ARDAppClient *strongSelf = weakSelf;
//回调 delegate
[strongSelf peerConnection:strongSelf.peerConnection
didSetSessionDescriptionWithError:error];
}];
break;
}复制代码
接收方 create answer,并把 SDP 发送给发起方。
- (void)peerConnection:(RTCPeerConnection*)peerConnection
didSetSessionDescriptionWithError:(NSError*)error {
dispatch_async(dispatch_get_main_queue(), ^{
//省略错误处理
// If we're answering and we've just set the remote offer we need to create
// an answer and set the local description.
if (!self.isInitiator&&!self.peerConnection.localDescription) {
RTCMediaConstraints*constraints= [selfdefaultAnswerConstraints];
__weakARDAppClient*weakSelf=self;
//创建 Answer
[self.peerConnectionanswerForConstraints:constraints
completionHandler:^(RTCSessionDescription*sdp, NSError*error) {
ARDAppClient*strongSelf=weakSelf;
//回调 delegate 的 didCreateSessionDescription 方法(和发起者创建完 offer 回调的方法一致,行为也一致,
//首先 setLocalDescription,然后发送到 remote peer,然后设置最大发送码率)
[strongSelfpeerConnection:strongSelf.peerConnection
didCreateSessionDescription:sdp
error:error];
}];
}
});
}
- (void)peerConnection:(RTCPeerConnection*)peerConnection
didCreateSessionDescription:(RTCSessionDescription*)sdp
error:(NSError*)error {
dispatch_async(dispatch_get_main_queue(), ^{
//...省略错误检查
__weakARDAppClient*weakSelf=self;
//设置 setLocalDescription
[self.peerConnectionsetLocalDescription:sdp
completionHandler:^(NSError*error) {
ARDAppClient*strongSelf=weakSelf;
[strongSelfpeerConnection:strongSelf.peerConnection
didSetSessionDescriptionWithError:error];
}];
ARDSessionDescriptionMessage*message=
[[ARDSessionDescriptionMessagealloc] initWithDescription:sdp];
//发送 SDP 到 remote peer
[selfsendSignalingMessage:message];
//设置 video sender 的最大码率
[selfsetMaxBitrateForPeerConnectionVideoSender];
});
}复制代码
3.7 获得 ICE candidate
❺ didGenerateIceCandidate 回调里,不管事发起方还是接收方,都把获取到的 ICE candidate,通过 signaling server 发给 remote peer 即可, 对于获取到的 ICE candidate 无需做其他任何的处理。
- (void)peerConnection:(RTCPeerConnection *)peerConnection
didGenerateIceCandidate:(RTCIceCandidate *)candidate {
dispatch_async(dispatch_get_main_queue(), ^{
ARDICECandidateMessage *message =
[[ARDICECandidateMessage alloc] initWithCandidate:candidate];
[self sendSignalingMessage:message];
});
}复制代码
对方收到之后,添加到 peer connection 里,也无需做其他的处理。
- (void)processSignalingMessage:(ARDSignalingMessage *)message {
NSParameterAssert(_peerConnection ||
message.type == kARDSignalingMessageTypeBye);
switch (message.type) {
//...省略
casekARDSignalingMessageTypeCandidate: {
ARDICECandidateMessage *candidateMessage =
(ARDICECandidateMessage *)message;
[_peerConnectionaddIceCandidate:candidateMessage.candidate];
break;
}
//...省略
}
}复制代码
同理,对方在 setLocalDescription 之后,也开始 gather ICE candidate,并把收集到的 ICE candidate 发给对方。当两端都有了双方的 candidate,就开始做连通性检查,找到一条双方都可以通信的通道之后(这一部分底层帮我们做了,如果是 Web 端程序,是浏览器做的,如果对连通性检查这块感兴趣,可以参考 rfc-8445 - 2.2 Connectivity Checks (https://tools.ietf.org/html/rfc8445#section-2.2),双方即可相互传递发送数据了,至此彼此也可以看到对方了。
如果发生异常情况,比如网络条件恶化、单方或者双方建议切换到低分辨率或者修改编码器,将会触发新的一轮 ICE candidate 的收集和交换。
Web 端上的整个过程和这个很相似,区别是采集阶段、获取摄像头和麦克风的输入调用的是 getUserMedia() 方法,app 里是用的 native 的方式,比如 iOS 是用 RTCCameraVideoCapturer 采集视频的(内部实现是通过 AVCaptureSession 来实现的)。
原文链接:https://juejin.cn/post/6844903788591988749
这篇关于结合 AppRTC 源码分析 WebRTC 建立连接的过程的文章就介绍到这儿,希望我们推荐的文章对编程师们有所帮助!


