本文主要是介绍【改进YOLOv8】融合高效网络架构 CloAtt的焊缝识别系统,希望对大家解决编程问题提供一定的参考价值,需要的开发者们随着小编来一起学习吧!
1.研究背景与意义
项目参考AAAI Association for the Advancement of Artificial Intelligence
研究背景与意义
近年来,随着人工智能技术的快速发展,计算机视觉领域取得了显著的进展。其中,目标检测是计算机视觉领域的一个重要研究方向,它在许多实际应用中起着关键作用,如智能监控、自动驾驶、工业检测等。然而,在实际应用中,目标检测面临着许多挑战,如目标尺度变化、复杂背景、遮挡等。
针对目标检测中的挑战,YOLO(You Only Look Once)系列算法提出了一种端到端的目标检测方法,具有高效、准确的特点。然而,YOLOv3和YOLOv4等版本在目标检测准确率和速度之间存在一定的矛盾。为了进一步提高目标检测的准确率和速度,本研究提出了一种改进的YOLOv8算法,通过融合高效网络架构CloAtt,实现焊缝识别系统的优化。
焊缝识别是工业领域中的一个重要问题,对于焊接质量的控制和缺陷检测具有重要意义。然而,传统的焊缝识别方法往往依赖于人工特征提取和分类器设计,存在着特征提取不准确、分类器泛化能力差等问题。而基于深度学习的目标检测方法可以自动学习特征表示,具有更好的泛化能力和准确性。
本研究的焊缝识别系统采用改进的YOLOv8算法,通过融合高效网络架构CloAtt,实现对焊缝的准确识别。CloAtt是一种轻量级的注意力机制网络,能够有效地提取图像中的关键信息。通过将CloAtt融合到YOLOv8中,可以进一步提高目标检测的准确率和速度。
该研究的意义主要体现在以下几个方面:
首先,改进的YOLOv8算法能够提高焊缝识别系统的准确率和速度。通过融合CloAtt网络,可以更好地提取焊缝图像中的关键信息,从而提高目标检测的准确性。同时,CloAtt网络具有轻量级的特点,可以加快目标检测的速度,提高系统的实时性。
其次,改进的YOLOv8算法具有较好的泛化能力。传统的焊缝识别方法往往依赖于人工特征提取和分类器设计,容易受到图像质量、光照条件等因素的影响。而基于深度学习的目标检测方法可以自动学习特征表示,具有更好的泛化能力和鲁棒性。
最后,改进的YOLOv8算法对于工业领域的自动化生产具有重要意义。焊缝识别是焊接质量控制和缺陷检测的关键环节,对于提高焊接质量、降低生产成本具有重要作用。通过引入改进的YOLOv8算法,可以实现对焊缝的自动化识别和检测,提高生产效率和质量。
综上所述,改进的YOLOv8算法融合高效网络架构CloAtt的焊缝识别系统具有重要的研究背景和意义。通过提高目标检测的准确率和速度,改进的算法能够应用于工业领域的焊缝识别,提高生产效率和质量。同时,改进的算法对于深度学习目标检测方法的发展也具有一定的推动作用。
2.图片演示


3.视频演示
【改进YOLOv8】融合高效网络架构 CloAtt的焊缝识别系统_哔哩哔哩_bilibili
4.数据集的采集&标注和整理
图片的收集
首先,我们需要收集所需的图片。这可以通过不同的方式来实现,例如使用现有的公开数据集HFDatasets。
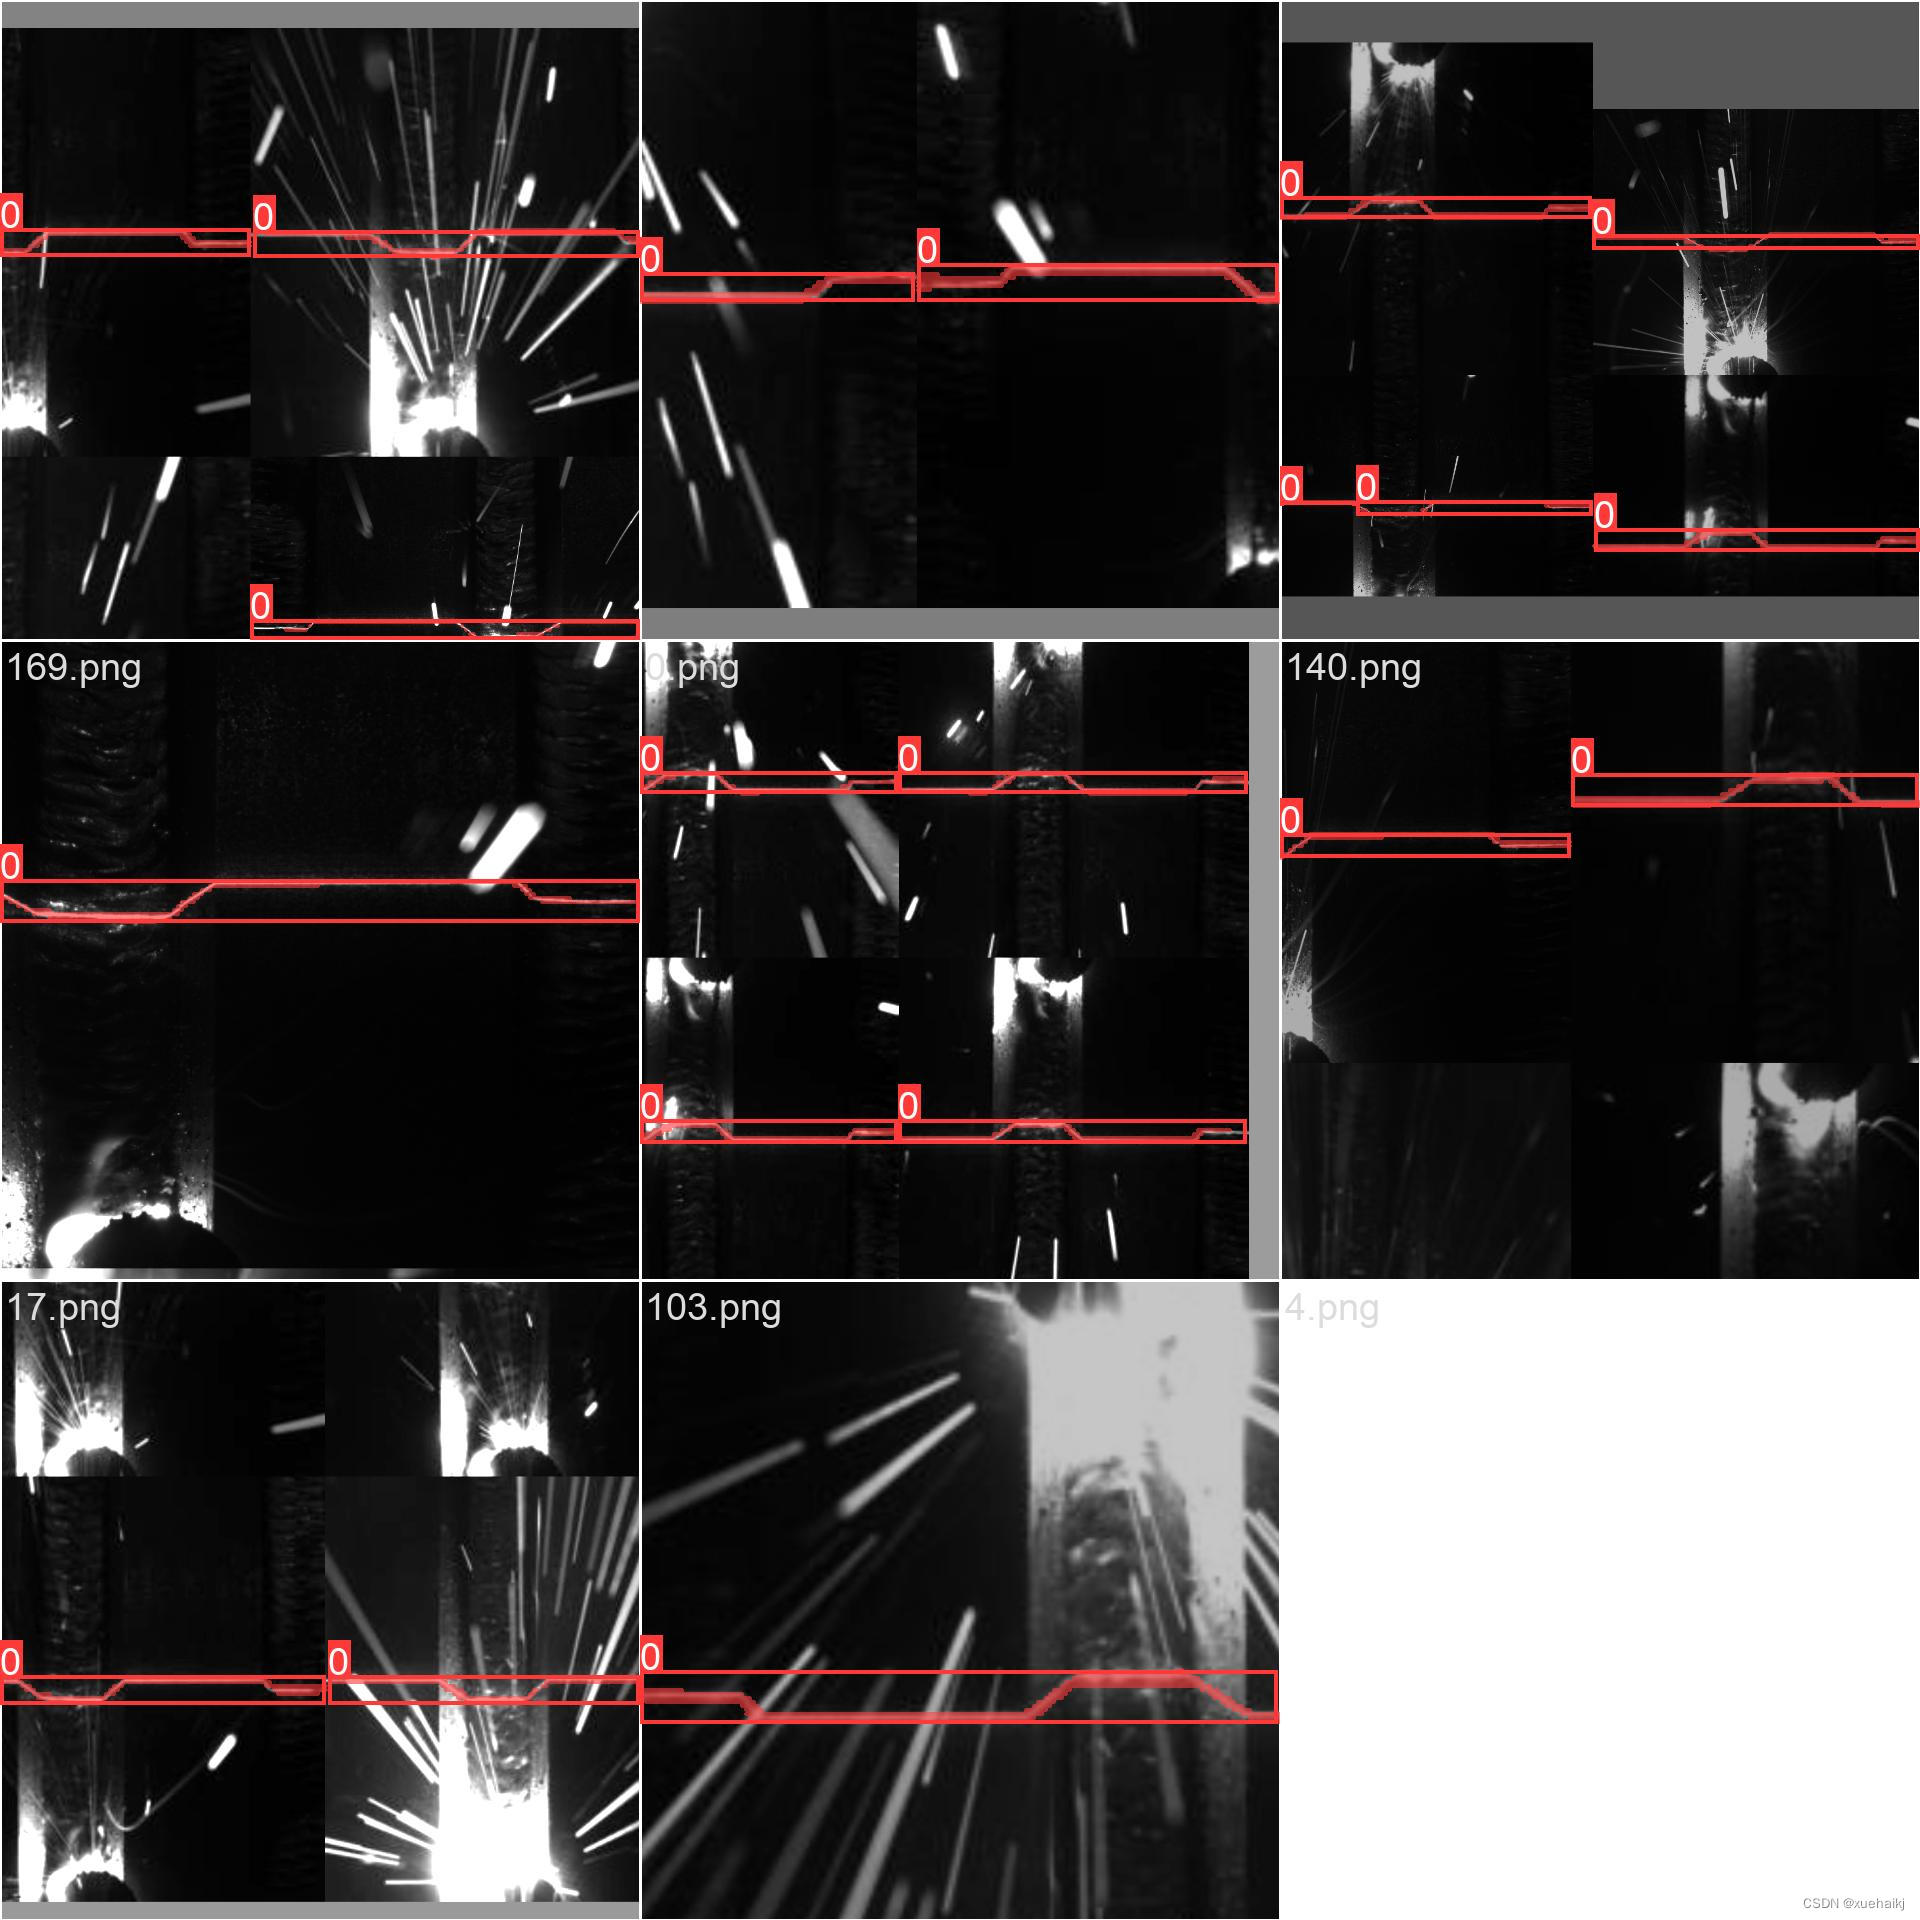
eiseg是一个图形化的图像注释工具,支持COCO和YOLO格式。以下是使用eiseg将图片标注为COCO格式的步骤:
(1)下载并安装eiseg。
(2)打开eiseg并选择“Open Dir”来选择你的图片目录。
(3)为你的目标对象设置标签名称。
(4)在图片上绘制矩形框,选择对应的标签。
(5)保存标注信息,这将在图片目录下生成一个与图片同名的JSON文件。
(6)重复此过程,直到所有的图片都标注完毕。
由于YOLO使用的是txt格式的标注,我们需要将VOC格式转换为YOLO格式。可以使用各种转换工具或脚本来实现。
下面是一个简单的方法是使用Python脚本,该脚本读取XML文件,然后将其转换为YOLO所需的txt格式。
import contextlib
import jsonimport cv2
import pandas as pd
from PIL import Image
from collections import defaultdictfrom utils import *# Convert INFOLKS JSON file into YOLO-format labels ----------------------------
def convert_infolks_json(name, files, img_path):# Create folderspath = make_dirs()# Import jsondata = []for file in glob.glob(files):with open(file) as f:jdata = json.load(f)jdata['json_file'] = filedata.append(jdata)# Write images and shapesname = path + os.sep + namefile_id, file_name, wh, cat = [], [], [], []for x in tqdm(data, desc='Files and Shapes'):f = glob.glob(img_path + Path(x['json_file']).stem + '.*')[0]file_name.append(f)wh.append(exif_size(Image.open(f)))  # (width, height)cat.extend(a['classTitle'].lower() for a in x['output']['objects'])  # categories# filenamewith open(name + '.txt', 'a') as file:file.write('%s\n' % f)# Write *.names filenames = sorted(np.unique(cat))# names.pop(names.index('Missing product'))  # removewith open(name + '.names', 'a') as file:[file.write('%s\n' % a) for a in names]# Write labels filefor i, x in enumerate(tqdm(data, desc='Annotations')):label_name = Path(file_name[i]).stem + '.txt'with open(path + '/labels/' + label_name, 'a') as file:for a in x['output']['objects']:# if a['classTitle'] == 'Missing product':#    continue  # skipcategory_id = names.index(a['classTitle'].lower())# The INFOLKS bounding box format is [x-min, y-min, x-max, y-max]box = np.array(a['points']['exterior'], dtype=np.float32).ravel()box[[0, 2]] /= wh[i][0]  # normalize x by widthbox[[1, 3]] /= wh[i][1]  # normalize y by heightbox = [box[[0, 2]].mean(), box[[1, 3]].mean(), box[2] - box[0], box[3] - box[1]]  # xywhif (box[2] > 0.) and (box[3] > 0.):  # if w > 0 and h > 0file.write('%g %.6f %.6f %.6f %.6f\n' % (category_id, *box))# Split data into train, test, and validate filessplit_files(name, file_name)write_data_data(name + '.data', nc=len(names))print(f'Done. Output saved to {os.getcwd() + os.sep + path}')# Convert vott JSON file into YOLO-format labels -------------------------------
def convert_vott_json(name, files, img_path):# Create folderspath = make_dirs()name = path + os.sep + name# Import jsondata = []for file in glob.glob(files):with open(file) as f:jdata = json.load(f)jdata['json_file'] = filedata.append(jdata)# Get all categoriesfile_name, wh, cat = [], [], []for i, x in enumerate(tqdm(data, desc='Files and Shapes')):with contextlib.suppress(Exception):cat.extend(a['tags'][0] for a in x['regions'])  # categories# Write *.names filenames = sorted(pd.unique(cat))with open(name + '.names', 'a') as file:[file.write('%s\n' % a) for a in names]# Write labels filen1, n2 = 0, 0missing_images = []for i, x in enumerate(tqdm(data, desc='Annotations')):f = glob.glob(img_path + x['asset']['name'] + '.jpg')if len(f):f = f[0]file_name.append(f)wh = exif_size(Image.open(f))  # (width, height)n1 += 1if (len(f) > 0) and (wh[0] > 0) and (wh[1] > 0):n2 += 1# append filename to listwith open(name + '.txt', 'a') as file:file.write('%s\n' % f)# write labelsfilelabel_name = Path(f).stem + '.txt'with open(path + '/labels/' + label_name, 'a') as file:for a in x['regions']:category_id = names.index(a['tags'][0])# The INFOLKS bounding box format is [x-min, y-min, x-max, y-max]box = a['boundingBox']box = np.array([box['left'], box['top'], box['width'], box['height']]).ravel()box[[0, 2]] /= wh[0]  # normalize x by widthbox[[1, 3]] /= wh[1]  # normalize y by heightbox = [box[0] + box[2] / 2, box[1] + box[3] / 2, box[2], box[3]]  # xywhif (box[2] > 0.) and (box[3] > 0.):  # if w > 0 and h > 0file.write('%g %.6f %.6f %.6f %.6f\n' % (category_id, *box))else:missing_images.append(x['asset']['name'])print('Attempted %g json imports, found %g images, imported %g annotations successfully' % (i, n1, n2))if len(missing_images):print('WARNING, missing images:', missing_images)# Split data into train, test, and validate filessplit_files(name, file_name)print(f'Done. Output saved to {os.getcwd() + os.sep + path}')# Convert ath JSON file into YOLO-format labels --------------------------------
def convert_ath_json(json_dir):  # dir contains json annotations and images# Create foldersdir = make_dirs()  # output directoryjsons = []for dirpath, dirnames, filenames in os.walk(json_dir):jsons.extend(os.path.join(dirpath, filename)for filename in [f for f in filenames if f.lower().endswith('.json')])# Import jsonn1, n2, n3 = 0, 0, 0missing_images, file_name = [], []for json_file in sorted(jsons):with open(json_file) as f:data = json.load(f)# # Get classes# try:#     classes = list(data['_via_attributes']['region']['class']['options'].values())  # classes# except:#     classes = list(data['_via_attributes']['region']['Class']['options'].values())  # classes# # Write *.names file# names = pd.unique(classes)  # preserves sort order# with open(dir + 'data.names', 'w') as f:#     [f.write('%s\n' % a) for a in names]# Write labels filefor x in tqdm(data['_via_img_metadata'].values(), desc=f'Processing {json_file}'):image_file = str(Path(json_file).parent / x['filename'])f = glob.glob(image_file)  # image fileif len(f):f = f[0]file_name.append(f)wh = exif_size(Image.open(f))  # (width, height)n1 += 1  # all imagesif len(f) > 0 and wh[0] > 0 and wh[1] > 0:label_file = dir + 'labels/' + Path(f).stem + '.txt'nlabels = 0try:with open(label_file, 'a') as file:  # write labelsfile# try:#     category_id = int(a['region_attributes']['class'])# except:#     category_id = int(a['region_attributes']['Class'])category_id = 0  # single-classfor a in x['regions']:# bounding box format is [x-min, y-min, x-max, y-max]box = a['shape_attributes']box = np.array([box['x'], box['y'], box['width'], box['height']],dtype=np.float32).ravel()box[[0, 2]] /= wh[0]  # normalize x by widthbox[[1, 3]] /= wh[1]  # normalize y by heightbox = [box[0] + box[2] / 2, box[1] + box[3] / 2, box[2],box[3]]  # xywh (left-top to center x-y)if box[2] > 0. and box[3] > 0.:  # if w > 0 and h > 0file.write('%g %.6f %.6f %.6f %.6f\n' % (category_id, *box))n3 += 1nlabels += 1if nlabels == 0:  # remove non-labelled images from datasetos.system(f'rm {label_file}')# print('no labels for %s' % f)continue  # next file# write imageimg_size = 4096  # resize to maximumimg = cv2.imread(f)  # BGRassert img is not None, 'Image Not Found ' + fr = img_size / max(img.shape)  # size ratioif r < 1:  # downsize if necessaryh, w, _ = img.shapeimg = cv2.resize(img, (int(w * r), int(h * r)), interpolation=cv2.INTER_AREA)ifile = dir + 'images/' + Path(f).nameif cv2.imwrite(ifile, img):  # if success append image to listwith open(dir + 'data.txt', 'a') as file:file.write('%s\n' % ifile)n2 += 1  # correct imagesexcept Exception:os.system(f'rm {label_file}')print(f'problem with {f}')else:missing_images.append(image_file)nm = len(missing_images)  # number missingprint('\nFound %g JSONs with %g labels over %g images. Found %g images, labelled %g images successfully' %(len(jsons), n3, n1, n1 - nm, n2))if len(missing_images):print('WARNING, missing images:', missing_images)# Write *.names filenames = ['knife']  # preserves sort orderwith open(dir + 'data.names', 'w') as f:[f.write('%s\n' % a) for a in names]# Split data into train, test, and validate filessplit_rows_simple(dir + 'data.txt')write_data_data(dir + 'data.data', nc=1)print(f'Done. Output saved to {Path(dir).absolute()}')def convert_coco_json(json_dir='../coco/annotations/', use_segments=False, cls91to80=False):save_dir = make_dirs()  # output directorycoco80 = coco91_to_coco80_class()# Import jsonfor json_file in sorted(Path(json_dir).resolve().glob('*.json')):fn = Path(save_dir) / 'labels' / json_file.stem.replace('instances_', '')  # folder namefn.mkdir()with open(json_file) as f:data = json.load(f)# Create image dictimages = {'%g' % x['id']: x for x in data['images']}# Create image-annotations dictimgToAnns = defaultdict(list)for ann in data['annotations']:imgToAnns[ann['image_id']].append(ann)# Write labels filefor img_id, anns in tqdm(imgToAnns.items(), desc=f'Annotations {json_file}'):img = images['%g' % img_id]h, w, f = img['height'], img['width'], img['file_name']bboxes = []segments = []for ann in anns:if ann['iscrowd']:continue# The COCO box format is [top left x, top left y, width, height]box = np.array(ann['bbox'], dtype=np.float64)box[:2] += box[2:] / 2  # xy top-left corner to centerbox[[0, 2]] /= w  # normalize xbox[[1, 3]] /= h  # normalize yif box[2] <= 0 or box[3] <= 0:  # if w <= 0 and h <= 0continuecls = coco80[ann['category_id'] - 1] if cls91to80 else ann['category_id'] - 1  # classbox = [cls] + box.tolist()if box not in bboxes:bboxes.append(box)# Segmentsif use_segments:if len(ann['segmentation']) > 1:s = merge_multi_segment(ann['segmentation'])s = (np.concatenate(s, axis=0) / np.array([w, h])).reshape(-1).tolist()else:s = [j for i in ann['segmentation'] for j in i]  # all segments concatenateds = (np.array(s).reshape(-1, 2) / np.array([w, h])).reshape(-1).tolist()s = [cls] + sif s not in segments:segments.append(s)# Writewith open((fn / f).with_suffix('.txt'), 'a') as file:for i in range(len(bboxes)):line = *(segments[i] if use_segments else bboxes[i]),  # cls, box or segmentsfile.write(('%g ' * len(line)).rstrip() % line + '\n')def min_index(arr1, arr2):"""Find a pair of indexes with the shortest distance. Args:arr1: (N, 2).arr2: (M, 2).Return:a pair of indexes(tuple)."""dis = ((arr1[:, None, :] - arr2[None, :, :]) ** 2).sum(-1)return np.unravel_index(np.argmin(dis, axis=None), dis.shape)def merge_multi_segment(segments):"""Merge multi segments to one list.Find the coordinates with min distance between each segment,then connect these coordinates with one thin line to merge all segments into one.Args:segments(List(List)): original segmentations in coco's json file.like [segmentation1, segmentation2,...], each segmentation is a list of coordinates."""s = []segments = [np.array(i).reshape(-1, 2) for i in segments]idx_list = [[] for _ in range(len(segments))]# record the indexes with min distance between each segmentfor i in range(1, len(segments)):idx1, idx2 = min_index(segments[i - 1], segments[i])idx_list[i - 1].append(idx1)idx_list[i].append(idx2)# use two round to connect all the segmentsfor k in range(2):# forward connectionif k == 0:for i, idx in enumerate(idx_list):# middle segments have two indexes# reverse the index of middle segmentsif len(idx) == 2 and idx[0] > idx[1]:idx = idx[::-1]segments[i] = segments[i][::-1, :]segments[i] = np.roll(segments[i], -idx[0], axis=0)segments[i] = np.concatenate([segments[i], segments[i][:1]])# deal with the first segment and the last oneif i in [0, len(idx_list) - 1]:s.append(segments[i])else:idx = [0, idx[1] - idx[0]]s.append(segments[i][idx[0]:idx[1] + 1])else:for i in range(len(idx_list) - 1, -1, -1):if i not in [0, len(idx_list) - 1]:idx = idx_list[i]nidx = abs(idx[1] - idx[0])s.append(segments[i][nidx:])return sdef delete_dsstore(path='../datasets'):# Delete apple .DS_store filesfrom pathlib import Pathfiles = list(Path(path).rglob('.DS_store'))print(files)for f in files:f.unlink()if __name__ == '__main__':source = 'COCO'if source == 'COCO':convert_coco_json('./annotations',  # directory with *.jsonuse_segments=True,cls91to80=True)elif source == 'infolks':  # Infolks https://infolks.info/convert_infolks_json(name='out',files='../data/sm4/json/*.json',img_path='../data/sm4/images/')elif source == 'vott':  # VoTT https://github.com/microsoft/VoTTconvert_vott_json(name='data',files='../../Downloads/athena_day/20190715/*.json',img_path='../../Downloads/athena_day/20190715/')  # images folderelif source == 'ath':  # ath formatconvert_ath_json(json_dir='../../Downloads/athena/')  # images folder# zip results# os.system('zip -r ../coco.zip ../coco')
整理数据文件夹结构
我们需要将数据集整理为以下结构:
-----datasets-----coco128-seg|-----images| |-----train| |-----valid| |-----test||-----labels| |-----train| |-----valid| |-----test|模型训练
Epoch gpu_mem box obj cls labels img_size1/200 20.8G 0.01576 0.01955 0.007536 22 1280: 100%|██████████| 849/849 [14:42<00:00, 1.04s/it]Class Images Labels P R mAP@.5 mAP@.5:.95: 100%|██████████| 213/213 [01:14<00:00, 2.87it/s]all 3395 17314 0.994 0.957 0.0957 0.0843Epoch gpu_mem box obj cls labels img_size2/200 20.8G 0.01578 0.01923 0.007006 22 1280: 100%|██████████| 849/849 [14:44<00:00, 1.04s/it]Class Images Labels P R mAP@.5 mAP@.5:.95: 100%|██████████| 213/213 [01:12<00:00, 2.95it/s]all 3395 17314 0.996 0.956 0.0957 0.0845Epoch gpu_mem box obj cls labels img_size3/200 20.8G 0.01561 0.0191 0.006895 27 1280: 100%|██████████| 849/849 [10:56<00:00, 1.29it/s]Class Images Labels P R mAP@.5 mAP@.5:.95: 100%|███████ | 187/213 [00:52<00:00, 4.04it/s]all 3395 17314 0.996 0.957 0.0957 0.0845
5.核心代码讲解
5.2 predict.py
class DetectionPredictor(BasePredictor):def postprocess(self, preds, img, orig_imgs):preds = ops.non_max_suppression(preds,self.args.conf,self.args.iou,agnostic=self.args.agnostic_nms,max_det=self.args.max_det,classes=self.args.classes)if not isinstance(orig_imgs, list):orig_imgs = ops.convert_torch2numpy_batch(orig_imgs)results = []for i, pred in enumerate(preds):orig_img = orig_imgs[i]pred[:, :4] = ops.scale_boxes(img.shape[2:], pred[:, :4], orig_img.shape)img_path = self.batch[0][i]results.append(Results(orig_img, path=img_path, names=self.model.names, boxes=pred))return results
这是一个名为predict.py的程序文件,主要用于预测基于检测模型的结果。该文件使用了Ultralytics YOLO库,使用AGPL-3.0许可证。
文件中定义了一个名为DetectionPredictor的类,该类继承自BasePredictor类,用于基于检测模型进行预测。
该类中包含了一个postprocess方法,用于对预测结果进行后处理,并返回一个Results对象的列表。在postprocess方法中,首先对预测结果进行非最大抑制处理,根据一定的阈值筛选出最有可能的目标框。然后,将预测框的坐标进行缩放,以适应原始图像的尺寸。最后,将处理后的结果存储在Results对象中,并将其添加到结果列表中。
该文件还包含了一个示例代码,用于演示如何使用DetectionPredictor类进行预测。示例代码中使用了Ultralytics的YOLO模型,并指定了模型文件和输入数据源。然后,创建了一个DetectionPredictor对象,并调用predict_cli方法进行预测。
总的来说,该文件实现了基于检测模型的预测功能,并提供了一个示例代码用于演示如何使用该功能。
5.3 train.py
from copy import copy
import numpy as np
from ultralytics.data import build_dataloader, build_yolo_dataset
from ultralytics.engine.trainer import BaseTrainer
from ultralytics.models import yolo
from ultralytics.nn.tasks import DetectionModel
from ultralytics.utils import LOGGER, RANK
from ultralytics.utils.torch_utils import de_parallel, torch_distributed_zero_firstclass DetectionTrainer(BaseTrainer):def build_dataset(self, img_path, mode='train', batch=None):gs = max(int(de_parallel(self.model).stride.max() if self.model else 0), 32)return build_yolo_dataset(self.args, img_path, batch, self.data, mode=mode, rect=mode == 'val', stride=gs)def get_dataloader(self, dataset_path, batch_size=16, rank=0, mode='train'):assert mode in ['train', 'val']with torch_distributed_zero_first(rank):dataset = self.build_dataset(dataset_path, mode, batch_size)shuffle = mode == 'train'if getattr(dataset, 'rect', False) and shuffle:LOGGER.warning("WARNING ⚠️ 'rect=True' is incompatible with DataLoader shuffle, setting shuffle=False")shuffle = Falseworkers = 0return build_dataloader(dataset, batch_size, workers, shuffle, rank)def preprocess_batch(self, batch):batch['img'] = batch['img'].to(self.device, non_blocking=True).float() / 255return batchdef set_model_attributes(self):self.model.nc = self.data['nc']self.model.names = self.data['names']self.model.args = self.argsdef get_model(self, cfg=None, weights=None, verbose=True):model = DetectionModel(cfg, nc=self.data['nc'], verbose=verbose and RANK == -1)if weights:model.load(weights)return modeldef get_validator(self):self.loss_names = 'box_loss', 'cls_loss', 'dfl_loss'return yolo.detect.DetectionValidator(self.test_loader, save_dir=self.save_dir, args=copy(self.args))def label_loss_items(self, loss_items=None, prefix='train'):keys = [f'{prefix}/{x}' for x in self.loss_names]if loss_items is not None:loss_items = [round(float(x), 5) for x in loss_items]return dict(zip(keys, loss_items))else:return keysdef progress_string(self):return ('\n' + '%11s' *(4 + len(self.loss_names))) % ('Epoch', 'GPU_mem', *self.loss_names, 'Instances', 'Size')def plot_training_samples(self, batch, ni):plot_images(images=batch['img'],batch_idx=batch['batch_idx'],cls=batch['cls'].squeeze(-1),bboxes=batch['bboxes'],paths=batch['im_file'],fname=self.save_dir / f'train_batch{ni}.jpg',on_plot=self.on_plot)def plot_metrics(self):plot_results(file=self.csv, on_plot=self.on_plot)def plot_training_labels(self):boxes = np.concatenate([lb['bboxes'] for lb in self.train_loader.dataset.labels], 0)cls = np.concatenate([lb['cls'] for lb in self.train_loader.dataset.labels], 0)plot_labels(boxes, cls.squeeze(), names=self.data['names'], save_dir=self.save_dir, on_plot=self.on_plot)
这是一个用于训练目标检测模型的程序文件。它使用了Ultralytics YOLO库,实现了一个名为DetectionTrainer的类,继承自BaseTrainer类。该类提供了一些方法来构建数据集、构建数据加载器、预处理批量数据、设置模型属性等。它还提供了一些用于训练过程中的可视化方法,如绘制训练样本、绘制指标、绘制训练标签等。在文件的最后,使用了一些参数来创建一个DetectionTrainer对象,并调用其train方法开始训练过程。
5.4 ui.py
from PyQt5.QtCore import *
from PyQt5.QtWidgets import *
from PyQt5.QtGui import *
from PyQt5 import QtCore, QtGui, QtWidgets
import os
import sys
from pathlib import Path
import numpy as np
import timeimport cv2
import numpy as np
from sklearn.ensemble import RandomForestClassifier
from sklearn.metrics import classification_report
from sklearn.svm import SVC
from sklearn.model
......
这个程序文件是一个使用PyQt5库创建的GUI应用程序。它包含了一个主窗口和一些按钮和标签,用于选择和显示图像,并对图像进行处理和识别焊缝。
5.5 backbone\convnextv2.py
class LayerNorm(nn.Module):def __init__(self, normalized_shape, eps=1e-6, data_format="channels_last"):super().__init__()self.weight = nn.Parameter(torch.ones(normalized_shape))self.bias = nn.Parameter(torch.zeros(normalized_shape))self.eps = epsself.data_format = data_formatif self.data_format not in ["channels_last", "channels_first"]:raise NotImplementedError self.normalized_shape = (normalized_shape, )def forward(self, x):if self.data_format == "channels_last":return F.layer_norm(x, self.normalized_shape, self.weight, self.bias, self.eps)elif self.data_format == "channels_first":u = x.mean(1, keepdim=True)s = (x - u).pow(2).mean(1, keepdim=True)x = (x - u) / torch.sqrt(s + self.eps)x = self.weight[:, None, None] * x + self.bias[:, None, None]return xclass GRN(nn.Module):def __init__(self, dim):super().__init__()self.gamma = nn.Parameter(torch.zeros(1, 1, 1, dim))self.beta = nn.Parameter(torch.zeros(1, 1, 1, dim))def forward(self, x):Gx = torch.norm(x, p=2, dim=(1,2), keepdim=True)Nx = Gx / (Gx.mean(dim=-1, keepdim=True) + 1e-6)return self.gamma * (x * Nx) + self.beta + xclass Block(nn.Module):def __init__(self, dim, drop_path=0.):super().__init__()self.dwconv = nn.Conv2d(dim, dim, kernel_size=7, padding=3, groups=dim)self.norm = LayerNorm(dim, eps=1e-6)self.pwconv1 = nn.Linear(dim, 4 * dim)self.act = nn.GELU()self.grn = GRN(4 * dim)self.pwconv2 = nn.Linear(4 * dim, dim)self.drop_path = DropPath(drop_path) if drop_path > 0. else nn.Identity()def forward(self, x):input = xx = self.dwconv(x)x = x.permute(0, 2, 3, 1)x = self.norm(x)x = self.pwconv1(x)x = self.act(x)x = self.grn(x)x = self.pwconv2(x)x = x.permute(0, 3, 1, 2)x = input + self.drop_path(x)return xclass ConvNeXtV2(nn.Module):def __init__(self, in_chans=3, num_classes=1000, depths=[3, 3, 9, 3], dims=[96, 192, 384, 768], drop_path_rate=0., head_init_scale=1.):super().__init__()self.depths = depthsself.downsample_layers = nn.ModuleList()stem = nn.Sequential(nn.Conv2d(in_chans, dims[0], kernel_size=4, stride=4),LayerNorm(dims[0], eps=1e-6, data_format="channels_first"))self.downsample_layers.append(stem)for i in range(3):downsample_layer = nn.Sequential(LayerNorm(dims[i], eps=1e-6, data_format="channels_first"),nn.Conv2d(dims[i], dims[i+1], kernel_size=2, stride=2),)self.downsample_layers.append(downsample_layer)self.stages = nn.ModuleList()dp_rates=[x.item() for x in torch.linspace(0, drop_path_rate, sum(depths))] cur = 0for i in range(4):stage = nn.Sequential(*[Block(dim=dims[i], drop_path=dp_rates[cur + j]) for j in range(depths[i])])self.stages.append(stage)cur += depths[i]self.norm = nn.LayerNorm(dims[-1], eps=1e-6)self.head = nn.Linear(dims[-1], num_classes)self.apply(self._init_weights)self.channel = [i.size(1) for i in self.forward(torch.randn(1, 3, 640, 640))]def _init_weights(self, m):if isinstance(m, (nn.Conv2d, nn.Linear)):trunc_normal_(m.weight, std=.02)nn.init.constant_(m.bias, 0)def forward(self, x):res = []for i in range(4):x = self.downsample_layers[i](x)x = self.stages[i](x)res.append(x)return res
该程序文件是一个用于构建 ConvNeXt V2 模型的 Python 文件。该文件定义了多个类和函数,用于构建不同规模的 ConvNeXt V2 模型。
文件中定义的类和函数包括:
- LayerNorm:一个支持两种数据格式(channels_last 和 channels_first)的 LayerNorm 类。
- GRN:全局响应归一化(Global Response Normalization)层。
- Block:ConvNeXtV2 模型的基本块。
- ConvNeXtV2:ConvNeXt V2 模型的主体部分。
- update_weight:用于更新模型权重的函数。
- convnextv2_atto、convnextv2_femto、convnextv2_pico、convnextv2_nano、convnextv2_tiny、convnextv2_base、convnextv2_large、convnextv2_huge:用于构建不同规模的 ConvNeXt V2 模型的函数。
该文件中的代码实现了 ConvNeXt V2 模型的各个组件,包括深度可分离卷积、LayerNorm、线性层、GELU 激活函数、GRN 层等。通过组合这些组件,可以构建不同规模的 ConvNeXt V2 模型,并加载预训练的权重进行初始化。
该文件还定义了一个辅助函数 update_weight,用于更新模型权重。根据给定的权重文件,该函数会将权重加载到模型中,并返回更新后的模型。
最后,该文件定义了多个函数(convnextv2_atto、convnextv2_femto、convnextv2_pico、convnextv2_nano、convnextv2_tiny、convnextv2_base、convnextv2_large、convnextv2_huge),用于构建不同规模的 ConvNeXt V2 模型。这些函数会根据给定的权重文件加载模型的权重,并返回构建好的模型。
总之,该程序文件是一个用于构建 ConvNeXt V2 模型的 Python 文件,提供了构建不同规模模型的函数,并支持加载预训练权重进行初始化。
5.6 backbone\CSwomTramsformer.py
class CSWinTransformer(nn.Module):def __init__(self, img_size=224, patch_size=4, in_chans=3, num_classes=1000, embed_dim=96, depths=[2, 2, 6, 2], num_heads=[3, 6, 12, 24], mlp_ratio=4., qkv_bias=True, qk_scale=None, drop_rate=0., attn_drop_rate=0., drop_path_rate=0., norm_layer=nn.LayerNorm):super().__init__()self.num_classes = num_classesself.depths = depthsself.embed_dim = embed_dimself.patch_size = patch_sizeself.mlp_ratio = mlp_ratioself.num_features = int(embed_dim * mlp_ratio)self.norm1 = norm_layer(self.num_features)self.patch_embed = PatchEmbed(img_size=img_size, patch_size=patch_size, in_chans=in_chans, embed_dim=embed_dim)self.pos_drop = nn.Dropout(p=drop_rate)self.blocks = nn.ModuleList([CSWinBlock(dim=self.num_features, reso=img_size // patch_size, num_heads=num_heads[i],mlp_ratio=mlp_ratio, qkv_bias=qkv_bias, qk_scale=qk_scale,drop=drop_rate, attn_drop=attn_drop_rate, drop_path=drop_path_rate,norm_layer=norm_layer, last_stage=(i == len(depths) - 1))for i in range(len(depths))])self.norm2 = norm_layer(self.num_features)self.avgpool = nn.AdaptiveAvgPool2d(1)self.head = nn.Linear(self.num_features, num_classes)def forward_features(self, x):x = self.patch_embed(x)x = self.pos_drop(x)for blk in self.blocks:x = blk(x)x = self.norm2(x)return xdef forward(self, x):x = self.forward_features(x)x = self.avgpool(x).flatten(1)x = self.head(x)return x
该程序文件是一个实现了CSWin Transformer模型的PyTorch模块。CSWin Transformer是一种用于图像分类任务的Transformer模型,它使用了基于Local Permutation Equivariant Attention的注意力机制。该模型由多个CSWinBlock组成,每个CSWinBlock包含了一个LePEAttention模块和一个MLP模块。LePEAttention模块用于计算注意力权重,MLP模块用于对注意力输出进行线性变换和非线性激活。模型还包含了一些辅助函数,用于将图像转换为窗口表示和将窗口表示转换回图像表示。最后,模型还包含了一个Merge_Block模块,用于将不同分辨率的特征图进行融合。
6.系统整体结构
下面是对每个文件的功能进行整理的表格:
| 文件名 | 功能 |
|---|---|
| export.py | 导出模型的功能 |
| predict.py | 进行预测的功能 |
| train.py | 进行模型训练的功能 |
| ui.py | 图形用户界面的功能 |
| backbone\convnextv2.py | ConvNeXt V2 模型的构建和权重加载功能 |
| backbone\CSwomTramsformer.py | CSwomTramsformer 模型的构建和注意力计算功能 |
| backbone\EfficientFormerV2.py | EfficientFormer V2 模型的构建和权重加载功能 |
| backbone\efficientViT.py | EfficientViT 模型的构建和权重加载功能 |
| backbone\fasternet.py | Fasternet 模型的构建和权重加载功能 |
| backbone\lsknet.py | LSKNet 模型的构建和权重加载功能 |
| backbone\repvit.py | RepVIT 模型的构建和权重加载功能 |
| backbone\revcol.py | RevCol 模型的构建和权重加载功能 |
| backbone\SwinTransformer.py | Swin Transformer 模型的构建和权重加载功能 |
| backbone\VanillaNet.py | VanillaNet 模型的构建和权重加载功能 |
| extra_modules\afpn.py | AFPN 模块的构建功能 |
| extra_modules\attention.py | 注意力模块的构建功能 |
| extra_modules\block.py | 基础块的构建功能 |
| extra_modules\dynamic_snake_conv.py | 动态蛇形卷积模块的构建功能 |
| extra_modules\head.py | 模型头部的构建功能 |
| extra_modules\kernel_warehouse.py | 卷积核仓库的功能 |
| extra_modules\orepa.py | OREPA 模块的构建功能 |
| extra_modules\rep_block.py | RepBlock 模块的构建功能 |
| extra_modules\RFAConv.py | RFAConv 模块的构建功能 |
| models\common.py | 通用模型函数和工具函数 |
| models\experimental.py | 实验性模型的构建和权重加载功能 |
| models\tf.py | TensorFlow 模型的构建和权重加载功能 |
| models\yolo.py | YOLO 模型的构建和权重加载功能 |
| segment\predict.py | 分割模型的预测功能 |
| segment\train.py | 分割模型的训练功能 |
| segment\val.py | 分割模型的验证功能 |
| ultralytics… | Ultralytics 相关模块和功能 |
| utils… | 通用工具函数和辅助功能 |
请注意,这只是对每个文件的功能进行了简要的概括,具体的实现细节可能还有其他功能和细节。
7.YOLOv8简介
YOLOv8是什么?
YOLOv8是Ultralytics公司推出的基于对象检测模型的YOLO最新系列,它能够提供截至目前最先进的对象检测性能。
借助于以前的YOLO模型版本支持技术,YOLOv8模型运行得更快、更准确,同时为执行任务的训练模型提供了统一的框架,这包括:
目标检测
实例分割
图像分类
在撰写本文时,Ultralytics的YOLOv8存储库中其实还有很多功能有待添加,这包括训练模型的整套导出功能等。此外,Ultralytics将计划在Arxiv上发布一篇相关的论文,将对YOLOv8与其他最先进的视觉模型进行比较。
YOLOv8的新功能
Ultralytics为YOLO模型发布了一个全新的存储库(https://github.com/ultralytics/ultralytics)。该存储库被构建为用于训练对象检测、实例分割和图像分类模型的统一框架。
以下列举的是这个新版本的一些关键功能:
用户友好的API(命令行+Python)。
更快、更准确。
支持:
目标检测,
实例分割和
图像分类。
可扩展到所有以前的版本。
新的骨干网络。
新的Anchor-Free head对象检测算法。
新的损失函数。
此外,YOLOv8也非常高效和灵活,它可以支持多种导出格式,而且该模型可以在CPU和GPU上运行。
YOLOv8中提供的子模型

YOLOv8模型的每个类别中共有五个模型,以便共同完成检测、分割和分类任务。其中,YOLOv8 Nano是最快和最小的模型,而YOLOv8Extra Large(YOLOv8x)是其中最准确但最慢的模型。
YOLOv8这次发行中共附带了以下预训练模型:
在图像分辨率为640的COCO检测数据集上训练的对象检测检查点。
在图像分辨率为640的COCO分割数据集上训练的实例分割检查点。
在图像分辨率为224的ImageNet数据集上预处理的图像分类模型。
8.高效网络架构 CloAtt简介
众所周知,自从 ViTs 提出后,Transformer 基本横扫各大 CV 主流任务,包括视觉识别、目标检测和语义分割等。然而,一个比较棘手的问题就是这个架构参数量和计算量太大,所以一直被广受诟病。因此,后续有不少工作都是朝着这个方向去改进,例如 Swin-Transformer 在局部非重叠窗口中进行注意力计算,而 PVT 中则是使用平均池化来合并 token 以进一步压缩耗时。然而,这些 ViTs 由于其参数量太大以及高 FLOPs 并不适合部署到移动设备。如果我们直接缩小到适合移动设备的尺寸时,它们的性能又会显著降低。
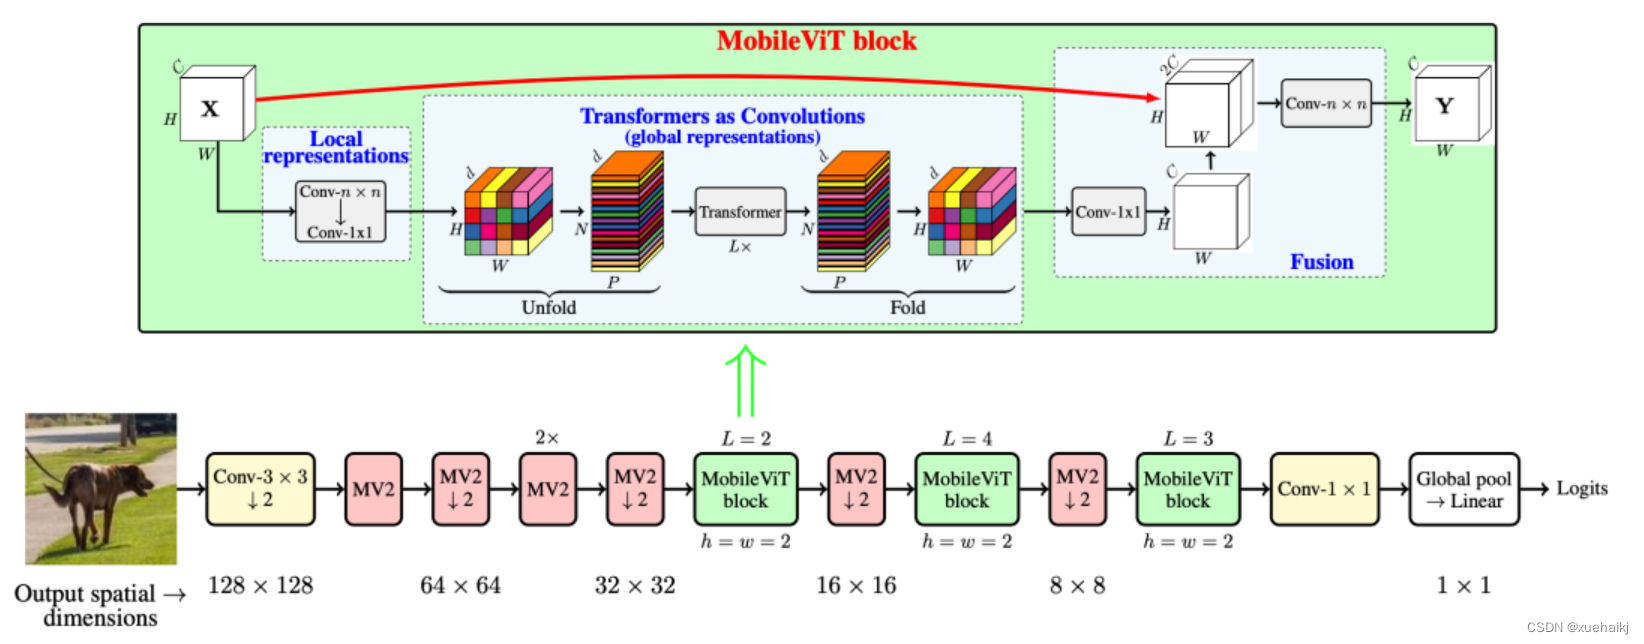
MobileViT
因此,出现了不少工作聚焦于探索轻量级的视觉变换器,使 ViTs 适用于移动设备,CVHub 此前也介绍过不少的工作,大家有兴趣可以翻阅历史文章读读。例如,苹果团队提出的 MobileViT 研究了如何将 CNN 与 Transformer 相结合,而另一个工作 MobileFormer 则将轻量级的 MobileNet 与 Transformer 进行融合。此外,最新提出的 EdgeViT 提出了一个局部-全局-局部模块来聚合信息。以上工作的目标都是设计具有高性能、较少参数和低 FLOPs 的移动端友好型模型。
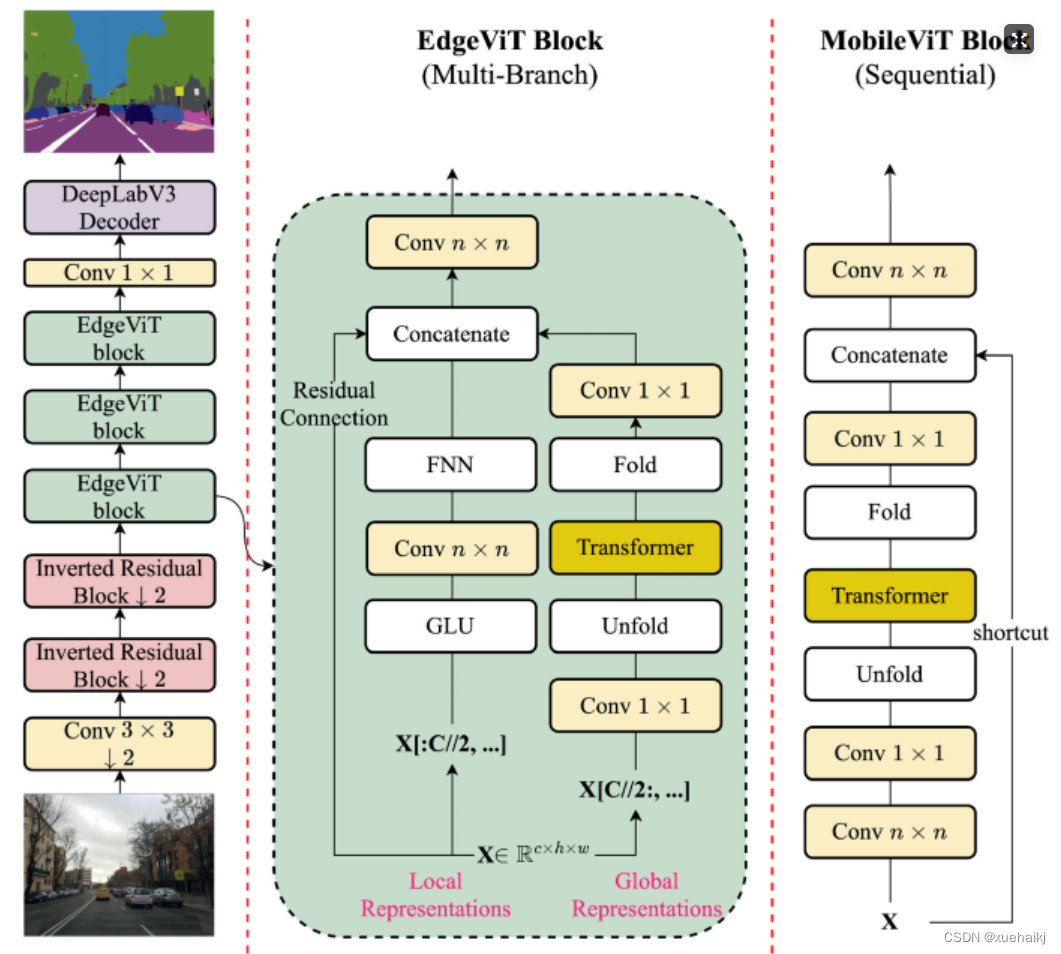
EdgeViT
然而,作者从频域编码的角度认为,在现有的轻量级模型中,大多数方法只关注设计稀疏注意力,以有效地处理低频全局信息,而使用相对简单的方法处理高频局部信息。具体而言,大多数模型如 EdgeViT 和 MobileViT,只是简单使用原始卷积提取局部表示,这些方法仅使用卷积中的全局共享权重处理高频本地信息。其他方法,如 LVT ,则是首先将标记展开到窗口中,然后使用窗口内的注意力获得高频信息。这些方法仅使用特定于每个 Token 的上下文感知权重进行局部感知。
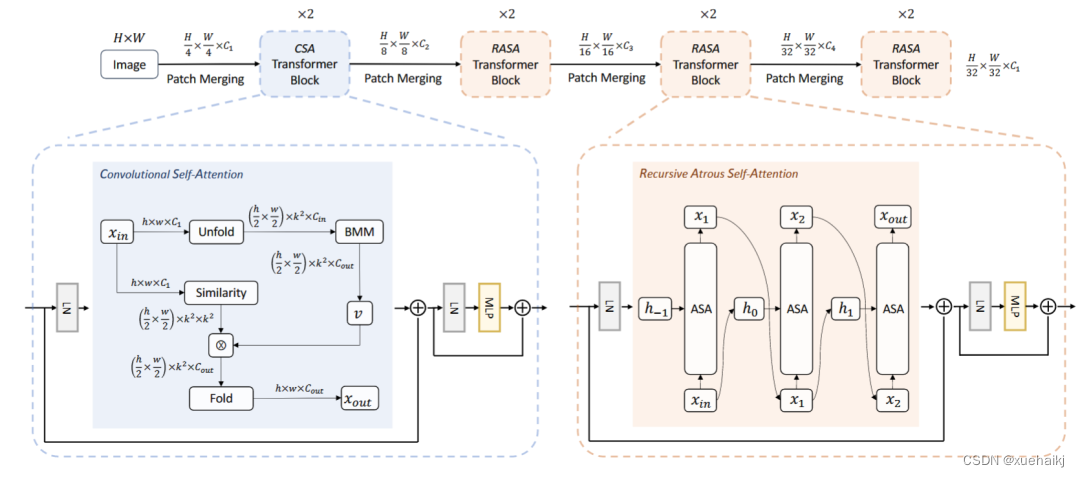
LVT
虽然上述轻量级模型在多个数据集上取得了良好的结果,但没有一种方法尝试设计更有效的方法,即利用共享和上下文感知权重的优势来处理高频局部信息。基于共享权重的方法,如传统的卷积神经网络,具有平移等变性的特征。与它们不同,基于上下文感知权重的方法,如 LVT 和 NAT,具有可以随输入内容变化的权重。这两种类型的权重在局部感知中都有自己的优势。
NAT
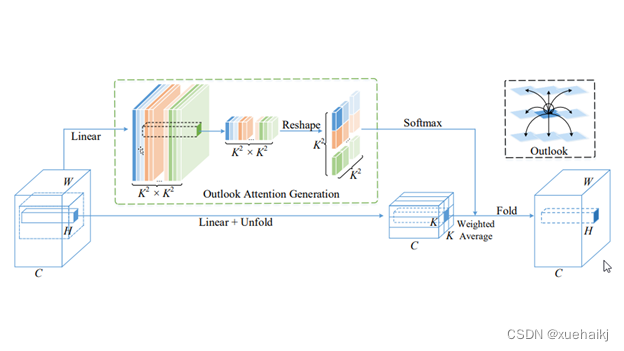
受该博客的启发,本文设计了一种轻量级视觉变换器——CloAtt,其利用了上下文感知的局部增强。特别地,CloAtt 采用了双分支设计结构。
局部分支
在局部分支中,本文引入了一个精心设计的 AttnConv,一种简单而有效的卷积操作符,它采用了注意力机制的风格。所提出的 AttnConv 有效地融合了共享权重和上下文感知权重,以聚合高频的局部信息。具体地,AttnConv 首先使用深度卷积(DWconv)提取局部表示,其中 DWconv 具有共享权重。然后,其使用上下文感知权重来增强局部特征。与 Non-Local 等生成上下文感知权重的方法不同,AttnConv 使用门控机制生成上下文感知权重,引入了比常用的注意力机制更强的非线性。此外,AttnConv 将卷积算子应用于 Query 和 Key 以聚合局部信息,然后计算 Q 和 K 的哈达玛积,并对结果进行一系列线性或非线性变换,生成范围在 [-1,1] 之间的上下文感知权重。值得注意的是,AttnConv 继承了卷积的平移等变性,因为它的所有操作都基于卷积。
全局分支
在全局分支中则使用了传统的注意力机制,但对 K 和 V 进行了下采样以减少计算量,从而捕捉低频全局信息。最后,CloFormer 通过简单的方法将局部分支和全局分支的输出进行融合,从而使模型能够同时捕捉高频和低频信息。总的来说,CloFormer 的设计能够同时发挥共享权重和上下文感知权重的优势,提高其局部感知的能力,使其在图像分类、物体检测和语义分割等多个视觉任务上均取得了优异的性能。
如上图2所示,CloFormer 共包含一个卷积主干和四个 stage,每个 stage you Clo 模块 和 ConvFFN 组合而成的模块堆叠而成 。具体得,首先将输入图像通过卷积主干传递,以获取 token 表示。该主干由四个卷积组成,每个卷积的步长依次为2、2、1和1。接下来,tokens 经历四个 Clo 块和 ConvFFN 阶段,以提取分层特征。最后,再利用全局平均池化和全连接层生成预测结果。可以看出,整个架构非常简洁,支持即插即用!
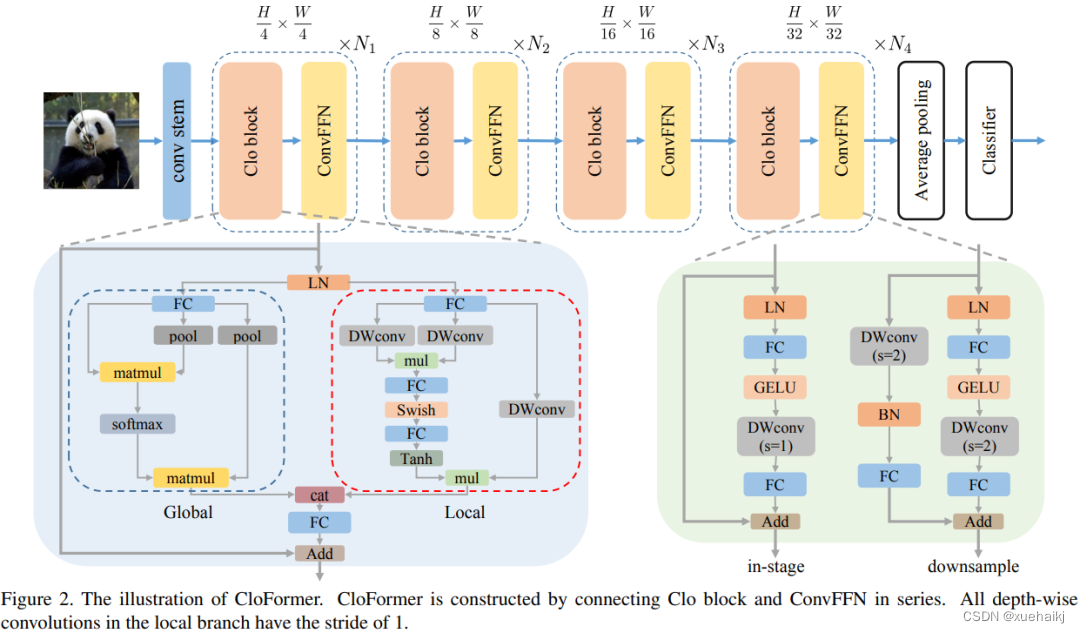
ConvFFN
为了将局部信息融入 FFN 过程中,本文采用 ConvFFN 替换了常用的 FFN。ConvFFN 和常用的 FFN 的主要区别在于,ConvFFN 在 GELU 激活函数之后使用了深度卷积(DWconv),从而使 ConvFFN 能够聚合局部信息。由于DWconv 的存在,可以直接在 ConvFFN 中进行下采样而不需要引入 PatchMerge 模块。CloFormer 使用了两种ConvFFN。第一种是在阶段内的 ConvFFN,它直接利用跳跃连接。另一种是连接两个阶段的 ConvFFN,主要用于下采样操作。
Clo block
CloFormer 中的 Clo块 是非常关键的组件。每个 Clo 块由一个局部分支和一个全局分支组成。在全局分支中,我们首先下采样 K 和 V,然后对 Q、K 和 V 进行标准的 attention 操作,以提取低频全局信息。
虽然全局分支的设计能够有效减少注意力机制所需的浮点运算次数,并且能够获得全局的感受野。然而,它在处理高频局部信息方面的能力不足。为了解决这个问题,CloFormer 引入了局部分支,并使用 AttnConv 对高频局部信息进行处理。AttnConv 可以融合共享权重和上下文感知权重,能够更好地处理高频局部信息。因此,CloFormer 结合了全局和局部的优势来提高图像分类性能。下面我们重点讲下 AttnConv 。
AttnConv
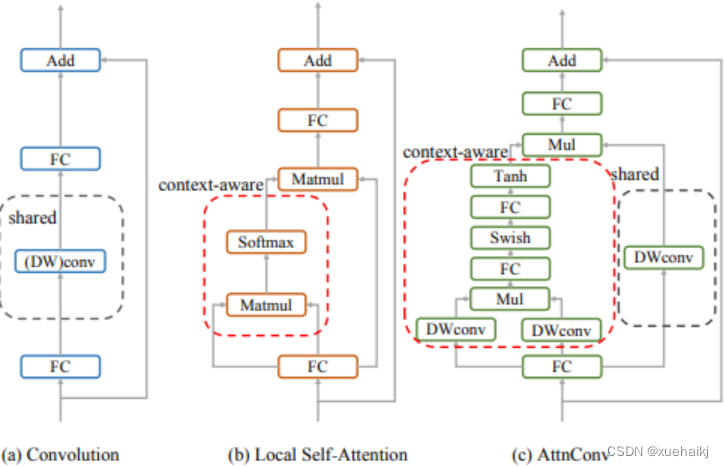
AttnConv 是一个关键模块,使得所提模型能够获得高性能。它结合了一些标准的 attention 操作。具体而言,在AttnConv 中,我们首先进行线性变换以获得 Q、K和V。在进行线性变换之后,我们再对 V 进行共享权重的局部特征聚合。然后,基于处理后的 V 和 Q ,K 进行上下文感知的局部增强。具体流程可对照流程图理解,我们可以将其拆解成三个步骤。
Local Feature Aggregation
为了简单起见,本文直接使用一个简单的深度卷积(DWconv)来对 V 进行局部信息聚合。
Context-aware Local Enhancement
在将具有共享权重的局部信息整合到 V 中后,我们结合 Q 和 K 生成上下文感知权重。值得注意的是,我们使用了与局部自注意力不同的方法,该方法更加简洁。具体而言,我们首先使用两个 DWconv 对 Q 和 K 分别进行局部信息聚合。然后,我们计算 Q 和 K 的 Hadamard 乘积,并对结果进行一系列转换,以获取在 -1 到 1 之间的上下文感知权重。最后,我们使用生成的权重来增强局部特征。
Fusion with Global Branch
在整个 CloFormer 中,我们使用一种简单直接的方法来将局部分支和全局分支的输出进行融合。具体而言,本文是通过将这两个输出在通道维度上进行直接拼接,然后再通过一个 FC 层聚合这些特征并结合残差输出。
最后,上图展示了三种不同的方法。相比于传统卷积,AttnConv 中的上下文感知权重使得模型能够更好地适应输入内容。相比于局部自注意力机制,引入共享权重使得模型能够更好地处理高频信息,从而提高性能。此外,生成上下文感知权重的方法引入了更强的非线性性,也提高了性能。需要注意的是,AttnConv 中的所有操作都基于卷积,保持了卷积的平移等变性特性。
9.训练结果可视化分析
评价指标
框、分割、对象和类 ( train/box_loss、train/seg_loss、train/obj_loss、train/cls_loss) 的训练损失。
不同交并集 (IoU) 阈值 ( metrics/precision、metrics/recall、metrics/mAP_0.5、metrics/mAP_0.5:0.95) 下两个类别(B 和 M)的精度和召回率指标。
验证损失 ( val/box_loss, val/seg_loss, val/obj_loss, val/cls_loss)。
学习率 ( x/lr0, x/lr1, x/lr2)。
为了进行详细分析,我们将直观地表示各个时期的这些指标,以观察趋势和模式。这将包括:
训练损失:绘制训练过程中框、分割、对象和类损失的趋势。
精确度和召回率:对 B 类和 M 类历元内的精确度和召回率进行分析。
验证损失:跨时期验证损失的趋势。
学习率:观察学习率随时间的变化。
我将为每个方面生成图表以提供全面的分析。
训练结果可视化
import matplotlib.pyplot as plt
import seaborn as sns# Set the style of the plots
sns.set(style="whitegrid")# Prepare a figure with subplots
fig, axs = plt.subplots(4, 1, figsize=(15, 20))# Plotting Training Losses
axs[0].plot(df['epoch'], df['train/box_loss'], label='Box Loss', color='blue')
axs[0].plot(df['epoch'], df['train/seg_loss'], label='Segmentation Loss', color='red')
axs[0].plot(df['epoch'], df['train/obj_loss'], label='Object Loss', color='green')
axs[0].plot(df['epoch'], df['train/cls_loss'], label='Class Loss', color='purple')
axs[0].set_title('Training Losses')
axs[0].set_xlabel('Epoch')
axs[0].set_ylabel('Loss')
axs[0].legend()# Plotting Precision and Recall for Category B
axs[1].plot(df['epoch'], df['metrics/precision(B)'], label='Precision (B)', color='orange')
axs[1].plot(df['epoch'], df['metrics/recall(B)'], label='Recall (B)', color='cyan')
axs[1].set_title('Precision and Recall for Category B')
axs[1].set_xlabel('Epoch')
axs[1].set_ylabel('Value')
axs[1].legend()# Plotting Validation Losses
axs[2].plot(df['epoch'], df['val/box_loss'], label='Box Loss', color='magenta')
axs[2].plot(df['epoch'], df['val/seg_loss'], label='Segmentation Loss', color='brown')
axs[2].plot(df['epoch'], df['val/obj_loss'], label='Object Loss', color='lime')
axs[2].plot(df['epoch'], df['val/cls_loss'], label='Class Loss', color='navy')
axs[2].set_title('Validation Losses')
axs[2].set_xlabel('Epoch')
axs[2].set_ylabel('Loss')
axs[2].legend()# Plotting Learning Rates
axs[3].plot(df['epoch'], df['x/lr0'], label='LR0', color='teal')
axs[3].plot(df['epoch'], df['x/lr1'], label='LR1', color='gold')
axs[3].plot(df['epoch'], df['x/lr2'], label='LR2', color='violet')
axs[3].set_title('Learning Rates')
axs[3].set_xlabel('Epoch')
axs[3].set_ylabel('Learning Rate')
axs[3].legend()# Adjust layout
plt.tight_layout()
plt.show()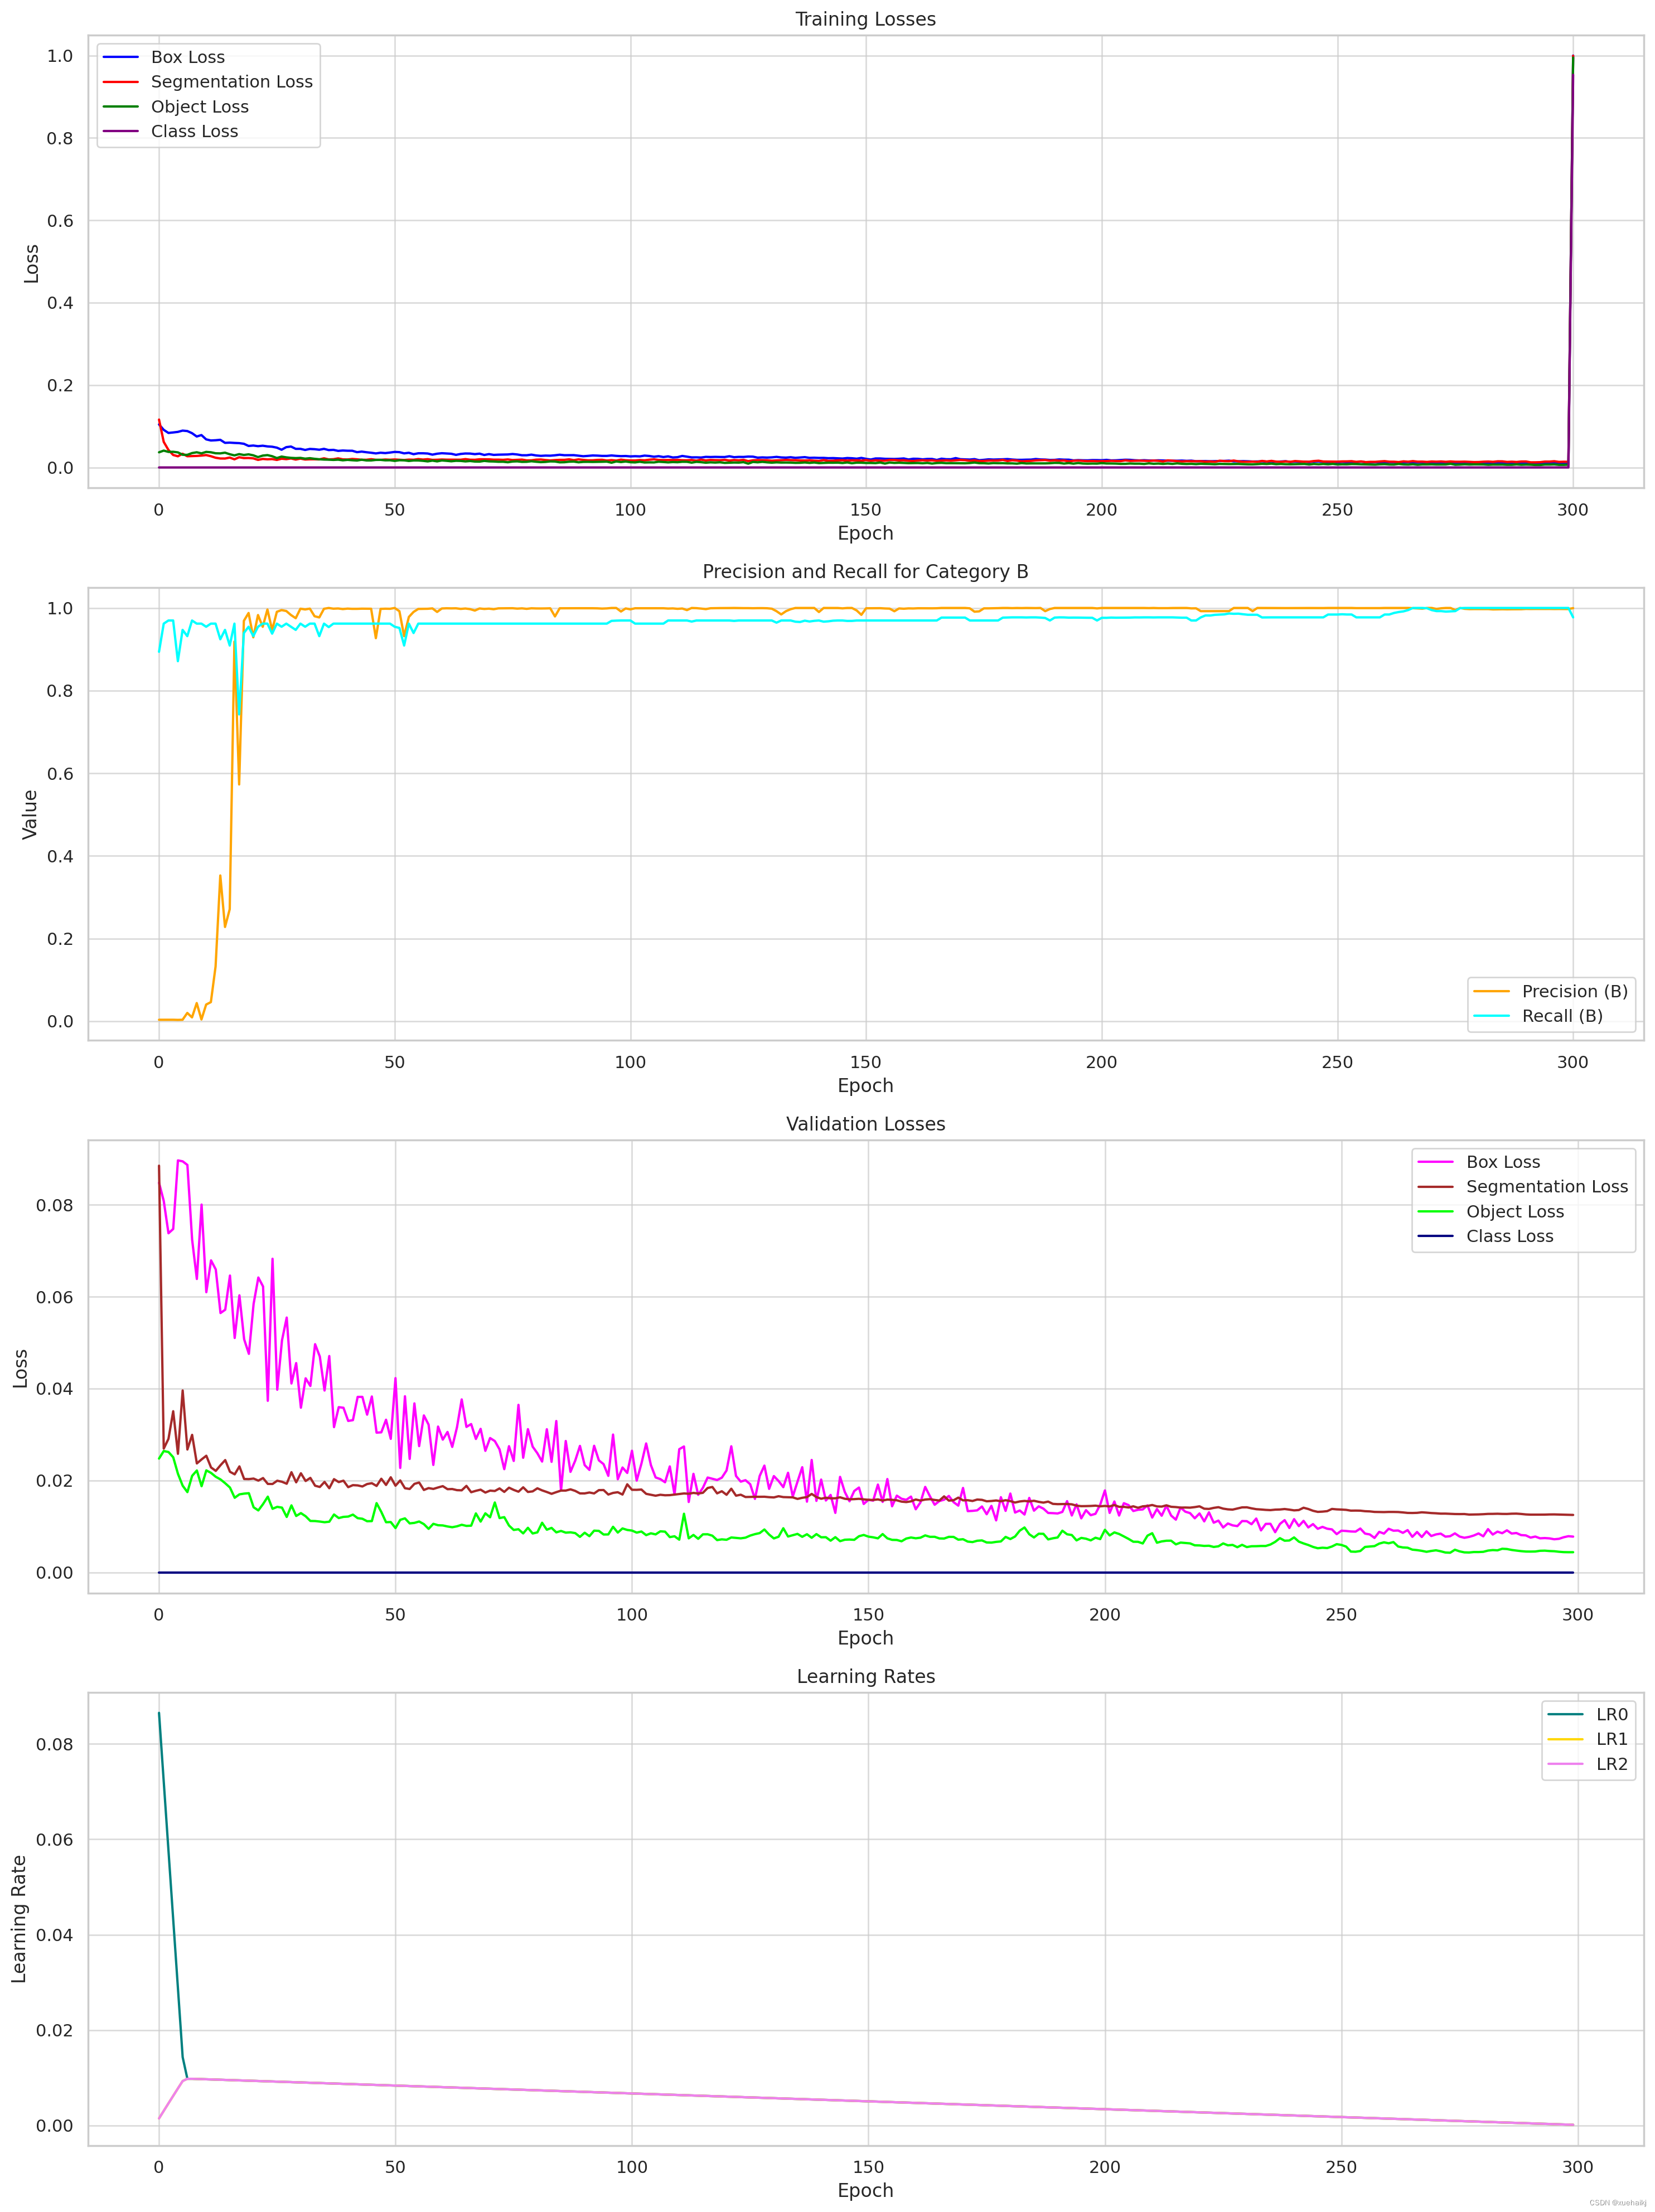
训练损失:
框损失:通常会随着时间的推移而减少,表明边界框预测的性能有所提高。
分割损失:显示出下降趋势,反映出分割图像的准确性有所提高。
对象丢失:这也会减少,表明随着训练的进行,对象检测能力会更好。
类丢失:始终保持较低水平,这可能表明系统从一开始就可以有效地对对象进行分类,或者数据集的类数量可能有限。
B 类的准确率和召回率:
精度(B):B类精度有所波动,但总体呈上升趋势。这表明预测的准确性不断提高,尽管存在一些差异。
召回率 (B):召回率很高,表明该模型有效地识别了类别 B 中的大多数相关实例。
验证损失:
与训练损失类似,框、分割、对象和类损失的验证损失呈现下降趋势。这是一个积极的信号,表明该模型不仅适合训练数据,而且还可以很好地推广到未见过的数据。
10.系统整合
下图完整源码&数据集&环境部署视频教程&自定义UI界面

参考博客《【改进YOLOv8】融合高效网络架构 CloAtt的焊缝识别系统》
11.参考文献
[1]刘洪伟,马立东,马自勇,等.基于线结构光的型钢自动焊接位置检测技术[J].焊接.2022,(5).DOI:10.12073/j.hj.20220105003 .
[2]王树强,周游,陈昊雷,等.基于激光视觉的钢结构焊缝图像处理系统[J].焊接学报.2022,43(2).DOI:10.12073/j.hjxb.20210603001 .
[3]胡丹,张艳喜,王静静,等.焊缝成形线结构光视觉检测方法研究[J].制造技术与机床.2022,(3).DOI:10.19287/j.cnki.1005-2402.2022.03.023 .
[4]刘东来,崔亚飞,罗辉,等.基于机器视觉的弧焊机器人焊缝识别及路径生成研究[J].制造技术与机床.2021,(12).DOI:10.19287/j.cnki.1005-2402.2021.12.004 .
[5]李祥瑞.机器视觉研究进展及工业应用综述[J].数字通信世界.2021,(11).DOI:10.3969/J.ISSN.1672-7274.2021.11.031 .
[6]樊丁,胡桉得,黄健康,等.基于改进卷积神经网络的管焊缝X射线图像缺陷识别方法[J].焊接学报.2020,(1).DOI:10.12073/j.hjxb.20190703002 .
[7]Shelhamer, Evan,Long, Jonathan,Darrell, Trevor.Fully Convolutional Networks for Semantic Segmentation[J].IEEE Transactions on Pattern Analysis & Machine Intelligence.2017,39(6).640-651.
[8]Guoxiang Xu,Peiquan Xu,Xinhua Tang,等.A visual seam tracking system for robotic arc welding[J].The International Journal of Advanced Manufacturing Technology.2008,37(1).
[9]T. Y. Zhang,C. Y. Suen.A fast parallel algorithm for thinning digital patterns[J].Communications of the ACM.1984,27 (3).236-239.DOI:10.1145/357994.358023 .
这篇关于【改进YOLOv8】融合高效网络架构 CloAtt的焊缝识别系统的文章就介绍到这儿,希望我们推荐的文章对编程师们有所帮助!


