本文主要是介绍Android画布Canvas绘制drawBitmap基于源Rect和目的Rect,Kotlin,希望对大家解决编程问题提供一定的参考价值,需要的开发者们随着小编来一起学习吧!
Android画布Canvas绘制drawBitmap基于源Rect和目的Rect,Kotlin
<?xml version="1.0" encoding="utf-8"?>
<androidx.appcompat.widget.LinearLayoutCompat xmlns:android="http://schemas.android.com/apk/res/android"xmlns:app="http://schemas.android.com/apk/res-auto"android:layout_width="match_parent"android:layout_height="match_parent"android:background="@android:color/darker_gray"android:orientation="vertical"app:divider="@android:drawable/divider_horizontal_bright"app:dividerPadding="5dp"app:showDividers="beginning|middle|end"><ImageViewandroid:id="@+id/iv"android:layout_width="300px"android:layout_height="wrap_content"android:layout_gravity="center_horizontal"android:background="@drawable/ic_launcher_background"android:scaleType="fitCenter"android:src="@mipmap/pic" /><LinearLayoutandroid:layout_width="match_parent"android:layout_height="wrap_content"android:orientation="horizontal"><ImageViewandroid:id="@+id/iv1"android:layout_width="300px"android:layout_height="wrap_content"android:layout_margin="10dp"android:background="@drawable/ic_launcher_background" /><ImageViewandroid:id="@+id/iv2"android:layout_width="300px"android:layout_height="wrap_content"android:layout_margin="10dp"android:background="@drawable/ic_launcher_background" /><ImageViewandroid:id="@+id/iv3"android:layout_width="300px"android:layout_height="wrap_content"android:layout_margin="10dp"android:background="@drawable/ic_launcher_background" /></LinearLayout><LinearLayoutandroid:layout_width="match_parent"android:layout_height="wrap_content"android:orientation="horizontal"><ImageViewandroid:id="@+id/iv4"android:layout_width="300px"android:layout_height="wrap_content"android:layout_margin="10dp"android:background="@drawable/ic_launcher_background" /><ImageViewandroid:id="@+id/iv5"android:layout_width="300px"android:layout_height="wrap_content"android:layout_margin="10dp"android:background="@drawable/ic_launcher_background" /><ImageViewandroid:id="@+id/iv6"android:layout_width="300px"android:layout_height="wrap_content"android:layout_margin="10dp"android:background="@drawable/ic_launcher_background" /></LinearLayout>
</androidx.appcompat.widget.LinearLayoutCompat>
import android.graphics.Bitmap
import android.graphics.Canvas
import android.graphics.Color
import android.graphics.Rect
import android.graphics.drawable.BitmapDrawable
import androidx.appcompat.app.AppCompatActivity
import android.os.Bundle
import android.widget.ImageView
import androidx.lifecycle.lifecycleScope
import kotlinx.coroutines.Dispatchers
import kotlinx.coroutines.delay
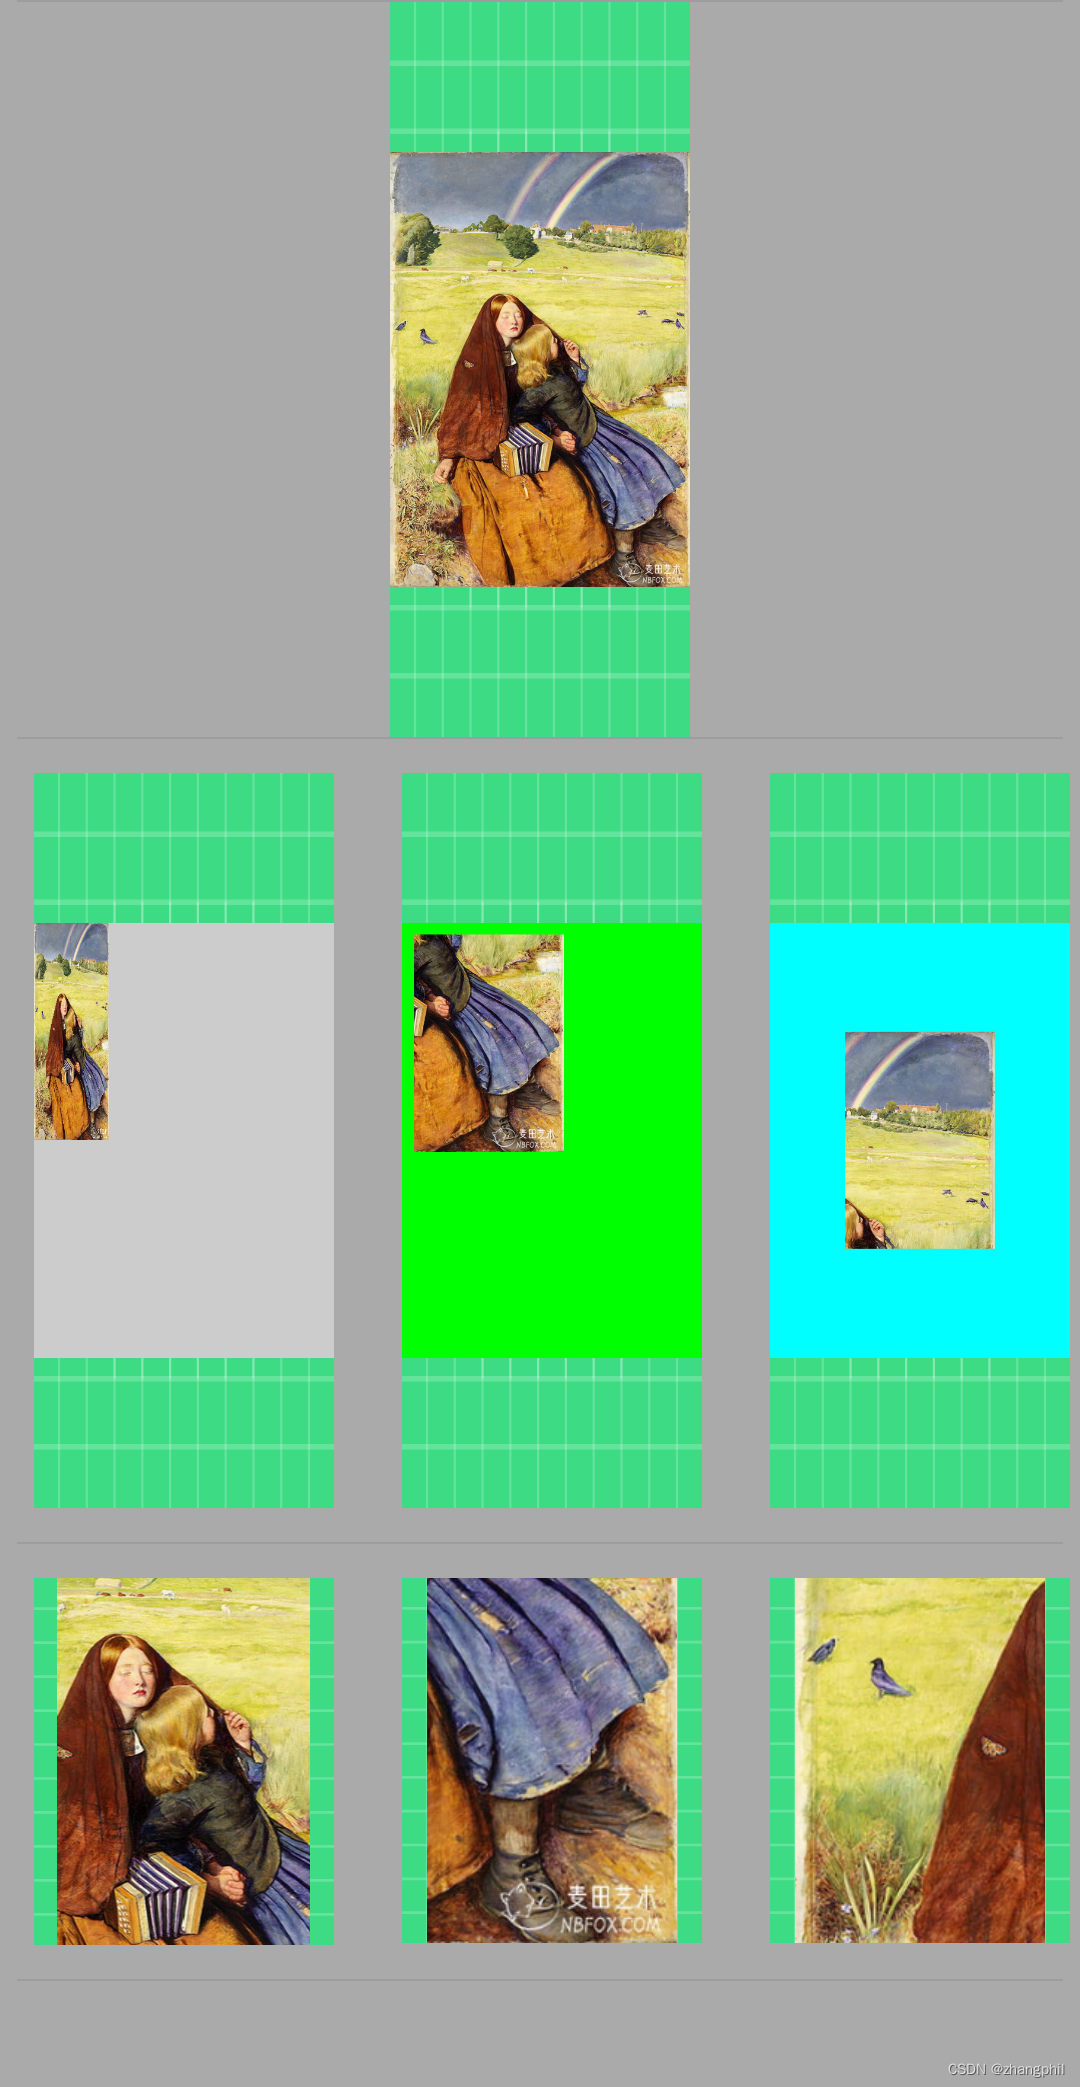
import kotlinx.coroutines.launchclass MainActivity : AppCompatActivity() {private var iv: ImageView? = nullprivate var iv1: ImageView? = nullprivate var iv2: ImageView? = nullprivate var iv3: ImageView? = nullprivate var iv4: ImageView? = nullprivate var iv5: ImageView? = nullprivate var iv6: ImageView? = nulloverride fun onCreate(savedInstanceState: Bundle?) {super.onCreate(savedInstanceState)setContentView(R.layout.activity_main)iv = findViewById(R.id.iv)iv1 = findViewById(R.id.iv1)iv2 = findViewById(R.id.iv2)iv3 = findViewById(R.id.iv3)iv4 = findViewById(R.id.iv4)iv5 = findViewById(R.id.iv5)iv6 = findViewById(R.id.iv6)lifecycleScope.launch(Dispatchers.Main) {delay(500)capture1()capture2()capture3()capture4()capture5()capture6()}}private fun capture1() {val srcBmp = (iv!!.drawable as BitmapDrawable).bitmap//创建一个和srcBmp宽高相同背景为Color.LTGRAY空Bitmapval bitmap = Bitmap.createBitmap(srcBmp!!.width, srcBmp!!.height, Bitmap.Config.ARGB_8888);val canvas = Canvas(bitmap)canvas.drawColor(Color.LTGRAY)val dstW = srcBmp!!.width / 4val dstH = srcBmp!!.height / 2val dstRect = Rect(0, 0, dstW, dstH) //bitmap坐标canvas.drawBitmap(srcBmp,null,dstRect,null)iv1!!.setImageBitmap(bitmap)}private fun capture2() {val srcBmp = (iv!!.drawable as BitmapDrawable).bitmapval bitmap = Bitmap.createBitmap(srcBmp!!.width, srcBmp!!.height, Bitmap.Config.ARGB_8888)val canvas = Canvas(bitmap)canvas.drawColor(Color.GREEN)//复制一个宽1/2和高1/2的原图。val dstW = srcBmp!!.width / 2val dstH = srcBmp!!.height / 2//框住原图中心点右下1/4部分。val srcRect = Rect(dstW, dstH, srcBmp!!.width, srcBmp!!.height)//bitmap左上角偏移20开始摆放。val dstRect = Rect(20, 20, dstW + 20, dstH + 20)canvas.drawBitmap(srcBmp,srcRect,dstRect,null)iv2!!.setImageBitmap(bitmap)}private fun capture3() {val srcBmp = (iv!!.drawable as BitmapDrawable).bitmapval bitmap = Bitmap.createBitmap(srcBmp!!.width, srcBmp!!.height, Bitmap.Config.ARGB_8888)val canvas = Canvas(bitmap)canvas.drawColor(Color.CYAN)val dstW = srcBmp!!.width / 2val dstH = srcBmp!!.height / 2val centerX = srcBmp!!.width / 2val centerY = srcBmp!!.height / 2//框住原图右上1/4部分,坐标仍以原图为准。val srcRect = Rect(centerX, 0, centerX + srcBmp!!.width / 2, centerY)//摆放到bitmap的中心位置。val dstRect = Rect(centerX - dstW / 2, centerY - dstH / 2, centerX + dstW / 2, centerY + dstH / 2)canvas.drawBitmap(srcBmp,srcRect,dstRect,null)iv3!!.setImageBitmap(bitmap)}private fun capture4() {val srcBmp = (iv!!.drawable as BitmapDrawable).bitmapval w = srcBmp!!.width / 2val h = srcBmp!!.height / 2val bitmap = Bitmap.createBitmap(w, h, Bitmap.Config.ARGB_8888)val canvas = Canvas(bitmap)canvas.drawColor(Color.YELLOW)val centerX = srcBmp!!.width / 2val centerY = srcBmp!!.height / 2//框住原图中心1/2部分,坐标仍以原图为准。val srcRect = Rect(centerX - w / 2, centerY - h / 2, centerX + w / 2, centerY + h / 2)//直接摆放到bitmap。val dstRect = Rect(0, 0, w, h)canvas.drawBitmap(srcBmp,srcRect,dstRect,null)iv4!!.setImageBitmap(bitmap)}//截取原图右下1/3的部分private fun capture5() {val srcBmp = (iv!!.drawable as BitmapDrawable).bitmapval w = srcBmp!!.width / 3val h = srcBmp!!.height / 3val bitmap = Bitmap.createBitmap(w, h, Bitmap.Config.ARGB_8888)val canvas = Canvas(bitmap)canvas.drawColor(Color.RED)val left = (srcBmp!!.width / 3) * 2val top = (srcBmp!!.height / 3) * 2//框住原图右下1/3部分,坐标仍以原图为准val srcRect = Rect(left, top, left + w, top + h)//直接摆放到bitmap。val dstRect = Rect(0, 0, w, h)canvas.drawBitmap(srcBmp,srcRect,dstRect,null)iv5!!.setImageBitmap(bitmap)}//截取原图左侧中间1/3部分private fun capture6() {val srcBmp = (iv!!.drawable as BitmapDrawable).bitmapval w = srcBmp!!.width / 3val h = srcBmp!!.height / 3val bitmap = Bitmap.createBitmap(w, h, Bitmap.Config.ARGB_8888)val canvas = Canvas(bitmap)canvas.drawColor(Color.BLUE)val top = srcBmp!!.height / 3//框住原图部分。val srcRect = Rect(0, top, 0 + w, top + h)//直接摆放到bitmap。val dstRect = Rect(0, 0, w, h)canvas.drawBitmap(srcBmp,srcRect,dstRect,null)iv6!!.setImageBitmap(bitmap)}
}Android Drawable 转化成 Bitmap-CSDN博客文章浏览阅读1.8k次。/*Java代码 将Drawable转化为Bitmap */ Bitmap drawableToBitmap(Drawable drawable) { int width = drawable.getIntrinsicWidth(); int height = drawable.getIntrinsicHeight(); Bitmap bitmaphttps://blog.csdn.net/zhangphil/article/details/43767535
Android Material Design :LinearLayoutCompat添加分割线divider_linearlayout 分割线-CSDN博客文章浏览阅读9.6k次。Android Material Design :LinearLayoutCompat添加分割线dividerAndroid Material Design 扩展支持包中的LinearLayoutCompat是过去的LinearLayout的扩展,可以为此布局中功德子View之间添加分割线divider。其中比较关键的地方有两点:(1)app:showDividers="beg_linearlayout 分割线https://blog.csdn.net/zhangphil/article/details/48899585
这篇关于Android画布Canvas绘制drawBitmap基于源Rect和目的Rect,Kotlin的文章就介绍到这儿,希望我们推荐的文章对编程师们有所帮助!


