本文主要是介绍nut-popup 二次封装 弹窗 选择组件 vue3,希望对大家解决编程问题提供一定的参考价值,需要的开发者们随着小编来一起学习吧!
<template><nut-popup overlay-class="diolagClass" pop-class="nut-popup-name-class" :position="posititon"v-model:visible="showBasic" @click-overlay="handleClickoverlay" duration="0.2"><div class="search-container" v-show="isSearch"><div class="search-ipt"><input type="text" v-model="cityValue" /><IconFont name="search" color="#cccccc" style="position: absolute;left: 10px;top: 50%;transform: translateY(-50%);"></IconFont></div><div class="search-Icon"><IconFont name="search" color="#ffffff" style="font-size: 16px"></IconFont></div></div><scroll-view :scroll-y="true" :style="{ 'min-height': `${listContainerHeight / 2}px` }"><div class="list-container" v-if="!status"><div class="item" @click="toggleAllItems" :class="{ selected: areAllOptionsSelected() }">全部</div><div class="item" v-for="(item, index) in state.options1" :key="item.id" @click="toggleItem(item)":class="{ selected: isSelected(item.name) }">{{ item.name }}</div></div><div class="list-container" v-else><div class="item" v-for="(item, index) in state.options1" :key="item.id" @click="toggleRadioItem(item)":class="{ selected: isSelected(item.name) }">{{ item.name }}</div></div></scroll-view><div class="footerBtn" v-if="!status"><div class="footerBtn-left">已选择<span style="color: #ee0a24">{{ selectedItems.length }}</span>个</div><div class="footerBtn-right"><nut-button plain type="primary" @click="resetSelected"><template #icon><IconFont name="del2"></IconFont></template>重置</nut-button><nut-button style="margin-left: 20px" color="linear-gradient(to right, #ff6034, #ee0a24)"@click="handleClickConfirm" type="info">确认选择</nut-button></div></div><div v-else style="height: 40px"></div></nut-popup>
</template>
<script setup>
import { reactive, ref } from "vue";
import { storeToRefs } from "pinia";
import { IconFont } from "@nutui/icons-vue-taro";
import { toRefs } from "vue";
import Taro from "@tarojs/taro";
const props = defineProps({list: Array,status: Boolean,listContainerHeight: Number,showBasic: Boolean,type: String,posititon: String,isSearch: Boolean
});
const { list, status, listContainerHeight, showBasic, type, posititon, isSearch } =toRefs(props);
const selectedItems = ref([]);//判断一下当前的组件是哪个数据触发的
if (type.value == "movie" && Taro.getStorageSync("movie").length) {selectedItems.value = Taro.getStorageSync("movie");} else if (type.value == "cinema" && Taro.getStorageSync("cinema").length) {selectedItems.value = Taro.getStorageSync("cinema");} else {selectedItems.value = [];}const emit = defineEmits(["onFlagChange", "onconfirmItems", "seatChange", "onupdatedItems"])
const sleectedCloneItems = ref([]);const state = reactive({options1: list,
});const isSelected = (id) => {// console.log(id,"valSeat");return selectedItems.value.includes(id);
};const toggleItem = (e) => {if (isSelected(e.name)) {selectedItems.value = selectedItems.value.filter((item) => item !== e.name);} else {selectedItems.value.push(e.name);}
};
// 新增函数来检查是否所有选项都被选中
const areAllOptionsSelected = () => {return state.options1.every((item) => isSelected(item.name));
};// 修改点击"全部"选项的逻辑
const toggleAllItems = () => {if (areAllOptionsSelected()) {selectedItems.value = [];} else {selectedItems.value = state.options1.map((item) => item.name);}
};const toggleRadioItem = (e) => {selectedItems.value = [e.name];emit("seatChange", selectedItems.value);
};
const handleClickoverlay = () => {emit("onFlagChange", false);}//点击确定
const handleClickConfirm = async () => {console.log(selectedItems);await emit("onconfirmItems", { result: selectedItems.value, type: type.value })await emit("onFlagChange", false);}
//重置按钮const resetSelected = () => {if (!selectedItems.value.length) {return}selectedItems.value = [];
}</script>
<style lang="less">
.diolagClass {top: 65px !important;
}.nut-popup-name-class {margin-top: 65px;padding-top: 20px;
}.nut-popup--top {width: 100% !important;border-bottom-left-radius: 40px;border-bottom-right-radius: 40px;
}.list-container {display: flex;// align-items: center;justify-content: space-around;flex-wrap: wrap;padding: 0 20px;.selected {color: #ee0a24 !important;border: 1px solid #ee0a24;background-color: #fff !important;}.item {margin-top: 10px;font-size: 24px;width: 160px;height: 60px;line-height: 60px;background-color: #f7f8fb;border-radius: 25px;display: -webkit-box;-webkit-box-orient: vertical;-webkit-line-clamp: 1;text-overflow: ellipsis;overflow: hidden;color: #15181d;text-align: center;}
}.footerBtn {display: flex;justify-content: space-between;align-items: center;padding: 20px;.footerBtn-left {color: #858a99;font-size: 30px;}.footerBtn-right {}
}.search-container {display: flex;justify-content: space-between;padding: 20px 40px;align-items: center;.search-ipt {background-color: #fff;border: 1px solid #ccc;// flex: 4;flex: 1;position: relative;border-radius: 45px;padding: 20px;font-size: 25px;input {padding-left: 70px;color: #858a99;}}.search-Icon {background-color: #fff;width: 50px;height: 50px;line-height: 50px;border-radius: 50%;display: flex;justify-content: center;align-items: center;margin-left: 40px;background-color: #ee0a24;opacity: 0.6;padding: 10px;}
}
</style>
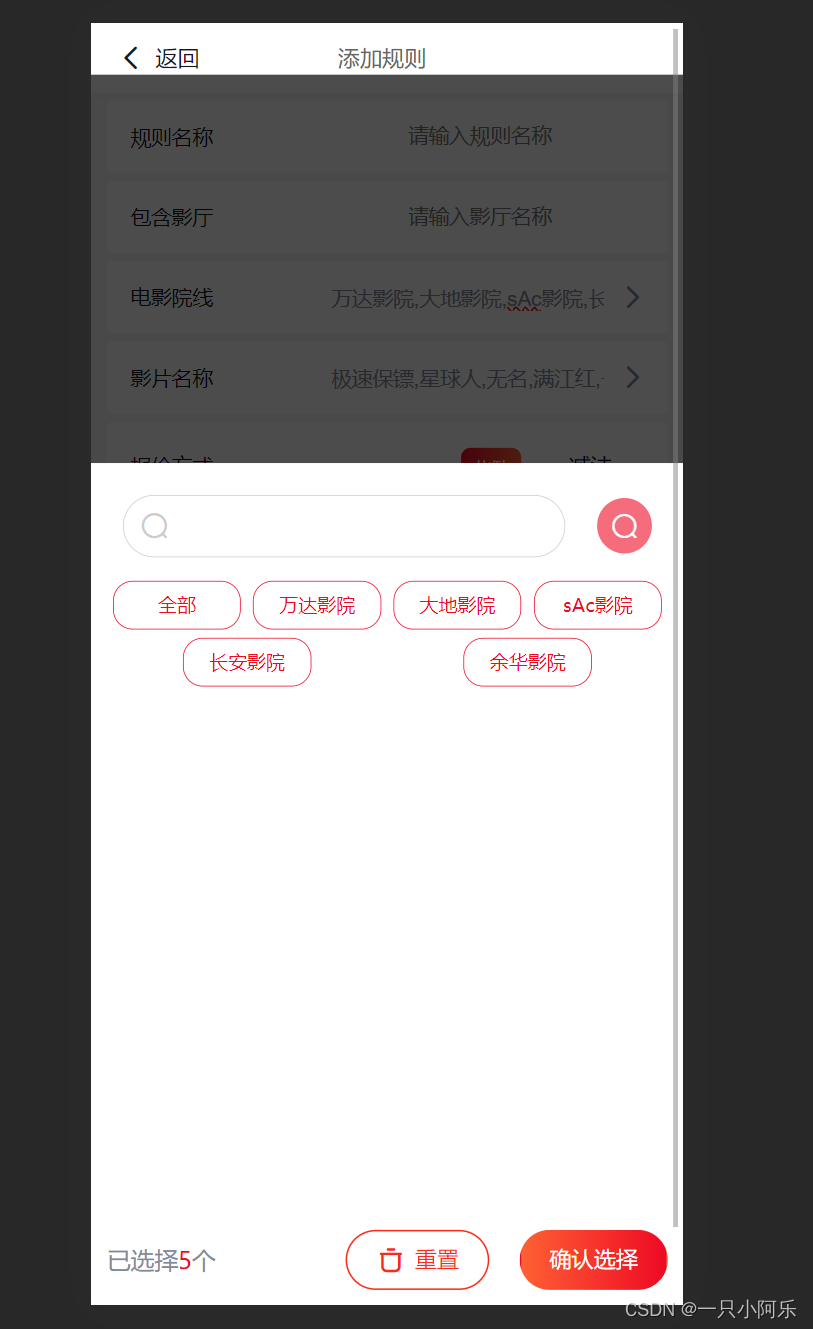
1.目前组件需求
移动端使用 ,当需要时选择 单选或者多选的时候 都可以用这个组件
2.效果图片
3.样式大家还可以微调
这篇关于nut-popup 二次封装 弹窗 选择组件 vue3的文章就介绍到这儿,希望我们推荐的文章对编程师们有所帮助!


