本文主要是介绍猿人学第八题:验证码 图文点选 识别新思路,希望对大家解决编程问题提供一定的参考价值,需要的开发者们随着小编来一起学习吧!
参考文章:
猿人学web端爬虫攻防大赛赛题解析_第八题:验证码 图文点选_起不好名字就不起了的博客-CSDN博客_猿人学第八题
针对文字图片使用pillow对图片进行操作并判断图片相似度_kong_and_white的博客-CSDN博客_pillow pixel
上面两篇文章,前者对图片的转换、去噪等都很清晰;后者对文字如何识别提供思路。
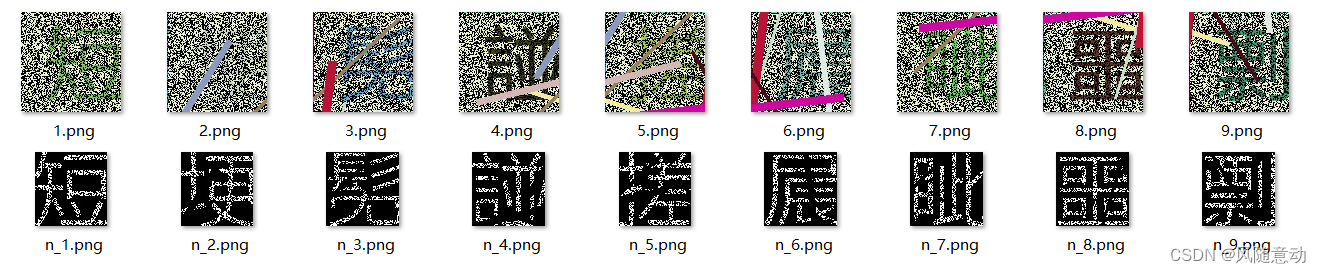
因为题目中用的是生僻字,百度识别API,tesseract OCR等识别效果均比较差;用深度学习又有点大材小用。观察题目中的字体相对比较规整,我这里考虑使用一种新思路,使用字体库生成目标字体,然后与图片截取获得的字体,进行相似度计算。经过一番尝试,获得了较为不错的识别效果,应该能有80%-90%以上的识别成功率。
pygame.init()
font = pygame.font.Font("msyh.ttc", 74)
# 获取字库中字体
for idy in range(len(words_uni)):word = words_uni[idy]rtext = font.render(chr(int('0x' + word[2:], 16)), True, (0, 0, 0), (255, 255, 255))pygame.image.save(rtext, 'dst_pic/r_%d.png' % (idy+1))
使用微软雅黑字体,生成字体像素大小与裁剪字体一致;并进行裁边,反黑等操作。

题目中图片裁剪,不再赘述,一系列操作后,图片如下:
选取了一个图片余弦距离的算法进行计算。
这里面重点说一些,这个方法灵活度有限,且对图片裁剪对齐可能要求比较高。之前图片没有严格裁边,导致识别率始终差很多。后来做了适当裁剪后,识别率大幅度提升。而且,这个也只适用于特别规范的字体,如果字体变形严重,基本就很难匹配成功了。
为了方便大家回溯验证,我把完整代码贴出来。也主要是面向百度编程,如果有参考了未列出的,望见谅,可以提醒我补上参考。
# -*- coding:utf-8 -*-
import base64
import random
import timeimport requests
from PIL import Image
import cv2 as cv
import numpy as np
import pygame
from urllib import parse
from numpy import average, dot, linalgorig_cookie = 'Hm_lvt_c99546cf032aaa5a679230de9a95c7db=1653554941,1653659559; no-alert3=true; Hm_lvt_9bcbda9cbf86757998a2339a0437208e=1653554979,1653659562; tk=5338698171357922207; mz=TW96aWxsYSxOZXRzY2FwZSw1LjAgKFdpbmRvd3MgTlQgMTAuMDsgV2luNjQ7IHg2NCkgQXBwbGVXZWJLaXQvNTM3LjM2IChLSFRNTCwgbGlrZSBHZWNrbykgQ2hyb21lLzEwMy4wLjAuMCBTYWZhcmkvNTM3LjM2LFtvYmplY3QgTmV0d29ya0luZm9ybWF0aW9uXSx0cnVlLCxbb2JqZWN0IEdlb2xvY2F0aW9uXSw4LHpoLUNOLHpoLUNOLGVuLUdCLGVuLVVTLGVuLDAsW29iamVjdCBNZWRpYUNhcGFiaWxpdGllc10sW29iamVjdCBNZWRpYVNlc3Npb25dLFtvYmplY3QgTWltZVR5cGVBcnJheV0sdHJ1ZSxbb2JqZWN0IFBlcm1pc3Npb25zXSxXaW4zMixbb2JqZWN0IFBsdWdpbkFycmF5XSxHZWNrbywyMDAzMDEwNyxbb2JqZWN0IFVzZXJBY3RpdmF0aW9uXSxNb3ppbGxhLzUuMCAoV2luZG93cyBOVCAxMC4wOyBXaW42NDsgeDY0KSBBcHBsZVdlYktpdC81MzcuMzYgKEtIVE1MLCBsaWtlIEdlY2tvKSBDaHJvbWUvMTAzLjAuMC4wIFNhZmFyaS81MzcuMzYsR29vZ2xlIEluYy4sLFtvYmplY3QgRGVwcmVjYXRlZFN0b3JhZ2VRdW90YV0sW29iamVjdCBEZXByZWNhdGVkU3RvcmFnZVF1b3RhXSw4MjQsMCwwLDE1MzYsMjQsODY0LFtvYmplY3QgU2NyZWVuT3JpZW50YXRpb25dLDI0LDE1MzYsW29iamVjdCBET01TdHJpbmdMaXN0XSxmdW5jdGlvbiBhc3NpZ24oKSB7IFtuYXRpdmUgY29kZV0gfSwsbWF0Y2gueXVhbnJlbnh1ZS5jb20sbWF0Y2gueXVhbnJlbnh1ZS5jb20saHR0cHM6Ly9tYXRjaC55dWFucmVueHVlLmNvbS9tYXRjaC8xNCxodHRwczovL21hdGNoLnl1YW5yZW54dWUuY29tLC9tYXRjaC8xNCwsaHR0cHM6LGZ1bmN0aW9uIHJlbG9hZCgpIHsgW25hdGl2ZSBjb2RlXSB9LGZ1bmN0aW9uIHJlcGxhY2UoKSB7IFtuYXRpdmUgY29kZV0gfSwsZnVuY3Rpb24gdG9TdHJpbmcoKSB7IFtuYXRpdmUgY29kZV0gfSxmdW5jdGlvbiB2YWx1ZU9mKCkgeyBbbmF0aXZlIGNvZGVdIH0=; RM4hZBv0dDon443M=KU/P0ozhPAAOMvbdxiOcesehHWODpMFe7X9pPXsCqqt86cfAYBU6fEh0MOXe3m0MjdfFhecCKtaxqzsXh2nCDxWW9Pviai1YjA0GOFnfSUCeB9KDj/p3WvUHsRkOUWLU8UplOInkHJBD8ajCtf17VebQ/J7DY7Ehk6s06rwW6QyYbnq67mAA8NDHUUQtqXictbstPYhNHO9tdNJxkKJFnRmFEDnlNXQvUy4jd1WdMak=; m=4RoMBNYJZIk6Pec7iw2AlnJprHOz7Ig%2BwBQywv0MGqMd9rxm%2BuxRJI8CIdhKc9Uv0b92XTKXn2YL%2Fb%2FT3fsiwICcVHHxIBh63tEYK1yFjB6o8nc6PBObT13jN0RT5Vqz2nLaa7W3hEhYozau5XbmPWopvQGdu6iOX9ZTVO%2BhNFNuLLGl00kExZ8%2FSWStVXJRNHzuc0q0bOlF1kbWjFr%2BDx0HG5S42PS2oRXUAurXPtgPJHpbyVGk3SaAPNoGWPowI9isnkq%2FoLEA4Twg%2BvlcUtya135rzsSmnKY3m8sq3XfuYgbANYxb1QJAM%2BpAmrnwbvGYXxPCJvuewIHMzeXa47Q%3D%3Dr; Hm_lvt_0362c7a08a9a04ccf3a8463c590e1e2f=1653571801,1653753744; Hm_lpvt_0362c7a08a9a04ccf3a8463c590e1e2f=1653754280; sessionid=kp2d4dtrfgkcb1xng36i5bg1jz451mlr; Hm_lpvt_9bcbda9cbf86757998a2339a0437208e=1653817959; '
headers = {'accept': 'application/json, text/javascript, */*; q=0.01','accept-encoding': 'gzip, deflate, br','accept-language': 'zh-CN,zh;q=0.9,en-GB;q=0.8,en-US;q=0.7,en;q=0.6','cookie': orig_cookie,'referer': 'https://match.yuanrenxue.com/match/8','User-Agent': 'yuanrenxue.project',# 'user-agent': 'Mozilla/5.0 (Windows NT 10.0; Win64; x64) AppleWebKit/537.36 (KHTML, like Gecko) Chrome/103.0.0.0 Safari/537.36','x-requested-with': 'XMLHttpRequest',
}pygame.init()
font = pygame.font.Font("msyh.ttc", 74)def get_bin_table(threshold=140):table = []for i in range(256):if i < threshold:table.append(0)else:table.append(1)return tabledef sum_9_region(img, x, y, color):cur_pixel = img.getpixel((x, y))  # 当前像素点的值width = img.widthheight = img.heightif cur_pixel != color:  # 如果当前点为非color点区域,则不统计邻域值return 0if y == 0:  # 第一行if x == 0:  # 左上顶点,4邻域# 中心点旁边3个点sum = cur_pixel \+ img.getpixel((x, y + 1)) \+ img.getpixel((x + 1, y)) \+ img.getpixel((x + 1, y + 1))if color:return sumelse:return 3-sumelif x == width - 1:  # 右上顶点sum = cur_pixel \+ img.getpixel((x, y + 1)) \+ img.getpixel((x - 1, y)) \+ img.getpixel((x - 1, y + 1))if color:return sumelse:return 3 - sumelse:  # 最上非顶点,6邻域sum = img.getpixel((x - 1, y)) \+ img.getpixel((x - 1, y + 1)) \+ cur_pixel \+ img.getpixel((x, y + 1)) \+ img.getpixel((x + 1, y)) \+ img.getpixel((x + 1, y + 1))if color:return sumelse:return 6 - sumelif y == height - 1:  # 最下面一行if x == 0:  # 左下顶点# 中心点旁边3个点sum = cur_pixel \+ img.getpixel((x + 1, y)) \+ img.getpixel((x + 1, y - 1)) \+ img.getpixel((x, y - 1))if color:return sumelse:return 3 - sumelif x == width - 1:  # 右下顶点sum = cur_pixel \+ img.getpixel((x, y - 1)) \+ img.getpixel((x - 1, y)) \+ img.getpixel((x - 1, y - 1))if color:return sumelse:return 3 - sumelse:  # 最下非顶点,6邻域sum = cur_pixel \+ img.getpixel((x - 1, y)) \+ img.getpixel((x + 1, y)) \+ img.getpixel((x, y - 1)) \+ img.getpixel((x - 1, y - 1)) \+ img.getpixel((x + 1, y - 1))if color:return sumelse:return 6 - sumelse:  # y不在边界if x == 0:  # 左边非顶点sum = img.getpixel((x, y - 1)) \+ cur_pixel \+ img.getpixel((x, y + 1)) \+ img.getpixel((x + 1, y - 1)) \+ img.getpixel((x + 1, y)) \+ img.getpixel((x + 1, y + 1))if color:return sumelse:return 6 - sumelif x == width - 1:  # 右边非顶点# print('%s,%s' % (x, y))sum = img.getpixel((x, y - 1)) \+ cur_pixel \+ img.getpixel((x, y + 1)) \+ img.getpixel((x - 1, y - 1)) \+ img.getpixel((x - 1, y)) \+ img.getpixel((x - 1, y + 1))if color:return sumelse:return 6 - sumelse:  # 具备9领域条件的sum = img.getpixel((x - 1, y - 1)) \+ img.getpixel((x - 1, y)) \+ img.getpixel((x - 1, y + 1)) \+ img.getpixel((x, y - 1)) \+ cur_pixel \+ img.getpixel((x, y + 1)) \+ img.getpixel((x + 1, y - 1)) \+ img.getpixel((x + 1, y)) \+ img.getpixel((x + 1, y + 1))if color:return sumelse:return 9 - sumdef collect_noise_point(img, color):'''收集所有的噪点'''noise_point_list = []for x in range(img.width):for y in range(img.height):res_9 = sum_9_region(img, x, y, color)# 降低噪声点要求, 4if (0 < res_9 < 4) and img.getpixel((x, y)) == color:  # 找到孤立点pos = (x, y)noise_point_list.append(pos)return noise_point_listdef remove_noise_pixel(img, noise_point_list, color):'''根据噪点的位置信息,消除二值图片的color点噪声'''for item in noise_point_list:img.putpixel((item[0], item[1]), 1-color)def blacktowhite(fonts_img):"""将图片黑白转换"""res = []for img in fonts_img:for x in range(img.width):for y in range(img.height):value = img.getpixel((x, y))img.putpixel((x, y), 1-value)# img.show()res.append(img)return resdef find_min_edge_hang(data1):"""找到data1主体的最小边界长度,一维数组"""index_1 = 0index_last1 = 0for i in range(len(data1)):if data1[i] == 1:index_1 = ibreakfor i in range(len(data1)):if data1[len(data1) - 1 - i] == 1:index_last1 = len(data1) - 1 - ibreakreturn index_1, index_last1def find_min_edge(data1):"""找到data1主体的最小边界长度,data1是二维数组"""edge_left = []edge_right = []for hang in data1:index, index_last = find_min_edge_hang(hang)edge_left.append(index)edge_right.append(index_last)# print(min(edge_left), max(edge_right))return min(edge_left), max(edge_right)def ont_to_two(data, lie):"""将行存储一维数组转化为每行lie个元素的二维数组"""two = []i = 0while i < len(data):hang = data[i: i+lie]i += lietwo.append(hang)# print(hang)return twodef cut_black(img):"""将图片的左右黑色部分去掉"""# print(img)edge_left, edge_right = find_min_edge(ont_to_two(list(img.getdata()), img.width))img = img.crop((edge_left, 0, edge_right, img.height))# img.show()return imgdef cut_black(img):"""将图片的左右黑色部分去掉"""# print(img)edge_left, edge_right = find_min_edge(ont_to_two(list(img.getdata()), img.width))img = img.crop((edge_left, 0, edge_right, img.height))# img.show()return imgdef calc_prop(point):return pow(point[0]-point[1],2) + pow(point[0]-point[2],2) + pow(point[1]-point[2],2)def descriptive_mode(list):# [第1步] 获取 变量值列表 中 所有不重复的变量值list_set=set(list) #将List转化为集合,去除重复元素# [第2步] 获取 所有不重复的变量值 在 变量值列表 中的 出现频数frequency_dict={} #定义存储 所有不重复的变量值 出现频数 的 哈希表for i in list_set: #遍历每一个list_set的元素(即去除重复元素后的集合),得到每个元素在原始集合中包含的数量:count(i)frequency_dict[i]=list.count(i)#向frequency_dic中添加key-value对象:dict[key]=value# [第3步] 获取 变量值列表 中 出现频数 最高的数值的 出现频数if len(frequency_dict.items()) <= 0:max_frequency = 1else:max_frequency=max(frequency_dict.values())mode_list=[] #定义存储 出现频数 最高的变量值的 数组if max_frequency==1: # 若最高的 出现频数 为1,则没有众数return mode_list# [第4步] 找出 所有不重复的变量值 中 出现频数 最高的变量值for key,value in frequency_dict.items():#遍历frequency_dic中每一个key-value对象if value==max_frequency:mode_list.append(key) #将 出现频数 最高的变量值添加到 数组return mode_list# 对图片进行统一化处理
def get_thum(image, size=(48, 48), greyscale=False):# 利用image对图像大小重新设置, Image.ANTIALIAS为高质量的image = image.resize(size, Image.ANTIALIAS)if greyscale:# 将图片转换为L模式,其为灰度图,其每个像素用8个bit表示image = image.convert('L')return image# 计算图片的余弦距离
def image_similarity_vectors_via_numpy(image1, image2):image1 = get_thum(image1)image2 = get_thum(image2)images = [image1, image2]vectors = []norms = []for image in images:vector = []for pixel_tuple in image.getdata():vector.append(average(pixel_tuple))vectors.append(vector)# linalg=linear(线性)+algebra(代数),norm则表示范数# 求图片的范数??norms.append(linalg.norm(vector, 2))a, b = vectorsa_norm, b_norm = norms# dot返回的是点积,对二维数组(矩阵)进行计算res = dot(a / a_norm, b / b_norm)return restotal_value = 0.0
all_data = []
idx = 0
while idx < 5:try:# now_time = int(time.time())cookie_tag = 'Hm_lpvt_c99546cf032aaa5a679230de9a95c7db=%d' % (int(time.time()), )headers['cookie'] = orig_cookie + cookie_tagurl = 'https://match.yuanrenxue.com/api/match/8_verify'ret_data = requests.get(url=url, headers=headers, timeout=10.0, verify= False, )words_uni = [item.replace('<p>','').replace('</p>','') for item in ret_data.text.split('---')[1:5]]words = [item.replace('<p>','').replace('</p>','').encode('latin-1').decode('unicode_escape') for item in ret_data.text.split('---')[1:5]]words_pic = base64.b64decode(ret_data.text.split('data:image/jpeg;base64,')[1].split('\\"')[0])# print(words_uni)pic_name = "%05d_%s" % (idx, ''.join(words))with open("./src_pic/%s.png" % (pic_name, ), "wb") as file:file.write(words_pic)words_points = []# 获取字库中字体for idy in range(len(words_uni)):word = words_uni[idy]rtext = font.render(chr(int('0x' + word[2:], 16)), True, (0, 0, 0), (255, 255, 255))pygame.image.save(rtext, 'dst_pic/r_%d.png' % (idy+1))word_points = cv.imread('dst_pic/r_%d.png' % (idy+1))word_points = word_points[20:88, ]cv.imwrite("dst_pic/u_%d.png" % (idy + 1), word_points)image = Image.open("dst_pic/u_%d.png" % (idy + 1))imgry = image.convert('L')# word_points = cv.cvtColor(word_points, cv.COLOR_BGR2GRAY)table = get_bin_table()out = imgry.point(table, '1')out = blacktowhite([out, ])[0]out = cut_black(out)# out = out[, :-6]out.save("dst_pic/u_%d.png" % (idy + 1), "png")# word_points = cv.imread('dst_pic/r_%d.png' % (idy + 1))# words_points.append(word_points)# 切分图片nparr = np.fromstring(words_pic, np.uint8)words_img = cv.imdecode(nparr, cv.IMREAD_COLOR)fonts_points = []for idy in range(3):for idz in range(3):word_img = words_img[idy*100:(idy+1)*100, idz*100:(idz+1)*100]cv.imwrite("src_pic/%d.png" % (idy * 3 + idz + 1), word_img)# 去除背景和噪音props = []for ida in range(2, 12):for idb in range(2, 12):ret_prop = calc_prop(word_img[ida][idb])bias = min([990000] + [abs(ret_prop - prop) for prop in props])# print(bias)if len(props) == 0 or (bias > 300 and len(props) < 3):props.append(ret_prop)for ida in range(len(word_img)):for idb in range(len(word_img[0])):ret_prop = calc_prop(word_img[ida][idb])bias = min([abs(ret_prop - prop) for prop in props])# print(bias)if bias < 500:word_img[ida][idb] = [255, 255, 255]# else:#    word_img[ida][idb] = [0, 0, 0]# if bias>10000:#    pixel_points[idx][idy] = [0, 0, 0]word_img = word_img[14:88, 26:100]# 抽样,再剔除all_props = []# 去除背景和噪音for idc in range(4):for idd in range(4):props = []for ida in range(2, 12):for idb in range(2, 12):ret_prop = calc_prop(word_img[idc * 18 + ida][idd * 18 + idb])bias = min([990000] + [abs(ret_prop - prop) for prop in props])# print(bias)if len(props) == 0 or (bias > 300 and len(props) < 3):props.append(ret_prop)if ret_prop != 0:all_props.append((ret_prop))# print(props)ret_data = descriptive_mode(all_props)# print(ret_data)for ida in range(len(word_img)):for idb in range(len(word_img[0])):ret_prop = calc_prop(word_img[ida][idb])if abs(ret_prop-ret_data) > 100:word_img[ida][idb] = [255, 255, 255]else:word_img[ida][idb] = [0, 0, 0]# 继续额外操作cv.imwrite("src_pic/n_%d.png" % (idy * 3 + idz + 1), word_img)image = Image.open("src_pic/n_%d.png" % (idy * 3 + idz + 1))imgry = image.convert('L')# word_points = cv.cvtColor(word_points, cv.COLOR_BGR2GRAY)table = get_bin_table()out = imgry.point(table, '1')out = blacktowhite([out, ])[0]out = cut_black(out)out.save("src_pic/n_%d.png" % (idy * 3 + idz + 1), "png")# word_img = cv.imread("src_pic/n_%d.png" % (idy * 3 + idz + 1))# fonts_points.append(word_img)answer = []for idz in range(4):cosin = 0.0lable_idk = -1for idk in range(9):# img1_path = "dst_pic/u_%d.png" % (idx+1)# img2_path = "src_pic/n_%d.png" % (idy+1)# result1 = classify_hist_with_split(img1_path, img2_path)# print("u_%d->n_%d相似度为:%.2f%%" % (idx+1, idy+1, result1 * 100))# img1 = cv2.imread("dst_pic/z_%d.png" % (idx+1))# img2 = cv2.imread("src_pic/v_%d.png" % (idy+1))# hash1 = pHash(img1)# hash2 = pHash(img2)# n = cmpHash(hash1, hash2)# print("u_%d->n_%d相似度为:%.2f%%" % (idx + 1, idy + 1, n * 100))image1 = Image.open("dst_pic/u_%d.png" % (idz+1))image2 = Image.open("src_pic/n_%d.png" % (idk+1))# image1 = words_points[idx]# image2 = fonts_points[idy]update_cosin = image_similarity_vectors_via_numpy(image1, image2)# print("u_%d->n_%d相似度为:%.2f%%" % (idx + 1, idy + 1, cosin * 100))if update_cosin > cosin:cosin = update_cosinlable_idk = idk_answer = 30*(10*int(lable_idk/3)+random.randint(4,6)-1) + (int(lable_idk%3)*10+random.randint(4,6)-1)answer.append(str(int(_answer))+'|')# print("u_%d相似度最大为%d,值%.2f%%" %(idx+1, lable_idk+1, update_cosin*100, ))url1 = 'https://match.yuanrenxue.com/api/match/8?page=%d&answer=%s' % (idx + 1, parse.quote(''.join(answer)),)ret_data1 = requests.get(url=url1, headers=headers, timeout=10.0, verify=False, ).json()for item in ret_data1['data']:all_data.append(item['value'])idx += 1except Exception as e:print(e)time.sleep(2.0)total_value = descriptive_mode(all_data)print(total_value[0])
这篇关于猿人学第八题:验证码 图文点选 识别新思路的文章就介绍到这儿,希望我们推荐的文章对编程师们有所帮助!


