本文主要是介绍钢铁缺陷检测mask rcnn版本,希望对大家解决编程问题提供一定的参考价值,需要的开发者们随着小编来一起学习吧!
一、项目主框架代码(tensorflow版本的Mask RCNN)
Mask RCNN论文及代码解析参考我的另一篇博客:https://blog.csdn.net/qq_32172681/article/details/99761084
Mask RCNN keras实现代码,大神的github地址:https://github.com/matterport/Mask_RCNN
运行环境:tensorflow_gpu 1.14.0,CUDA版本是10.0,cudnn版本号7.4.1,python3.6,tensorflow+keras实现。
二、训练过程
1、数据预处理/标签预处理
数据预处理:
去均值
数据增强imgaug
共12000+张图像,其中10000张为训练集,其他为验证集
标签预处理:
(1)标签格式
训练集的标签采用RLE编码,RLE编码见我的另一篇博客:https://blog.csdn.net/qq_32172681/article/details/100537042
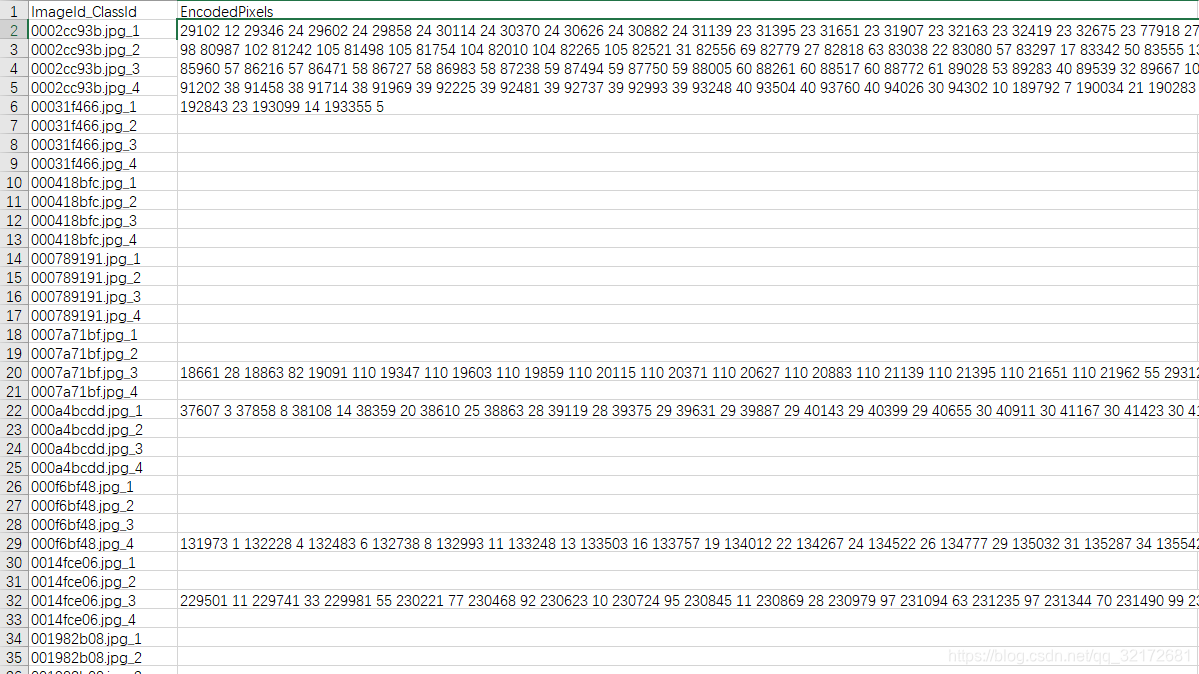
如下图所示:ImageId_ClassId为image_name+"_"+class_id,EncodedPixels为图片的RLE编码,一共有4类缺陷,因此每4行数据表示一个图片的标签。

(2)将EncodedPixels转换为mask和bbox
- 1个EncodedPixels得到1个mask,它的size为图像大小[256,1600],1表示mask,0表示background
- 1个mask得到多个bbox:(x1,y1,x2,y2)
此部分代码参考自kaggle public kernel:https://www.kaggle.com/applefish/get-bboxes-from-segmentation-labels
"""将rle编码转换为mask数组(size=[256,1600],1表示mask,0表示background)"""
def rle_decode(mask_rle, shape=(768, 768)):"""mask_rle: run-length as string formated (start length)shape: (height,width) of array to returnReturns numpy array, 1 - mask, 0 - background"""s = mask_rle.split()starts, lengths = [np.asarray(x, dtype=int) for x in (s[0:][::2], s[1:][::2])]starts -= 1ends = starts + lengthsimg = np.zeros(shape[0] * shape[1], dtype=np.uint8)for lo, hi in zip(starts, ends):img[lo:hi] = 1return img.reshape((shape[1], shape[0])).T  # Needed to align to RLE direction""""""
def masks_as_image(in_mask_list, all_masks=None, shape=(256, 1600)):# Take the individual masks and create a single mask arrayif all_masks is None:all_masks = np.zeros(shape, dtype=np.int16)# if isinstance(in_mask_list, list):for mask in in_mask_list:if isinstance(mask, str):all_masks += rle_decode(mask, shape)return np.expand_dims(all_masks, -1)"""从一个rle编码的mask,获取所有的bbox"""
def get_bboxes_from_rle(encoded_pixels, return_mask=False):"""get all bboxes from a whole mask label""""""将rle编码转换为mask(size=[256,1600],1表示mask,0表示background)"""mask = masks_as_image([encoded_pixels])lbl = label(mask)props = regionprops(lbl)# get bboxes by a for loop"""获取mask中的全部bbox"""bboxes = []for prop in props:bboxes.append([prop.bbox[1], prop.bbox[0], prop.bbox[4], prop.bbox[3]])if return_mask:return bboxes, maskreturn bboxes
(3)每张image生成instance count个mask,bbox,class_id (实例分割)
- masks: [height, width, instance count]
- bboxes:[num_instances, (y1, x1, y2, x2)]
- class_ids:size=instance count
def load_mask(self,image_id):"""Generate instance masks and bboxs for an image.Returns:masks: A bool array of shape [height, width, instance count] withone mask per instance.bboxs: bbox array [num_instances, (y1, x1, y2, x2)]class_ids: a 1D array of class IDs of the instance masks."""train_data = pd.read_csv(ROOT_DIR + "\\train.csv")instance_masks = []instance_bboxes = []class_ids = []instance_num = 0# 类别数为4for i in range(4):# 得到每个图片每个类别的rle编码字符串rle_0 = train_data.query('ImageId_ClassId=="' + image_id + '_' + str(i + 1) + '"')['EncodedPixels'].values[0]if isinstance(rle_0, str) != True and i != 0:continue# 得到一张图片一个类别的所有bboxes和masksbboxes_0, mask_0 = get_bboxes_from_rle(rle_0, True)if max(mask_0.reshape(-1)) != 0:# 每个类别有len(bboxes_0)个实例 (每个实例对应一个classids、instance_bboxes、instance_masks)for j in range(len(bboxes_0)):# class_idclass_ids.append(i+1)# maskx1,y1,x2,y2 = bboxes_0[j][0],bboxes_0[j][1],bboxes_0[j][2],bboxes_0[j][3]mask_temp = np.zeros([256,1600,1])mask_temp[y1:y2+1,x1:x2+1] = mask_0[y1:y2+1,x1:x2+1]instance_masks.append(mask_0)# bboxinstance_bboxes.append(np.array(bboxes_0[j]))# Pack instance masks into an arrayif class_ids:masks = np.stack(instance_masks,axis=2).astype(np.bool)[:,:,:,0]bboxes = np.stack(instance_bboxes,axis=0)class_ids = np.array(class_ids, dtype=np.int32)else:masks = np.empty([0, 0, 0])bboxes = np.empty([0, 0, 0])class_ids = np.empty([0], np.int32)return masks, bboxes, class_ids
(4)一张图片的mask和bbox处理结果如下(每个实例对应一个mask和一个bbox):


说明我们的数据预处理是没有问题滴~
display的代码如下:
img = cv2.imread(ROOT_DIR + "\\steels_train_images\\" + image_id)
img_0 = img.copy()
fig, [ax1, ax2, ax3] = plt.subplots(1, 3, figsize=(15, 5))
print('Found bbox', bboxes_0[j])
cv2.rectangle(img_0, (bboxes_0[j][0], bboxes_0[j][1]), (bboxes_0[j][2], bboxes_0[j][3]), (255, 0, 0), 5)ax1.imshow(img)
ax1.set_title('Image')
ax2.set_title('Mask')
ax3.set_title('Image with derived bounding box')
ax2.imshow(mask_temp[..., 0], cmap='gray')
ax3.imshow(img_0)
plt.show()
2、使用mask_rcnn_coco预训练模型微调
加快收敛速度
3、调节参数 RPN_ANCHOR_SCALES
RPN_ANCHOR_SCALES 表示anchor边长的平方,Mask RCNN中建议值为(32,64,128, 256, 512),分别是2-6个卷积特征图上anchor的尺度。我的输入图像形状IMAGE_SHAPE 为[256 1600 3],所以第2-6个卷积特征图大小为64*400、32*200、16*100、8*50、4*25,第2-6个特征图相对于原图的BACKBONE_STRIDES为[4, 8, 16, 32, 64],所以5种anchor尺度(32,64,128, 256, 512)对应到原图都是8像素。特征图上每个位置的anchors有3种比例RPN_ANCHOR_RATIOS为 [0.5, 1, 2],因此我一共有(64*400+32*200+16*100+8*50+4*25)* 3 = 102300个anchor。
当RPN_ANCHOR_SCALES 值为建议值: (32,64,128, 256, 512) 时,RPN损失如下:

当 RPN_ANCHOR_SCALES = (128, 256, 512, 1024, 2048) 时,训练1个epoch,RPN损失如下:

由此可以看出,RPN_ANCHOR_SCALES对RPN损失的影响很大,我猜想应该是图像宽度为1600,比较大,因此需要更大的anchor,我采用的anchor尺度映射到原图也就是32(anchor边长的平方为32)。
RPN_ANCHOR_SCALES 更详细的理解可以点击:https://blog.csdn.net/qq_17172467/article/details/83986518
4、自定义优化器
一次训练更多的图片,相当于扩大batchsize,达到扩大显存的效果(默认优化器:SGD+Momentum)
我是用mask rcnn做分割,模型比较庞大,1080显卡最多也就能跑batch size=2,但又想起到batch size=64的效果,那可以怎么办呢?一种可以考虑的方案是,每次算batch size=2,然后把梯度缓存起来,32个batch后才更新参数。也就是说,每个小batch都算梯度,但每32个batch才更新一次参数。
我的需求是,SGD+Momentum实现梯度累加功能,借鉴了keras的optimizier的定义,可以看出每个优化器SGD、Adam等都是重载了Optimizer类,主要是需要重写get_updates方法。
完整实现代码如下:
"""自定义优化器,多个batch更新一次梯度,可以小GPU训练多图片"""from keras.legacy import interfaces
from keras.optimizers import Optimizer
from keras import backend as Kclass MySGD(Optimizer):"""Keras中简单自定义SGD优化器每隔一定的batch才更新一次参数Includes support for momentum,learning rate decay, and Nesterov momentum.# Argumentslr: float >= 0. Learning rate.momentum: float >= 0. Parameter that accelerates SGD in the relevant direction and dampens oscillations.decay: float >= 0. Learning rate decay over each update.nesterov: boolean. Whether to apply Nesterov momentum.steps_per_update: how many batch to update gradient"""def __init__(self, lr=0.01, momentum=0., decay=0.,nesterov=False, steps_per_update=32, **kwargs):super(MySGD, self).__init__(**kwargs)with K.name_scope(self.__class__.__name__):self.iterations = K.variable(0, dtype='int64', name='iterations')self.lr = K.variable(lr, name='lr')self.steps_per_update = steps_per_update  # 多少batch才更新一次self.momentum = K.variable(momentum, name='momentum')self.decay = K.variable(decay, name='decay')self.initial_decay = decayself.nesterov = nesterovprint("每%dbatch更新一次梯度" % self.steps_per_update)@interfaces.legacy_get_updates_supportdef get_updates(self, loss, params):"""主要的参数更新算法"""# learning rate decaylr = self.lrif self.initial_decay > 0:lr = lr * (1. / (1. + self.decay * K.cast(self.iterations,K.dtype(self.decay))))shapes = [K.int_shape(p) for p in params]sum_grads = [K.zeros(shape) for shape in shapes]  # 平均梯度,用来梯度下降grads = self.get_gradients(loss, params)  # 当前batch梯度self.updates = [K.update_add(self.iterations, 1)]  # 定义赋值算子集合self.weights = [self.iterations] + sum_grads  # 优化器带来的权重,在保存模型时会被保存for p, g, sg in zip(params, grads, sum_grads):# momentum 梯度下降v = self.momentum * sg / float(self.steps_per_update) - lr * g  # velocityif self.nesterov:new_p = p + self.momentum * v - lr * gelse:new_p = p + v# 如果有约束,对参数加上约束if getattr(p, 'constraint', None) is not None:new_p = p.constraint(new_p)cond = K.equal(self.iterations % self.steps_per_update, 0)# 满足条件才更新参数self.updates.append(K.switch(cond, K.update(sg, v), p))self.updates.append(K.switch(cond, K.update(p, new_p), p))# 满足条件就要重新累积,不满足条件直接累积self.updates.append(K.switch(cond, K.update(sg, g), K.update(sg, sg + g)))return self.updatesdef get_config(self):config = {'lr': float(K.get_value(self.lr)),'steps_per_update': self.steps_per_update,'momentum': float(K.get_value(self.momentum)),'decay': float(K.get_value(self.decay)),'nesterov': self.nesterov}base_config = super(MySGD, self).get_config()return dict(list(base_config.items()) + list(config.items()))
更详细的内容参考我的另一篇博客:https://blog.csdn.net/qq_32172681/article/details/100804607
5、优化器由sgd+momentum换成adam
adam自适应学习率,适合稀疏性数据
6、同时使用adam+学习率衰减,效果有微弱提升
在一篇博客上看到的方法
7、损失加权
LOSS_WEIGHTS参数表示5项损失的权重,此处我想重点训练"mrcnn_class_loss"、"mrcnn_mask_loss",因此我调高他们的权重,以期望获得更加优化的结果。
LOSS_WEIGHTS = {"rpn_class_loss": 0.25,"rpn_bbox_loss": 0.25,"mrcnn_class_loss": 2,"mrcnn_bbox_loss": 0.5,"mrcnn_mask_loss": 2
}
8、dropout(防止过拟合)
在全连接层加上dropout=0.5,如下:
# Classifier head
mrcnn_class_logits = KL.TimeDistributed(KL.Dense(num_classes),name='mrcnn_class_logits')(shared)
mrcnn_class_logits = KL.TimeDistributed(KL.Dropout(0.5),name='mrcnn_class_logits_dropout')(mrcnn_class_logits)
mrcnn_probs = KL.TimeDistributed(KL.Activation("softmax"),name="mrcnn_class")(mrcnn_class_logits)# BBox head
# [batch, num_rois, NUM_CLASSES * (dy, dx, log(dh), log(dw))]
x = KL.TimeDistributed(KL.Dense(num_classes * 4, activation='linear'),name='mrcnn_bbox_fc')(shared)
x = KL.TimeDistributed(KL.Dropout(0.5),name='mrcnn_bbox_fc_dropout')(x)
只有mrcnn中分类和框回归任务有全连接层,所以这部分损失明显增大。
试验下结果,再考虑是否在卷积层加dropout,测试的时候记得去掉dropout,学习率自动衰减
9、准确率:86%
衡量标准为dice系数:

10、其他优化
cascade-rcnn模型准确率更高,但是也更慢,还没有尝试
没有用批标准化,因为batchsize=2,太小了
激活函数是relu,也可以考虑用He初始化
USE_MINI_MASK参数设置为True,可以将mask放缩到固定大小,对于高分辨率图像可以节省大量内存。
下面是默认设置:
参数初始化:xavier权重初始化、0 bias初始化
激活函数:relu
L2权重衰减:避免过拟合
11、记录一个愚蠢的错误
模型训练一开始,mrcnn_bbox损失为0,然后慢慢开始有值,如下:

排查了一下问题,发现是bbox的坐标应该是(y1,x1,y2,x2),我处理成(x1,y1,x2,y2)了。

嗯,问题解决,果然越是悬疑的bug,越蠢...
知乎匿名用户:
感觉除了层数和每层隐节点的个数,也没啥好调的。其它参数,近两年论文基本都用同样的参数设定:迭代几十到几百epoch。sgd,mini batch size从几十到几百皆可。步长0.1,可手动收缩,weight decay取0.005,momentum取0.9。dropout加relu。weight用高斯分布初始化,bias全初始化为0。最后记得输入特征和预测目标都做好归一化。做完这些你的神经网络就应该跑出基本靠谱的结果,否则反省一下自己的人品。
这篇关于钢铁缺陷检测mask rcnn版本的文章就介绍到这儿,希望我们推荐的文章对编程师们有所帮助!


