本文主要是介绍PyQt5 布局管理(水平、垂直、网格、表单、嵌套、QSplitter),希望对大家解决编程问题提供一定的参考价值,需要的开发者们随着小编来一起学习吧!
文章目录
- 1. 布局管理
- 2. 使用绝对位置布局
- 3. QBoxLayout
- addStretch() 添加可伸缩控件
- 4. QGridLayout
- 5. QFormLayout
- 6. 嵌套布局
- 7. QSplitter 布局
learn from 《PyQt5 快速开发与实战》
https://doc.qt.io/qtforpython/index.html
https://www.riverbankcomputing.com/static/Docs/PyQt5
1. 布局管理
QHBoxLayout水平QVBoxLayout垂直QGridLayout网格QFormLayout表单布局,两列的形式
addLayout() 插入子布局
addWidget() 在布局中插入控件
2. 使用绝对位置布局
- 使用
(x, y)坐标
import sys
from PyQt5.QtWidgets import QWidget, QLabel, QApplicationclass Example(QWidget):def __init__(self):super().__init__()self.initUI()def initUI(self):lbl1 = QLabel('欢迎', self)# lbl1.move(15, 10)lbl2 = QLabel('学习', self)lbl2.move(35, 40)lbl3 = QLabel('PyQt5 !', self)lbl3.move(55, 70)self.setGeometry(300, 300, 320, 120)self.setWindowTitle('绝对位置布局例子')if __name__ == '__main__':app = QApplication(sys.argv)demo = Example()demo.show()sys.exit(app.exec_())
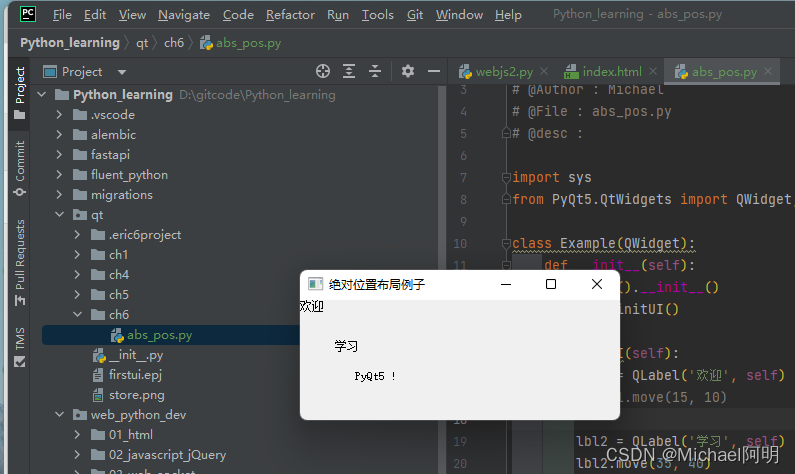
- 缺点: 窗口大小变动时,控件大小和位置不会随动
3. QBoxLayout
stretch参数设置伸缩量
# _*_ coding: utf-8 _*_
# @Time : 2022/6/4 18:49
# @Author : Michael
# @File : hbox.py
# @desc :from PyQt5.QtCore import Qt
from PyQt5.QtWidgets import QWidget, QHBoxLayout, QPushButton, QApplicationclass Winform(QWidget):def __init__(self):super(Winform, self).__init__()self.setWindowTitle('HBox')layout = QHBoxLayout()layout.addWidget(QPushButton('1'), 2, Qt.AlignTop)layout.addWidget(QPushButton('2'), 0, Qt.AlignBottom | Qt.AlignRight)layout.addWidget(QPushButton('3'))layout.addWidget(QPushButton('4'), 3, Qt.AlignTop | Qt.AlignJustify) # 伸缩量3, 居中,两边对齐layout.addWidget(QPushButton('5'))layout.setSpacing(5) # 控件间距 5self.setLayout(layout)if __name__ == '__main__':import sysapp = QApplication(sys.argv)win = Winform()win.show()sys.exit(app.exec_())
addStretch() 添加可伸缩控件
- 添加到布局末尾
from PyQt5.QtWidgets import QApplication, QWidget, QHBoxLayout, QPushButton
import sysclass WindowDemo(QWidget):def __init__(self):super().__init__()btn1 = QPushButton(self)btn2 = QPushButton(self)btn3 = QPushButton(self)btn1.setText('button 1')btn2.setText('button 2')btn3.setText('button 3')layout = QHBoxLayout()# 设置伸缩量为2layout.addStretch(2)layout.addWidget(btn1)# 设置伸缩量为1layout.addStretch(1)layout.addWidget(btn2)# 设置伸缩量为1layout.addStretch(1)layout.addWidget(btn3)# 设置伸缩量为1layout.addStretch(1)# 剩余空间比例 2:1:1:1self.setLayout(layout)self.setWindowTitle("addStretch 例子")if __name__ == "__main__":app = QApplication(sys.argv)win = WindowDemo()win.show()sys.exit(app.exec_())
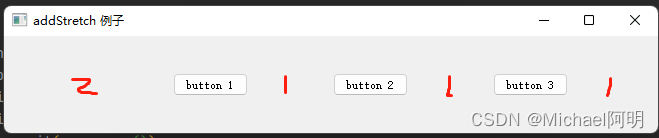
若只给最前面添加一个,则为右对齐
若只给最后面添加一个,则为左对齐
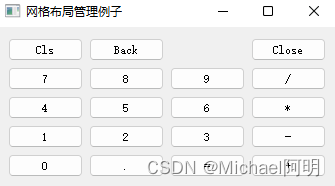
4. QGridLayout
- 控件占一格的例子
import sys
from PyQt5.QtWidgets import QApplication, QWidget, QGridLayout, QPushButtonclass Winform(QWidget):def __init__(self, parent=None):super(Winform, self).__init__(parent)self.initUI()def initUI(self):# 1grid = QGridLayout()self.setLayout(grid)# 2names = ['Cls', 'Back', '', 'Close','7', '8', '9', '/','4', '5', '6', '*','1', '2', '3', '-','0', '.', '=', '+']# 3positions = [(i, j) for i in range(5) for j in range(4)]print(positions)# 4for position, name in zip(positions, names):if name == '':continuebutton = QPushButton(name)grid.addWidget(button, *position)self.move(300, 150)self.setWindowTitle('网格布局管理例子')if __name__ == "__main__":app = QApplication(sys.argv)form = Winform()form.show()sys.exit(app.exec_())
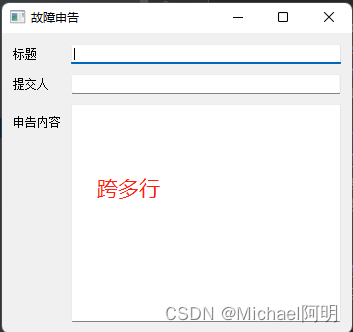
- 控件跨越多格
import sys
from PyQt5.QtWidgets import QWidget, QLabel, QLineEdit, QTextEdit, QGridLayout, QApplicationclass Winform(QWidget):def __init__(self, parent=None):super(Winform, self).__init__(parent)self.initUI()def initUI(self):titleLabel = QLabel('标题')authorLabel = QLabel('提交人')contentLabel = QLabel('申告内容')titleEdit = QLineEdit()authorEdit = QLineEdit()contentEdit = QTextEdit()grid = QGridLayout()grid.setSpacing(10)grid.addWidget(titleLabel, 1, 0) # row 1, column 0grid.addWidget(titleEdit, 1, 1) # row 1, column 1grid.addWidget(authorLabel, 2, 0)grid.addWidget(authorEdit, 2, 1)grid.addWidget(contentLabel, 3, 0)grid.addWidget(contentEdit, 3, 1, 5, 1) # 行,列,行高,列宽self.setLayout(grid)self.setGeometry(300, 300, 350, 300)self.setWindowTitle('故障申告')if __name__ == "__main__":app = QApplication(sys.argv)form = Winform()form.show()sys.exit(app.exec_())
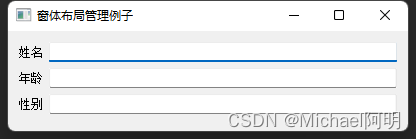
5. QFormLayout
- 两列,一般左侧是 label,右侧是用户选择或者输入 field
import sys
from PyQt5.QtWidgets import QApplication, QWidget, QFormLayout, QLineEdit, QLabelclass Winform(QWidget):def __init__(self, parent=None):super(Winform, self).__init__(parent)self.setWindowTitle("窗体布局管理例子")self.resize(400, 100)fromlayout = QFormLayout()labl1 = QLabel("姓名")lineEdit1 = QLineEdit()labl2 = QLabel("年龄")lineEdit2 = QLineEdit()labl3 = QLabel("性别")lineEdit3 = QLineEdit()fromlayout.addRow(labl1, lineEdit1)fromlayout.addRow(labl2, lineEdit2)fromlayout.addRow(labl3, lineEdit3)self.setLayout(fromlayout)if __name__ == "__main__":app = QApplication(sys.argv)form = Winform()form.show()sys.exit(app.exec_())
6. 嵌套布局
import sys
from PyQt5.QtWidgets import QApplication, QWidget, QHBoxLayout, QVBoxLayout, QGridLayout, QFormLayout, QPushButtonclass MyWindow(QWidget):def __init__(self):super().__init__()self.setWindowTitle('嵌套布局示例')# 全局布局(1个):水平wlayout = QHBoxLayout()# 局部布局(4个):水平、竖直、网格、表单hlayout = QHBoxLayout()vlayout = QVBoxLayout()glayout = QGridLayout()formlayout = QFormLayout()# 局部布局添加部件(例如:按钮)hlayout.addWidget(QPushButton(str(1)))hlayout.addWidget(QPushButton(str(2)))vlayout.addWidget(QPushButton(str(3)))vlayout.addWidget(QPushButton(str(4)))glayout.addWidget(QPushButton(str(5)), 0, 0)glayout.addWidget(QPushButton(str(6)), 0, 1)glayout.addWidget(QPushButton(str(7)), 1, 0)glayout.addWidget(QPushButton(str(8)), 1, 1)formlayout.addWidget(QPushButton(str(9)))formlayout.addWidget(QPushButton(str(10)))formlayout.addWidget(QPushButton(str(11)))formlayout.addWidget(QPushButton(str(12)))# 准备四个部件hwg = QWidget()vwg = QWidget()gwg = QWidget()fwg = QWidget()# 四个部件设置局部布局hwg.setLayout(hlayout)vwg.setLayout(vlayout)gwg.setLayout(glayout)fwg.setLayout(formlayout)# 四个部件加至全局布局wlayout.addWidget(hwg)wlayout.addWidget(vwg)wlayout.addWidget(gwg)wlayout.addWidget(fwg)# 窗体本体设置全局布局self.setLayout(wlayout)if __name__ == "__main__":app = QApplication(sys.argv)win = MyWindow()win.show()sys.exit(app.exec_())
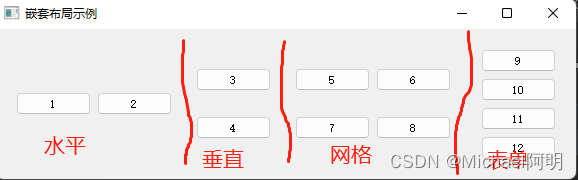
上面使用了多个空白控件来设置局部布局
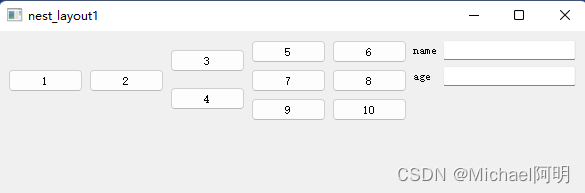
下面只使用一个空白控件
# _*_ coding: utf-8 _*_
# @Time : 2022/6/5 17:11
# @Author : Michael
# @File : nest_layout1.py
# @desc :
import sysfrom PyQt5.QtWidgets import QWidget, QHBoxLayout, QVBoxLayout, QGridLayout, QFormLayout, QPushButton, QLineEdit, \QApplicationclass mywin(QWidget):def __init__(self):super().__init__()self.setWindowTitle('nest_layout1')self.resize(500, 300)# 全局部件, 注意 self 参数globalwidget = QWidget(self)# 全局布局globallayout = QHBoxLayout(globalwidget)# 局部布局h_layout = QHBoxLayout()v_layout = QVBoxLayout()g_layout = QGridLayout()form_layout = QFormLayout()# 局部布局 添加控件h_layout.addWidget(QPushButton(str(1)))h_layout.addWidget(QPushButton(str(2)))v_layout.addWidget(QPushButton(str(3)))v_layout.addWidget(QPushButton(str(4)))g_layout.addWidget(QPushButton(str(5)), 0, 0)g_layout.addWidget(QPushButton(str(6)), 0, 1)g_layout.addWidget(QPushButton(str(7)), 1, 0)g_layout.addWidget(QPushButton(str(8)), 1, 1)g_layout.addWidget(QPushButton(str(9)), 2, 0)g_layout.addWidget(QPushButton(str(10)), 2, 1)form_layout.addRow('name', QLineEdit())form_layout.addRow('age', QLineEdit())# 局部布局 添加到 全局布局globallayout.addLayout(h_layout)globallayout.addLayout(v_layout)globallayout.addLayout(g_layout)globallayout.addLayout(form_layout)
if __name__ == '__main__':app = QApplication(sys.argv)win = mywin()win.show()sys.exit(app.exec_())
7. QSplitter 布局
- 可以动态拖动子控件之间的边界,默认是横向布局
# _*_ coding: utf-8 _*_
# @Time : 2022/6/5 17:31
# @Author : Michael
# @File : qsplitter.py
# @desc :
import sysfrom PyQt5.QtCore import Qt
from PyQt5.QtWidgets import QWidget, QHBoxLayout, QFrame, QSplitter, QTextEdit, QApplicationclass qsplitter_demo(QWidget):def __init__(self):super().__init__()self.initUI()def initUI(self):self.setGeometry(300, 300, 300, 300)self.setWindowTitle('QSplitter')h_layout = QHBoxLayout(self)topleft = QFrame()topleft.setFrameShape(QFrame.StyledPanel)textedit = QTextEdit()spliter1 = QSplitter(Qt.Horizontal)spliter1.addWidget(topleft)spliter1.addWidget(textedit)spliter1.setSizes([100, 200])bottom = QFrame()bottom.setFrameShape(QFrame.StyledPanel)spliter2 = QSplitter(Qt.Vertical)spliter2.addWidget(spliter1)spliter2.addWidget(bottom)h_layout.addWidget(spliter2)self.setLayout(h_layout)
if __name__ == '__main__':app = QApplication(sys.argv)qsplitter_demo = qsplitter_demo()qsplitter_demo.show()sys.exit(app.exec_())
这篇关于PyQt5 布局管理(水平、垂直、网格、表单、嵌套、QSplitter)的文章就介绍到这儿,希望我们推荐的文章对编程师们有所帮助!


