本文主要是介绍Scrapy_redis框架分布式爬虫的实现案例-书山有路网,希望对大家解决编程问题提供一定的参考价值,需要的开发者们随着小编来一起学习吧!
普通爬虫:
流程:
- 创建项目
- 明确目标
- 创建爬虫
- 保存内容
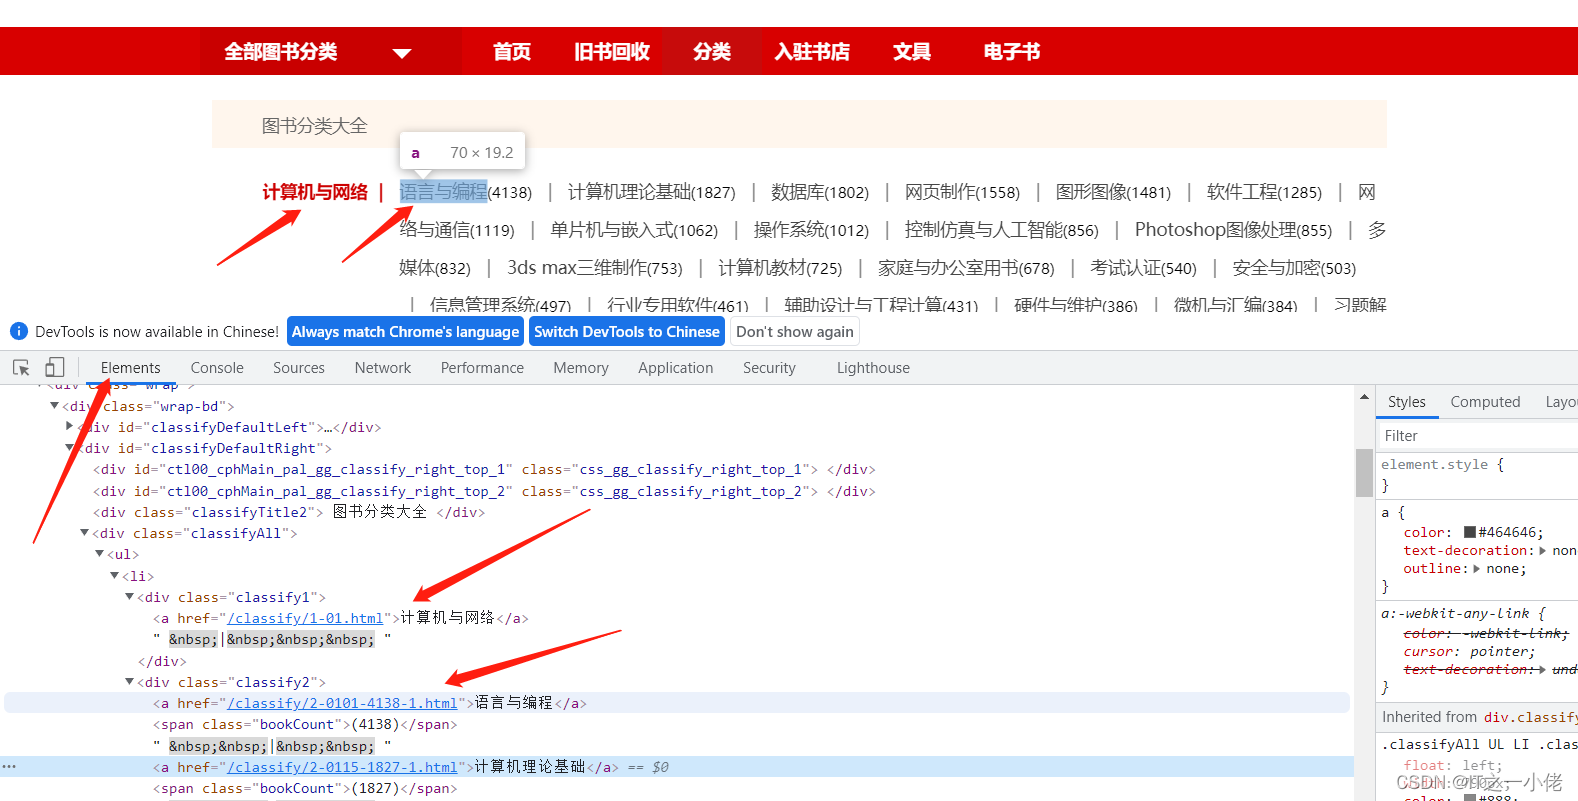
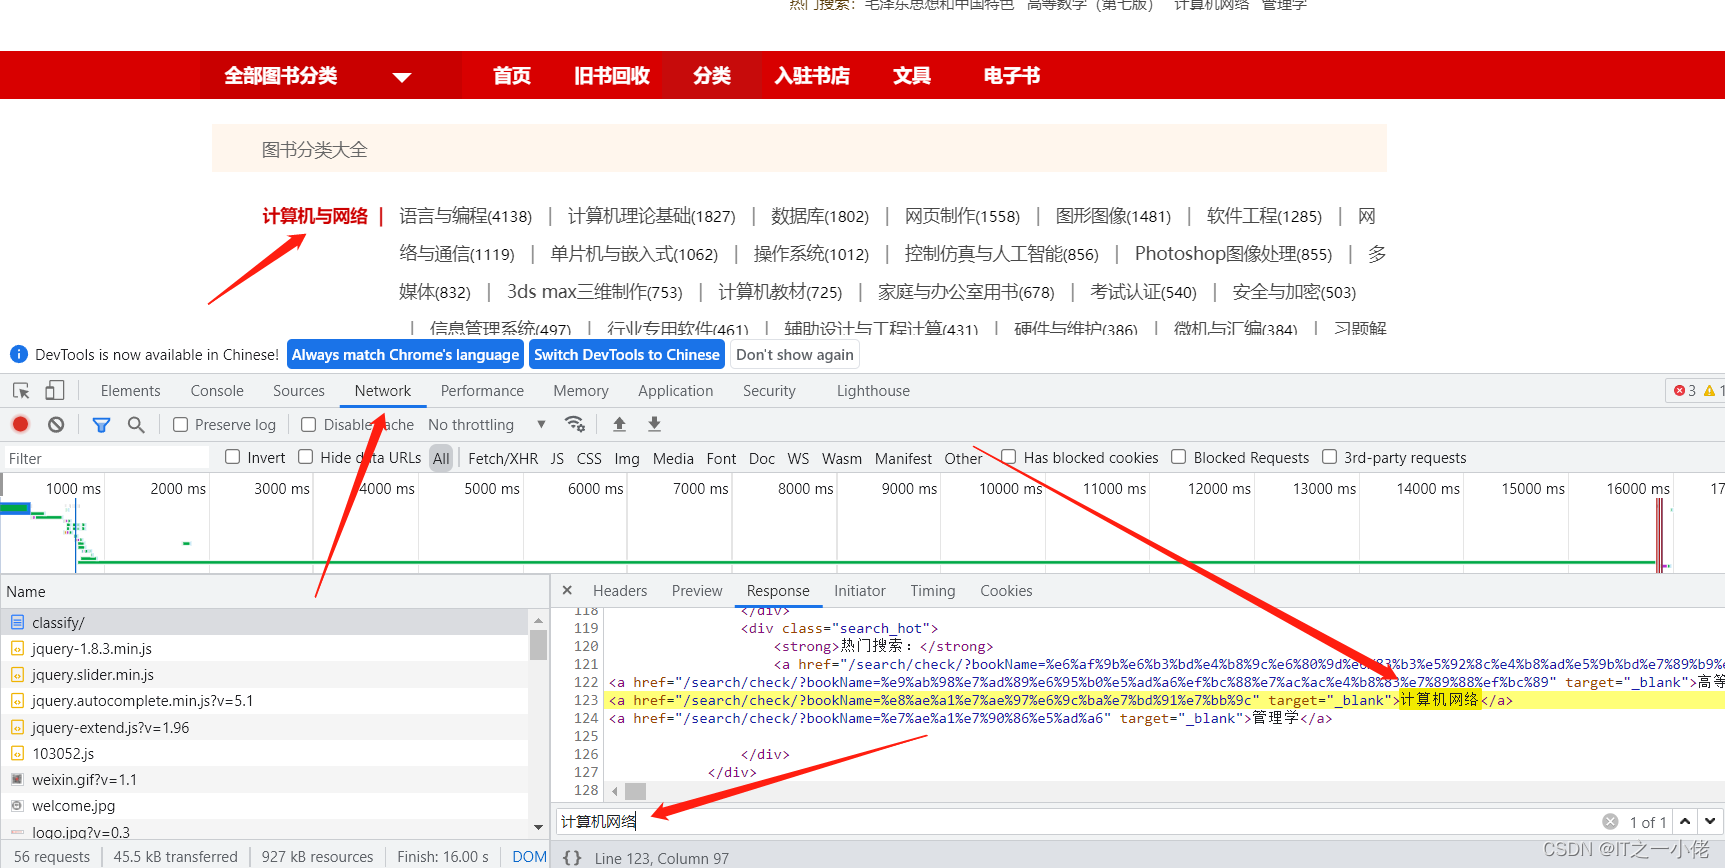
爬取书山有路网上图书页面:图书分类::有路网 - 买旧书 上有路

点击到浏览图书所有分类:图书分类::有路网 - 买旧书 上有路

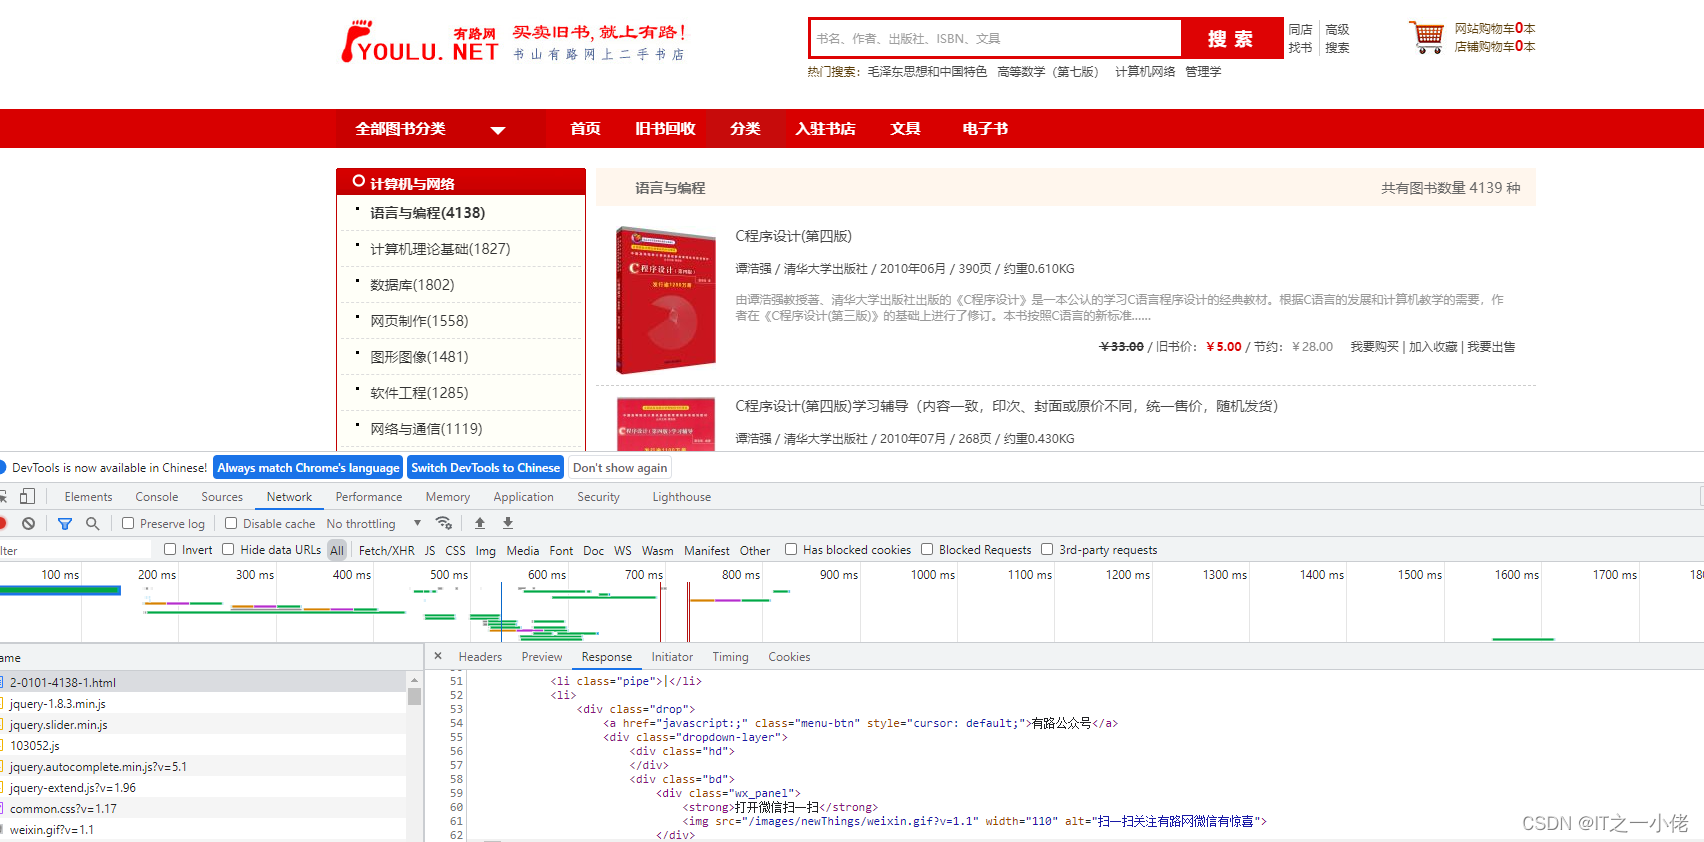
详情页:
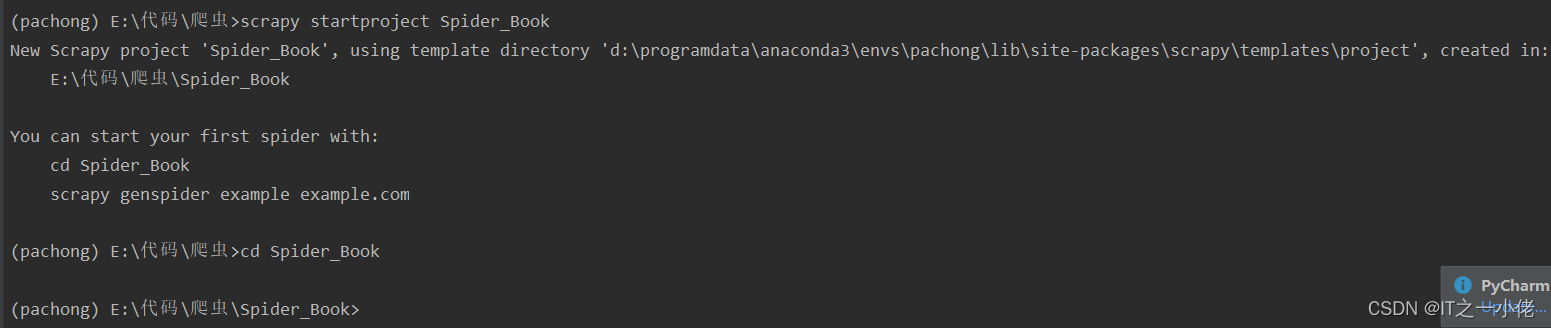
开始创建爬虫项目:
修改items.py文件:
# Define here the models for your scraped items
#
# See documentation in:
# https://docs.scrapy.org/en/latest/topics/items.htmlimport scrapyclass SpiderBookItem(scrapy.Item):# define the fields for your item here like:big_category = scrapy.Field()big_category_link = scrapy.Field()small_category = scrapy.Field()small_category_link = scrapy.Field()book_name = scrapy.Field()book_price = scrapy.Field()book_author = scrapy.Field()
创建爬虫任务:

book.py
import scrapyclass BookSpider(scrapy.Spider):name = 'book'# 修改允许的域allowed_domains = ['youlu.net']# 修改起始urlstart_urls = ['https://www.youlu.net/classify/']def parse(self, response):# 获取所有图书大分类的节点列表big_node_list = response.xpath('//*[@id="classifyDefaultRight"]/div[4]/ul/li/div[1]/a')print(len(big_node_list))
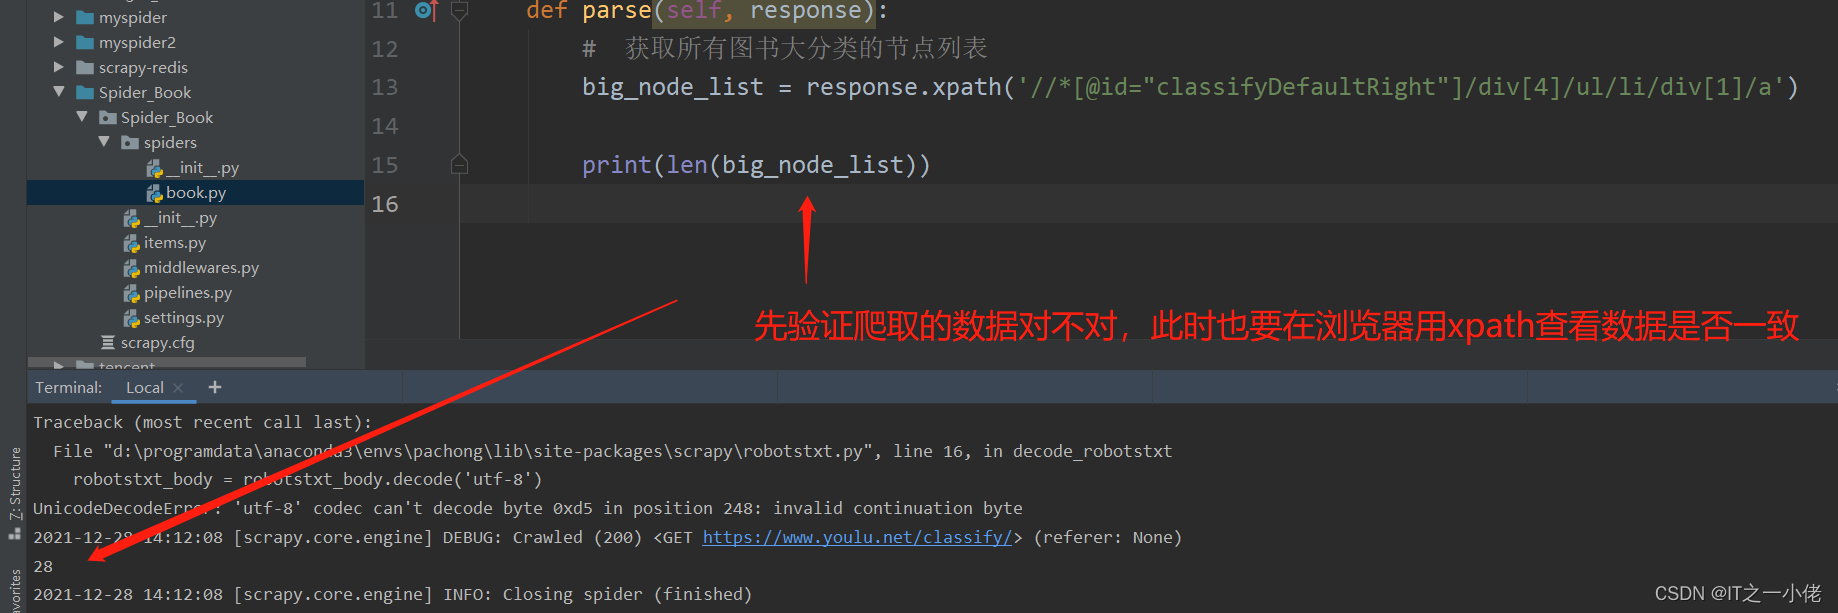
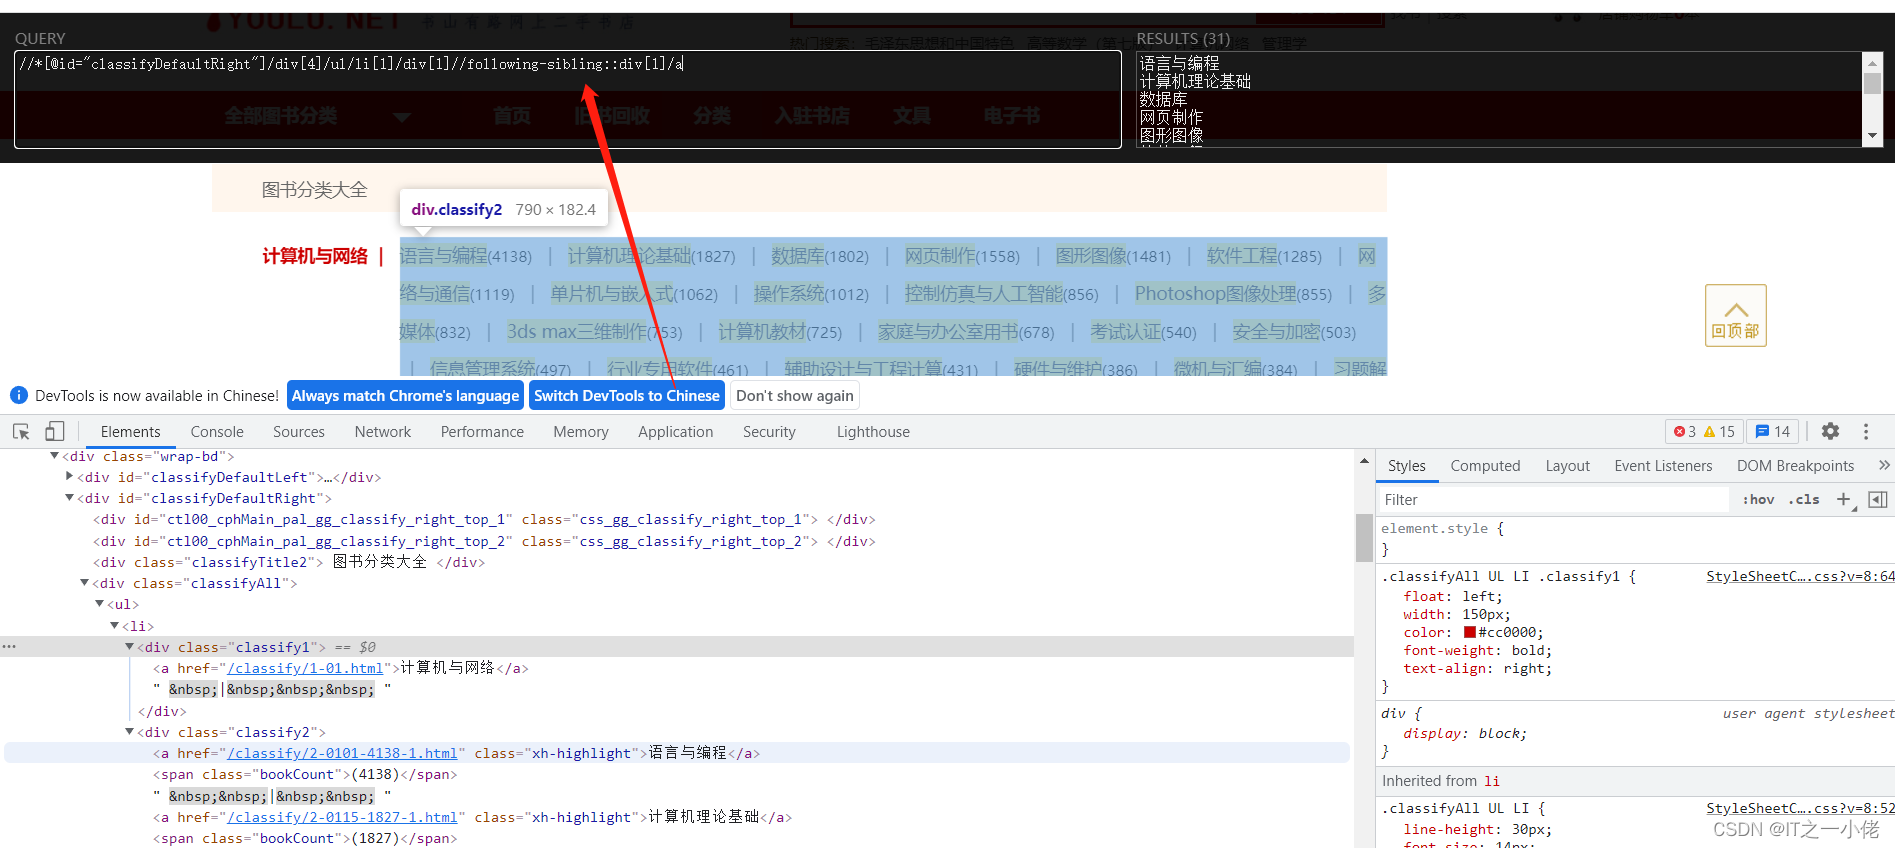
此时一级标题和二级标题是兄弟节点,可以百度查看如何获取到兄弟节点xpath。
有时候网页中的url中也会藏着一些数据,这时需要对url进行解析,如对下面这个url进行解析:http%3A%2F%2Fwww.baidu.com%3Fnums%3Dn_123%2Cn_456%2Cn_789
直接百度url解析网站:如UrlEncode编码/UrlDecode解码 - 站长工具

完整book.py代码:【以下代码实现是一种方式,还可以根据xpath的选取采取别的逻辑进行抓取数据】
import scrapy
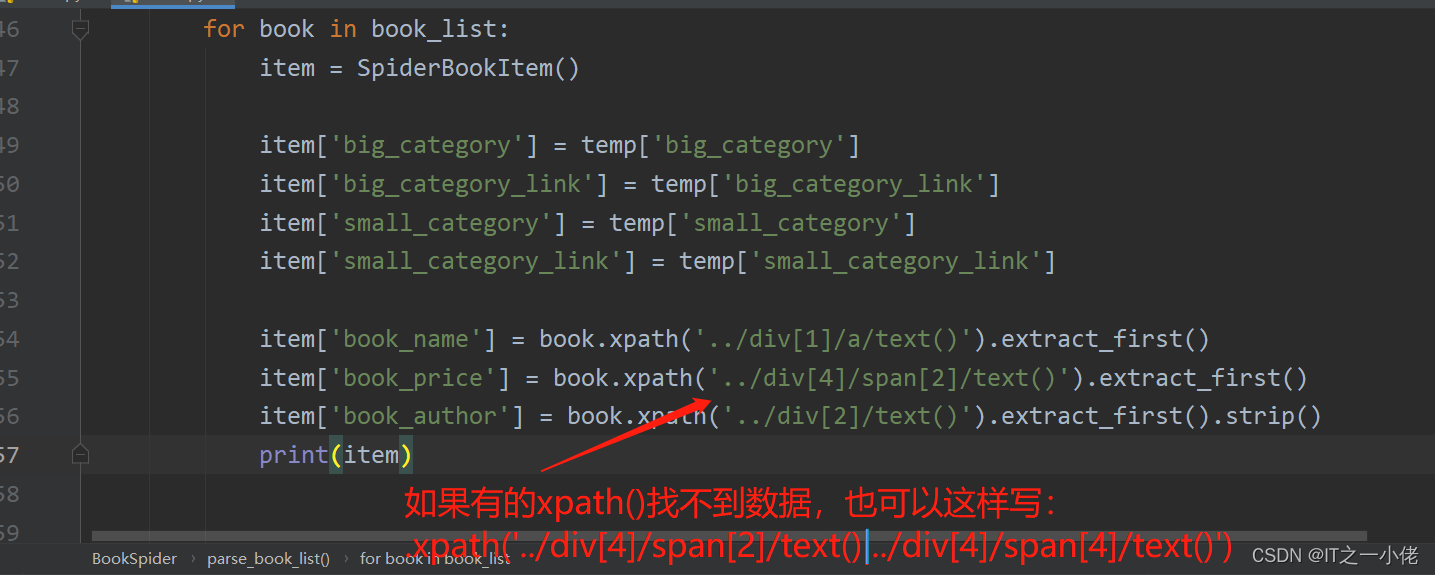
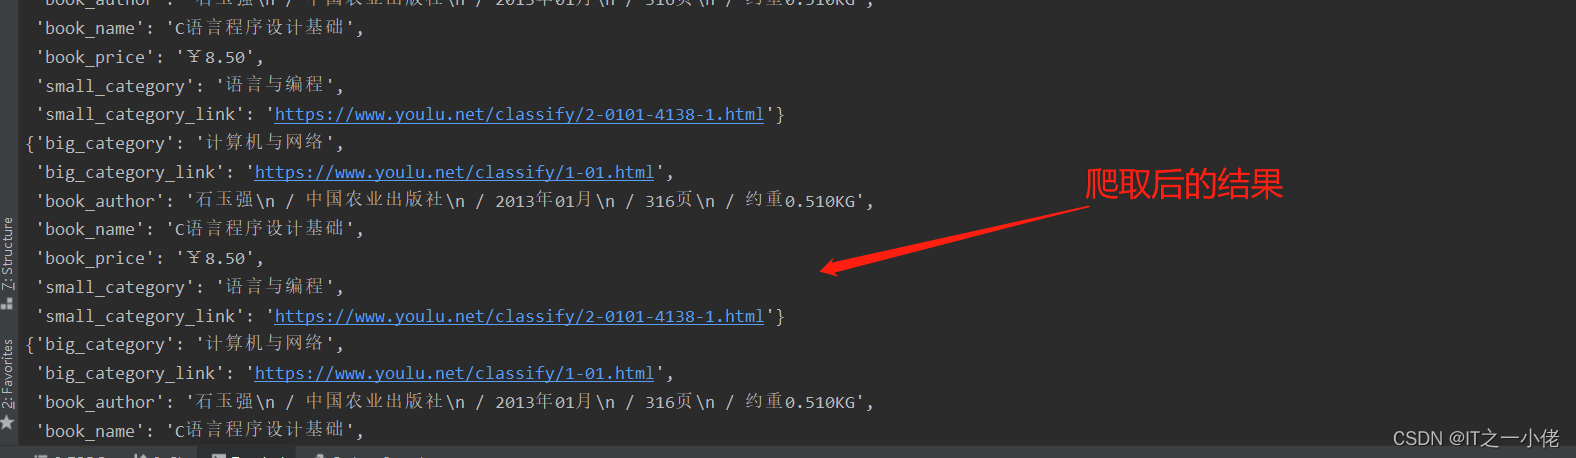
from Spider_Book.items import SpiderBookItemclass BookSpider(scrapy.Spider):name = 'book'# 修改允许的域,如果爬取的网站中途还有别的域名,需要在这儿添加allowed_domains = ['youlu.net']# 修改起始urlstart_urls = ['https://www.youlu.net/classify/']def parse(self, response):# 获取所有图书大分类的节点列表big_node_list = response.xpath('//*[@id="classifyDefaultRight"]/div[4]/ul/li/div[1]/a')# print(len(big_node_list))for big_node in big_node_list[:1]:big_category = big_node.xpath('./text()').extract_first()big_category_link = response.urljoin(big_node.xpath('./@href').extract_first())# print(big_category)# print(big_category_link)# 获取所有图书的小分类节点列表small_node_list = big_node.xpath('..//following-sibling::div[1]/a')# print(len(small_node_list))for small_node in small_node_list[:3]:temp = {}temp['big_category'] = big_categorytemp['big_category_link'] = big_category_linktemp['small_category'] = small_node.xpath('./text()').extract_first()temp['small_category_link'] = response.urljoin(small_node.xpath('./@href').extract_first())print(temp)# 模拟点击小分类链接yield scrapy.Request(url=temp['small_category_link'],callback=self.parse_book_list,meta={"big": temp})def parse_book_list(self, response):temp = response.meta['big']book_list = response.xpath('//*[@id="classifyDefaultRight"]/div[5]/ul/li/div[2]/div')for book in book_list:item = SpiderBookItem()item['big_category'] = temp['big_category']item['big_category_link'] = temp['big_category_link']item['small_category'] = temp['small_category']item['small_category_link'] = temp['small_category_link']item['book_name'] = book.xpath('../div[1]/a/text()').extract_first()item['book_price'] = book.xpath('../div[4]/span[2]/text()').extract_first()item['book_author'] = book.xpath('../div[2]/text()').extract_first().strip()print(item)
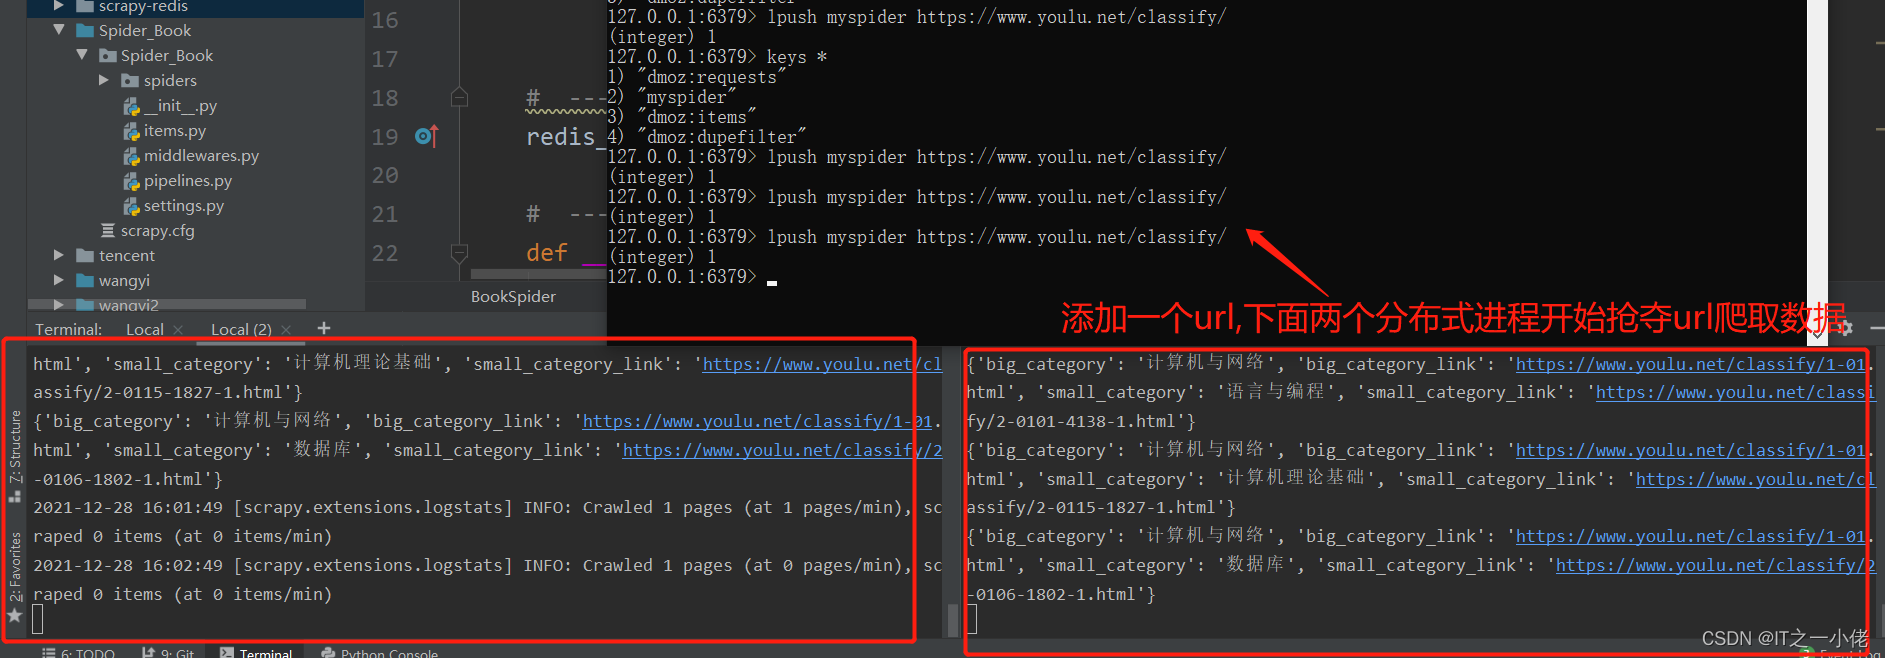
分布式爬虫
流程:
1改造爬虫
- 导入scrapy_redis中的分布式爬虫类
- 继承类
- 注销start_url&allowed_domains
- 设置redis_key获取start_urls
- 设置__init__获取允许的域
2改造配置文件
- copy配置参数
还是以上面的例子为例,修改book.py文件如下:
import scrapy
from Spider_Book.items import SpiderBookItem#  ---1.导入分布式爬虫类
from scrapy_redis.spiders import RedisSpider#  ---2.继承分布式爬虫类
class BookSpider(RedisSpider):name = 'book'# ---3.注销start_url&allow_domains# #  修改允许的域,如果爬取的网站中途还有别的域名,需要在这儿添加# allowed_domains = ['youlu.net']# #  修改起始url# start_urls = ['https://www.youlu.net/classify/']#  ---4.设置redis-keyredis_key = 'myspider'  # 这儿是自己定义的,需要在redis数据库中写数据#  ---5.设置__init__def __init__(self, *args,  **kwargs):domain = kwargs.pop('domain', '')self.allowed_domains = filter(None, domain.split(','))super(BookSpider, self).__init__(*args, **kwargs)def parse(self, response):#  获取所有图书大分类的节点列表big_node_list = response.xpath('//*[@id="classifyDefaultRight"]/div[4]/ul/li/div[1]/a')# print(len(big_node_list))for big_node in big_node_list[:1]:big_category = big_node.xpath('./text()').extract_first()big_category_link = response.urljoin(big_node.xpath('./@href').extract_first())# print(big_category)# print(big_category_link)#  获取所有图书的小分类节点列表small_node_list = big_node.xpath('..//following-sibling::div[1]/a')# print(len(small_node_list))for small_node in small_node_list[:3]:temp = {}temp['big_category'] = big_categorytemp['big_category_link'] = big_category_linktemp['small_category'] = small_node.xpath('./text()').extract_first()temp['small_category_link'] = response.urljoin(small_node.xpath('./@href').extract_first())print(temp)#  模拟点击小分类链接yield scrapy.Request(url=temp['small_category_link'],callback=self.parse_book_list,meta={"big": temp})def parse_book_list(self, response):temp = response.meta['big']book_list = response.xpath('//*[@id="classifyDefaultRight"]/div[5]/ul/li/div[2]/div')for book in book_list:item = SpiderBookItem()item['big_category'] = temp['big_category']item['big_category_link'] = temp['big_category_link']item['small_category'] = temp['small_category']item['small_category_link'] = temp['small_category_link']item['book_name'] = book.xpath('../div[1]/a/text()').extract_first()item['book_price'] = book.xpath('../div[4]/span[2]/text()').extract_first()item['book_author'] = book.xpath('../div[2]/text()').extract_first().strip()print(item)yield item
修改settings.py文件
把当前爬虫中的settings.py中的内容全部删除或者全部注释掉,然后把分布式爬虫中的settings.py文件中的内容全部复制到当前项目中,修改里面的部分内容:
# Scrapy settings for example project
#
# For simplicity, this file contains only the most important settings by
# default. All the other settings are documented here:
#
#     http://doc.scrapy.org/topics/settings.html
#
SPIDER_MODULES = ['Spider_Book.spiders']
NEWSPIDER_MODULE = 'Spider_Book.spiders'USER_AGENT = 'scrapy-redis (+https://github.com/rolando/scrapy-redis)'#  设置重复过滤器的模块
DUPEFILTER_CLASS = "scrapy_redis.dupefilter.RFPDupeFilter"
#  设置调取器, scrapy_redis中的调度器具备与数据库交互的功能
SCHEDULER = "scrapy_redis.scheduler.Scheduler"
#  设置当爬虫结束的时候是否保持redis数据库中的去重集合与任务队列
SCHEDULER_PERSIST = True
#SCHEDULER_QUEUE_CLASS = "scrapy_redis.queue.SpiderPriorityQueue"
#SCHEDULER_QUEUE_CLASS = "scrapy_redis.queue.SpiderQueue"
#SCHEDULER_QUEUE_CLASS = "scrapy_redis.queue.SpiderStack"ITEM_PIPELINES = {'Spider_Book.pipelines.ExamplePipeline': 300,#  当开启该管道,该管道将会把数据库存到redis数据库中'scrapy_redis.pipelines.RedisPipeline': 400,
}
#  设置redis数据库
REDIS_URL = "redis://127.0.0.1:6379"LOG_LEVEL = 'DEBUG'# Introduce an artifical delay to make use of parallelism. to speed up the
# crawl.
DOWNLOAD_DELAY = 1# # Scrapy settings for Spider_Book project
# #
# # For simplicity, this file contains only settings considered important or
# # commonly used. You can find more settings consulting the documentation:
# #
# #     https://docs.scrapy.org/en/latest/topics/settings.html
# #     https://docs.scrapy.org/en/latest/topics/downloader-middleware.html
# #     https://docs.scrapy.org/en/latest/topics/spider-middleware.html
#
# BOT_NAME = 'Spider_Book'
#
# SPIDER_MODULES = ['Spider_Book.spiders']
# NEWSPIDER_MODULE = 'Spider_Book.spiders'
#
#
# # Crawl responsibly by identifying yourself (and your website) on the user-agent
# #USER_AGENT = 'Spider_Book (+http://www.yourdomain.com)'
#
# # Obey robots.txt rules
# ROBOTSTXT_OBEY = True
#
# # Configure maximum concurrent requests performed by Scrapy (default: 16)
# #CONCURRENT_REQUESTS = 32
#
# # Configure a delay for requests for the same website (default: 0)
# # See https://docs.scrapy.org/en/latest/topics/settings.html#download-delay
# # See also autothrottle settings and docs
# #DOWNLOAD_DELAY = 3
# # The download delay setting will honor only one of:
# #CONCURRENT_REQUESTS_PER_DOMAIN = 16
# #CONCURRENT_REQUESTS_PER_IP = 16
#
# # Disable cookies (enabled by default)
# #COOKIES_ENABLED = False
#
# # Disable Telnet Console (enabled by default)
# #TELNETCONSOLE_ENABLED = False
#
# # Override the default request headers:
# #DEFAULT_REQUEST_HEADERS = {
# #   'Accept': 'text/html,application/xhtml+xml,application/xml;q=0.9,*/*;q=0.8',
# #   'Accept-Language': 'en',
# #}
#
# # Enable or disable spider middlewares
# # See https://docs.scrapy.org/en/latest/topics/spider-middleware.html
# #SPIDER_MIDDLEWARES = {
# #    'Spider_Book.middlewares.SpiderBookSpiderMiddleware': 543,
# #}
#
# # Enable or disable downloader middlewares
# # See https://docs.scrapy.org/en/latest/topics/downloader-middleware.html
# #DOWNLOADER_MIDDLEWARES = {
# #    'Spider_Book.middlewares.SpiderBookDownloaderMiddleware': 543,
# #}
#
# # Enable or disable extensions
# # See https://docs.scrapy.org/en/latest/topics/extensions.html
# #EXTENSIONS = {
# #    'scrapy.extensions.telnet.TelnetConsole': None,
# #}
#
# # Configure item pipelines
# # See https://docs.scrapy.org/en/latest/topics/item-pipeline.html
# #ITEM_PIPELINES = {
# #    'Spider_Book.pipelines.SpiderBookPipeline': 300,
# #}
#
# # Enable and configure the AutoThrottle extension (disabled by default)
# # See https://docs.scrapy.org/en/latest/topics/autothrottle.html
# #AUTOTHROTTLE_ENABLED = True
# # The initial download delay
# #AUTOTHROTTLE_START_DELAY = 5
# # The maximum download delay to be set in case of high latencies
# #AUTOTHROTTLE_MAX_DELAY = 60
# # The average number of requests Scrapy should be sending in parallel to
# # each remote server
# #AUTOTHROTTLE_TARGET_CONCURRENCY = 1.0
# # Enable showing throttling stats for every response received:
# #AUTOTHROTTLE_DEBUG = False
#
# # Enable and configure HTTP caching (disabled by default)
# # See https://docs.scrapy.org/en/latest/topics/downloader-middleware.html#httpcache-middleware-settings
# #HTTPCACHE_ENABLED = True
# #HTTPCACHE_EXPIRATION_SECS = 0
# #HTTPCACHE_DIR = 'httpcache'
# #HTTPCACHE_IGNORE_HTTP_CODES = []
# #HTTPCACHE_STORAGE = 'scrapy.extensions.httpcache.FilesystemCacheStorage'
注意:要把替换的所有example替换为项目的名称。
开启多个任务的时候,可以使用相对路径,也可以使用绝对路径,可以使用下面这个命令:
scrapy runspider book.py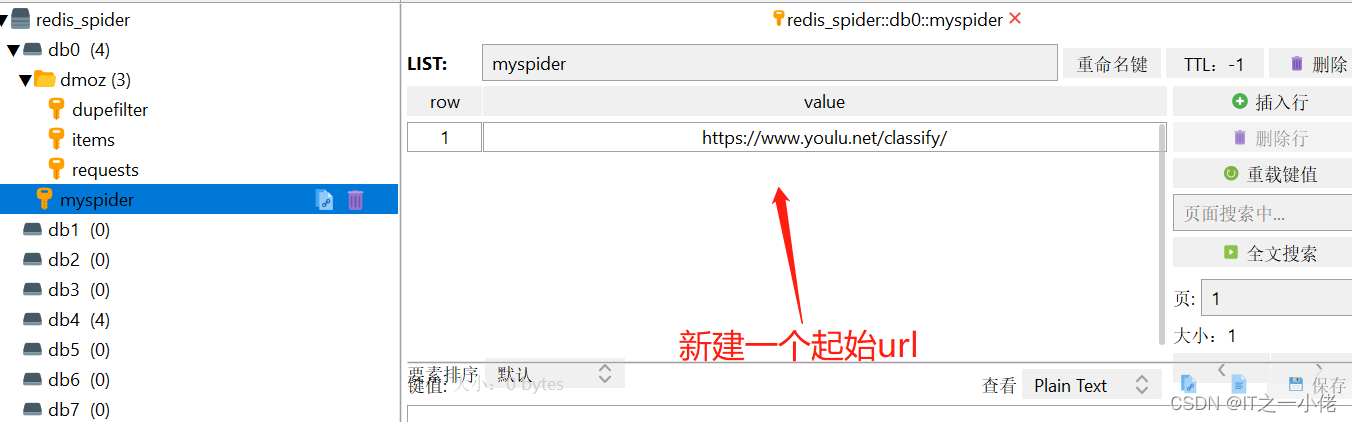
以上就以书山有路网详细实现了普通爬虫和分布式爬虫!
这篇关于Scrapy_redis框架分布式爬虫的实现案例-书山有路网的文章就介绍到这儿,希望我们推荐的文章对编程师们有所帮助!


