本文主要是介绍0基础学习PyFlink——用户自定义函数之UDF,希望对大家解决编程问题提供一定的参考价值,需要的开发者们随着小编来一起学习吧!
大纲
- 标量函数
- 入参并非表中一行(Row)
- 入参是表中一行(Row)
- alias
PyFlink中关于用户定义方法有:
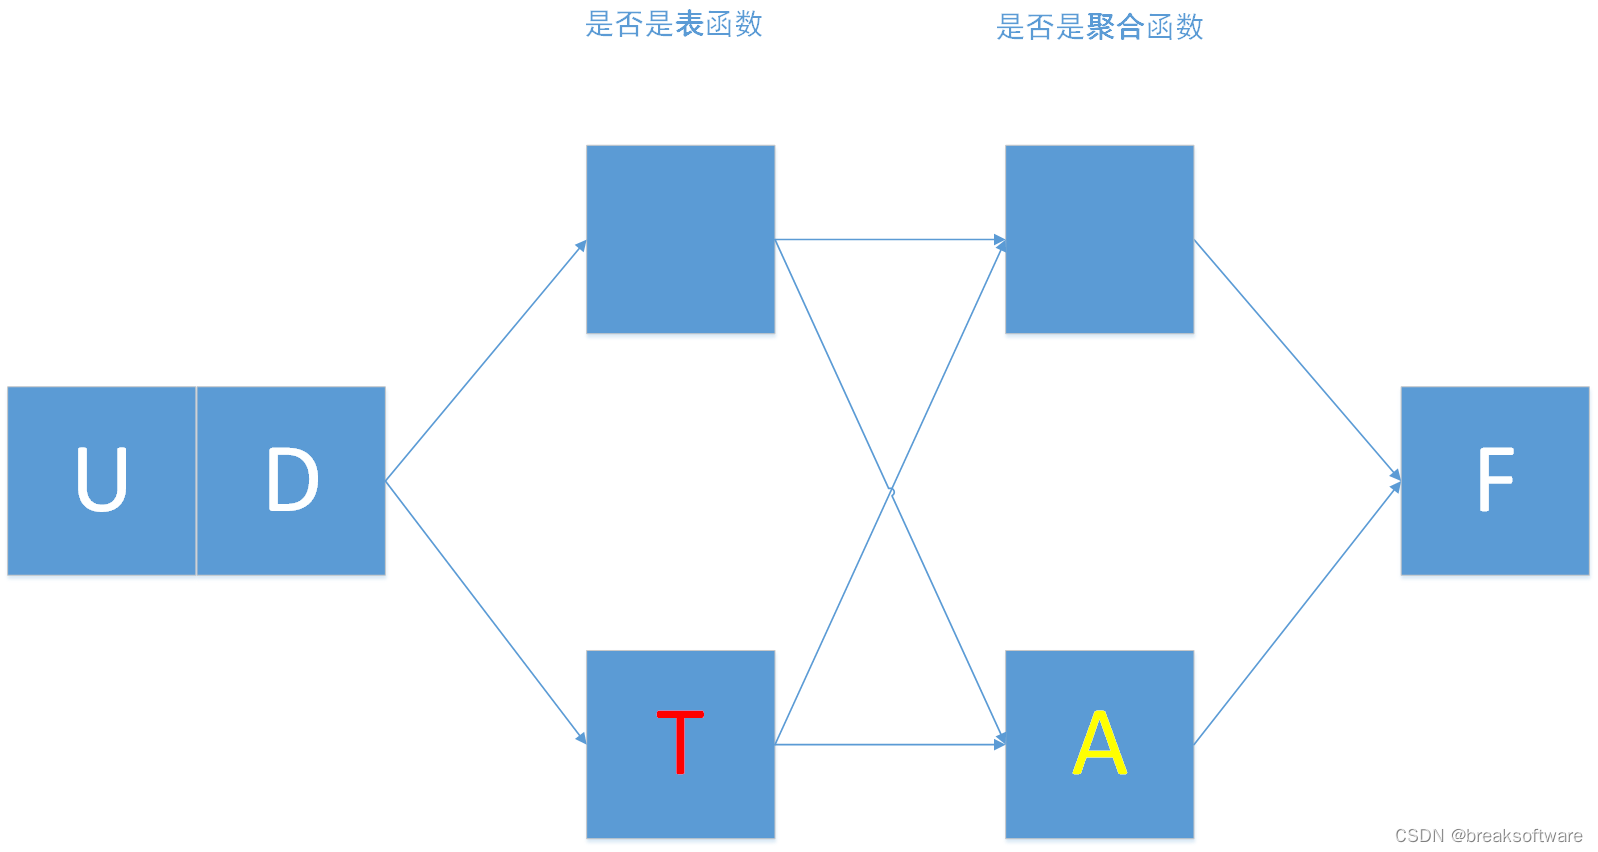
- UDF:用户自定义函数。
- UDTF:用户自定义表值函数。
- UDAF:用户自定义聚合函数。
- UDTAF:用户自定义表值聚合函数。
这些字母可以拆解如下:
- UD表示User Defined(用户自定义);
- F表示Function(方法);
- T表示Table(表);
- A表示Aggregate(聚合);

Aggregate(聚合)函数是指:以多行数据为输入,计算出一个新的值的函数。这块我们会在后续的章节介绍,本文我们主要介绍非聚合类型的用户自定义方法的简单使用。
标量函数
即我们常见的UDF。
def udf(f: Union[Callable, ScalarFunction, Type] = None,input_types: Union[List[DataType], DataType, str, List[str]] = None,result_type: Union[DataType, str] = None,deterministic: bool = None, name: str = None, func_type: str = "general",udf_type: str = None) -> Union[UserDefinedScalarFunctionWrapper, Callable]:
我们主要关注result_type和input_types,它们分别用于确定函数的输入和输出。
input_types可以是List[DataType], DataType, str, List[str]之一任何一种,这个要视使用者决定。UDTF也是这种类型,它们没啥区别。
result_type只能是DataType或str;而UDTF可以是List[DataType], DataType, str, List[str]任意之一。这也是UDF和UDTF最大的区别。
我们以一个例子来介绍它的用法。这个例子会将大写字符转换成小写字符,然后统计字符出现的次数。
在介绍例子之前,我们先构造Execute之前的准备环境
from pyflink.common import Configuration
from pyflink.table import (EnvironmentSettings, TableEnvironment, Schema)
from pyflink.table.types import DataTypes
from pyflink.table.table_descriptor import TableDescriptor
from pyflink.table.expressions import lit, col
from pyflink.common import Row
from pyflink.table.udf import udf,udtf,udaf,udtaf
import pandas as pd
from pyflink.table.udf import UserDefinedFunctionword_count_data = ["A", "B", "C", "D", "E", "F", "G", "H", "I", "J", "A", "G"]  def word_count():config = Configuration()# write all the data to one fileconfig.set_string('parallelism.default', '1')env_settings = EnvironmentSettings \.new_instance() \.in_batch_mode() \.with_configuration(config) \.build()t_env = TableEnvironment.create(env_settings)row_type_tab_source = DataTypes.ROW([DataTypes.FIELD('word', DataTypes.STRING())])tab_source = t_env.from_elements(map(lambda i: Row(i), word_count_data), row_type_tab_source)# define the sink schemasink_schema = Schema.new_builder() \.column("word", DataTypes.STRING().not_null()) \.column("count", DataTypes.BIGINT()) \.primary_key("word") \.build()# Create a sink descriptorsink_descriptor = TableDescriptor.for_connector('print')\.schema(sink_schema) \.build()t_env.create_temporary_table("WordsCountTableSink", sink_descriptor)
这段代码从读取数据word_count_data,并构造出tab_source作为输入数据暂存的表。下面我们看下入参不同时,UDF怎么写
入参并非表中一行(Row)
@udf(result_type=DataTypes.ROW([DataTypes.FIELD("lower_word", DataTypes.STRING())]), input_types=[DataTypes.STRING()])def colFunc(oneCol):return Row(oneCol.lower())
input_types我们设置成[DataTypes.STRING()],即该数组中只有一个参数,也表示修饰的方法只有一个参数,类型是String。如果觉得input_types写起来麻烦,这个参数可以不设置。
result_type我们设置为一个DataTypes.ROW([DataTypes.FIELD(“lower_word”, DataTypes.STRING())])。我们可以把它看成是一个新表的结构描述,即一行只有一个字段——lower_word,它的类型也是String。
tab_lower=tab_source.map(colFunc(col('word')))
map方法中,我们会给UDF修饰的方法传入原始表tab_source每行中的word字段的值。然后构造出一个新的表tab_lower。这个新的表没有word字段,只有UDF中result_type定义的lower_word。
def map(self, func: Union[Expression, UserDefinedScalarFunctionWrapper]) -> 'Table':
后续只要使用这个新表,新字段即可。
tab_lower.group_by(col('lower_word')) \.select(col('lower_word'), lit(1).count) \.execute_insert("WordsCountTableSink") \.wait()
完整代码
from pyflink.common import Configuration
from pyflink.table import (EnvironmentSettings, TableEnvironment, Schema)
from pyflink.table.types import DataTypes
from pyflink.table.table_descriptor import TableDescriptor
from pyflink.table.expressions import lit, col
from pyflink.common import Row
from pyflink.table.udf import udf,udtf,udaf,udtaf
import pandas as pd
from pyflink.table.udf import UserDefinedFunctionword_count_data = ["A", "B", "C", "D", "E", "F", "G", "H", "I", "J", "A", "G"]  def word_count():config = Configuration()# write all the data to one fileconfig.set_string('parallelism.default', '1')env_settings = EnvironmentSettings \.new_instance() \.in_batch_mode() \.with_configuration(config) \.build()t_env = TableEnvironment.create(env_settings)row_type_tab_source = DataTypes.ROW([DataTypes.FIELD('word', DataTypes.STRING())])tab_source = t_env.from_elements(map(lambda i: Row(i), word_count_data), row_type_tab_source )# define the sink schemasink_schema = Schema.new_builder() \.column("word", DataTypes.STRING().not_null()) \.column("count", DataTypes.BIGINT()) \.primary_key("word") \.build()# Create a sink descriptorsink_descriptor = TableDescriptor.for_connector('print')\.schema(sink_schema) \.build()t_env.create_temporary_table("WordsCountTableSink", sink_descriptor)@udf(result_type=DataTypes.ROW([DataTypes.FIELD("lower_word", DataTypes.STRING())]), input_types=[DataTypes.STRING()])def colFunc(oneCol):return Row(oneCol.lower())tab_lower=tab_source.map(colFunc(col('word')))   tab_lower.group_by(col('lower_word')) \.select(col('lower_word'), lit(1).count) \.execute_insert("WordsCountTableSink") \.wait()if __name__ == '__main__':word_count()
入参是表中一行(Row)
@udf(result_type=DataTypes.ROW([DataTypes.FIELD("lower_word", DataTypes.STRING())]), input_types=row_type_tab_source)def rowFunc(row):return Row(row[0].lower())tab_lower=tab_source.map(rowFunc) tab_lower.group_by(col('lower_word')) \.select(col('lower_word'), lit(1).count) \.execute_insert("WordsCountTableSink") \.wait()
主要的区别是map方法直接传递udf修饰的方法,而不是直接其调用返回值。input_types是原始表的行结构——RowType,而不是一个参数数组。
map方法给rowFunc传递原始表tab_source的每行数据,然后构造出一个新表tab_lower。新表的字段也在udf的result_type中定义了,它是String类型的lower_word。后面我们对新表就要聚合统计这个新的字段,而不是老表中的字段。
alias
前面两个案例,在定义UDF时,我们严格设置了result_type和input_types。实际input_types可以不用设置,但是result_type必须设置。上面例子中,result_type我们都设置为RowType,即表行的结构。如果觉得这样写很麻烦,可以考虑使用alias来实现。
@udf(result_type=DataTypes.STRING())def colFunc(oneCol):return oneCol.lower()tab_lower=tab_source.map(colFunc(col('word'))).alias('lower_word')tab_lower.group_by(col('lower_word')) \.select(col('lower_word'), lit(1).count) \.execute_insert("WordsCountTableSink") \.wait()
@udf(result_type=DataTypes.STRING())def rowFunc(row):return row[0].lower()tab_lower=tab_source.map(rowFunc).alias('lower_word')tab_lower.group_by(col('lower_word')) \.select(col('lower_word'), lit(1).count) \.execute_insert("WordsCountTableSink") \.wait()
这样我们在定义udf时,只是指定了返回类型是个字符串,也不知道它在新表中叫啥名字(实际叫f0)。但是为了便于后续使用,我们使用alias给它取了一个别名lower_word。这样就可以让其参与后续的计算了。
这篇关于0基础学习PyFlink——用户自定义函数之UDF的文章就介绍到这儿,希望我们推荐的文章对编程师们有所帮助!


