本文主要是介绍HTML5中canvas实现拼图游戏,vue+canvas实现拼图小游戏,希望对大家解决编程问题提供一定的参考价值,需要的开发者们随着小编来一起学习吧!
利用 vue+canvas 实现拼图小游戏,供大家参考,具体内容如下
思路步骤
一个拼图拼盘和一个原图参照
对原图的切割以及随机排序
通过W/A/D/S或上下左右进行移动
难度的自主选择
对拼图是否完成的判定
JS实现部分
数据分析
row:拼图的总行数;column:拼图的总列数。(用来设置拼图难度,也是每个拼图块宽高的设置规则)
pic[{x,y,row,column,index}]:小拼图的集合,其内元素为小拼图的数据结构。(x、y:拼图块在canvas的绘制规则,初始化后不会进行改变;row、column:对原图进行切割并绘制的规则;index:用来判定是否完成拼图的规则之一,绘制空白块的规则,其中空白块的index=-1)
num:随机排列的次数。
sign:空白块在拼图集合pic中的索引。 (数字类型,用来定位空白块,跟随空白块的移动而变化,是进行移动的规则之一;默认为:15)
isWin:用来判断是否完成拼图的条件。(布尔类型,默认为false)
step:表示移动的有效步数。(数字类型,默认为0,重新游戏及完成游戏会清零)
maskShow: 编辑游戏 的判定条件。(布尔类型,用来显示与隐藏编辑游戏的对话框,默认为false)
方法分析
拼图集合 pic的初始化及随机排列
randomHandler() {
// pic的初始化
for(let i=0;i
// 设置切割后每个小图片的位置
let row = parseInt(i/this.row);
let column = i - row*this.column;
// 对在canvas的排列进行初始化,后续不会进行改变
let x = parseInt(i/this.row);
let y = i - x*this.column;
this.pic[i] = {...this.pic[i],x:x,y:y,row:row,column:column,index:i};
// 设置最后一个元素为空白块,index = -1
if(i == (this.row*this.column-1)) {
this.pic[i] = {...this.pic[i],row:row,column:column,index:-1};
}
}
// 随机排列 pic集合
for(let i=0;i
let ran1,ran2,temp={};
// 随机获取0-14
ran1 = parseInt((this.row*this.column-1)*Math.random())
ran2 = parseInt((this.row*this.column-1)*Math.random())
temp.row = this.pic[ran1].row
temp.column = this.pic[ran1].column
this.pic[ran1] = {...this.pic[ran1],row:this.pic[ran2].row,column:this.pic[ran2].column}
this.pic[ran2] = {...this.pic[ran2],...temp}
}
}
拼图的绘制(根据得到的随机 pic 集合进行绘制)
drawHandler() {
// 获取 canvas DOM元素
let canvas = this.$refs.can;
let ctx = canvas.getContext('2d');
canvas.width = 400;
canvas.height = 400;
ctx.clearRect(0,0,400,400);
// 每个小拼图的宽高,根据canvas的宽高和拼图行数row列数column来动态设置
// 是进行难度动态设置的唯一方式
let width = canvas.width/this.column;
let height = canvas.width/this.row;
// 必须通过 Image 构造函数动态创建,若是通过获取 DOM 节点,则onload只执行一次,无法进行移动
let img = new Image();
img.src = require('../../public/image/test.png');
img.onload = () => {
for(let i=0;i
// 绘制到canvas的各元素的起始坐标
let dx = this.pic[i].y * width;
let dy = this.pic[i].x * height;
// 对图片进行切割的起始点坐标
let cx = this.pic[i].column * width;
let cy = this.pic[i].row * height;
// 参数:img图片,切割的起始点坐标,切割的宽高,绘制的起始点坐标,绘制的宽高
ctx.drawImage(img,cx,cy,width,height,dx,dy,width,height);
if(this.pic[i].index == -1) {
this.sign = i;
ctx.clearRect(dx,dy,width,height);
}
}
}
}
其中 img 必须通过 Image 构造函数动态创建
拼图的移动
// 在 mounted 钩子进行键盘的监听事件
mounted() {
this.newGame();
document.onkeydown = (event) => {
let key = event.keyCode;
if(key==38 || key==87) this.moveHandler('up');
else if (key==40 || key==83 ) this.moveHandler('down');
else if (key==37 || key==65 ) this.moveHandler('left');
else if (key==39 || key==68 ) this.moveHandler('right');
}
}
methods: {
moveHandler(dir) {
// re:空白块根据方向最终需移动到的位置索引
let re,temp = {};
if(dir == 'up' && this.pic[this.sign].x>0) {
// 根据空白块的row和column推算出上面一块图片的序号
// 在将两个图片快进行互换位置,及交换row、column、index
// 重新赋值this.sign(标志着空白块的序号:默认15)
re = (this.pic[this.sign].x-1) * this.row + this.pic[this.sign].y;
temp.row = this.pic[re].row;
temp.column = this.pic[re].column;
temp.index = this.pic[re].index;
this.pic[re] = {...this.pic[re],row:this.pic[this.sign].row,column:this.pic[this.sign].column,index:this.pic[this.sign].index};
this.pic[this.sign] = {...this.pic[this.sign],...temp};
this.step = this.step + 1;
}
else if(dir == 'down' && this.pic[this.sign].x
re = (this.pic[this.sign].x+1) * this.row + this.pic[this.sign].y;
temp.row = this.pic[re].row;
temp.column = this.pic[re].column;
temp.index = this.pic[re].index;
this.pic[re] = {...this.pic[re],row:this.pic[this.sign].row,column:this.pic[this.sign].column,index:this.pic[this.sign].index};
this.pic[this.sign] = {...this.pic[this.sign],...temp};
this.step = this.step + 1;
}
else if(dir == 'left' && this.pic[this.sign].y>0) {
re = (this.pic[this.sign].x) * this.row + this.pic[this.sign].y-1;
temp.row = this.pic[re].row;
temp.column = this.pic[re].column;
temp.index = this.pic[re].index;
this.pic[re] = {...this.pic[re],row:this.pic[this.sign].row,column:this.pic[this.sign].column,index:this.pic[this.sign].index};
this.pic[this.sign] = {...this.pic[this.sign],...temp};
this.step = this.step + 1;
}
else if(dir == 'right' && this.pic[this.sign].y
re = (this.pic[this.sign].x) * this.row + this.pic[this.sign].y+1;
temp.row = this.pic[re].row;
temp.column = this.pic[re].column;
temp.index = this.pic[re].index;
this.pic[re] = {...this.pic[re],row:this.pic[this.sign].row,column:this.pic[this.sign].column,index:this.pic[this.sign].index};
this.pic[this.sign] = {...this.pic[this.sign],...temp};
this.step = this.step + 1;
}
// 重新绘制拼图,也可以通过计算只重新绘制移动的部分区域
this.drawHandler();
}
}
完成拼图的判定
isWinHandler() {
// 通过比较所有元素的x、y和row、column是否相等即可,也可以通过index来判断
for(let i=0;i
if(this.pic[i].x == this.pic[i].row && this.pic[i].y == this.pic[i].column) {
// 显示成功的状态以及清空步数
this.isWin = true;
this.step = 0;
}
}
}
重新游戏
newGame() {
// 在 mounted 钩子进行
// 隐藏完成状态,清空步数,获取随机排列,绘制拼图模块
this.isWin = false;
this.step = 0;
this.randomHandler();
this.drawHandler();
}
JS总合
export default {
data() {
return {
// row:拼图的总行数,column:拼图的总列数
row:2,
column:2,
// 随机打乱的次数
num:100,
// pic:拼图的所有子集和;
// 元素:index:子图片的位置编号
// row/column:对原图分割后的横纵编号
// x/y:在canvas中的坐标位置(不会改变)
pic:[{x:0,y:0,row:0,column:0,index:0}],
sign:15,
isWin: false,
step:0,
maskShow:false
}
},
mounted() { 代码在拼图移动模块中 },
methods: {
// 判断是否完成拼图
isWinHandler() { ... },
// 移动的函数方法
moveHandler(dir) { ... },
// 绘制拼图
drawHandler() { ... },
// 获取随机排序
randomHandler() { ... },
newGame() { ... }
}
HTML部分
重新游戏
编辑游戏
检验
{{step}}
行:
列:
完成

CSS部分
/* 编辑的弹出框 */
.mask {
width: 200px;
height: 200px;
background-color: rosybrown;
position: absolute;
left: 510px;
top: 0;
}
/* 按钮样式 */
.btns > span {
display: inline-block;
width: 80px;
font-size: 12px;
height: 24px;
text-align: center;
line-height: 24px;
margin-bottom: 5px;
background-color: thistle;
cursor: pointer;
}
/* 右侧按钮区 */
.btns {
width: 80px;
height: 400px;
border: 1px solid tan;
border-radius: 5px;
background-origin: border-box;
padding: 5px;
position: absolute;
left: 412px;
top: 0;
}
/* 完成拼图的状态 */
.win {
width: 402px;
height: 402px;
line-height: 402px;
text-align: center;
font: 24px;
opacity: 0.5;
background-color: paleturquoise;
position: absolute;
top: 0;
left: 0;
}
.img {
display: inline-block;
}
/* canvas */
.can {
border: 1px solid teal;
}
/* canvas容器 */
.contain {
position: relative;
}
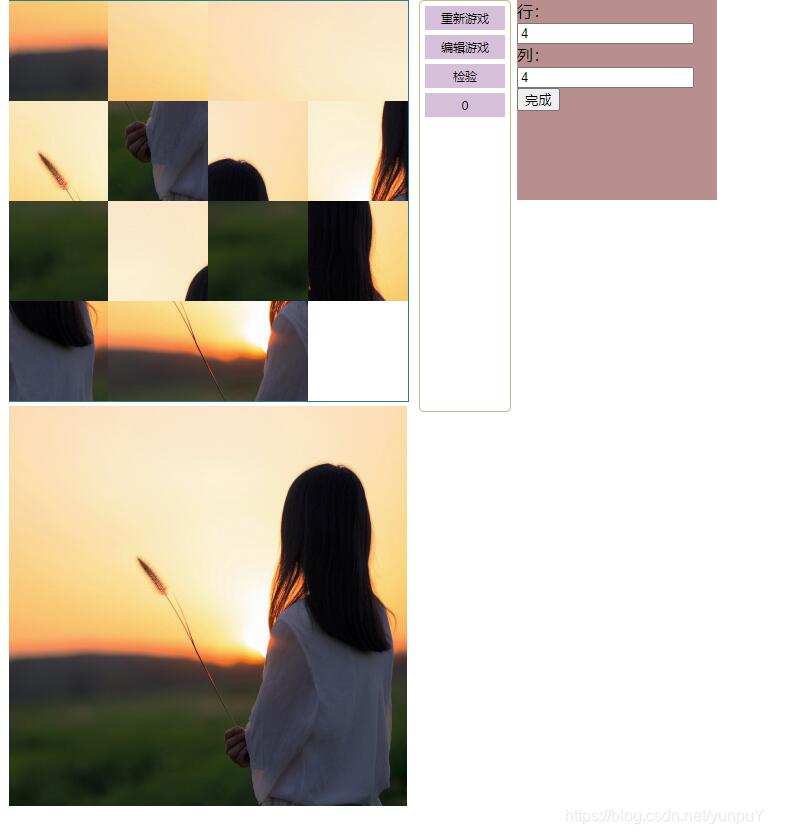
最终的完成结果图
代码地址:拼图游戏
以上就是本文的全部内容,希望对大家的学习有所帮助,也希望大家多多支持脚本之家。
这篇关于HTML5中canvas实现拼图游戏,vue+canvas实现拼图小游戏的文章就介绍到这儿,希望我们推荐的文章对编程师们有所帮助!


