本文主要是介绍玩转 gpgpu-sim 03记 —— 建立源代码感性体验,希望对大家解决编程问题提供一定的参考价值,需要的开发者们随着小编来一起学习吧!

官方文档:
GPGPU-Sim 3.x Manual
这篇的基本原则是程序跑到哪里,我们代码就看到哪里,不需要看太远,培养一个感性体验;
1. 编译一个 debug 可跟踪版本的 gpgpu-sim
跟踪 顶层 Makefile 和 setup_environment 的代码可以看出来,如果跟上一个参数 “debug” 来运行 source setup_environment debug,那么就会编译一个debug版本的 gpgpu-sim;
创建一个新的容器,并构建 debug 版本的 gpgpu-sim:
export   NEW_DIR=gpgpu-sim_debug_002     \
&&  export WORK_SPACE=/home/hipper/workspace/bitbucket   \
&&  mkdir -p   ${WORK_SPACE}/${NEW_DIR}    \
&&  cd ${WORK_SPACE}/${NEW_DIR}      \
&&  git clone --recursive https://github.com/gpgpu-sim/gpgpu-sim_distribution.git      \
&&  cd ${WORK_SPACE}/${NEW_DIR}/gpgpu-sim_distribution/      \
&&  git   checkout    24f29469c042761d8b8d185c374493fbde79aca4   -b   version_3.2.2      \
&&  sudo docker run --name  ${NEW_DIR}_Jim -it                                            \
-v  ${WORK_SPACE}/${NEW_DIR}:${WORK_SPACE}/${NEW_DIR}                                           \
-v  ${WORK_SPACE}/${NEW_DIR}/gpgpu-sim_distribution:/root/gpgpu-sim_distribution       \
-v /dev:/dev -v /usr/src/:/usr/src -v /lib/modules/:/lib/modules --privileged --cap-add=ALL    \
socalucr/gpgpu-sim:latest    /bin/bash
在容器内部,设置为 debug 编译模式
# cd /root/gpgpu-sim_distribution/
# source setup_environment debug
具体会话内容如下,可以查看 环境变量 GPGPUSIM_CONFIG 的值来确认:
root@9fdeefe458ff:~/gpgpu-sim_distribution# source setup_environment debug
GPGPU-Sim version 3.2.2 (build ) configured with GPUWattch.
setup_environment succeeded
root@9fdeefe458ff:~/gpgpu-sim_distribution# echo GPGPUSIM_CONFIG
GPGPUSIM_CONFIG
root@9fdeefe458ff:~/gpgpu-sim_distribution# echo $GPGPUSIM_CONFIG
gcc-4.4.7/cuda-4000/debug
root@9fdeefe458ff:~/gpgpu-sim_distribution#
进行编译:
# make -j2. 编译一个 debug 可跟踪版本的 vectorAdd
打开文件 /root/NVIDIA_GPU_Computing_SDK/C/common/common.mk
# vim /root/NVIDIA_GPU_Computing_SDK/C/common/common.mk添加 -g 编译选项,将对应行的内容改为如下:
57 # Compilers58 NVCC := $(CUDA_INSTALL_PATH)/bin/nvcc -g59 CXX := g++ -fPIC -g60 CC := gcc -fPIC -g61 LINK := g++ -fPIC -g 回到 vectorAdd项目文件夹,编译项目:
# cd /root/NVIDIA_GPU_Computing_SDK/C/src/vectorAdd可调式版的vectorAdd 存在于此处,即,依然保存于 release文件夹中:
/root/NVIDIA_GPU_Computing_SDK/C/bin/linux/release/vectorAdd
3. 简单跟踪 cudaMalloc 的实现
3.1 创建 运行测试配置环境
# mkdir /root/test_debug_vectorAdd_01
# cd /root/test_debug_vectorAdd_01
# cp ../gpgpu-sim_distribution/configs/GTX480/* ./
3.2 先运行试试,看结果检测是否PASS;
# /roo/NVIDIA_GPU_Computing_SDK/C/bin/linux/release/vectorAdd
最后输出为:
[vectorAdd] test results...
PASSEDPress ENTER to exit...
3.3 使用 cuda-gdb 进行调试跟踪
~/test_debug_vectorAdd_01# cuda-gdb ../NVIDIA_GPU_Computing_SDK/C/bin/linux/release/vectorAdd3.4 设置 vectorAdd.cu 文件中的断点并运行
vectorAdd.cu 的源代码中,第70行出现第一个 cudaMalloc 函数,设置断点
(cuda-gdb) b 70开始运行,直到遇到一个断点时暂停:
(cuda-gdb) start
(cuda-gdb) c
会停留在 70 行,敲入step命令:
(cuda-gdb) s根据输出信息知道,这里的cudaMalloc是在文件 at cuda_runtime_api.cc:424 行中定义的,
具体代码内容如下:
(cuda-gdb) s
cudaMalloc (devPtr=0x605150, size=200000) at cuda_runtime_api.cc:424
424             CUctx_st* context = GPGPUSim_Context();
(cuda-gdb) l
419      *                                                                              *
420      *******************************************************************************/
421
422     __host__ cudaError_t CUDARTAPI cudaMalloc(void **devPtr, size_t size)
423     {
424             CUctx_st* context = GPGPUSim_Context();
425             *devPtr = context->get_device()->get_gpgpu()->gpu_malloc(size);
426             if(g_debug_execution >= 3)
427                     printf("GPGPU-Sim PTX: cudaMallocing %zu bytes starting at 0x%llx..\n",size, (unsigned long long) *devPtr);
428             if ( *devPtr  ) {
(cuda-gdb)
4. 跟踪动态库 libcudart.so.4 的方法
使用cuda-gdb 工具调试 vectorAdd, 并由此跟踪调试 libcudart.so.4 及 gpgpu-sim 中的代码;
主要注意事项,需要通过run一遍程序的方法来load进 libcudart.so库,当然也可以使用命令选项来实现载入;
步骤:
4.1, 先使用cuda-gdb 来启动程序
### 记得 source setup_environment debug
# cd /root/test_debug_vectorAdd_01/
# cp 配置文件进来
test_debug_vectorAdd_01# cuda-gdb /root/NVIDIA_GPU_Computing_SDK/C/bin/linux/release/vectorAdd
4.2,run 一遍程序
使用 gdb 的 run 命令跑一遍程序,这是将依赖库 libcudart.so.4 加载进当前环境的简单方法;
(cuda-gdb) run4.3,start 程序 并设置libcudart.so.4 中感兴趣函数处的断点
使用 start 命令,将程序运行到 main函数处,这时可以设置断点:
比如,对文件cuda_runtime_api.cc 中的函数 __cudaRegisterFatBinary处设置断点
(cuda-gdb) b cuda_runtime_api.cc:1611
或者:
(cuda-gdb) b cuda_runtime_api.cc:__cudaRegisterFatBinary
(cuda-gdb) b cuda_runtime_api.cc:cudaMalloc
4.4,continue 程序运行至结束后重新start
执行 gdb 的 continue 命令跑完整个程序,这时全部断点可以设置好了,并重新 start程序;
这是会在第一次遇到某个断点时挂起:

4. 证明 cuda 程序先运行__cudaRegisterFatBinary(...) 再运行 main() 函数
在一个nvgpu的cuda平台(2080ti + cuda12.1)
4.1 加入验证代码printf
在文件 /usr/local/cuda/targets/x86_64-linux/include/crt/host_runtime.h 中的一个宏函数
#define __cudaRegisterBinary(X)
的定义中,加入打印代码:

并且在 vectorAdd.cu的main函数的第一行也加入类似 printf 代码;
4.2 创建项目
将vectorAdd.cu 拷贝到一个单独的文件夹中,并写一个如下的Makefile:
Makefile
#(base) hipper@hipper-G21:~/ex/ex_ptx_vector$ cat Makefile
vectorAdd: vectorAdd.cu/usr/local/cuda/bin/nvcc $< -o $@ -I ../cuda-samples/Common/ -g  --keep.PHONY:clean
clean:rm -f *.cpp1.ii     *.cpp4.ii        *.cudafe1.c     *.cudafe1.cpprm -f *.cudafe1.gpu *.cudafe1.stub.c *.fatbinrm -f *.fatbin.c    *.reg.c          *.sm_52.cubinrm -f *.module_id   *.o              *.ptx vectorAdd
4.3 编译运行
编译项目:make
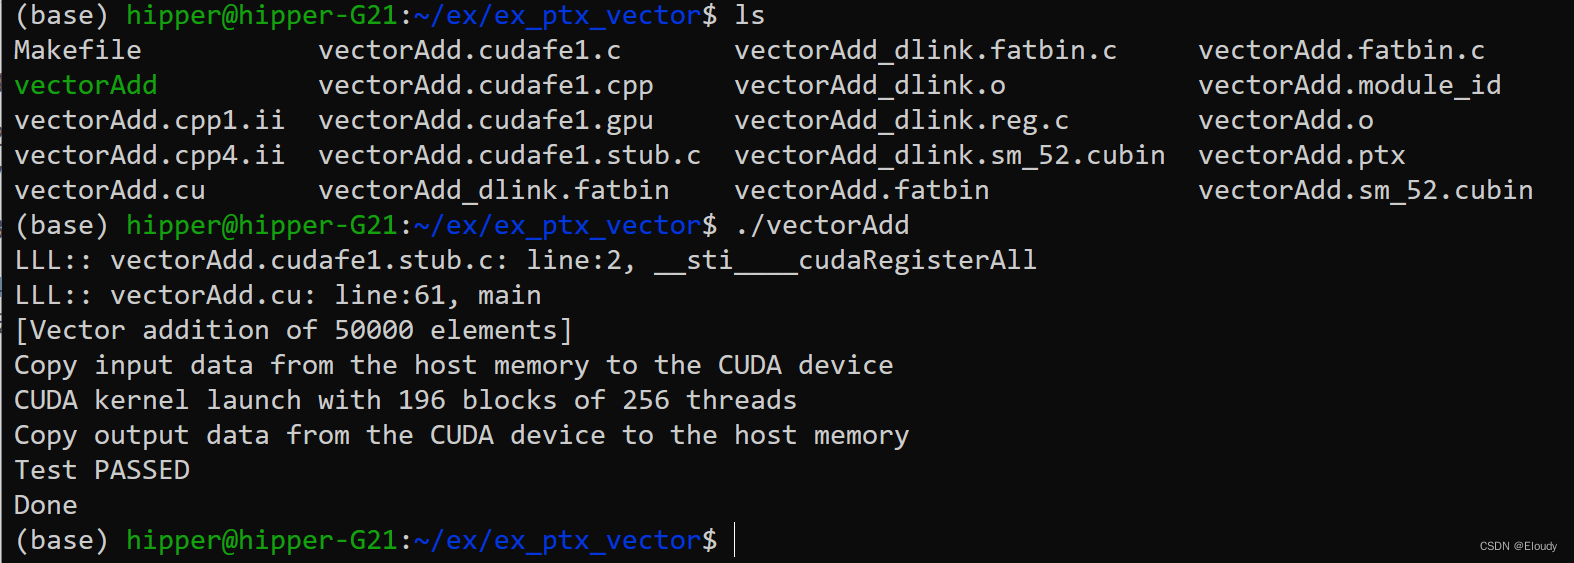
运行项目: ./vectorAdd
运行效果:

4.4 分析
根据运行结果可以发现,main函数是在 __sti____cudaRegisterAll()函数之后运行的,
其中 __sti____cudaRegisterAll()调用了
/usr/local/cuda/targets/x86_64-linux/include/crt/host_runtime.h 中定义的宏函数
#define __cudaRegisterBinary(X)
而, __cudaRegisterBinary(X) 又调用了 __cudaRegisterFatBinary( void *fatCubin )
总之是先调用了 __cudaRegisterFatBinary 后调用了 main函数;
可以在宏函数定义中的更多地方加入 printf 来印证这一点;
5. 分析一下 cudaMalloc 函数
通过跟踪发现,gpgpu-sim 的 cudaMalloc 函数定义于文件
/root/gpgpu-sim_distribution/libcuda/cuda_runtime_api.cc
422行
这个函数的原型为:
__host__ cudaError_t CUDARTAPI cudaMalloc(void **devPtr, size_t size)
作用:是分配一块 size bytes大小的显存,并将显存的起始地址存储在 devPtr 中; __host__ 表示本实现仅在 Host 侧调用; CUDARTAPI 在linux平台为空,相当于什么都没写;
cudaError_t 返回值,如果分配失败,将返回非零错误码;
源代码:
这里略加注释,细节待进一步展开
__host__ cudaError_t CUDARTAPI cudaMalloc(void **devPtr, size_t size)
{CUctx_st* context = GPGPUSim_Context();    // 获取 GPGPUSim 上下文信息;*devPtr = context->get_device()->get_gpgpu()->gpu_malloc(size);// 获得 gpu 设备,并在其中分配一块显存;细节待探讨if(g_debug_execution >= 3)printf("GPGPU-Sim PTX: cudaMallocing %zu bytes starting at 0x%llx..\n",size, (unsigned long long) *devPtr);if ( *devPtr  ) {// 如果 *devPtr 不为空,则表示分配成功;return g_last_cudaError = cudaSuccess;// 返回操作成功} else {return g_last_cudaError = cudaErrorMemoryAllocation;// 返回显存分配失败}
}
CUctx_st* context = GPGPUSim_Context(); 所关联到的信息:
cudaMalloc 先调用 GPGPUSim_Context(); 获得一个 gpgpu-sim 的上下文类 CUctx_st 的对象,对象地址存储在 CUctx_st* context 之中;如果写过 gpu 的某类 driver,那么很容易想象 CUctx 中应该指明自己所选择托管的具体 gpu 设备等信息;
这也可以从这个指针链中看出来 context 中持有一个 gpu device:
*devPtr = context->get_device()->get_gpgpu()->gpu_malloc(size);
struct CUctx_st 的定义如下:
struct CUctx_st {CUctx_st( _cuda_device_id *gpu ) { m_gpu = gpu; }_cuda_device_id *get_device() { return m_gpu; }void add_binary( symbol_table *symtab, unsigned fat_cubin_handle ){m_code[fat_cubin_handle] = symtab;m_last_fat_cubin_handle = fat_cubin_handle;}void add_ptxinfo( const char *deviceFun, const struct gpgpu_ptx_sim_kernel_info &info ){symbol *s = m_code[m_last_fat_cubin_handle]->lookup(deviceFun);assert( s != NULL );function_info *f = s->get_pc();assert( f != NULL );f->set_kernel_info(info);}void register_function( unsigned fat_cubin_handle, const char *hostFun, const char *deviceFun ){if( m_code.find(fat_cubin_handle) != m_code.end() ) {symbol *s = m_code[fat_cubin_handle]->lookup(deviceFun);assert( s != NULL );function_info *f = s->get_pc();assert( f != NULL );m_kernel_lookup[hostFun] = f;} else {m_kernel_lookup[hostFun] = NULL;}}function_info *get_kernel(const char *hostFun){std::map<const void*,function_info*>::iterator i=m_kernel_lookup.find(hostFun);assert( i != m_kernel_lookup.end() );return i->second;}private:_cuda_device_id *m_gpu; // selected gpustd::map<unsigned,symbol_table*> m_code; // fat binary handle => global symbol tableunsigned m_last_fat_cubin_handle;std::map<const void*,function_info*> m_kernel_lookup; // unique id (CUDA app function address) => kernel entry point
};
这个结构体非常重要,所以罗列出来,但是cuda APP 启动后,会先调用如下函数:
void** CUDARTAPI __cudaRegisterFatBinary( void *fatCubin )
如前所述,在main函数调用之前已经调用过一次__cudaRegisterFatBinary(...),所以这里是第二次调用;
__cudaRegisterFatBinary()的实现,是nv SDK实现的一部分,在gpgpu-sim中也做了替换性的实现;
这篇关于玩转 gpgpu-sim 03记 —— 建立源代码感性体验的文章就介绍到这儿,希望我们推荐的文章对编程师们有所帮助!


