本文主要是介绍粒子滤波PF在于机器人定位的应用(python实践),希望对大家解决编程问题提供一定的参考价值,需要的开发者们随着小编来一起学习吧!
文章目录
- 引言:
- 粒子滤波主要的四个步骤:
- 初始化步骤
- 预测步
- 更新步
- 重采样
- 粒子滤波器VS卡尔曼滤波器
- 粒子滤波的缺点
- 概括
- 实践:
引言:
粒子滤波是带有离散编号的粒子。每个粒子都是一个向量,其中包含 x 坐标、y 坐标和方向。粒子的生存取决于它们与传感器测量值的一致性。一致性是基于实际测量与预测测量之间的不匹配来衡量的,称为权重。权重是衡量粒子重要性的指标。权重越大,越重要。粒子的存活概率与其重量成正比。
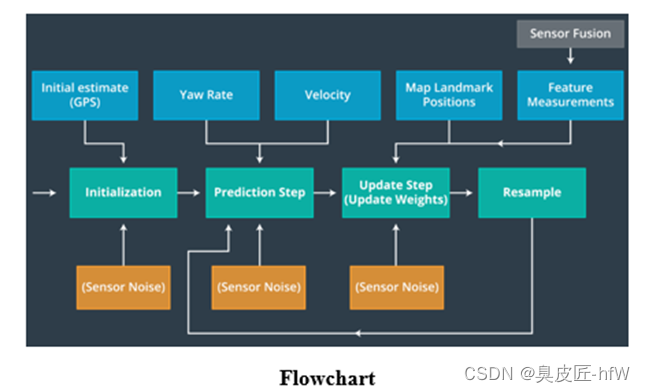
粒子滤波主要的四个步骤:
- 初始化步骤:在初始化步骤中,我们根据 GPS 输入估计我们的位置。
- 预测步骤:在预测步骤中,我们为所有粒子添加控制输入(偏航率和速度)。
- 更新步骤:在更新步骤中,我们使用地图地标位置和特征测量来更新我们的粒子权重。
- 重采样步骤:在重采样期间,我们将重采样 M 次,绘制一个粒子 i,与它的权重成正比。在这一步使用重采样轮。
初始化步骤
初始化所有粒子。在这一步,我们必须决定要使用多少粒子。选择合适粒子数,太小容易出错;选择太多,计算成本很高。
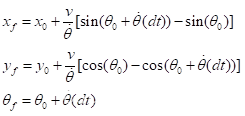
预测步
为了预测车辆的位置,将使用以下公式通过基于速度和偏航率的更新来预测车辆在下一个时间步的位置。
更新步
下一步是根据地标的 LIDAR 和 RADAR 读数更新粒子权重。
更新步主要有三小步:
- Transformation
- Association
- Update Weights
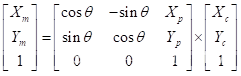
Transformation
代理的测量值需要从其定位坐标系转换为地图坐标系。

这里 Xm 和 Ym 是测量观测值的变换地图坐标。 Xp,Yp 是粒子,位置。 Xc, Yc 是观察点在代理的局部坐标系中的位置,theta 是通过齐次变换矩阵的旋转角度。
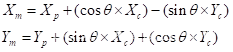
这个齐次变换矩阵,如下所示,执行旋转和平移。
矩阵乘法得到:
Association
关联是将地标测量与现实世界中的对象(例如地图地标)进行匹配的问题。由于我们对地标进行了多次测量,我们可以使用最近邻技术来找到正确的。
Update Weights
实际测量值与预测测量值的比值称为该粒子的重要性权重。随着预测的测量值接近实际测量值,权重越来越接近 1。因此,权重越大,粒子越有可能代表正确的车辆位置。
重采样
就涉及多少操作而言,随机抽取样本并不是最有效的重采样方式。为了使重采样更有效,我们使用了一种称为重采样轮的技术。
重采样是一种用于从旧粒子中随机抽取新粒子的技术,并按其重要性权重的比例进行替换。重新采样后,具有较高权重的粒子可能会保留下来,而所有其他粒子可能会消失。
为了进行重采样,使用了重采样轮技术。

因此,在重新采样后,我们的粒子将更接近汽车的实际位置,并且彼此之间的距离也更近,因此噪音会降低。
粒子滤波器VS卡尔曼滤波器
粒子滤波器可用于解决非高斯噪声问题,但通常比卡尔曼滤波器计算成本更高。这是因为粒子过滤器使用模拟方法而不是解析方程来解决估计任务。
粒子滤波的缺点
当样本量太小时,粒子可能会漂移,并且永远不会以粒子聚集在所需状态附近的方式收敛;
如果样本量太大,粒子就会相互塌陷,它看起来像一个大点,所有的粒子都太粘在一起了,这被巧妙地称为粒子坍缩;
机器人面临的环境越复杂,描述后验概率分布的样本就越多,算法也就越复杂;
此外,重采样阶段可能会导致样本有效性和多样性的丧失,从而导致样本枯竭。
概括
粒子过滤器的主要目的是根据来自实际汽车的测量值和来自虚拟汽车(粒子)的测量值生成每个粒子是实际汽车的后验概率,并且随着汽车继续移动,不相关的粒子将逐渐被过滤掉。
所以总的来说,粒子滤波的实现可以概括为3个步骤:
生成一组粒子;
测量每个粒子是实际汽车(机器人)的概率;
基于概率权重的重采样。
实践:
**注:**使用 pygame 可视化的基本机器人,pip install pygame
import pygame
import random
import time
from math import *
from copy import deepcopydisplay_width = 800
display_height = 800world_size = display_widthred = (200, 0, 0)
blue = (0, 0, 255)
green = (0, 155, 0)
yellow = (255, 255, 0)
white = (255, 255, 255)
black = (0, 0, 0)car_length = 60
car_width = 40car_img = pygame.image.load("car60_40.png")origin = (display_width/2, display_height/2)pygame.init()screen = pygame.display.set_mode((display_width, display_height))
pygame.display.set_caption("Moving robot")
clock = pygame.time.Clock()screen.fill(white)class robot:def __init__(self):self.x = random.random()*world_sizeself.y = random.random()*world_sizeself.orientation = random.random() * 2.0 * piself.forward_noise = 0.0self.turn_noise	= 0.0self.sense_noise = 0.0 # or bearing_noisedef set(self, x, y, orientation):if x >= world_size or x < 0:raise ValueError("X coordinate out of bound")if y >= world_size or y < 0:raise ValueError("Y coordinate out of bound")if orientation >= 2*pi or orientation < 0:raise ValueError("Orientation must be in [0..2pi]")self.x = xself.y = yself.orientation = orientationdef set_noise(self, f_noise, t_noise, s_noise):self.forward_noise = f_noiseself.turn_noise = t_noiseself.sense_noise = s_noisedef move(self, turn, forward):if forward < 0:raise ValueError("Cant move backwards")self.orientation = self.orientation + turn + random.gauss(0.0, self.turn_noise)self.orientation %= 2*pidist = forward + random.gauss(0.0, self.forward_noise)self.x = self.x + dist*cos(self.orientation)self.y = self.y - dist*sin(self.orientation)self.x %= world_sizeself.y %= world_sizetemp = robot()temp.set_noise(0.001, 0.1, 0.1)temp.set(self.x, self.y, self.orientation)temp.set_noise(self.forward_noise, self.turn_noise, self.sense_noise)return tempdef sense(self, landmarks, add_noise=False):Z = []for i in range(len(landmarks)):bearing_angle = atan2(landmarks[i][0] - self.y, landmarks[i][1] - self.x) - self.orientationif add_noise:bearing_angle += random.gauss(0.0, self.bearing_noise)# avoid angles greater than 2pibearing_angle %= 2*piZ.append(bearing_angle)return Z # Return vector Z of 4 bearings.def measurement_prob(self, measurements, landmarks):# calculate the correct measurementpredicted_measurements = self.sense(landmarks) # compute errorserror = 1.0for i in range(len(measurements)):error_bearing = abs(measurements[i] - predicted_measurements[i])error_bearing = (error_bearing + pi) % (2.0 * pi) - pi # truncate# update Gaussianerror *= (exp(- (error_bearing ** 2) / (self.sense_noise ** 2) / 2.0) /  sqrt(2.0 * pi * (self.sense_noise ** 2)))return errordef Gaussian(self, mu, sigma, x):# calculates the probability of x for 1-dim Gaussian with mean mu and var. sigmareturn exp(- ((mu - x) ** 2) / (sigma ** 2) / 2.0) / sqrt(2.0 * pi * (sigma ** 2))def draw_robot(car):x = car.xy = car.yorientation = car.orientationimg = pygame.transform.rotate(car_img, orientation*180/pi)screen.blit(img, (x-30, y-20))# # in radians# print orientation# # in degrees# print orientation*180/pi# pygame.draw.circle(screen, blue, (int(x), int(y)), 5)# rect = pygame.draw.polygon(screen, blue, ((x-car_length/2,y-car_width/2),(x+car_length/2,y-car_width/2), \# 	(x + car_length/2, y + car_width/2), (x-car_length/2, y+car_width/2)))def draw_particles(particles):for i in range(len(particles)):x = particles[i].xy = particles[i].yorientation = particles[i].orientationpygame.draw.circle(screen, green, (int(x), int(y)), 5)landmarks_loc  = [[200, 200], [600, 600], [200, 600], [600, 200], [200, 300], [300, 200], [500, 200],\[200, 200], [200, 500], [300, 600],[500, 600], [600, 500], [600, 300], [400, 200],\[200, 400], [400, 600], [600, 400]]car = robot()
# car.set_noise(0.1, 0.1, 0.1)orientation = 0
#in radians
orientation = orientation*pi/180
car.set(origin[0], origin[1], orientation)exit = Falsedelta_orient = 0.0
delta_forward = 0.0particles = []
# create particles
for i in range(1000):particle = robot()# particle.orientation = orientationparticle.set_noise(0.001, 0.1, 0.1)particles.append(particle)while exit == False:screen.fill(white)pygame.draw.line(screen, green, (display_width/2, 0), (display_width/2, display_height), 1)pygame.draw.line(screen, black, (0, display_height/2), (display_width, display_height/2), 1)for i in range(len(landmarks_loc)):pygame.draw.circle(screen, blue, landmarks_loc[i], 20)draw_robot(car)draw_particles(particles)pygame.display.update()clock.tick(100)for event in pygame.event.get():if event.type == pygame.QUIT:exit = Trueif event.type == pygame.KEYDOWN:if event.key == pygame.K_LEFT:delta_orient = 0.0175elif event.key == pygame.K_RIGHT:delta_orient = -0.0175elif event.key == pygame.K_UP:delta_forward = 2elif event.key == pygame.K_DOWN:delta_forward = -2elif event.type == pygame.KEYUP:if event.key == pygame.K_RIGHT or event.key == pygame.K_LEFT or event.key == pygame.K_UP \or event.key == pygame.K_DOWN:delta_orient = 0.0delta_forward = 0.0car.move(delta_orient, delta_forward)particles2 = []for particle in particles:# print "before :",particle.x, particle.y, particle.orientation# particle.orientation = car.orientationparticles2.append(particle.move(delta_orient, delta_forward))# print "afer :",particle.x, particle.y, particle.orientationparticles = particles2measurements = car.sense(landmarks_loc)weights = []for i in range(1000):weights.append(particles[i].measurement_prob(measurements, landmarks_loc))# resamplingp = []index = int(random.random() * 1000)beta = 0.0mw = max(weights)for i in range(1000):beta += random.random() * 2.0 * mwwhile beta > weights[index]:beta -= weights[index]index = (index + 1) % 1000p.append(particles[index])particles = deepcopy(p)
这篇关于粒子滤波PF在于机器人定位的应用(python实践)的文章就介绍到这儿,希望我们推荐的文章对编程师们有所帮助!


