本文主要是介绍vue组件传值 父传子、子传父(3种)、非父子传值,希望对大家解决编程问题提供一定的参考价值,需要的开发者们随着小编来一起学习吧!
父组件向子组件传值
直接在子组件中通过props来接收
父组件:
<template><div class="home"><img alt="Vue logo" src="../assets/logo.png" /><HelloWorld :obj1="obj" :mes1="mes"></HelloWorld></div>
</template><script>
import HelloWorld from "@/components/HelloWorld.vue";export default {name: "home",data() {return {obj: {name: "hello",age: 12,last: "父向子传的值"},mes: "我是父组件的内容",};},components: {HelloWorld}
};
</script>
子组件
<template><div class="hello"><h1>{{ mes1 }}</h1><h2>{{obj1.last}}</h2></div>
</template><script>
export default {name: "HelloWorld",props: {obj1: Object,mes1: String},
};
</script>
子组件向父组件传值(3种)
通过$.emit
父组件:
<template><div class="home"><img alt="Vue logo" src="../assets/logo.png" /><HelloWorld @setValue="getValue"></HelloWorld><h1>{{value}}</h1></div>
</template><script>
import HelloWorld from "@/components/HelloWorld.vue";export default {name: "home",data() {return {value: [],};},components: {HelloWorld},methods: {getValue(value) {this.value = value;}},
};
</script>
子组件:
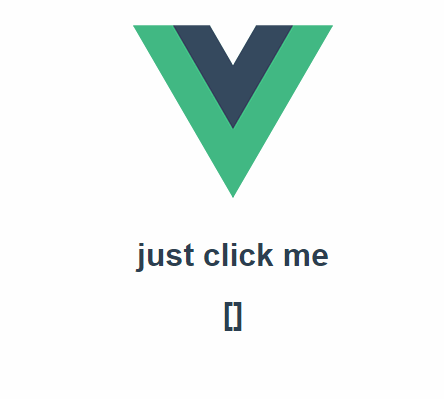
<template><div class="hello"><h1 @click="change" ref="h1">just click me</h1></div>
</template><script>
export default {name: "HelloWorld",data() {return {val: "子组建向父组件传的值"};},// mounted () {//   this.change();// },methods: {change(){this.$emit("setValue",this.val);this.$refs.h1.setAttribute('class','backcolor');}}
};
</script><style scoped lang="less">
.backcolor {color: red;
}
</style>
gif效果图:
通过ref属性
调用子组件方法时可以传值,ex:
this.$refs.xxx.someMeth(param)
父组件:
<template><div><h1>父组件</h1><Child ref="child"></Child><h4>{{mes}}</h4></div>
</template><script>
import child from '../components/child'
export default {data() {return {mes: ''};},components:{Child: child},mounted() {this.mes = this.$refs.child.message;},
};
</script>
<style lang='less' scoped>
</style>
子组件:
<template><div></div>
</template><script>
export default {data() {return {message: '我是子组件的内容'};},
};
</script>
<style lang='scss' scoped>
</style>
通过slot作用域插槽
ps:只要出现多个插槽,始终为所有的插槽使用完整的基于 template 的语法,即v-slot 只能添加在 <template> 上 并绑定相应的name,v-slot:name,单个插槽可以直接在组件上使用。插槽详解
父组件(下面props为自己定义的变量):
<template><div><hello v-slot:default="props"><template><div v-for="(item,index) in props.people" :key="index" >{{item}}-{{item.name}}</div></template></hello></div>
</template><script>
import hello from "@/components/test.vue";
export default {components: {hello: hello},
};
</script>
<style scoped>
</style>
子组件:
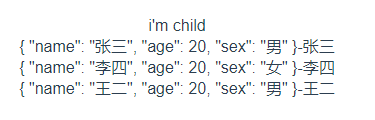
<template><div><span>i'm child</span><template><!-- 此处插槽的内容会被覆盖 --><slot :people="people">{{people[0].name}}</slot> </template></div>
</template><script>
export default {data () {return {people:[{name: '张三',age: 20,sex: '男'},{name: '李四',age: 20,sex: '女'},{name: '王二',age: 20,sex: '男'}]}},
};
</script>
<style lang='scss' scoped>
</style>
效果:
非父子组件传值(也可以通过vuex共享数据)
公共实例文件bus.js,作为公共数控中央总线:
import Vue from 'vue'export default new Vue()第一个组件 first.vue:
<template><div><h1>firstPage</h1> </div>
</template><script>
import bus from '../bus'
export default {data() {return {message: '我是firstPage的内容'};},beforeDestroy() {bus.$emit('textFromPage1',this.message);},
};
</script>
<style scoped>
</style>
第二个组件second.vue:
<template><div><h1>secondPage</h1> <h4>{{mes}}</h4></div>
</template><script>
import bus from "../bus";
export default {data() {return {mes: ""};},created() {bus.$on("textFromPage1", (val) => {this.mes = val;});}
};
</script>
<style scoped>
</style>
博文参考:
https://www.cnblogs.com/jin-zhe/p/9291071.html
这篇关于vue组件传值 父传子、子传父(3种)、非父子传值的文章就介绍到这儿,希望我们推荐的文章对编程师们有所帮助!


