本文主要是介绍深度学习作业L5W3(2):Improvise a Jazz Solo with an LSTM Network,希望对大家解决编程问题提供一定的参考价值,需要的开发者们随着小编来一起学习吧!
构建一个识别触发语言的模型(siri)
数据构建
我们手里有:
背景音
正例音(符合trigger word)
反例音 (不符合trigger word)
我们把正例音和反例音随机插在背景音当中作为训练集数据,同时如下设置标签:在每个正例音结束之后,将一定时间段的y值设为1(增加1的个数提高学习效果)
判断时间段是否冲突
# GRADED FUNCTION: is_overlappingdef is_overlapping(segment_time, previous_segments):"""Checks if the time of a segment overlaps with the times of existing segments.Arguments:segment_time -- a tuple of (segment_start, segment_end) for the new segmentprevious_segments -- a list of tuples of (segment_start, segment_end) for the existing segmentsReturns:True if the time segment overlaps with any of the existing segments, False otherwise"""segment_start, segment_end = segment_time### START CODE HERE ### (≈ 4 line)# Step 1: Initialize overlap as a "False" flag. (≈ 1 line)overlap = False# Step 2: loop over the previous_segments start and end times.# Compare start/end times and set the flag to True if there is an overlap (≈ 3 lines)for previous_start, previous_end in previous_segments:if not(previous_start>segment_end or previous_end<segment_start):overlap = Truebreak### END CODE HERE ###return overlap
设置插入方法来构造训练集数据
# GRADED FUNCTION: insert_audio_clipdef insert_audio_clip(background, audio_clip, previous_segments):"""Insert a new audio segment over the background noise at a random time step, ensuring that the audio segment does not overlap with existing segments.Arguments:background -- a 10 second background audio recording. audio_clip -- the audio clip to be inserted/overlaid. previous_segments -- times where audio segments have already been placedReturns:new_background -- the updated background audio"""# Get the duration of the audio clip in mssegment_ms = len(audio_clip)### START CODE HERE ### # Step 1: Use one of the helper functions to pick a random time segment onto which to insert # the new audio clip. (≈ 1 line)segment_time = get_random_time_segment(segment_ms)# Step 2: Check if the new segment_time overlaps with one of the previous_segments. If so, keep # picking new segment_time at random until it doesn't overlap. (≈ 2 lines)while is_overlapping(segment_time, previous_segments):segment_time = get_random_time_segment(segment_ms)# Step 3: Add the new segment_time to the list of previous_segments (≈ 1 line)previous_segments.append(segment_time)### END CODE HERE #### Step 4: Superpose audio segment and backgroundnew_background = background.overlay(audio_clip, position = segment_time[0])return new_background, segment_time
构建标签
# GRADED FUNCTION: insert_onesdef insert_ones(y, segment_end_ms):"""Update the label vector y. The labels of the 50 output steps strictly after the end of the segment should be set to 1. By strictly we mean that the label of segment_end_y should be 0 while, the50 followinf labels should be ones.Arguments:y -- numpy array of shape (1, Ty), the labels of the training examplesegment_end_ms -- the end time of the segment in msReturns:y -- updated labels"""# duration of the background (in terms of spectrogram time-steps)segment_end_y = int(segment_end_ms * Ty / 10000.0)# Add 1 to the correct index in the background label (y)### START CODE HERE ### (≈ 3 lines)for i in range(segment_end_y + 1, segment_end_y + 51):if i < Ty:y[0, i] = 1### END CODE HERE ###return y
构建带标签的数据
# GRADED FUNCTION: create_training_exampledef create_training_example(background, activates, negatives):"""Creates a training example with a given background, activates, and negatives.Arguments:background -- a 10 second background audio recordingactivates -- a list of audio segments of the word "activate"negatives -- a list of audio segments of random words that are not "activate"Returns:x -- the spectrogram of the training exampley -- the label at each time step of the spectrogram"""# Set the random seednp.random.seed(18)# Make background quieterbackground = background - 20### START CODE HERE #### Step 1: Initialize y (label vector) of zeros (≈ 1 line)y = np.zeros((1, Ty))# Step 2: Initialize segment times as empty list (≈ 1 line)previous_segments = []### END CODE HERE #### Select 0-4 random "activate" audio clips from the entire list of "activates" recordingsnumber_of_activates = np.random.randint(0, 5)random_indices = np.random.randint(len(activates), size=number_of_activates)random_activates = [activates[i] for i in random_indices]### START CODE HERE ### (≈ 3 lines)# Step 3: Loop over randomly selected "activate" clips and insert in backgroundfor random_activate in random_activates:# Insert the audio clip on the backgroundbackground, segment_time = insert_audio_clip(background, random_activate, previous_segments)# Retrieve segment_start and segment_end from segment_timesegment_start, segment_end = segment_time# Insert labels in "y"y = insert_ones(y, segment_end)### END CODE HERE #### Select 0-2 random negatives audio recordings from the entire list of "negatives" recordingsnumber_of_negatives = np.random.randint(0, 3)random_indices = np.random.randint(len(negatives), size=number_of_negatives)random_negatives = [negatives[i] for i in random_indices]### START CODE HERE ### (≈ 2 lines)# Step 4: Loop over randomly selected negative clips and insert in backgroundfor random_negative in random_negatives:# Insert the audio clip on the background background, _ = insert_audio_clip(background, random_negative, previous_segments)### END CODE HERE #### Standardize the volume of the audio clip background = match_target_amplitude(background, -20.0)# Export new training example file_handle = background.export("train" + ".wav", format="wav")print("File (train.wav) was saved in your directory.")# Get and plot spectrogram of the new recording (background with superposition of positive and negatives)x = graph_spectrogram("train.wav")return x, y
模型建立
接下来我们利用已经处理好的训练集数据进行训练
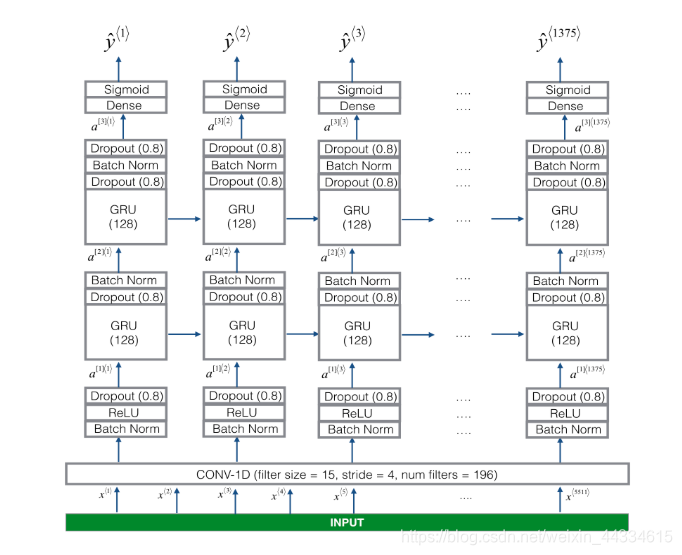
模型先是对输入进行一维卷积,随后通过两层GRU单元以及softmax得到输出
# GRADED FUNCTION: modeldef model(input_shape):"""Function creating the model's graph in Keras.Argument:input_shape -- shape of the model's input data (using Keras conventions)Returns:model -- Keras model instance"""X_input = Input(shape = input_shape)### START CODE HERE #### Step 1: CONV layer (≈4 lines)X = Conv1D(196, 15, strides=4)(X_input) # CONV1DX = BatchNormalization()(X) # Batch normalizationX = Activation('relu')(X) # ReLu activationX = Dropout(0.8)(X) # dropout (use 0.8)# Step 2: First GRU Layer (≈4 lines)X = GRU(128, return_sequences=True)(X) # GRU (use 128 units and return the sequences)X = Dropout(0.8)(X) # dropout (use 0.8)X = BatchNormalization()(X) # Batch normalization# Step 3: Second GRU Layer (≈4 lines)X = GRU(128, return_sequences=True)(X) # GRU (use 128 units and return the sequences)X = Dropout(0.8)(X) # dropout (use 0.8)X = BatchNormalization()(X) # Batch normalizationX = Dropout(0.8)(X) # dropout (use 0.8)# Step 4: Time-distributed dense layer (≈1 line)X = TimeDistributed(Dense(1, activation = "sigmoid"))(X) # time distributed (sigmoid)### END CODE HERE ###model = Model(inputs = X_input, outputs = X)return model
model = model(input_shape = (Tx, n_freq))
model = load_model('./models/tr_model.h5')
opt = Adam(lr=0.0001, beta_1=0.9, beta_2=0.999, decay=0.01)
model.compile(loss='binary_crossentropy', optimizer=opt, metrics=["accuracy"])
model.fit(X, Y, batch_size = 5, epochs=1)
最终获得了不错的效果
这篇关于深度学习作业L5W3(2):Improvise a Jazz Solo with an LSTM Network的文章就介绍到这儿,希望我们推荐的文章对编程师们有所帮助!


