本文主要是介绍osg实现三次样条Cardinal曲线,希望对大家解决编程问题提供一定的参考价值,需要的开发者们随着小编来一起学习吧!
目录
1. 前言
2. 预备知识
3. Qt实现的二维Cardinal曲线
4. 用osg实现三维Cardinal曲线
4.1. 工具/ 原料
4.2. 代码实现
1. 前言
在设计矢量图案的时候,我们常常需要用到曲线来表达物体造型,单纯用鼠标轨迹绘制显然是不足的。于是我们希望能够实现这样的方法:通过设计师手工选择控制点,再通过插值得到过控制点(或在附近)的一条平滑曲线。在这样的需求下,样条曲线诞生了。简而言之,样条曲线是由多个多项式按比例系数组成的多项式函数,而比例系数是由控制点决定的。Hermite曲线、Cardinal曲线在平时的开发中,经常用于模拟运动物体的轨迹,如下:

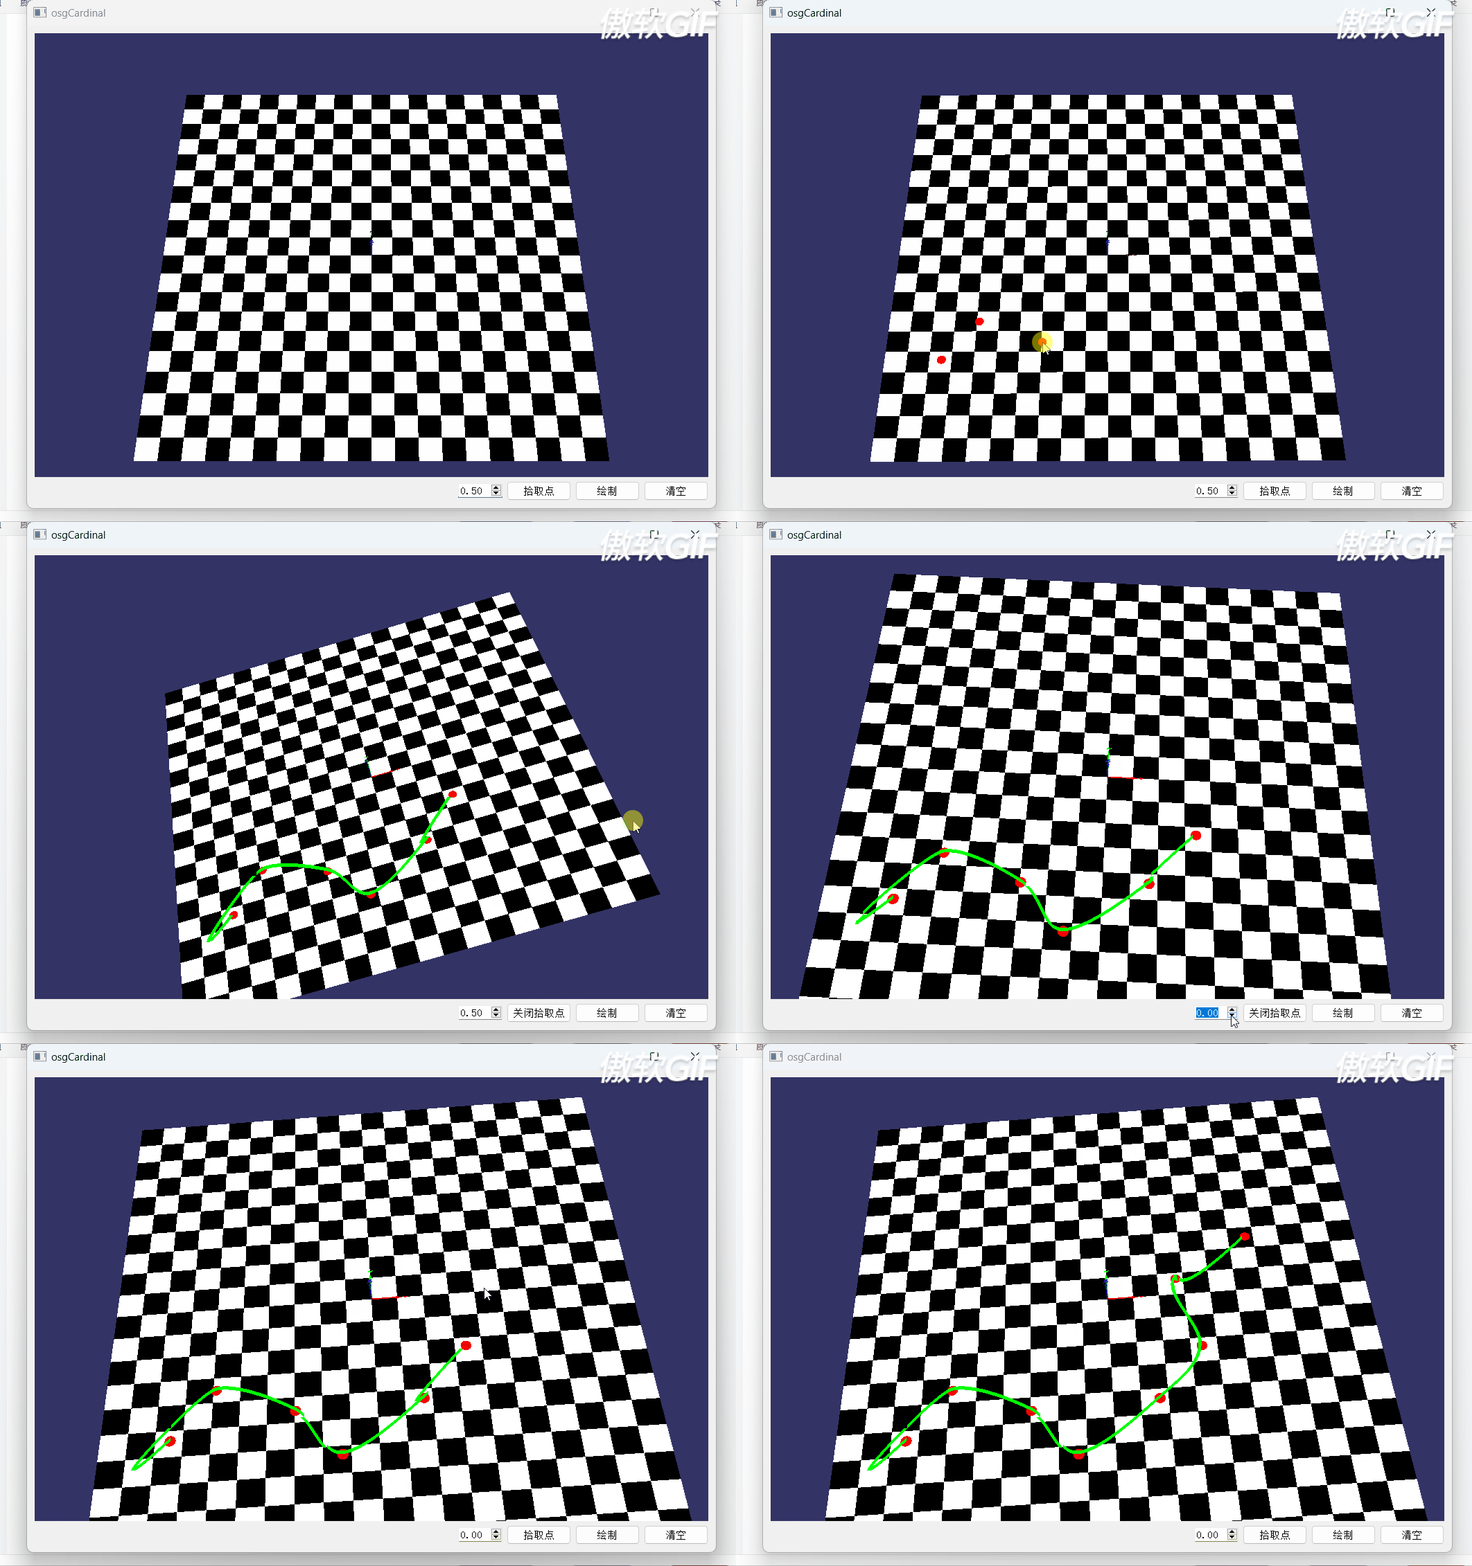
以上是二维下的Cardinal曲线效果,如何用osg实现 三维的Cardinal曲线呢?即像下面那样:

即:
- 单击“拾取点”按钮,该按钮文字变为“关闭拾取点”,此时可以用鼠标在棋盘格上单击,点击的点用红色圆圈表示。
- 当所有的点都拾取完,单击“绘制”,可以绘制三维Cardinal曲线。
- 当绘制完三维Cardinal曲线后,再次用鼠标在棋盘格上单击,单击“绘制”,可以绘制新的三维Cardinal曲线。
- 单击“关闭拾取点”按钮,鼠标在棋盘格上单击时,无法拾取点。
- 调整阈值,可以更改曲线的圆弧度,使曲线从圆滑变为直线。
2. 预备知识
关于Hermite曲线、Cardinal曲线的数学理论,参见如下博文:
- [计算机动画] 路径曲线与运动物体控制(Cardinal样条曲线)。
- 三次参数样条曲线与Cardinal曲线。
3. Qt实现的二维Cardinal曲线
如下博文为Qt实现的二维Cardinal曲线:
Qt实现三次样条Cardinal曲线
4. 用osg实现三维Cardinal曲线
4.1. 工具/ 原料
开发环境如下:
- Qt 5.14.1。
- Visual Studio 2022。
- OpenSceneGraph 3.6.2。
4.2. 代码实现
main.cpp
#include "osgCardinal.h"
#include <QtWidgets/QApplication>int main(int argc, char *argv[])
{QApplication a(argc, argv);osgCardinal w;w.show();return a.exec();
}
myEventHandler.cpp
#include "myEventHandler.h"
#include<osgViewer/Viewer>
bool myEventHandler::handle(const osgGA::GUIEventAdapter& ea, osgGA::GUIActionAdapter& aa, osg::Object* obj, osg::NodeVisitor* nv)
{auto pViewer = dynamic_cast<osgViewer::Viewer*>(&aa);auto eventType = ea.getEventType();switch (eventType){case GUIEventAdapter::PUSH:{if(_bPickPoint && (GUIEventAdapter::LEFT_MOUSE_BUTTON == ea.getButton())){osgUtil::LineSegmentIntersector::Intersections intersections;auto bRet = pViewer->computeIntersections(ea, intersections);if (!bRet) // 判断是否相交{return false;}auto iter = intersections.begin();  // 取相交的第1个点auto interPointCoord = iter->getLocalIntersectPoint();_pOsgCardinal->drawEllipse(interPointCoord);}}break;} // end switchreturn false;
}void myEventHandler::setPickPoint(bool bPickPoint)
{_bPickPoint = bPickPoint;
}
myEventHandler.h
#ifndef MYEVENTHANDLER_H
#define MYEVENTHANDLER_H
#include<osgGA/GUIEventHandler>
#include<osgCardinal.h>
using namespace osgGA;class myEventHandler:public GUIEventHandler
{
public:myEventHandler(osgCardinal* p) { _pOsgCardinal = p; }
public:void setPickPoint(bool bPickPoint);private:virtual bool handle(const osgGA::GUIEventAdapter& ea, osgGA::GUIActionAdapter& aa, osg::Object* obj, osg::NodeVisitor* nv) override;private:bool _bPickPoint{false};osgCardinal* _pOsgCardinal{nullptr};
};#endif MYEVENTHANDLER_H
osgCardinal.h
#pragma once#include <QtWidgets/QWidget>
#include "ui_osgCardinal.h"
using std::list;QT_BEGIN_NAMESPACE
namespace Ui { class osgCardinalClass; };
QT_END_NAMESPACEclass myEventHandler;class osgCardinal : public QWidget
{Q_OBJECTpublic:osgCardinal(QWidget *parent = nullptr);~osgCardinal();public:// 画点。以小圆表示void  drawEllipse(const osg::Vec3d& pt);private:void addBaseScene();osg::Geode* createGrid();void valueChanged(double dfValue);void startDraw();void pickPoint();void clear();// 计算MC矩阵void calMcMatrix(double s);// 压入头部和尾部两个点,用于计算void pushHeadAndTailPoint();// 画Cardinal曲线void drawCardinal();void drawLines(osg::Vec3Array* pVertArray);
private:Ui::osgCardinalClass *ui;myEventHandler*_myEventHandler{nullptr};bool _startPickPoint{false};bool _lastPointHasPoped{ false }; // 最后一个点是否被弹出(删除)bool _hasDrawed{ false }; // 以前是否绘制过Cardinal曲线double _dfMcMatrix[4][4];list<osg::Vec3d> _lstInterPoint;osg::Vec3Array*_pVertArray{ nullptr };osg::Geometry* _pCardinalCurveGemo{ nullptr };
};
osgCardinal.cpp
#include "osgCardinal.h"
#include"myEventHandler.h"
#include<osg/MatrixTransform>
#include<osg/PositionAttitudeTransform>
#include<osg/PolygonMode>
#include<osg/LineWidth>
#include<vector>
using std::vector;osgCardinal::osgCardinal(QWidget *parent): QWidget(parent), ui(new Ui::osgCardinalClass())
{ui->setupUi(this);setWindowState(Qt::WindowMaximized);addBaseScene();ui->doubleSpinBox->setMinimum(0);ui->doubleSpinBox->setMaximum(1);ui->doubleSpinBox->setValue(0.5);ui->doubleSpinBox->setSingleStep(0.1);connect(ui->doubleSpinBox, QOverload<double>::of(&QDoubleSpinBox::valueChanged), this, &osgCardinal::valueChanged);connect(ui->startDrawBtn, &QAbstractButton::clicked, this, &osgCardinal::startDraw);connect(ui->clearBtn, &QAbstractButton::clicked, this, &osgCardinal::clear);connect(ui->pickPointBtn, &QAbstractButton::clicked, this, &osgCardinal::pickPoint);calMcMatrix(0.5);
}osgCardinal::~osgCardinal()
{delete ui;
}void osgCardinal::valueChanged(double dfValue)
{auto s = (1 - dfValue) / 2.0;// 计算MC矩阵calMcMatrix(s);drawCardinal();
}// 画点。以小圆表示
void osgCardinal::drawEllipse(const osg::Vec3d& pt)
{if (!_lastPointHasPoped && _hasDrawed && !_lstInterPoint.empty()){_lstInterPoint.pop_back();_lastPointHasPoped = true;}_lstInterPoint.emplace_back(pt);auto pGeometry = new osg::Geometry;auto pVertArray = new osg::Vec3Array;auto radius = 0.2;auto twoPi = 2 * 3.1415926;for (auto iAngle = 0.0; iAngle < twoPi; iAngle += 0.001){auto x = pt.x() + radius * std::cosf(iAngle);auto y = pt.y() + radius * std::sinf(iAngle);auto z = pt.z() + 0.001; // 注意:适当增加点,否则和网格重合了,会导致圆形绘制不正常pVertArray->push_back(osg::Vec3d(x, y, z));}pGeometry->setVertexArray(pVertArray);auto pColorArray = new osg::Vec4Array;pColorArray->push_back(osg::Vec4d(1.0, 0.0, 0.0, 1.0));pGeometry->setColorArray(pColorArray/*, osg::Array::BIND_OVERALL*/);pGeometry->setColorBinding(osg::Geometry::BIND_OVERALL);pGeometry->addPrimitiveSet(new osg::DrawArrays(GL_POLYGON, 0, pVertArray->size()));auto pMatrixTransform =  ui->osg_widget->getSceneData()->asGroup()->getChild(0)->asTransform()->asMatrixTransform();pMatrixTransform->addChild(pGeometry);
}void osgCardinal::pickPoint()
{_startPickPoint = !_startPickPoint;_myEventHandler->setPickPoint(_startPickPoint);if (_startPickPoint){ui->pickPointBtn->setText(QString::fromLocal8Bit("关闭拾取点"));}else{ui->pickPointBtn->setText(QString::fromLocal8Bit("拾取点"));}
}void osgCardinal::startDraw()
{if (nullptr != _pCardinalCurveGemo) // 如果以前绘制过Cardinal曲线{/* 在上次绘制Cardinal曲线时,通过pushHeadAndTailPoint()*  压入的头部、尾部用户控制的两个点去掉,以重新压入头部、尾部用户控制的两个点* ,便于绘制本次曲线*/if (_lstInterPoint.size() >= 0 ) {_lstInterPoint.pop_front();}}pushHeadAndTailPoint();drawCardinal();_hasDrawed = true;
}// 压入头部和尾部两个点,用于计算
void osgCardinal::pushHeadAndTailPoint()
{// 随便构造两个点auto ptBegin = _lstInterPoint.begin();auto x = ptBegin->x() + 20;auto y = ptBegin->y() + 20;auto z = ptBegin->z();_lstInterPoint.insert(_lstInterPoint.begin(), osg::Vec3d(x, y, z));auto ptEnd = _lstInterPoint.back();x = ptEnd.x() + 20;y = ptEnd.y() + 20;z = ptBegin->z();_lstInterPoint.insert(_lstInterPoint.end(), osg::Vec3d(x, y, z));
}// 画Cardinal曲线
void osgCardinal::drawCardinal()
{if (_lstInterPoint.size() < 4){return;}if (nullptr == _pVertArray){_pVertArray = new osg::Vec3Array();}else{_pVertArray->clear();}auto iter = _lstInterPoint.begin();++iter; // 第1个点(基于0的索引)_pVertArray->push_back(*iter);--iter;auto endIter = _lstInterPoint.end();int nIndex = 0;while (true){--endIter;++nIndex;if (3 == nIndex){break;}}for (; iter != endIter; ++iter){auto& p0 = *iter;auto& p1 = *(++iter);auto& p2 = *(++iter);auto& p3 = *(++iter);--iter;--iter;--iter;vector<osg::Vec3d>vtTempPoint;vtTempPoint.push_back(p0);vtTempPoint.push_back(p1);vtTempPoint.push_back(p2);vtTempPoint.push_back(p3);for (auto i = 0; i < 4; ++i){vtTempPoint[i] = p0 * _dfMcMatrix[i][0]  + p1 * _dfMcMatrix[i][1] + p2 * _dfMcMatrix[i][2] + p3 * _dfMcMatrix[i][3];}float t3, t2, t1, t0;for (double t = 0.0; t < 1; t += 0.01){t3 = t * t * t; t2 = t * t; t1 = t; t0 = 1;osg::Vec3d newPoint;newPoint =  vtTempPoint[0] * t3 + vtTempPoint[1] * t2 + vtTempPoint[2] * t1 + vtTempPoint[3] * t0;_pVertArray->push_back(newPoint);}}drawLines(_pVertArray);
}void osgCardinal::drawLines(osg::Vec3Array* pVertArray)
{if (nullptr == _pCardinalCurveGemo){_pCardinalCurveGemo = new osg::Geometry;auto pLineWidth = new osg::LineWidth(50);_pCardinalCurveGemo->getOrCreateStateSet()->setAttributeAndModes(pLineWidth);auto pColorArray = new osg::Vec4Array;pColorArray->push_back(osg::Vec4d(0.0, 1.0, 0.0, 1.0));_pCardinalCurveGemo->setColorArray(pColorArray/*, osg::Array::BIND_OVERALL*/);_pCardinalCurveGemo->setColorBinding(osg::Geometry::BIND_OVERALL);auto pMatrixTransform = ui->osg_widget->getSceneData()->asGroup()->getChild(0)->asTransform()->asMatrixTransform();pMatrixTransform->addChild(_pCardinalCurveGemo);}// 曲线可能变了,先删除上次的曲线_pCardinalCurveGemo->removePrimitiveSet(0);_pCardinalCurveGemo->setVertexArray(pVertArray);// 再用新点绘制新曲线_pCardinalCurveGemo->addPrimitiveSet(new osg::DrawArrays(GL_LINE_STRIP, 0, pVertArray->size()));
}// 计算MC矩阵
void osgCardinal::calMcMatrix(double s)
{_dfMcMatrix[0][0] = -s, _dfMcMatrix[0][1] = 2 - s, _dfMcMatrix[0][2] = s - 2, _dfMcMatrix[0][3] = s;_dfMcMatrix[1][0] = 2 * s, _dfMcMatrix[1][1] = s - 3, _dfMcMatrix[1][2] = 3 - 2 * s, _dfMcMatrix[1][3] = -s;_dfMcMatrix[2][0] = -s, _dfMcMatrix[2][1] = 0, _dfMcMatrix[2][2] = s, _dfMcMatrix[2][3] = 0;_dfMcMatrix[3][0] = 0, _dfMcMatrix[3][1] = 1, _dfMcMatrix[3][2] = 0, _dfMcMatrix[3][3] = 0;
}void osgCardinal::clear()
{_lstInterPoint.clear();_hasDrawed = false;_lastPointHasPoped = false;
}osg::Geode* osgCardinal::createGrid()
{auto pGeode = new osg::Geode;auto pVertArray = new osg::Vec3Array;for (auto y = -10; y < 10; ++y){for (auto x = -10; x < 10; ++x){pVertArray->push_back(osg::Vec3d(x, y, 0.0));pVertArray->push_back(osg::Vec3d(x + 1, y, 0.0));pVertArray->push_back(osg::Vec3d(x + 1, y + 1, 0.0));pVertArray->push_back(osg::Vec3d(x, y + 1, 0.0));}}auto iSize = pVertArray->size();osg::DrawElementsUShort* pEle{ nullptr };osg::Geometry* pGeomerty{ nullptr };osg::Vec4Array* pColorArray{ nullptr };auto nQuardIndex = 0;bool bNewLineQuard = true;  // 新的一行四边形for (auto iVertIndex = 0; iVertIndex < iSize; ++iVertIndex){if (0 == (iVertIndex % 4)){pEle = new osg::DrawElementsUShort(GL_QUADS);pGeomerty = new osg::Geometry;pGeomerty->getOrCreateStateSet()->setMode(GL_LIGHTING, osg::StateAttribute::OFF);pGeomerty->addPrimitiveSet(pEle);pGeode->addDrawable(pGeomerty);pGeomerty->setVertexArray(pVertArray);pColorArray = new osg::Vec4Array();if (bNewLineQuard){pColorArray->push_back(osg::Vec4d(1.0, 1.0, 1.0, 1.0));}else{pColorArray->push_back(osg::Vec4d(0.0, 0.0, 0.0, 1.0));}++nQuardIndex;if (0 != (nQuardIndex % 20)){bNewLineQuard = !bNewLineQuard;}pGeomerty->setColorArray(pColorArray, osg::Array::Binding::BIND_PER_PRIMITIVE_SET);}pEle->push_back(iVertIndex);} // end forreturn pGeode;
}void osgCardinal::addBaseScene()
{auto pAxis = osgDB::readRefNodeFile(R"(E:\osg\OpenSceneGraph-Data\axes.osgt)");if (nullptr == pAxis){OSG_WARN << "axes node is nullpr!";return;}auto pRoot = new osg::Group();pRoot->getOrCreateStateSet()->setMode(GL_LIGHTING, osg::StateAttribute::OFF);auto pMatrixRoot = new osg::MatrixTransform;auto pGrid = createGrid();pMatrixRoot->addChild(pGrid);pMatrixRoot->addChild(pAxis);pRoot->addChild(pMatrixRoot);pMatrixRoot->setMatrix(osg::Matrix::rotate(osg::inDegrees(60.0), osg::Vec3(1, 0, 0)));ui->osg_widget->setSceneData(pRoot);ui->osg_widget->setCameraManipulator(new osgGA::TrackballManipulator);ui->osg_widget->addEventHandler(new osgViewer::WindowSizeHandler);ui->osg_widget->addEventHandler(new osgViewer::StatsHandler);_myEventHandler = new myEventHandler(this);ui->osg_widget->addEventHandler(_myEventHandler);// 模拟鼠标滚轮朝向人滚动三次,以便场景离人显得更近些for (auto iLoop = 0; iLoop < 3; ++iLoop){ui->osg_widget->getEventQueue()->mouseScroll(osgGA::GUIEventAdapter::SCROLL_DOWN);}
}
QtOsgView.h、QtOsgView.cpp文件参见:osg嵌入到Qt窗体,实现Qt和osg混合编程 博文。
这篇关于osg实现三次样条Cardinal曲线的文章就介绍到这儿,希望我们推荐的文章对编程师们有所帮助!


