本文主要是介绍Colmap学习二:前端部分(特征点提取、匹配与剔除),希望对大家解决编程问题提供一定的参考价值,需要的开发者们随着小编来一起学习吧!
1 Colmap特征提取和描述
colmap一般使用sift-gpu,涉及的知识:
1.1 图像金字塔:DOG图像金字塔,再找极值
1.2 SIFT特征检测与描述:确定主方向和128维的描述子,再归一化(消除光照的影响)。
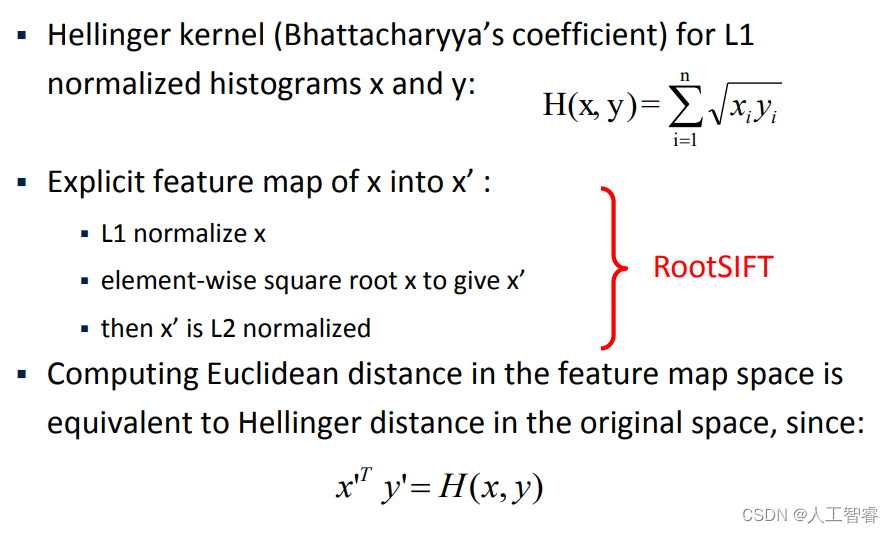
其中由于Euclidean distance 容易受较大值的影响,使用
Hellinger distance更稳定。colmap先对sift的结果进行L1 normalize,再对每一个元素求平方根,得到的结果便是L2 normalized。在论文中给出了使用RootSIFT匹配的结果优于SIFT
1.3 colmap代码细节参数
Octave,Sublevel,模糊尺度,极值筛选阈值,初始直方图的平滑次数,描述子的归一化,DSP-Sift特征等。
直接看源码:
1.4 colmap特征点储存格式,便于后续自己改feature
- feature/types.h可以看到,2,4,6参数的形式都可以:
struct FeatureKeypoint {FeatureKeypoint();FeatureKeypoint(const float x, const float y);FeatureKeypoint(const float x, const float y, const float scale,const float orientation);FeatureKeypoint(const float x, const float y, const float a11,const float a12, const float a21, const float a22);static FeatureKeypoint FromParameters(const float x, const float y,const float scale_x,const float scale_y,const float orientation,const float shear);// Rescale the feature location and shape size by the given scale factor.void Rescale(const float scale);void Rescale(const float scale_x, const float scale_y);// Compute similarity shape parameters from affine shape.float ComputeScale() const;float ComputeScaleX() const;float ComputeScaleY() const;float ComputeOrientation() const;float ComputeShear() const;// Location of the feature, with the origin at the upper left image corner,// i.e. the upper left pixel has the coordinate (0.5, 0.5).float x;float y;// Affine shape of the feature.float a11;float a12;float a21;float a22;
};
- base/database.cc可以看到默认为6(也就是ASIFT算法)
FeatureKeypointsBlob FeatureKeypointsToBlob(const FeatureKeypoints& keypoints) {const FeatureKeypointsBlob::Index kNumCols = 6;FeatureKeypointsBlob blob(keypoints.size(), kNumCols);for (size_t i = 0; i < keypoints.size(); ++i) {blob(i, 0) = keypoints[i].x;blob(i, 1) = keypoints[i].y;blob(i, 2) = keypoints[i].a11;blob(i, 3) = keypoints[i].a12;blob(i, 4) = keypoints[i].a21;blob(i, 5) = keypoints[i].a22;}return blob;
}FeatureKeypoints FeatureKeypointsFromBlob(const FeatureKeypointsBlob& blob) {FeatureKeypoints keypoints(static_cast<size_t>(blob.rows()));if (blob.cols() == 2) {for (FeatureKeypointsBlob::Index i = 0; i < blob.rows(); ++i) {keypoints[i] = FeatureKeypoint(blob(i, 0), blob(i, 1));}} else if (blob.cols() == 4) {for (FeatureKeypointsBlob::Index i = 0; i < blob.rows(); ++i) {keypoints[i] =FeatureKeypoint(blob(i, 0), blob(i, 1), blob(i, 2), blob(i, 3));}} else if (blob.cols() == 6) {for (FeatureKeypointsBlob::Index i = 0; i < blob.rows(); ++i) {keypoints[i] = FeatureKeypoint(blob(i, 0), blob(i, 1), blob(i, 2),blob(i, 3), blob(i, 4), blob(i, 5));}} else {LOG(FATAL) << "Keypoint format not supported";}return keypoints;
}FeatureMatchesBlob FeatureMatchesToBlob(const FeatureMatches& matches) {const FeatureMatchesBlob::Index kNumCols = 2;FeatureMatchesBlob blob(matches.size(), kNumCols);for (size_t i = 0; i < matches.size(); ++i) {blob(i, 0) = matches[i].point2D_idx1;blob(i, 1) = matches[i].point2D_idx2;}return blob;
}FeatureMatches FeatureMatchesFromBlob(const FeatureMatchesBlob& blob) {CHECK_EQ(blob.cols(), 2);FeatureMatches matches(static_cast<size_t>(blob.rows()));for (FeatureMatchesBlob::Index i = 0; i < blob.rows(); ++i) {matches[i].point2D_idx1 = blob(i, 0);matches[i].point2D_idx2 = blob(i, 1);}return matches;
}
2 Colmap特征匹配算法
2.1 相似度判断准则:余弦相似度
2.2 五种匹配算法
暴力匹配(遍历费时),顺序匹配(序列图像用)、词汇树匹配(兼顾时效)、空间匹配(有额外的空间信息用)和转移匹配:

上图的Custom为自定义,自己去定义哪几张图像匹配哪几张不匹配,算是一种人工调参手段。
- colmap中的Sequential Matching
- colmap中Spatial Matching增添位姿信息
- colmap各种匹配的使用体验
2.3 几何验证算法:剔除outliers
- 对于标定相机,用E/F H/F H/E的内点个数比值来决定选用的剔除模型
// Determine inlier ratios of different models.const double E_F_inlier_ratio =static_cast<double>(E_report.support.num_inliers) /F_report.support.num_inliers;const double H_F_inlier_ratio =static_cast<double>(H_report.support.num_inliers) /F_report.support.num_inliers;const double H_E_inlier_ratio =static_cast<double>(H_report.support.num_inliers) /E_report.support.num_inliers;
- 对于未标定相机,利用仅可以得到的F矩阵(E无法得到
// Uncalibrated configuration.num_inliers = F_report.support.num_inliers;best_inlier_mask = &F_report.inlier_mask;if (H_F_inlier_ratio > options.max_H_inlier_ratio) {config = ConfigurationType::PLANAR_OR_PANORAMIC;if (H_report.support.num_inliers > num_inliers) {num_inliers = H_report.support.num_inliers;best_inlier_mask = &H_report.inlier_mask;}} else {config = ConfigurationType::UNCALIBRATED;}} else if (H_report.success &&H_report.support.num_inliers >= options.min_num_inliers) {num_inliers = H_report.support.num_inliers;best_inlier_mask = &H_report.inlier_mask;config = ConfigurationType::PLANAR_OR_PANORAMIC;} else {config = ConfigurationType::DEGENERATE;return;}
- Guide Matching:由网课上说的是,图1点x在图2的极线Fx上,但是由于误差可能在其附近,于是设置了一个极线的上下阈值。想更全面的了解,可以参考OpenMVG的匹配对几何验证。
- GeometricAdjacencyMatrix:无向图,一个矩阵。
– n*n矩阵(n为图像个数),0代表没有,其他数值代表有多少匹配。
– i行j列也就是图i∈n与图j∈n的匹配点个数。可知,对角位置为0(自己和自己无匹配)
2.4 匹配点存储格式
索引对(替换前端只要统一为以下输出格式就好了)
FeatureMatchesBlob FeatureMatchesToBlob(const FeatureMatches& matches) {const FeatureMatchesBlob::Index kNumCols = 2;FeatureMatchesBlob blob(matches.size(), kNumCols);for (size_t i = 0; i < matches.size(); ++i) {blob(i, 0) = matches[i].point2D_idx1;blob(i, 1) = matches[i].point2D_idx2;}return blob;
}FeatureMatches FeatureMatchesFromBlob(const FeatureMatchesBlob& blob) {CHECK_EQ(blob.cols(), 2);FeatureMatches matches(static_cast<size_t>(blob.rows()));for (FeatureMatchesBlob::Index i = 0; i < blob.rows(); ++i) {matches[i].point2D_idx1 = blob(i, 0);matches[i].point2D_idx2 = blob(i, 1);}return matches;
}
3. 动态物体剔除
剔除Mask以外的特征
- Mask是动态目标的话,mask内部应该为黑色0
- Mask是要保留的目标的话,mask外部为黑色0
- colmap的以下函数仅将mask内的点输入到out_index中输出keypoints:
void MaskKeypoints(const Bitmap& mask, FeatureKeypoints* keypoints,FeatureDescriptors* descriptors) {size_t out_index = 0;BitmapColor<uint8_t> color;for (size_t i = 0; i < keypoints->size(); ++i) {if (!mask.GetPixel(static_cast<int>(keypoints->at(i).x),static_cast<int>(keypoints->at(i).y), &color) ||color.r == 0) {// Delete this keypoint by not copying it to the output.} else {// Retain this keypoint by copying it to the output index (in case this// index differs from its current position).if (out_index != i) {keypoints->at(out_index) = keypoints->at(i);for (int col = 0; col < descriptors->cols(); ++col) {(*descriptors)(out_index, col) = (*descriptors)(i, col);}}out_index += 1;}}keypoints->resize(out_index);descriptors->conservativeResize(out_index, descriptors->cols());
}
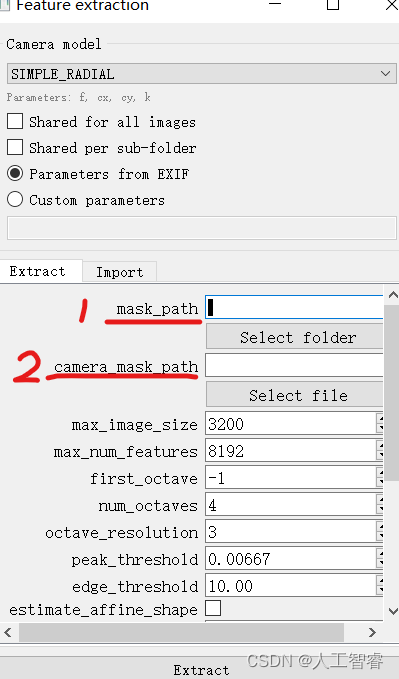
看一下GUI:
- 1为输入图像的Mask序列
- 2可以只输入一张图像,是整体所有图像序列的Mask(可以用来去边缘水印)
4. 自定义feature替换sift
4.1自己写特征提取
输出为1.4的db格式,246
4.2匹配、筛outliers
输出为2.4的db格式,索引值
4.3 继续后面的流程
Reference:以上主要参考源代码和网课
这篇关于Colmap学习二:前端部分(特征点提取、匹配与剔除)的文章就介绍到这儿,希望我们推荐的文章对编程师们有所帮助!


