本文主要是介绍【用unity实现100个游戏之7】从零开始制作一个仿杀戮尖塔卡牌回合制游戏,希望对大家解决编程问题提供一定的参考价值,需要的开发者们随着小编来一起学习吧!
文章目录
- 前言
- 开始项目
- 素材资源
- 开始
- 一、UI框架
- 二、挂载脚本
- 三、事件监听,用于绑定按钮事件
- 四、声音管理器
- 五、excel转txt文本
- 六、游戏配置
- 七、用户信息表
- 八、战斗管理器
- 九、 敌人管理器
- 十、玩家血量、能量、防御值、卡牌数
- 十一、敌人血量 行动显示逻辑
- 十二、UI提示效果实现
- 十三、卡牌生成
- 十四、卡片信息显示
- 十五、卡牌选中效果
- 十六、卡牌拖拽
- 十七、卡片分支(攻击卡、抽卡、防御卡)
- 十八、防御卡效果
- 十九、抽卡的卡牌效果
- 二十、怪物选中效果
- 二十一、怪物受伤
- 二十二、攻击卡效果
- 二十三、曲线效果
- 二十四、切换敌人回合
- 二十五、敌人行为逻辑
- 二十六、游戏胜利or结束逻辑
- 最终效果
- 源码
- 参考
- 完结
前言
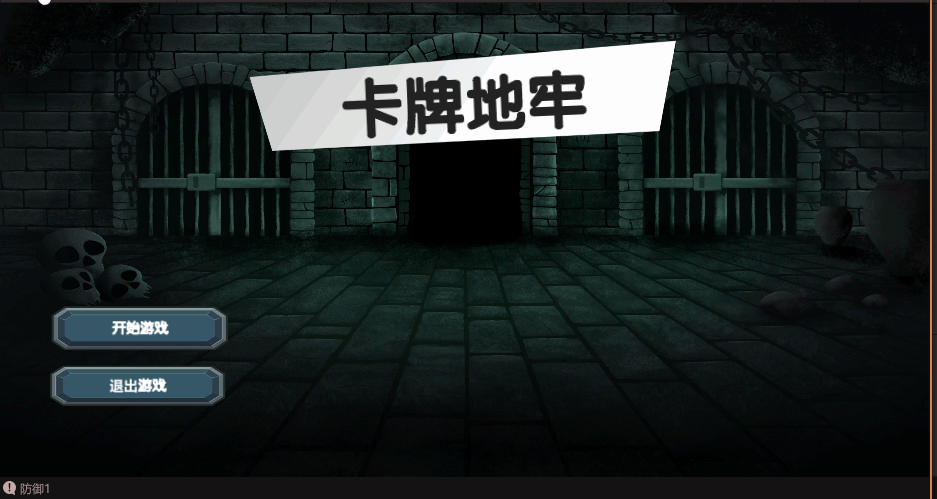
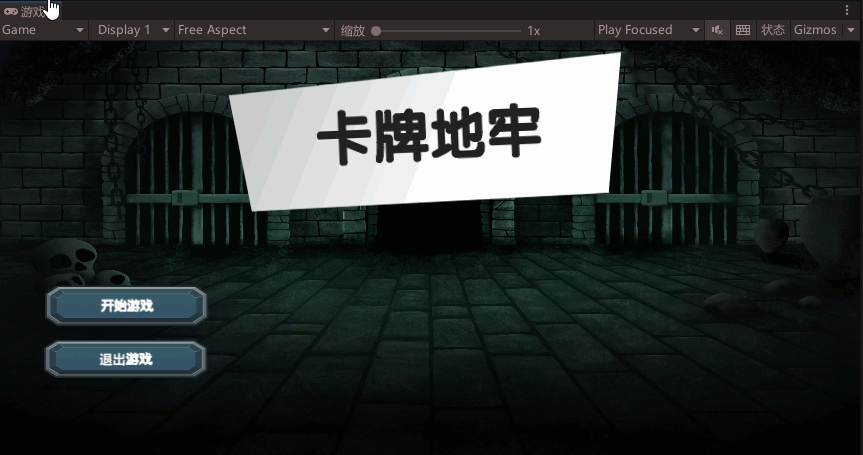
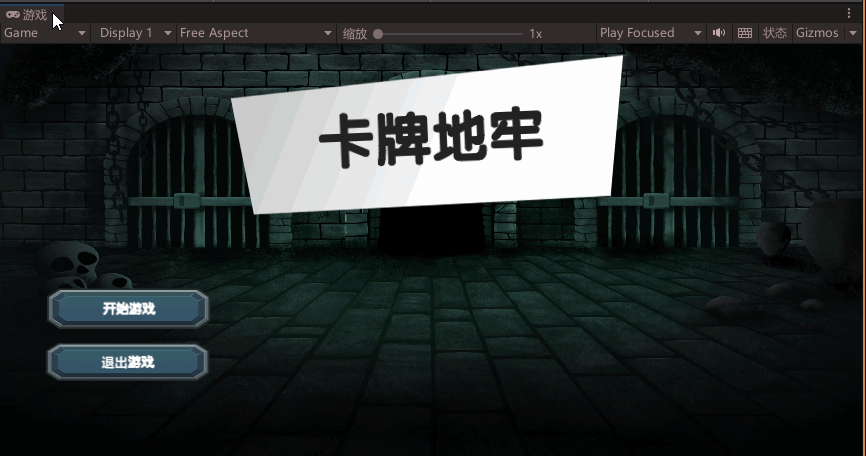
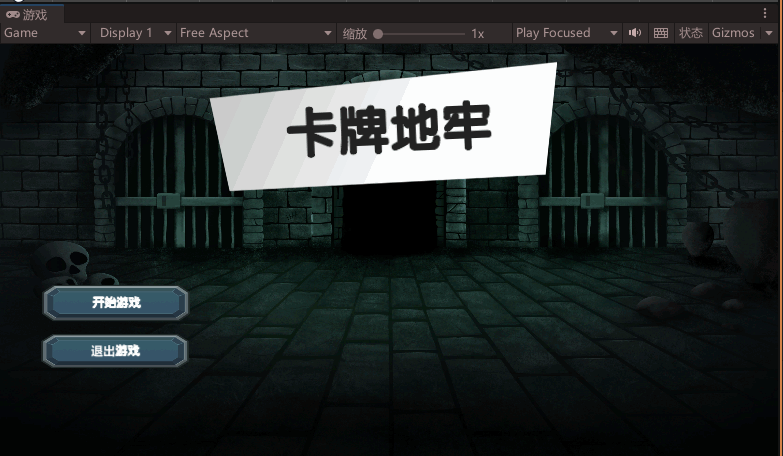
今天来带大家实现一个简单的卡牌回合制游戏
照例先来看看最终效果
开始项目
百度链接:https://pan.baidu.com/s/1uy8lN9wESsLy7z1YbfsjLw
提取码:4345
素材资源
百度链接:https://pan.baidu.com/s/1uy8lN9wESsLy7z1YbfsjLw
提取码:4345
开始
一、UI框架
UIManager.cs UI管理器
using System.Collections;
using System.Collections.Generic;
using UnityEngine;//UI管理器
public class UIManager : MonoBehaviour
{//ui管理器public static UIManager Instance;private Transform canvasTf;//画布的变换组件private List<UIBase> uiList;//存储加载过的界面的集合private void Awake(){Instance = this;//找世界中的画布canvasTf = GameObject.Find("Canvas").transform;//初始化集合uiList = new List<UIBase>();}public UIBase ShowUI<T>(string uiName) where T : UIBase{UIBase ui = Find(uiName);if (ui == null){//集合中没有 需要从Resources/UI文件夹加载GameObject obj = Instantiate(Resources.Load("UI/" + uiName), canvasTf) as GameObject;//改名字,默认实例化会加上(clone),所以得重命名obj.name = uiName;//添加需要的脚本ui = obj.AddComponent<T>();//添加到集合进行存储uiList.Add(ui);}else{//显示ui.Show();}return ui;}//隐藏public void HideUI(string uiName){UIBase ui = Find(uiName);if (ui != null){ui.Hide();}}//关闭某个界面public void CloseUI(string uiName){UIBase ui = Find(uiName);if (ui != null){uiList.Remove(ui);Destroy(ui.gameObject);}}//关闭所有界面public void CloseAllUI(){for(int i = uiList.Count - 1; i>=0; i--){Destroy(uiList[i].gameObject);}uiList.Clear();//清空合集}  //从集合中找到名字对应的界面脚本public UIBase Find(string uiName){for (int i = 0; i < uiList.Count; i++){if (uiList[i].name == uiName) return uiList[i];}return null;}
}
UIBase.cs 界面基类
using System.Collections;
using System.Collections.Generic;
using UnityEngine;//界面基类
public class UIBase : MonoBehaviour
{//显示public virtual void Show(){gameObject.SetActive(true);}//隐藏public virtual void Hide(){gameObject.SetActive(false);}//关闭界面(销毁)public virtual void Close(){UIManager.Instance.CloseUI(gameObject.name);}}
LoginUI .cs中调用
using System.Collections;
using System.Collections.Generic;
using UnityEngine;
using UnityEngine.EventSystems;//开始界面(要继承UIBase)
public class LoginUI : UIBase{}
GameApp .cs
using System.Collections;
using System.Collections.Generic;
using UnityEngine;//游戏入口脚本
public class GameApp : MonoBehaviour
{void Start(){//显示loginUI创建的脚本名字记得跟预制体物体名字一致UIManager.Instance.ShowUI<LoginUI>("LoginUI");}
}
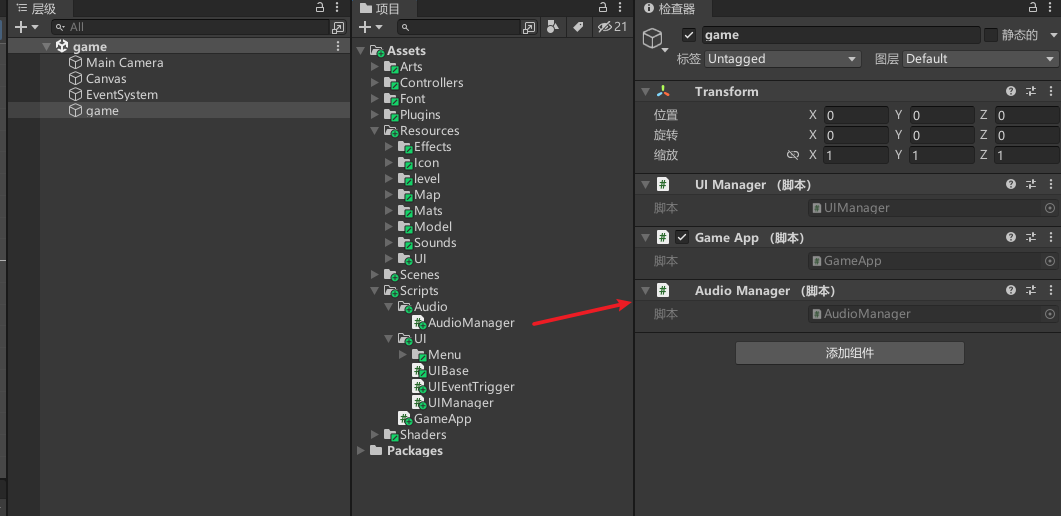
二、挂载脚本
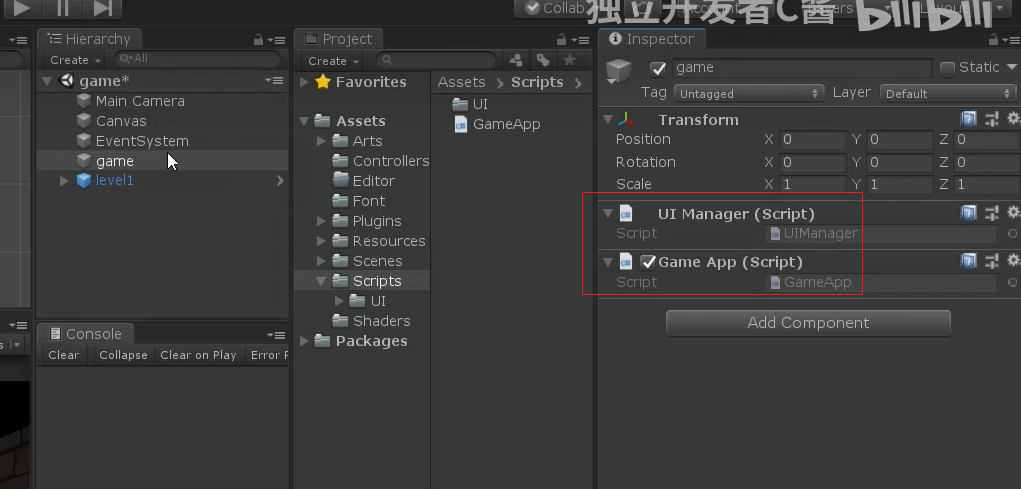
运行效果
三、事件监听,用于绑定按钮事件
给开始游戏按钮新增事件
新增UIEventTrigger.cs脚本
using System.Collections;
using System.Collections.Generic;
using UnityEngine;
using System;
using UnityEngine.EventSystems;//事件监听
public class UIEventTrigger : MonoBehaviour, IPointerClickHandler
{//这是一个公共的委托,它接受两个参数,一个是被点击的游戏对象,另一个是关于点击事件的数据。public Action<GameObject, PointerEventData> onClick;//用于获取或添加 UIEventTrigger 组件public static UIEventTrigger Get(GameObject obj){UIEventTrigger trigger = obj.GetComponent<UIEventTrigger>();if (trigger == null){trigger = obj.AddComponent<UIEventTrigger>();}return trigger;}public void OnPointerClick(PointerEventData eventData){//这是 IPointerClickHandler 接口的方法,当 UI 元素被点击时,它将被调用。if (onClick != null) onClick(gameObject, eventData);}
}
UIBase.cs新增注册事件
//注册事件
public UIEventTrigger Register(string name)
{Transform tf = transform.Find(name);return UIEventTrigger.Get(tf.gameObject);
}
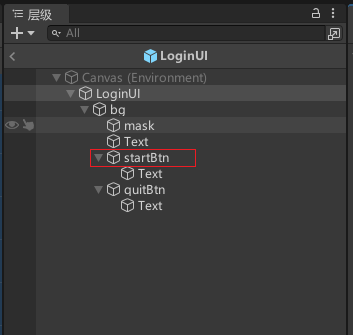
LoginUI绑定按钮事件
void Awake(){//开始游戏Register("bg/startBtn").onClick = onStartGameBtn;
}private void onStartGameBtn(GameObject obj, PointerEventData pData){//关闭login界面Close();
}
运行效果
四、声音管理器
AudioManager.cs
using System.Collections;
using System.Collections.Generic;
using UnityEngine;//声音管理器
public class AudioManager : MonoBehaviour
{public static AudioManager Instance;private AudioSource bgmSource;//播放bgm的音频private void Awake(){Instance = this;}//初始化public void Init(){bgmSource = gameObject.AddComponent<AudioSource>();}//播放bgmpublic void PlayBGM(string name, bool isLoop = true){//加载bgm声音剪辑AudioClip clip = Resources.Load<AudioClip>("Sounds/BGM/" + name);bgmSource.clip = clip;//设置音频bgmSource.loop = isLoop;//是否循环bgmSource.Play();}//播放音效public void PlaEffect(string name){AudioClip clip = Resources.Load<AudioClip>("Sounds/" + name);AudioSource.PlayClipAtPoint(clip, transform.position);}
}
调用
//游戏入口脚本
public class GameApp : MonoBehaviour
{void Start(){//初始化声音管理器AudioManager.Instance.Init();//显示loginUI创建的脚本名字记得跟预制体物体名字一致UIManager.Instance.ShowUI<LoginUI>("LoginUI");//播放bgmAudioManager.Instance.PlayBGM("bgm1");}
}
挂载脚本
效果
五、excel转txt文本
读取Excel需要用到
Excel.dll和ICSharpCode.SharpZipLib库文件
新建MyEditor.cs放在Editor目录下
using System.Collections;
using System.Collections.Generic;
using UnityEngine;
using UnityEditor;//编辑器的命名空间
using System.IO;//文件流
using Excel;//读取excel
using System.Data;//编辑器脚本
public static class MyEditor
{[MenuItem("我的工具/excel转成txt")]public static void ExportExcelToTxt(){//_Excel文件夹路径string assetPath = Application.dataPath + "/_Excel";//获得Excel文件夹中的excel文件string[] files = Directory.GetFiles(assetPath, "*.xlsx");for (int i = 0; i < files.Length; i++){files[i] = files[i].Replace('\\', '/');//反斜杠替换成正斜杠//通过文件流读取文件using (FileStream fs = File.Open(files[i], FileMode.Open, FileAccess.Read)){//文件流转成excel 对象var excelDataReader = ExcelReaderFactory.CreateOpenXmlReader(fs);//获得excel数据DataSet dataSet = excelDataReader.AsDataSet();//读取excel第一张表DataTable table = dataSet.Tables[0];//将表中内容 读取后 存储到 对应的txt文件readTableToTxt(files[i], table);}}//刷新编辑器AssetDatabase.Refresh();}private static void readTableToTxt(string filePath, DataTable table){// 获得文件名(不要文件后缀 生成与之名字相同的txt文件)string fileName = Path.GetFileNameWithoutExtension(filePath);// txt文件存储的路径string path = Application.dataPath + "/Resources/Data/" + fileName + ".txt";//判断Resources/Data文件夹中是否已经存在对应的txt文件,如果是 则删除if (File.Exists(path)){File.Delete(path);}// 文件流创建txt文件using (FileStream fs = new FileStream(path, FileMode.Create)){// 文件流转写入流方便写入字符串using (StreamWriter sw = new StreamWriter(fs)){// 遍历tablefor (int row = 0; row < table.Rows.Count; row++){DataRow dataRow = table.Rows[row];string str = "";//遍历列for (int col = 0; col < table.Columns.Count; col++){string val = dataRow[col].ToString();str = str + val + "\t";//每一项tab分割}//写入sw.Write(str);//如果不是最后一行换行if (row != table.Rows.Count - 1){sw.WriteLine();}}}}}
}
记得在Resources目录下新建Data文件夹用来存放生成的txt文本,点击工具会将_Excel文件夹里的xlsx文件生成为txt保存到/Resources/Data/目录下


配置表大概样式
card.xlsx

cardType.xlsx

enemy.xlsx
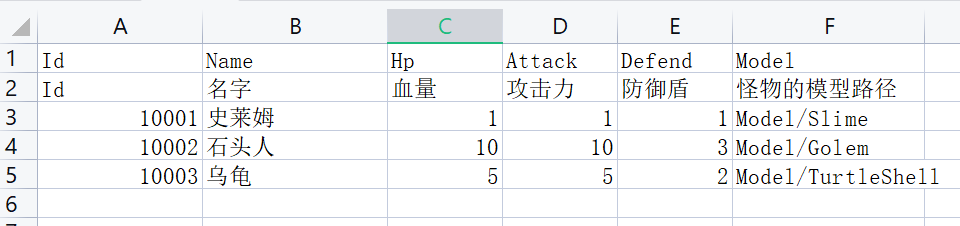
level.xlsx
六、游戏配置
游戏配置GameConfigData
using System.Collections;
using System.Collections.Generic;
using UnityEngine;// 游戏配置表类,每个对象对应一个xt配置表
public class GameConfigData
{// 存储配置表中的所有数据private List<Dictionary<string, string>> dataDic;// 构造函数,参数为字符串public GameConfigData(string str){// 初始化数据字典dataDic = new List<Dictionary<string, string>>();// 按换行符切割字符串string[] lines = str.Split('\n');// 第一行是存储数据的类型string[] title = lines[0].Trim().Split('\t');//tab切割// 从第三行(下标为2)开始遍历数据,第二行数据是解释说明for (int i = 2; i < lines.Length; i++){// 创建新的字典存储每行数据Dictionary<string, string> dic = new Dictionary<string, string>();// 按tab切割每行数据string[] tempArr = lines[i].Trim().Split("\t");// 将切割后的数据添加到字典中for (int j = 0; j < tempArr.Length; j++){dic.Add(title[j], tempArr[j]);}// 将字典添加到数据列表中dataDic.Add(dic);}}// 获取所有行的数据public List<Dictionary<string, string>> GetLines(){return dataDic;}// 根据ID获取一行数据public Dictionary<string, string> GetOneById(string id){// 遍历数据列表for (int i = 0; i < dataDic.Count; i++){// 获取当前字典Dictionary<string, string> dic = dataDic[i];// 如果字典中的ID与参数相同,返回该字典if (dic["Id"] == id){return dic;}}// 如果没有找到,返回nullreturn null;}
}
GameConfigManager.cs
using System;
using System.Collections.Generic;
using System.Linq;
using System.Threading.Tasks;
using UnityEngine;
// 游戏配置管理类
public class GameConfigManager
{// 单例模式public static GameConfigManager Instance = new GameConfigManager();private GameConfigData cardData;//卡牌表private GameConfigData enemyData;//敌人表private GameConfigData levelData;//关卡表private GameConfigData cardTypeData; //卡牌类型// 文本资源private TextAsset textAsset;// 初始化配置文件(txt文件 存储到内存)public void Init(){// 加载卡牌数据textAsset = Resources.Load<TextAsset>("Data/card");cardData = new GameConfigData(textAsset.text);// 加载敌人数据textAsset = Resources.Load<TextAsset>("Data/enemy");enemyData = new GameConfigData(textAsset.text);// 加载关卡数据textAsset = Resources.Load<TextAsset>("Data/level");levelData = new GameConfigData(textAsset.text);//卡牌类型数据textAsset = Resources.Load<TextAsset>("Data/cardType");cardTypeData = new GameConfigData(textAsset.text);}// 获取卡牌行数据public List<Dictionary<string, string>> GetCardLines(){return cardData.GetLines();}// 获取敌人行数据public List<Dictionary<string, string>> GetEnemyLines(){return enemyData.GetLines();}// 获取关卡行数据public List<Dictionary<string, string>> GetLevelLines(){return levelData.GetLines();}// 根据ID获取卡牌数据public Dictionary<string, string> GetCardById(string id){return cardData.GetOneById(id);}// 根据ID获取敌人数据public Dictionary<string, string> GetEnemyById(string id){return enemyData.GetOneById(id);}// 根据ID获取关卡数据public Dictionary<string, string> GetLevelById(string id){return levelData.GetOneById(id);}//根据ID获取卡牌类型public Dictionary<string, string> GetCardTypeById(string id){return cardTypeData.GetOneById(id);}
}
游戏入口脚本GameApp初始化并调用测试
//初始化配置表
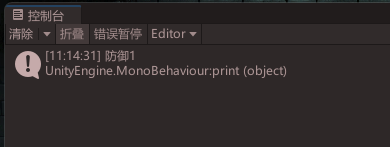
GameConfigManager.Instance.Init();//测试
string name = GameConfigManager.Instance.GetCardById("1001")["Name"];
print(name);
运行效果

输出正确
七、用户信息表
using System;
using System.Collections.Generic;
using System.Linq;
using System.Threading.Tasks;//用户信息管理器(拥有的卡牌等信息金币等)
public class RoleManager
{public static RoleManager Instance = new RoleManager();public List<string> cardList;//存储拥有的卡牌的idpublic void Init(){cardList = new List<string>();//四张攻击卡 四张防御卡 两张效果卡cardList.Add("1000");cardList.Add("1000");cardList.Add("1000");cardList.Add("1000");cardList.Add("1001");cardList.Add("1001");cardList.Add("1001");cardList.Add("1001");cardList.Add("1002");cardList.Add("1002");}
}
游戏入口脚本GameApp初始化
//初始化用户信息
RoleManager.Instance.Init();
八、战斗管理器
战斗单元
using System.Collections;
using System.Collections.Generic;
using UnityEngine;
//战斗单元
public class FightUnit
{public virtual void Init() { }//初始化public virtual void OnUpdate() { }//每帧调用
}
新增不同战斗状态的脚本控制
# 卡牌战斗初始化
public class FightInit : FightUnit{}# 玩家回合
public class Fight_PlayerTurn : FightUnit{}# 敌人回合
public class Fight_EnemyTurn : FightUnit{}# 胜利
public class Fight_Win : FightUnit{}# 失败
public class Fight_Fail : FightUnit{}
战斗管理器FightManager
using System.Collections;
using System.Collections.Generic;
using UnityEngine;//战斗枚举
public enum FightType
{None,Init,Player,//玩家回合Enemy,//敌人回合Win,Fail
}
//战斗管理器
public class FightManager : MonoBehaviour
{public static FightManager Instance;public FightUnit fightUnit;//战斗单元private void Awake(){Instance = this;}//切换战斗类型public void ChangeType(FightType type){switch (type){case FightType.None:break;case FightType.Init:fightUnit = new FightInit();break;case FightType.Player:fightUnit = new Fight_PlayerTurn();break;case FightType.Enemy:fightUnit = new Fight_EnemyTurn();break;case FightType.Win:fightUnit = new Fight_Win();break;case FightType.Fail:fightUnit = new Fight_Fail();break;}fightUnit.Init();// 初始化}private void Update(){if(fightUnit != null){fightUnit.OnUpdate();}}}
挂载脚本
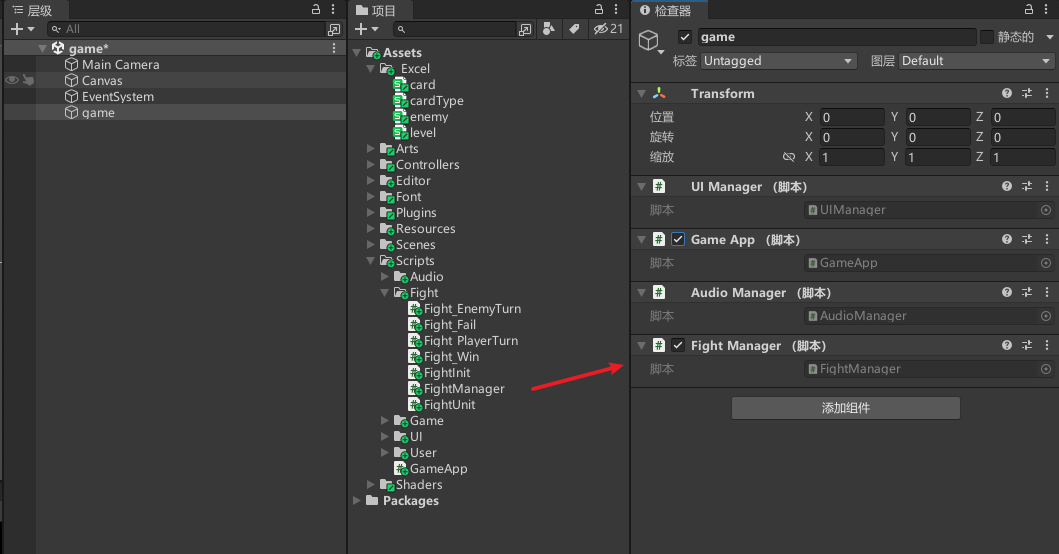
修改LoginUI ,开始游戏时,进行战斗初始化
private void onStartGameBtn(GameObject obj, PointerEventData pData){//关闭login界面Close();//战斗初始化FightManager.Instance.ChangeType(FightType.Init);
}
完善卡牌战斗初始化,切换界面和bgm,记得先新增FightUI脚本代码
using System.Collections;
using System.Collections.Generic;
using UnityEngine;
//卡牌战斗初始化
public class FightInit : FightUnit
{public override void Init() {//切换bgmAudioManager.Instance.PlayBGM("battle");//显示战斗界面UIManager.Instance.ShowUI<FightUI>("FightUI");}public override void OnUpdate() { base.OnUpdate();}
}
运行效果
九、 敌人管理器
敌人脚本Enemy
using System.Collections;
using System.Collections.Generic;
using UnityEngine;
//敌人脚本
public class Enemy : MonoBehaviour
{protected Dictionary<string, string> data;//敌人数据表信息public void Init(Dictionary<string, string> data){this.data = data;}
}
敌人管理器EnemyManeger
using System.Collections;
using System.Collections.Generic;
using UnityEngine;
//敌人管理器
public class EnemyManeger
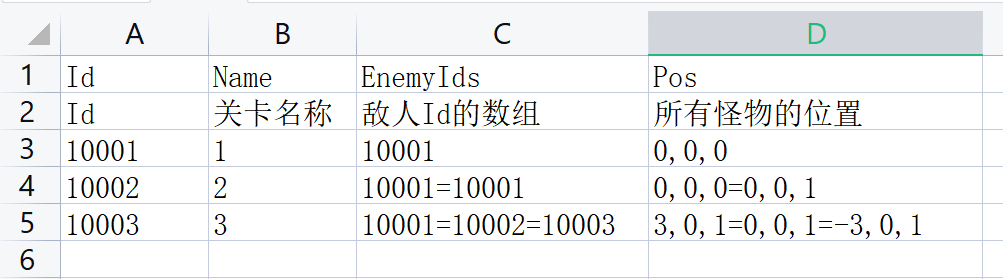
{public static EnemyManeger Instance = new EnemyManeger();private List<Enemy> enemyList;//存储战斗中的敌人//加载敌人资源 id=关卡Idpublic void LoadRes(string id){enemyList = new List<Enemy>();/* * Id Name EnemyIds Pos * Id 关卡名称 敌人Id的数组 所有怪物的位置 * 10003 3 10001=10002=10003 3,0,1=0,0,1=-3,0,1 *///读取关卡表Dictionary<string, string> levelData = GameConfigManager.Instance.GetLevelById(id);//切割字符串,获取敌人id信息string[] enemyIds = levelData["EnemyIds"].Split('=');string[] enemyPos = levelData["Pos"].Split('=');// 敌人位置信息for (int i = 0; i < enemyIds.Length; i++){string enemyId = enemyIds[i];string[] posArr = enemyPos[i].Split(',');//敌人位置float x = float.Parse(posArr[0]);float y = float.Parse(posArr[1]);float z = float.Parse(posArr[2]);// 根据敌人id获得单个敌人信息Dictionary<string, string> enemyData = GameConfigManager.Instance.GetEnemyById(enemyId);GameObject obj = Object.Instantiate(Resources.Load(enemyData["Model"])) as GameObject;//从资源路径加载对应的敌人Enemy enemy = obj.AddComponent<Enemy>();//添加敌人脚本enemy.Init(enemyData);//存储敌人信息enemyList.Add(enemy);//存储到集合obj.transform.position = new Vector3(x, y, z);}}
}
战斗卡牌管理器
using System.Collections;
using System.Collections.Generic;
using UnityEngine;//战斗卡牌管理器
public class FightCardManager
{public static FightCardManager Instance = new FightCardManager();public List<string> cardList;//卡堆集合public List<string> usedCardList;//弃牌堆//初始化public void Init(){cardList = new List<string>();usedCardList = new List<string>();//定义临时集合List<string> tempList = new List<string>();//将玩家的卡牌存储到临时集合tempList.AddRange(RoleManager.Instance.cardList);while (tempList.Count > 0){//随机下标int tempIndex = Random.Range(0, tempList.Count);//添加到卡堆cardList.Add(tempList[tempIndex]);//临时集合删除tempList.RemoveAt(tempIndex);}Debug.Log(cardList.Count);}
}
卡牌战斗初始化FightInit,新增敌人生成,初始化战斗卡牌
//这里读取关卡三的敌人数据做测试,可以自由选择其他的
EnemyManeger.Instance.LoadRes("10003");//初始化战斗卡牌
FightCardManager.Instance.Init();
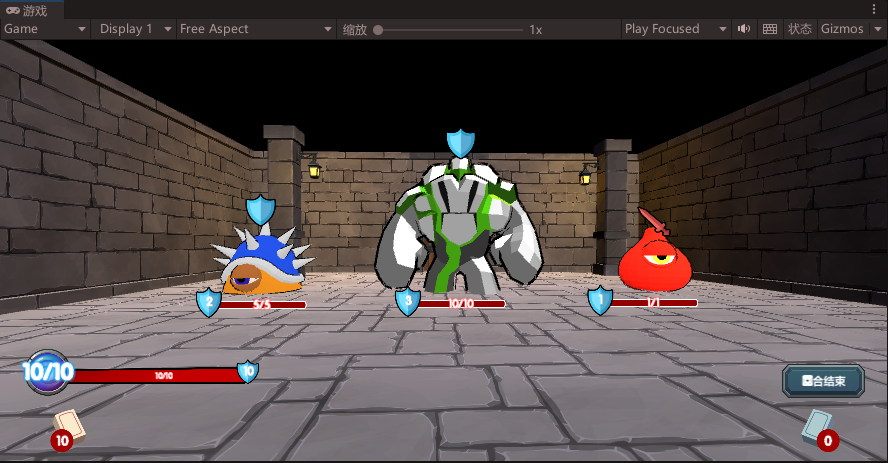
运行效果,敌人就被加载出来了
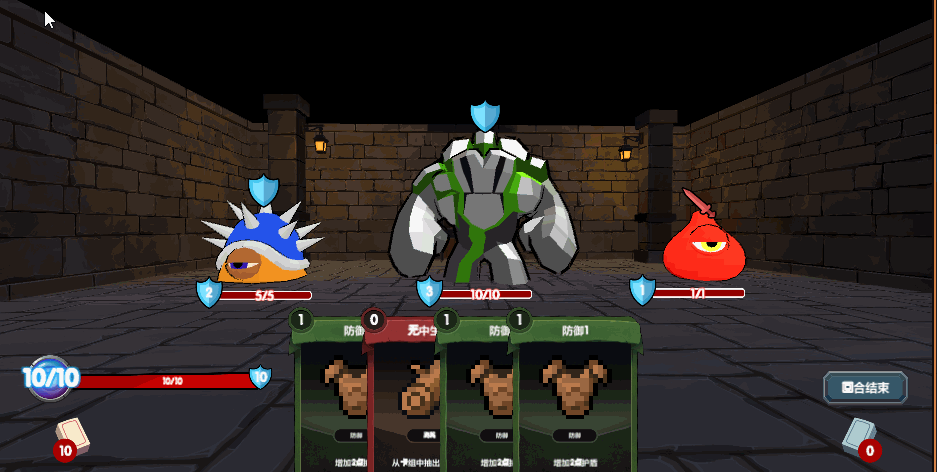
十、玩家血量、能量、防御值、卡牌数
修改战斗管理器FightManager代码
public int MaxHp;//最大血量
public int CurHp;//当前血量
public int MaxPowerCount;//最大能量(卡牌使用会消耗能量)
public int CurPowerCount;//当前能量
public int DefenseCount;//防御值public void Init()
{MaxHp = 10;CurHp = 10;MaxPowerCount = 10;CurPowerCount = 10;DefenseCount = 10;
}
卡牌战斗初始化FightInit脚本,调用初始化战斗数值
//初始化战斗数值
FightManager.Instance.Init();
完善战斗界面FightUI代码
using System.Collections;
using System.Collections.Generic;
using UnityEngine;
using UnityEngine.EventSystems;
using UnityEngine.UI;//战斗界面
public class FightUI : UIBase
{private Text cardCountTxt;//卡牌数量private Text noCardCountTxt;//弃牌堆数量private Text powerTxt;private Text hpTxt;private Image hpImg;private Text fyTxt;//防御数值private void Awake(){cardCountTxt = transform.Find("hasCard/icon/Text").GetComponent<Text>();noCardCountTxt = transform.Find("noCard/icon/Text").GetComponent<Text>();powerTxt = transform.Find("mana/Text").GetComponent<Text>();hpTxt = transform.Find("hp/moneyTxt").GetComponent<Text>();hpImg = transform.Find("hp/fill").GetComponent<Image>();fyTxt = transform.Find("hp/fangyu/Text").GetComponent<Text>();}private void Start(){UpdateHp();UpdatePower();UpdateDefense();UpdateCardCount();UpdateUsedCardCount();}//更新血量显示public void UpdateHp(){hpTxt.text = FightManager.Instance.CurHp + "/" + FightManager.Instance.MaxHp;hpImg.fillAmount = (float)FightManager.Instance.CurHp / (float)FightManager.Instance.MaxHp;}//更新能量public void UpdatePower(){powerTxt.text = FightManager.Instance.CurPowerCount + "/" + FightManager.Instance.MaxPowerCount;}//防御更新public void UpdateDefense(){fyTxt.text = FightManager.Instance.DefenseCount.ToString();}//更新卡堆数量public void UpdateCardCount(){cardCountTxt.text = FightCardManager.Instance.cardList.Count.ToString();}//更新弃牌堆数量public void UpdateUsedCardCount(){noCardCountTxt.text = FightCardManager.Instance.usedCardList.Count.ToString();}
}
运行效果
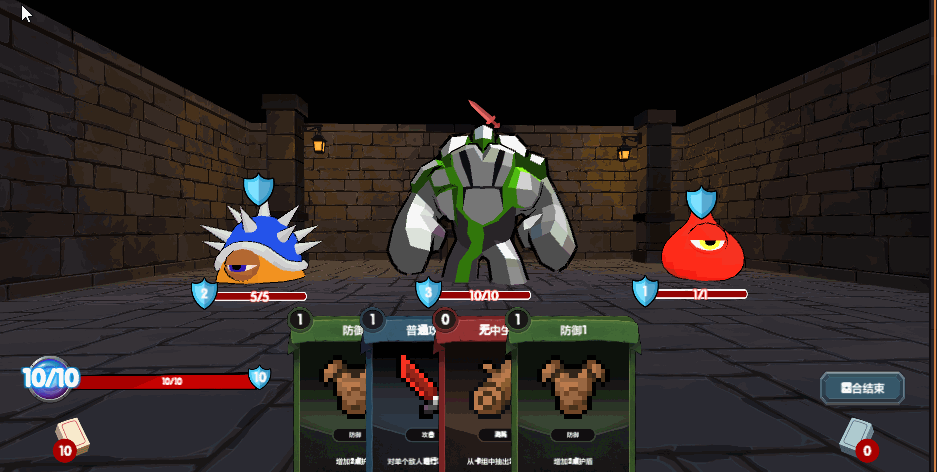
十一、敌人血量 行动显示逻辑
UI管理器UIManager新增方法
//创建敌人头部的行动图标物体
public GameObject CreateActionIcon()
{GameObject obj = Instantiate(Resources.Load("UI/actionIcon"), canvasTf) as GameObject;obj.transform.SetAsFirstSibling();// 设置在父级的第一位return obj;
}//创建敌人底部的血量物体
public GameObject CreateHpItem()
{GameObject obj = Instantiate(Resources.Load("UI/HpItem"), canvasTf) as GameObject;obj.transform.SetAsFirstSibling();// 设置在父级的第一位return obj;
}
完善敌人脚本Enemy
using System.Collections;
using System.Collections.Generic;
using UnityEngine;
using UnityEngine.UI;public enum ActionType
{None,Defend,//加防御Attack,//攻击
}//敌人脚本
public class Enemy : MonoBehaviour
{protected Dictionary<string, string> data;//敌人数据表信息public ActionType type;public GameObject hpItemObj;public GameObject actionObj;//UI相关public Transform attackTf;public Transform defendTf;public Text defendTxt;public Text hpTxt;public Image hpImg;//数值相关public int Defend;public int Attack;public int MaxHp;public int CurHp;public void Init(Dictionary<string, string> data){this.data = data;}void Start(){type = ActionType.None;hpItemObj = UIManager.Instance.CreateHpItem();actionObj = UIManager.Instance.CreateActionIcon();attackTf = actionObj.transform.Find("attack");defendTf = actionObj.transform.Find("defend");defendTxt = hpItemObj.transform.Find("fangyu/Text").GetComponent<Text>();hpTxt = hpItemObj.transform.Find("hpTxt").GetComponent<Text>();hpImg = hpItemObj.transform.Find("fill").GetComponent<Image>();// 设置血条行动力位置hpItemObj.transform.position = Camera.main.WorldToScreenPoint(transform.position + Vector3.down * 0.2f);actionObj.transform.position = Camera.main.WorldToScreenPoint(transform.Find("head").position);SetRandomAction();//初始化数值Attack = int.Parse(data["Attack"]);CurHp = int.Parse(data["Hp"]);MaxHp = CurHp;Defend = int.Parse(data["Defend"]);UpdateHp();UpdateDefend();}//随机一个行动void SetRandomAction(){int ran = Random.Range(1, 3);type = (ActionType)ran;switch (type){case ActionType.None:break;case ActionType.Defend:attackTf.gameObject.SetActive(false);defendTf.gameObject.SetActive(true);break;case ActionType.Attack:attackTf.gameObject.SetActive(true);defendTf.gameObject.SetActive(false);break;}}//更新血量信息public void UpdateHp(){hpTxt.text = CurHp + "/" + MaxHp;hpImg.fillAmount = (float)CurHp / (float)MaxHp;}//更新防御信息public void UpdateDefend(){defendTxt.text = Defend.ToString();}
}
效果,为了让战斗效果更丰富,加了个背景
十二、UI提示效果实现
现在卡牌战斗初始化FightInit调用切换玩家回合功能
//切换到玩家回合
FightManager.Instance.ChangeType(FightType.Player);
UI管理器UIManager新增调用提示界面方法,引入DoTween插件,实现提示弹窗的动画效果,不会用DoTween的可以看我之前的另一篇文章:
【unity插件】 DoTween动画插件的安装和使用整合(最全)
//提示界面
public void ShowTip(string msg, Color color, System.Action callback = null)
{GameObject obj = Instantiate(Resources.Load("UI/Tips"), canvasTf) as GameObject;Text text = obj.transform.Find("bg/Text").GetComponent<Text>();text.color = color;text.text = msg;Tween scale1 = obj.transform.Find("bg").DOScaleY(1, 0.4f);Tween scale2 = obj.transform.Find("bg").DOScaleY(0, 0.4f);Sequence seq = DOTween.Sequence();seq.Append(scale1);seq.AppendInterval(0.5f);seq.Append(scale2);seq.AppendCallback(delegate (){if (callback != null) callback();});MonoBehaviour.Destroy(obj, 2);
}
玩家回合Fight_PlayerTurn调用提示效果
UIManager.Instance.ShowTip("玩家回合", Color.green, delegate(){Debug.Log("抽卡");
});
效果
十三、卡牌生成
战斗卡牌管理器FightCardManager新增两个方法
//是否有卡
public bool HasCard()
{return cardList.Count > 0;
}
//抽卡
public string DrawCard()
{string id = cardList[cardList.Count - 1];cardList.RemoveAt(cardList.Count - 1);return id;
}
新增CardItem脚本
public class CardItem : MonoBehaviour
{public Dictionary<string, string> data;//卡牌信息public void Init(Dictionary<string, string> data){this.data = data;}
}
战斗界面FightUI修改
//存储卡牌物体的合集
private List<CardItem> cardItemList;private void Awake()
{cardItemList = new List<CardItem>();
}//创建卡牌物体
public void CreateCardItem(int count)
{if (count > FightCardManager.Instance.cardList.Count){count = FightCardManager.Instance.cardList.Count;}for (int i = 0; i < count; i++){GameObject obj = Instantiate(Resources.Load("UI/CardItem"), transform) as GameObject;obj.GetComponent<RectTransform>().anchoredPosition = new Vector2(-1000, -700);var item = obj.AddComponent<CardItem>();string cardId = FightCardManager.Instance.DrawCard();Dictionary<string, string> data = GameConfigManager.Instance.GetCardById(cardId);item.Init(data);cardItemList.Add(item);}
}//更新卡牌位置
public void UpdateCardItemPos()
{float offset = 800f / cardItemList.Count;Vector2 startPos = new Vector2(-cardItemList.Count / 2f * offset + offset * 0.5f, -500);for (int i = 0; i < cardItemList.Count; i++){cardItemList[i].GetComponent<RectTransform>().DOAnchorPos(startPos, 0.5f);startPos.x = startPos.x + offset;}
}
UI管理器UIManager新增方法
//获取某个界面的脚本
public T GetUI<T>(string uiName) where T :  UIBase{UIBase ui = Find(uiName);if(ui != null){return ui.GetComponent<T>();}return null;
}
玩家回合调用抽卡方法
public override void Init() {UIManager.Instance.ShowTip("玩家回合", Color.green, delegate(){//抽卡Debug.Log("抽卡");UIManager.Instance.GetUI<FightUI>("FightUI").CreateCardItem(4);//抽4张UIManager.Instance.GetUI<FightUI>("FightUI").UpdateCardItemPos();//更新卡牌位置});
}
运行效果
十四、卡片信息显示
CardItem新增开始方法,渲染卡牌信息
private void Start()
{transform.Find("bg").GetComponent<Image>().sprite = Resources.Load<Sprite>(data["BgIcon"]);transform.Find("bg/icon").GetComponent<Image>().sprite = Resources.Load<Sprite>(data["Icon"]);transform.Find("bg/msgTxt").GetComponent<Text>().text = string.Format(data["Des"], data["Arg0"]);transform.Find("bg/nameTxt").GetComponent<Text>().text = data["Name"];transform.Find("bg/useTxt").GetComponent<Text>().text = data["Expend"];transform.Find("bg/Text").GetComponent<Text>().text = GameConfigManager.Instance.GetCardTypeById(data["Type"])["Name"];
}
效果
十五、卡牌选中效果
CardItem 新增鼠标事件
public class CardItem : MonoBehaviour, IPointerEnterHandler, IPointerExitHandler
{//鼠标进入public void OnPointerEnter(PointerEventData eventData){transform.DOScale(1.5f, 0.25f);index = transform.GetSiblingIndex();transform.SetAsLastSibling();transform.Find("bg").GetComponent<Image>().material.SetColor("_lineColor", Color.yellow);transform.Find("bg").GetComponent<Image>().material.SetFloat("_lineWidth",10);}//鼠标离开public void OnPointerExit(PointerEventData eventData){transform.DOScale(1, 0.25f);transform.SetSiblingIndex(index);transform.Find("bg").GetComponent<Image>().material.SetColor("_lineColor", Color.black);transform.Find("bg").GetComponent<Image>().material.SetFloat("_lineWidth", 1);}private void Start(){//。。。//设置bg背景image的外边框材质transform.Find("bg").GetComponent<Image>().material = Instantiate(Resources.Load<Material>("Mats/outline"));}
}
运行效果
十六、卡牌拖拽
CardItem新增拖拽事件
public class CardItem : MonoBehaviour, IPointerEnterHandler, IPointerExitHandler, IBeginDragHandler, IDragHandler, IEndDragHandler
{Vector2 initPos;//拖拽开始时记录卡牌的位置//开始拖拽public virtual void OnBeginDrag(PointerEventData eventData){initPos = transform.GetComponent<RectTransform>().anchoredPosition;//播放声音AudioManager.Instance.PlaEffect("Cards/draw");}//拖拽中public virtual void OnDrag(PointerEventData eventData){Vector2 pos;if (RectTransformUtility.ScreenPointToLocalPointInRectangle(transform.parent.GetComponent<RectTransform>(),eventData.position,eventData.pressEventCamera,out pos)){transform.GetComponent<RectTransform>().anchoredPosition = pos;}}//结束拖拽public virtual void OnEndDrag(PointerEventData eventData){transform.GetComponent<RectTransform>().anchoredPosition = initPos;transform.SetSiblingIndex(index);}
}
运行效果

十七、卡片分支(攻击卡、抽卡、防御卡)
修改FightUI创建卡牌物体方法CreateCardItem
// var item = obj.AddComponent<CardItem>();
改为
CardItem item = obj.AddComponent(System.Type.GetType(data["Script"])) as CardItem;
新增各种卡牌脚本
# 无中生有卡(抽卡效果的卡片)
public class AddCard : CardItem {}# 攻击卡
public class AttackCardItem : CardItem {}# 防御卡(加护盾效果)
public class DefendCard : CardItem {}
十八、防御卡效果
战斗界面FightUI新增删除卡牌物体方法
//删除卡牌物体
public void RemoveCard(CardItem item)
{AudioManager.Instance.PlayEffect("Cards/cardShove");//移除音效item.enabled = false;//禁用卡牌逻辑//添加到弃牌集合FightCardManager.Instance.usedCardList.Add(item.data["Id"]);//更新使用后的卡牌数量noCardCountTxt.text = FightCardManager.Instance.usedCardList.Count.ToString();//从集合中删除cardItemList.Remove(item);//刷新卡牌位置UpdateCardItemPos();//卡牌移到弃牌堆效果item.GetComponent<RectTransform>().DOAnchorPos(new Vector2(1000, -700), 0.25f);item.transform.DOScale(0, 0.25f);Destroy(item.gameObject, 1);
}
CardItem新增使用卡牌方法
//尝试使用卡牌
public virtual bool TryUse()
{//卡牌需要的费用int cost = int.Parse(data["Expend"]);if (cost > FightManager.Instance.CurPowerCount){//费用不足AudioManager.Instance.PlayEffect("Effect/lose");//使用失败音效//提示UIManager.Instance.ShowTip("费用不足", Color.red);return false;}else{//减少费用FightManager.Instance.CurPowerCount -= cost;//刷新费用文本UIManager.Instance.GetUI<FightUI>("FightUI").UpdatePower();//使用的卡牌删除UIManager.Instance.GetUI<FightUI>("FightUI").RemoveCard(this);return true;}
}//创建卡牌使用后的特效
public void PlayEffect(Vector3 pos)
{GameObject effectobj = Instantiate(Resources.Load(data["Effects"])) as GameObject;effectobj.transform.position = pos;Destroy(effectobj, 2);
}
防御卡DefendCard调用
public class DefendCard : CardItem
{public override void OnEndDrag(PointerEventData eventData){if (TryUse() == true){//使用效果int val = int.Parse(data["Arg0"]);//播放使用后的声音(每张卡使用的声音可能不一样)AudioManager.Instance.PlayEffect("Effect/healspell");// 这个字段可以配置到表中//增加防御力FightManager.Instance.DefenseCount += val;// 刷新防御文本UIManager.Instance.GetUI<FightUI>("FightUI").UpdateDefense();Vector3 pos = Camera.main.transform.position;pos.y = 0;PlayEffect(pos);}else{base.OnEndDrag(eventData);}}
}
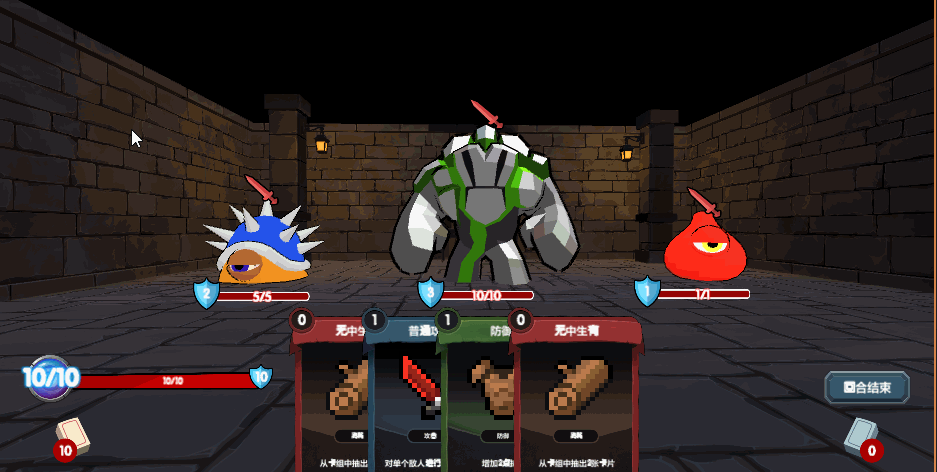
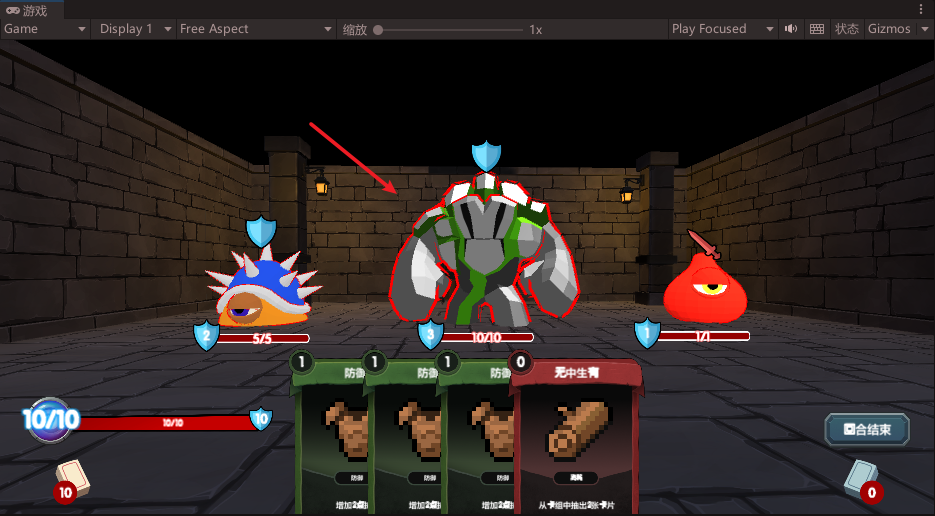
效果
十九、抽卡的卡牌效果
public class AddCard : CardItem
{public override void OnEndDrag(PointerEventData eventData){if (TryUse() == true){int val = int.Parse(data["Arg0"]);//抽卡数量//是否有卡抽if (FightCardManager.Instance.HasCard() == true){UIManager.Instance.GetUI<FightUI>("FightUI").CreateCardItem(val);UIManager.Instance.GetUI<FightUI>("FightUI").UpdateCardItemPos();Vector3 pos = Camera.main.ScreenToWorldPoint(new Vector3(Input.mousePosition.x, Input.mousePosition.y, 2.5f));PlayEffect(pos);}else{base.OnEndDrag(eventData);}}else{base.OnEndDrag(eventData);}}
}
效果
二十、怪物选中效果
修改Enemy
SkinnedMeshRenderer _meshrenderer;
void Start()
{_meshrenderer = transform.GetComponentInChildren<SkinnedMeshRenderer>();//。。。//TODO:测试OnSelect();
}//被攻击卡选中,显示红边
public void OnSelect(){_meshrenderer.material.SetColor("_OtlColor", Color.red);
}//未选中
public void OnUnSelect(){_meshrenderer.material.SetColor("_OtlColor", Color.black);
}
效果
二十一、怪物受伤
敌人管理器EnemyManeger新增移除敌人方法
//移除敌人
public void DeleteEnemy(Enemy enemy){enemyList.Remove(enemy);//TODO:后续还要做击杀所有怪物的判断
}
敌人脚本Enemy新增受伤方法
public Animator ani;void Start()
{ani = transform.GetComponent<Animator>();
}//受伤
public void Hit(int val)
{//先扣护盾if (Defend > val){//扣护盾Defend -= val;//播放受伤ani.Play("hit", 0, 0);}else{val = val - Defend;Defend = 0;CurHp -= val;if (CurHp <= 0){CurHp = 0;// 播放死亡ani.Play("die");//敌人从列表中移除EnemyManeger.Instance.DeleteEnemy(this);Destroy(gameObject, 1);Destroy(actionObj);Destroy(hpItemObj);}else{//受伤ani.Play("hit", 0, 0);}}//刷新血量等uiUpdateDefend();UpdateHp();
}
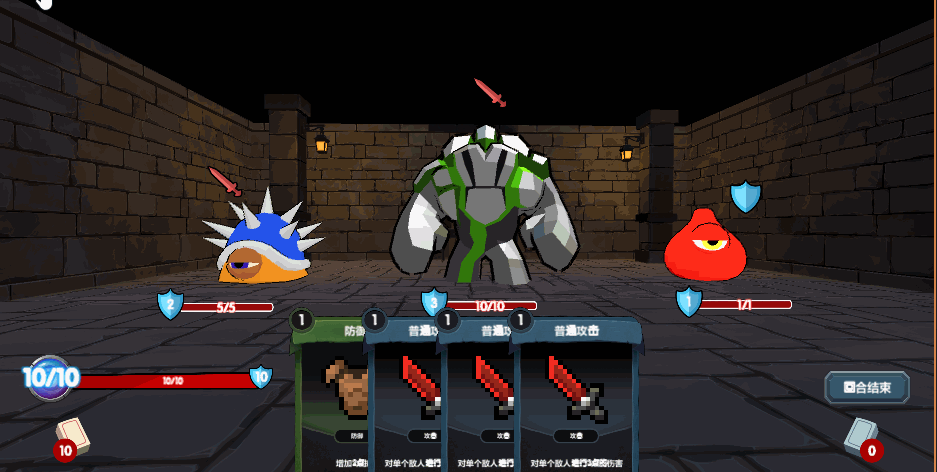
二十二、攻击卡效果
AttackCardItem 脚本
using UnityEngine;
using UnityEngine.EventSystems;
using System.Collections;public class AttackCardItem : CardItem, IPointerDownHandler
{//按下public void OnPointerDown(PointerEventData eventData){//播放声音AudioManager.Instance.PlayEffect("Cards/draw");//隐藏鼠标Cursor.visible = false;//关闭所有协同程序StopAllCoroutines();//启动鼠标操作协同程序StartCoroutine(OnMouseDownRight(eventData));}IEnumerator OnMouseDownRight(PointerEventData pData){while (true){//如果按下鼠标右键跳出循环if (Input.GetMouseButton(1)) break;Vector2 pos;if (RectTransformUtility.ScreenPointToLocalPointInRectangle(transform.parent.GetComponent<RectTransform>(),pData.position,pData.pressEventCamera,out pos)){// 进行射线检测是否碰到怪物CheckRayToEnemy();}yield return null;}}Enemy hitEnemy;//射线检测到的敌人脚本private void CheckRayToEnemy(){Ray ray = Camera.main.ScreenPointToRay(Input.mousePosition);RaycastHit hit;if (Physics.Raycast(ray, out hit, 10000, LayerMask.GetMask("Enemy"))){hitEnemy = hit.transform.GetComponent<Enemy>();hitEnemy.OnSelect();//选中//如果按下鼠标左键使用攻击卡if (Input.GetMouseButtonDown(0)){//关闭所有协同程序StopAllCoroutines();//鼠标显示Cursor.visible = true;if (TryUse() == true){//播放特效PlayEffect(hitEnemy.transform.position);//打击音效AudioManager.Instance.PlayEffect("Effect/sword");//敌人受伤int val = int.Parse(data["Arg0"]);hitEnemy.Hit(val);}//敌人未选中hitEnemy.OnUnSelect();//设置敌人脚本nullhitEnemy = null;}}else{//未射到怪物if (hitEnemy != null){hitEnemy.OnUnSelect();hitEnemy = null;}}}
}
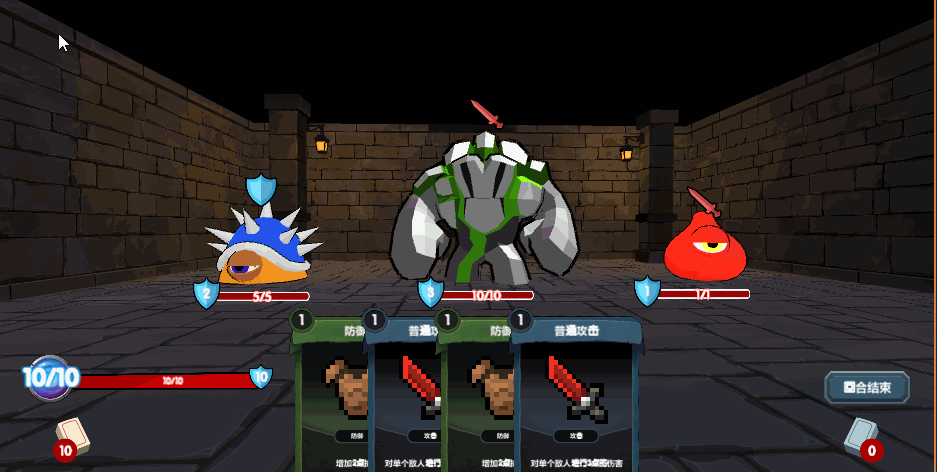
运行效果,记得把怪物的图层修改为Enemy
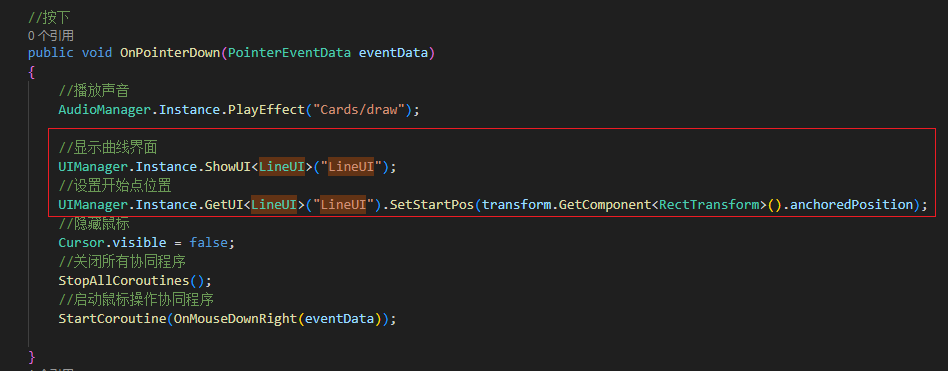
二十三、曲线效果
LineUI脚本
using UnityEngine;
using UnityEngine.EventSystems;
using System.Collections;public class LineUI : UIBase
{//设置开始位置public void SetStartPos(Vector2 pos){transform.GetChild(0).GetComponent<RectTransform>().anchoredPosition = pos;}//设置终点位置public void SetEndPos(Vector2 pos){transform.GetChild(transform.childCount - 1).GetComponent<RectTransform>().anchoredPosition = pos;//开始点Vector3 startPos = transform.GetChild(0).GetComponent<RectTransform>().anchoredPosition;//终点Vector3 endPos = pos;//中点Vector3 midPos = Vector3.zero;midPos.y = (startPos.y + endPos.y) * 0.5f;midPos.x = startPos.x;//计算开始点跟终点的方向Vector3 dir = (endPos - startPos).normalized;float angle = Mathf.Atan2(dir.y, dir.x) * Mathf.Rad2Deg;//弧度转角度//设置终点角度transform.GetChild(transform.childCount - 1).eulerAngles = new Vector3(0, 0, angle - 90);for (int i = transform.childCount - 1; i >= 0; i--){transform.GetChild(i).GetComponent<RectTransform>().anchoredPosition = GetBezier(startPos, midPos, endPos, i / (float)transform.childCount);if (i != transform.childCount - 1){dir = (transform.GetChild(i + 1).GetComponent<RectTransform>().anchoredPosition - transform.GetChild(i).GetComponent<RectTransform>().anchoredPosition).normalized;angle = Mathf.Atan2(dir.y, dir.x) * Mathf.Rad2Deg;transform.GetChild(i).eulerAngles = new Vector3(0, 0, angle - 90);}}}//贝塞尔曲线public Vector3 GetBezier(Vector3 start, Vector3 mid, Vector3 end, float t){return (1f - t) * (1f - t) * start + 2.0f * t * (1.0f - t) * mid + t * t * end;}
}
AttackCardItem调用
效果
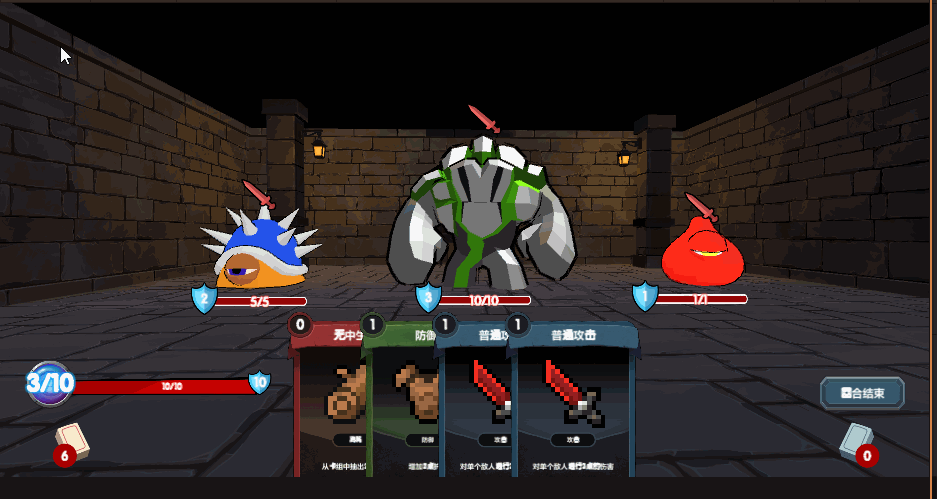
二十四、切换敌人回合
修改战斗界面FightUI代码,绑定结束事件和删除所有卡牌
private void Awake()
{//结束回合按钮,绑定点击事件transform.Find("turnBtn").GetComponent<Button>().onClick.AddListener(onChangeTurnBtn);}//玩家回合结束,切换到敌人回合
private void onChangeTurnBtn()
{//只有玩家回合才能切换if (FightManager.Instance.fightUnit is Fight_PlayerTurn)  FightManager.Instance.ChangeType(FightType.Enemy);
}//删除所有卡牌
public void RemoveAllCards()
{for (int i = cardItemList.Count - 1; i > 0; i--){RemoveCard(cardItemList[i]);}
}
敌人回合Fight_EnemyTurn初始化调用删除所有卡牌和弹窗提示
public override void Init()
{//删除所有卡牌UIManager.Instance.GetUI<FightUI>("FightUI").RemoveAllCards();//显示敌人回合提示UIManager.Instance.ShowTip("敌人回合", Color.red, delegate (){Debug.Log("执行敌人ai");});
}
效果
二十五、敌人行为逻辑
战斗管理器FightManager新增玩家受击方法
//玩家受击
public void GetPlayerHit(int hit)
{//扣护盾if (DefenseCount > hit){DefenseCount -= hit;} else {hit = hit - DefenseCount;DefenseCount = 0;CurHp -= hit;if (CurHp <= 0){CurHp = 0;//切换到游戏失败状态ChangeType(FightType.Fail);}}// 更新界面UIManager.Instance.GetUI<FightUI>("FightUI").UpdateHp();UIManager.Instance.GetUI<FightUI>("FightUI").UpdateDefense();
}
敌人脚本Enemy修改
//隐藏怪物头上的行动标志
public void HideAction()
{attackTf.gameObject.SetActive(false);defendTf.gameObject.SetActive(false);
}//执行敌人行动
public IEnumerator DoAction()
{HideAction();//播放对应的动画(可以配置到excel表这里都默认播放攻击)ani.Play("attack");//等待某一时间的后执行对应的行为(也可以配置到excel表)yield return new WaitForSeconds(0.5f);//这里我写死了switch (type){case ActionType.None:break;case ActionType.Defend:// 加防御Defend += 1;UpdateDefend();//可以播放对应的特效break;case ActionType.Attack:// 玩家扣血FightManager.Instance.GetPlayerHit(Attack);//摄像机可以抖一抖Camera.main.DOShakePosition(0.1f, 0.2f, 5, 45);break;}//等待动画播放完(这里的时长也可以配置)yield return new WaitForSeconds(1);//播放待机ani.Play("idle");
}
EnemyManeger新增执行活着的怪物的行为
//执行活着的怪物的行为
public IEnumerator DoAllEnemyAction()
{for (int i = 0; i < enemyList.Count; i++){yield return FightManager.Instance.StartCoroutine(enemyList[i].DoAction());}// 行动完后更新所有敌人行为for (int i = 0; i < enemyList.Count; i++){enemyList[i].SetRandomAction();}// 切换到玩家回合FightManager.Instance.ChangeType(FightType.Player);
}
修改Fight_EnemyTurn调用活着的怪物的行为
public override void Init()
{//删除所有卡牌UIManager.Instance.GetUI<FightUI>("FightUI").RemoveAllCards();//显示敌人回合提示UIManager.Instance.ShowTip("敌人回合", Color.red, delegate (){FightManager.Instance.StartCoroutine(EnemyManeger.Instance.DoAllEnemyAction());});}
效果
二十六、游戏胜利or结束逻辑
完善玩家回合Fight_PlayerTurn代码
public override void Init()
{UIManager.Instance.ShowTip("玩家回合", Color.green, delegate (){//回复行动力FightManager.Instance.CurPowerCount = 3;UIManager.Instance.GetUI<FightUI>("FightUI").UpdatePower();//卡堆己经没有卡重新初始化if (FightCardManager.Instance.HasCard() == false){FightCardManager.Instance.Init();//更新弃卡堆数量UIManager.Instance.GetUI<FightUI>("FightUI").UpdateUsedCardCount();}//抽卡Debug.Log("抽卡");UIManager.Instance.GetUI<FightUI>("FightUI").CreateCardItem(4);//抽4张UIManager.Instance.GetUI<FightUI>("FightUI").UpdateCardItemPos();//更新卡牌位置//更新卡牌数UIManager.Instance.GetUI<FightUI>("FightUI").UpdateCardCount();});
}
游戏失败Fight_Fail代码
public override void Init()
{Debug.Log("失败了");FightManager.Instance.StopAllCoroutines();//显失败界面石到这里的小伙伴可以自已作
}
游戏胜利Fight_Win代码
public override void Init() {Debug.Log("游戏胜利");//何以显示结算界面预制体有了能看到这里的小伙伴应该可以自己补上了
}
敌人管理器EnemyManeger击杀所有怪物的判断
//移除敌人
public void DeleteEnemy(Enemy enemy)
{enemyList.Remove(enemy);//击杀所有怪物的判断if (enemyList.Count == 0){FightManager.Instance.ChangeType(FightType.Win);}
}
效果
最终效果
源码
要啥源码,给我好好看,好好学
参考
【视频】https://www.bilibili.com/video/BV1eF41177hu/
完结
赠人玫瑰,手有余香!如果文章内容对你有所帮助,请不要吝啬你的点赞评论和关注,以便我第一时间收到反馈,你的每一次支持都是我不断创作的最大动力。当然如果你发现了文章中存在错误或者有更好的解决方法,也欢迎评论私信告诉我哦!
好了,我是向宇,https://xiangyu.blog.csdn.net
一位在小公司默默奋斗的开发者,出于兴趣爱好,于是最近才开始自习unity。如果你遇到任何问题,也欢迎你评论私信找我, 虽然有些问题我可能也不一定会,但是我会查阅各方资料,争取给出最好的建议,希望可以帮助更多想学编程的人,共勉~

这篇关于【用unity实现100个游戏之7】从零开始制作一个仿杀戮尖塔卡牌回合制游戏的文章就介绍到这儿,希望我们推荐的文章对编程师们有所帮助!


