本文主要是介绍【Unity C#_菜单Window开发系列_Inspector Component UnityEditor开发】,希望对大家解决编程问题提供一定的参考价值,需要的开发者们随着小编来一起学习吧!
GUI系列操作
- 1.枚举菜单实现
- 文件1:Assets/MyScript/Test1.cs
- 代码如下:
- 文件2:Assets/MyScript/Editor/Test1Editor.cs
- 代码如下:
- 测试一下
- 新建一个场景,新建一个Empty 节点,用来测试枚举组件
- 将文件1:Assets/MyScript/Test1.cs拖到Game Object的Inspector面板上。
- 实现了一个简单的枚举菜单:
- 2.Window窗口菜单实现
- 窗口菜单实现1——显示窗口:
- 文件:Assets/MyScript/Test2Window.cs
- 代码如下:
- 测试一下
- 保存文件后,在窗口左边有"测试2/ShowWindow"菜单选项
- 打开"测试2/ShowWindow"窗口,如下:
- 窗口菜单实现2——弹出类型:
- 文件:Assets/MyScript/Test3Window.cs
- 代码如下:
- 测试一下
- 打开"测试2/Test3Window"窗口,如下:
- 窗口菜单实现3——浮动工具窗口:
- 文件:Assets/MyScript/Test4Window.cs
- 代码如下:
- 测试一下
- 打开"测试2/Test4Window"窗口,如下:
- 3.Window窗口文本与颜色
- 文件:Assets/MyScript/Test6Window.cs
- 代码如下:
- 测试一下
- 打开"测试2/Test6Window"窗口,如下:
- 窗口文本与颜色关键字:TextField、TextArea、PasswordField和ColorField。
- 4.Window窗口标签字段
- 文件:Assets/MyScript/Test7Window.cs
- 代码如下:
- 测试一下
- 打开"测试2/Test7Window"窗口,如下:
- 窗口标签字段关键字:LabelField("文本输入框");和Space(20);
- 5.Window窗口滑动条
- 文件:Assets/MyScript/Test8Window.cs
- 代码如下:
- 测试一下
- 打开"测试2/Test8Window"窗口,如下:
- 窗口标签字段关键字:Slider、IntSlider和EditorGUILayout.MinMaxSlider(ref this.mMinFloat, ref this.mMaxFloat, 0, 100);
- 6.Window三维四维数组
- 文件:Assets/MyScript/Test9Window.cs
- 代码如下:
- 测试一下
- 打开"测试2/Test9Window"窗口,如下:
- 窗口标签字段关键字:Vector4Field、RectField和BoundsField
- 7.Window标签/层和对象选择
- 文件:Assets/MyScript/Test10Window.cs
- 代码如下:
- 测试一下
- 打开"测试2/Test10Window"窗口,如下:
- 8.Window实现Bool和折叠框
- 文件:Assets/MyScript/Test11Window.cs
- 代码如下:
- 测试一下
- 打开"测试2/Test11Window"窗口,如下:
- Bool和折叠框实现结构:
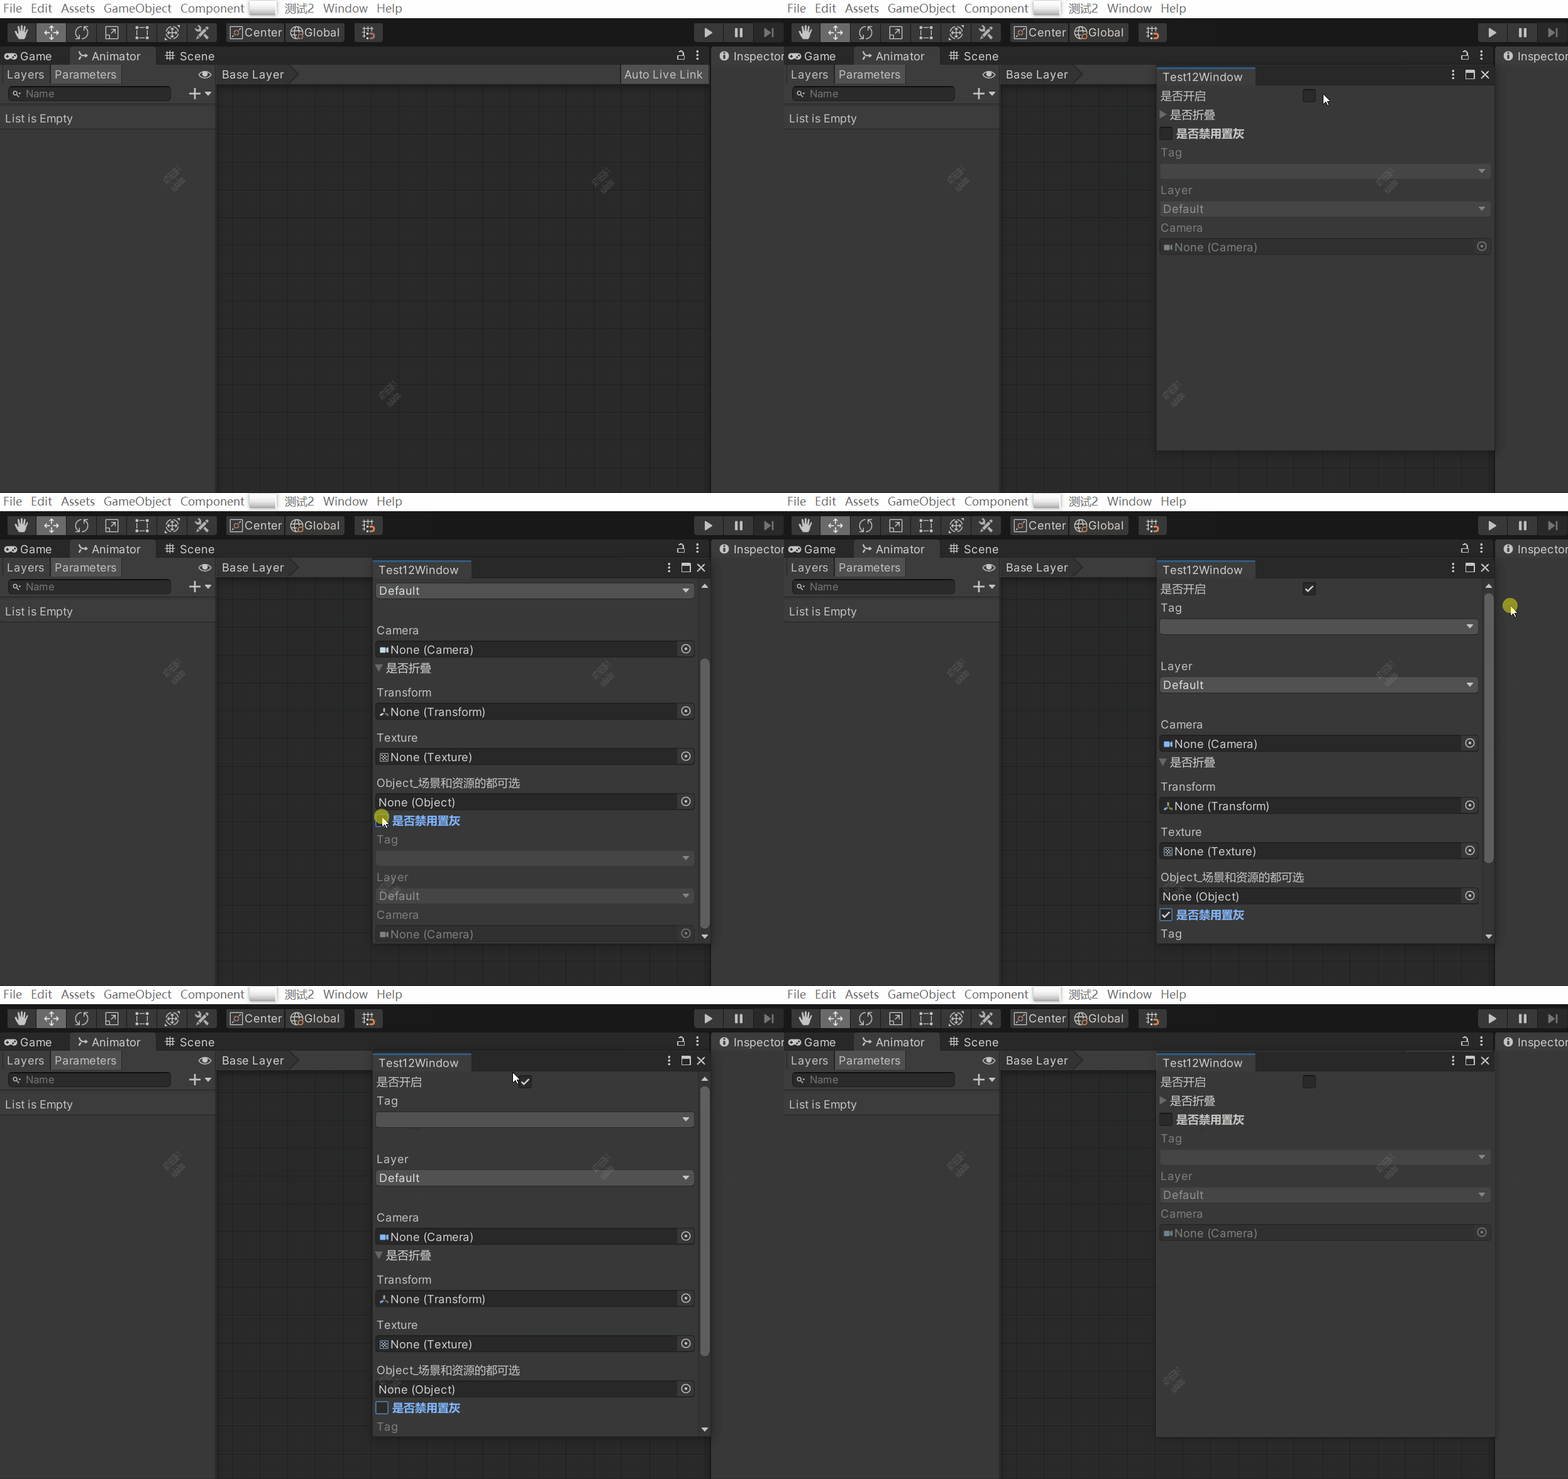
- 9.Window实现滑动条和禁用置灰选项
- 文件:Assets/MyScript/Test12Window.cs
- 代码如下:
- 测试一下
- 打开"测试2/Test12Window"窗口,如下:
- 窗口右侧滑动条实现结构
- 是否禁用置灰实现结构
1.枚举菜单实现
文件1:Assets/MyScript/Test1.cs
代码如下:
using System.Collections;
using System.Collections.Generic;
using UnityEngine;public class Test1 : MonoBehaviour
{public Enum4 mEnum;public int mInt;public float mFloat;public string mStr;public Color mColor;// Start is called before the first frame updatevoid Start(){}// Update is called once per framevoid Update(){}
}public enum Enum4
{None,IntVal,FloatVal,StrVal,ColorVal
}
文件2:Assets/MyScript/Editor/Test1Editor.cs
代码如下:
using System.Collections;
using System.Collections.Generic;
using UnityEngine;
using UnityEditor;[CustomEditor(typeof(Test1),true)]
public class Test4Editor : Editor
{public SerializedObject mObj;public SerializedProperty mEnum;public SerializedProperty mInt;public SerializedProperty mFloat;public SerializedProperty mStr;public SerializedProperty mColor;public void OnEnable(){this.mObj = new SerializedObject(target);this.mEnum = this.mObj.FindProperty("mEnum");this.mInt = this.mObj.FindProperty("mInt");this.mFloat = this.mObj.FindProperty("mFloat");this.mStr = this.mObj.FindProperty("mStr");this.mColor = this.mObj.FindProperty("mColor");}public override void OnInspectorGUI(){this.mObj.Update();EditorGUILayout.PropertyField(this.mEnum);switch (this.mEnum.enumValueIndex){case 1:EditorGUILayout.PropertyField(this.mInt);break;case 2:EditorGUILayout.PropertyField(this.mFloat);break;case 3:EditorGUILayout.PropertyField(this.mStr);break;case 4:EditorGUILayout.PropertyField(this.mColor);break;}this.mObj.ApplyModifiedProperties();}
}
测试一下
新建一个场景,新建一个Empty 节点,用来测试枚举组件

将文件1:Assets/MyScript/Test1.cs拖到Game Object的Inspector面板上。

实现了一个简单的枚举菜单:

2.Window窗口菜单实现
窗口菜单实现1——显示窗口:
文件:Assets/MyScript/Test2Window.cs
代码如下:
using System.Collections;
using System.Collections.Generic;
using UnityEngine;
using UnityEditor;public class Test2Window : EditorWindow
{[MenuItem("测试2/ShowWindow")]public static void ShowWindow(){Test2Window.CreateInstance<Test2Window>().Show();}
}
测试一下
保存文件后,在窗口左边有"测试2/ShowWindow"菜单选项
如下:

打开"测试2/ShowWindow"窗口,如下:

窗口菜单实现2——弹出类型:
文件:Assets/MyScript/Test3Window.cs
代码如下:
using System.Collections;
using System.Collections.Generic;
using UnityEngine;
using UnityEditor;public class Test3Window : EditorWindow
{[MenuItem("测试2/Test3Window")]public static void ShowWindow(){Test3Window.CreateInstance<Test3Window>().ShowUtility();}
}
测试一下
打开"测试2/Test3Window"窗口,如下:

窗口菜单实现3——浮动工具窗口:
文件:Assets/MyScript/Test4Window.cs
代码如下:
using System.Collections;
using System.Collections.Generic;
using UnityEngine;
using UnityEditor;public class Test4Window : EditorWindow
{[MenuItem("测试2/Test4Window")]public static void ShowWindow(){Test4Window.CreateInstance<Test4Window>().ShowPopup();}public void OnGUI(){if(GUILayout.Button("关闭")){this.Close();}}
}
测试一下
打开"测试2/Test4Window"窗口,如下:

3.Window窗口文本与颜色
文件:Assets/MyScript/Test6Window.cs
代码如下:
using System.Collections;
using System.Collections.Generic;
using UnityEngine;
using UnityEditor;public class Test6Window : EditorWindow
{[MenuItem("测试2/Test6Window")]public static void ShowWindow(){EditorWindow.GetWindow<Test6Window>().Show();}public string mText = "默认文本";public Color mColor = Color.white;public void OnGUI(){if (GUILayout.Button("关闭")){this.Close();}this.mText = EditorGUILayout.TextField(this.mText);this.mText = EditorGUILayout.TextArea(this.mText);this.mText = EditorGUILayout.PasswordField(this.mText);this.mColor = EditorGUILayout.ColorField(this.mColor);
//EditorGUILayout 后面的关键字:TextField、TextArea、PasswordField和ColorField。}
}
测试一下
打开"测试2/Test6Window"窗口,如下:

窗口文本与颜色关键字:TextField、TextArea、PasswordField和ColorField。
4.Window窗口标签字段
文件:Assets/MyScript/Test7Window.cs
代码如下:
using System.Collections;
using System.Collections.Generic;
using UnityEngine;
using UnityEditor;public class Test7Window : EditorWindow
{[MenuItem("测试2/Test7Window")]public static void ShowWindow(){EditorWindow.GetWindow<Test7Window>().Show();}public string mText = "默认文本";public Color mColor = Color.white;public void OnGUI(){EditorGUILayout.LabelField("文本输入框");this.mText = EditorGUILayout.TextField(this.mText);EditorGUILayout.Space(20);this.mText = EditorGUILayout.TextArea(this.mText);EditorGUILayout.SelectableLabel("密码输入框");this.mText = EditorGUILayout.PasswordField(this.mText);this.mColor = EditorGUILayout.ColorField(this.mColor);}
}
测试一下
打开"测试2/Test7Window"窗口,如下:

窗口标签字段关键字:LabelField(“文本输入框”);和Space(20);
5.Window窗口滑动条
文件:Assets/MyScript/Test8Window.cs
代码如下:
using System.Collections;
using System.Collections.Generic;
using UnityEngine;
using UnityEditor;public class Test8Window : EditorWindow
{[MenuItem("测试2/Test8Window")]public static void ShowWindow(){EditorWindow.GetWindow<Test8Window>().Show();}public int mInt;public float mFloat;public float mMinFloat;public float mMaxFloat;public void OnGUI(){EditorGUILayout.LabelField("浮点值滑动条0-100");this.mFloat = EditorGUILayout.Slider(this.mFloat, 0, 100);EditorGUILayout.Space(20);EditorGUILayout.LabelField("整数值滑动条0-100");this.mInt = EditorGUILayout.IntSlider(this.mInt, 0, 100);EditorGUILayout.Space(30);EditorGUILayout.LabelField("最小值和最大值滑动条");this.mMinFloat = EditorGUILayout.Slider(this.mMinFloat, 0, 100);this.mMaxFloat = EditorGUILayout.Slider(this.mMaxFloat, 0, 100);EditorGUILayout.MinMaxSlider(ref this.mMinFloat, ref this.mMaxFloat, 0, 100);}
}
测试一下
打开"测试2/Test8Window"窗口,如下:

窗口标签字段关键字:Slider、IntSlider和EditorGUILayout.MinMaxSlider(ref this.mMinFloat, ref this.mMaxFloat, 0, 100);
6.Window三维四维数组
文件:Assets/MyScript/Test9Window.cs
代码如下:
using System.Collections;
using System.Collections.Generic;
using UnityEngine;
using UnityEditor;public class Test9Window : EditorWindow
{[MenuItem("测试2/Test9Window")]public static void ShowWindow(){EditorWindow.GetWindow<Test9Window>().Show();}public Vector2 mPos2;public Vector3 mPos3;public Vector4 mPos4;public Rect mRect;public Bounds mBounds;public void OnGUI(){this.mPos2 = EditorGUILayout.Vector2Field("二维数值",this.mPos2);this.mPos3 = EditorGUILayout.Vector3Field("三维数值",this.mPos3);this.mPos4 = EditorGUILayout.Vector4Field("四维数值",this.mPos4);EditorGUILayout.Space(20);EditorGUILayout.LabelField("矩阵");this.mRect = EditorGUILayout.RectField(this.mRect);EditorGUILayout.Space(20);EditorGUILayout.LabelField("间距");this.mBounds = EditorGUILayout.BoundsField(this.mBounds);}
}
测试一下
打开"测试2/Test9Window"窗口,如下:

窗口标签字段关键字:Vector4Field、RectField和BoundsField
7.Window标签/层和对象选择
文件:Assets/MyScript/Test10Window.cs
代码如下:
using System.Collections;
using System.Collections.Generic;
using UnityEngine;
using UnityEditor;public class Test10Window : EditorWindow
{[MenuItem("测试2/Test10Window")]public static void ShowWindow(){EditorWindow.GetWindow<Test10Window>().Show();}public string mStr;public int mInt;public Object mObj1;public Object mObj2;public Object mObj3;public Object mObj4;public void OnGUI(){EditorGUILayout.LabelField("Tag");this.mStr = EditorGUILayout.TagField(this.mStr);EditorGUILayout.Space(170);EditorGUILayout.LabelField("Layer");this.mInt = EditorGUILayout.LayerField(this.mInt);EditorGUILayout.Space(150);EditorGUILayout.LabelField("Camera");this.mObj1 = EditorGUILayout.ObjectField(this.mObj1, typeof(Camera));EditorGUILayout.Space();EditorGUILayout.LabelField("Transform");this.mObj2 = EditorGUILayout.ObjectField(this.mObj2, typeof(Transform));EditorGUILayout.Space();EditorGUILayout.LabelField("Texture");this.mObj3 = EditorGUILayout.ObjectField(this.mObj3, typeof(Texture));EditorGUILayout.Space();EditorGUILayout.LabelField("Object_场景和资源的都可选");this.mObj4 = EditorGUILayout.ObjectField(this.mObj4, typeof(Object));}
}
测试一下
打开"测试2/Test10Window"窗口,如下:

8.Window实现Bool和折叠框
文件:Assets/MyScript/Test11Window.cs
代码如下:
using System.Collections;
using System.Collections.Generic;
using UnityEngine;
using UnityEditor;public class Test11Window : EditorWindow
{[MenuItem("测试2/Test11Window")]public static void ShowWindow(){EditorWindow.GetWindow<Test11Window>().Show();}public bool mBool1;public bool mBool2;public string mStr;public int mInt;public Object mObj1;public Object mObj2;public Object mObj3;public Object mObj4;public void OnGUI(){this.mBool1 = EditorGUILayout.Toggle("是否开启", this.mBool1);if (this.mBool1){EditorGUILayout.LabelField("Tag");this.mStr = EditorGUILayout.TagField(this.mStr);EditorGUILayout.Space(20);EditorGUILayout.LabelField("Layer");this.mInt = EditorGUILayout.LayerField(this.mInt);EditorGUILayout.Space(20);EditorGUILayout.LabelField("Camera");this.mObj1 = EditorGUILayout.ObjectField(this.mObj1, typeof(Camera));}this.mBool2 = EditorGUILayout.Foldout(this.mBool2 , "是否折叠");if (this.mBool2){EditorGUILayout.Space();EditorGUILayout.LabelField("Transform");this.mObj2 = EditorGUILayout.ObjectField(this.mObj2, typeof(Transform));EditorGUILayout.Space();EditorGUILayout.LabelField("Texture");this.mObj3 = EditorGUILayout.ObjectField(this.mObj3, typeof(Texture));EditorGUILayout.Space();EditorGUILayout.LabelField("Object_场景和资源的都可选");this.mObj4 = EditorGUILayout.ObjectField(this.mObj4, typeof(Object));}}
}
测试一下
打开"测试2/Test11Window"窗口,如下:

Bool和折叠框实现结构:
using System.Collections;
using System.Collections.Generic;
using UnityEngine;
using UnityEditor;public class Test11Window : EditorWindow
{[MenuItem("测试2/Test11Window")]public static void ShowWindow(){EditorWindow.GetWindow<Test11Window>().Show();}public bool mBool1;public bool mBool2;
...public void OnGUI(){this.mBool1 = EditorGUILayout.Toggle("是否开启", this.mBool1);if (this.mBool1){
...}this.mBool2 = EditorGUILayout.Foldout(this.mBool2 , "是否折叠");if (this.mBool2){
...}}
}
9.Window实现滑动条和禁用置灰选项
文件:Assets/MyScript/Test12Window.cs
代码如下:
using System.Collections;
using System.Collections.Generic;
using UnityEngine;
using UnityEditor;public class Test12Window : EditorWindow
{[MenuItem("测试2/Test12Window")]public static void ShowWindow(){EditorWindow.GetWindow<Test12Window>().Show();}public bool mBool1;public bool mBool2;public bool mBool3;public string mStr;public int mInt;public Object mObj1;public Object mObj2;public Object mObj3;public Object mObj4;public Vector2 mPos;public void OnGUI(){this.mPos = EditorGUILayout.BeginScrollView(this.mPos);this.mBool1 = EditorGUILayout.Toggle("是否开启", this.mBool1);if (this.mBool1){EditorGUILayout.LabelField("Tag");this.mStr = EditorGUILayout.TagField(this.mStr);EditorGUILayout.Space(20);EditorGUILayout.LabelField("Layer");this.mInt = EditorGUILayout.LayerField(this.mInt);EditorGUILayout.Space(20);EditorGUILayout.LabelField("Camera");this.mObj1 = EditorGUILayout.ObjectField(this.mObj1, typeof(Camera));}this.mBool2 = EditorGUILayout.Foldout(this.mBool2, "是否折叠");if (this.mBool2){EditorGUILayout.Space();EditorGUILayout.LabelField("Transform");this.mObj2 = EditorGUILayout.ObjectField(this.mObj2, typeof(Transform));EditorGUILayout.Space();EditorGUILayout.LabelField("Texture");this.mObj3 = EditorGUILayout.ObjectField(this.mObj3, typeof(Texture));EditorGUILayout.Space();EditorGUILayout.LabelField("Object_场景和资源的都可选");this.mObj4 = EditorGUILayout.ObjectField(this.mObj4, typeof(Object));}this.mBool3 = EditorGUILayout.BeginToggleGroup("是否禁用置灰", this.mBool3);EditorGUILayout.LabelField("Tag");this.mStr = EditorGUILayout.TagField(this.mStr);EditorGUILayout.LabelField("Layer");this.mInt = EditorGUILayout.LayerField(this.mInt);EditorGUILayout.LabelField("Camera");this.mObj1 = EditorGUILayout.ObjectField(this.mObj1, typeof(Camera));EditorGUILayout.EndToggleGroup();EditorGUILayout.EndScrollView();}
}
测试一下
打开"测试2/Test12Window"窗口,如下:

窗口右侧滑动条实现结构
using System.Collections;
using System.Collections.Generic;
using UnityEngine;
using UnityEditor;public class Test12Window : EditorWindow
{[MenuItem("测试2/Test12Window")]public static void ShowWindow(){EditorWindow.GetWindow<Test12Window>().Show();}public Object mObj4;public Vector2 mPos;public void OnGUI(){this.mPos = EditorGUILayout.BeginScrollView(this.mPos);//窗口右侧滑动条开始
...//中间包含的菜单EditorGUILayout.EndScrollView();//窗口右侧滑动条结束}
}
是否禁用置灰实现结构
this.mBool3 = EditorGUILayout.BeginToggleGroup("是否禁用置灰", this.mBool3);...EditorGUILayout.EndToggleGroup();...
这篇关于【Unity C#_菜单Window开发系列_Inspector Component UnityEditor开发】的文章就介绍到这儿,希望我们推荐的文章对编程师们有所帮助!


