本文主要是介绍猫猫学iOS之ipad开发qq空间项目横竖屏幕适配,希望对大家解决编程问题提供一定的参考价值,需要的开发者们随着小编来一起学习吧!
猫猫分享,必须精品
原创文章,欢迎转载。转载请注明:翟乃玉的博客
地址:http://blog.csdn.net/u013357243
一:效果图
先看效果
二:结构图
如图所示:
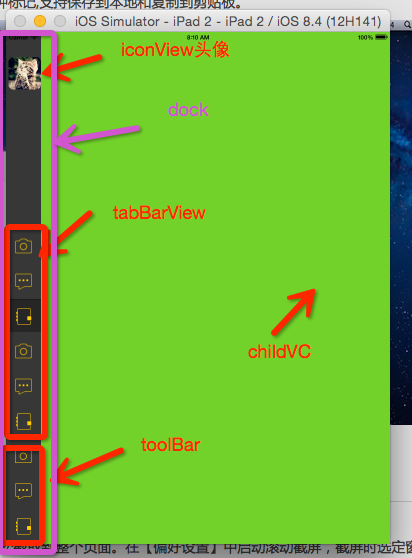
其中用到了UIView+extension分类
Masonry第三方框架做子控制器的适配
NYHomeViewController对应主页也就是全部
NYDock是左边的菜单栏 放置各个选项卡等按钮功能区域
NYIconView头像
NYTabBar选项卡
NYToolBar最下面的功能区
NYTabBarButton自定义的tabbar按钮,为了让在横竖屏下面分别显示不同的样式
三:源码
NYHomeViewController
//
//  NYHomeViewController.m
//  QQ空间 横竖屏适配
//
//  Created by apple on 15/10/17.
//  Copyright (c) 2015年 apple. All rights reserved.
//#import "NYHomeViewController.h"
#import "NYDock.h"#import "NYConst.h"#import "Masonry.h"@interface NYHomeViewController ()
@property (nonatomic, weak) NYDock *dock;/***  正在显示的控制器*/
@property (nonatomic, weak) UIViewController *showingChildVc;
@end@implementation NYHomeViewController-(NYDock *)dock
{if (!_dock) {//创建dockNYDock *dock = [[NYDock alloc]init];[self.view addSubview:dock];self.dock = dock;}return _dock;
}- (void)viewDidLoad {[super viewDidLoad];//设置背景色self.view.backgroundColor = NYColor(55, 55, 55);//初始化子控制器[self setupChildVcs];//接受通知[[NSNotificationCenter defaultCenter]addObserver:self selector:@selector(tabBarDidSelect:) name:NYTabBarDidSelectNotification object:nil];//根据屏幕方向控制dock属性[self willAnimateRotationToInterfaceOrientation:self.interfaceOrientation duration:0];
}- (void)setupChildVcs
{for (int i = 0; i < 6; i++) {UIViewController *vc = [[UIViewController alloc]init];vc.view.backgroundColor = NYRandomColor;[self addChildViewController:vc];}//设置第一个为默认选中[self switchChildVc:0];
}/***  切换子控制器**  @param index 控制器索引*/
- (void)switchChildVc:(int)index
{//移除当前正在显示的子控制器[self.showingChildVc.view removeFromSuperview];//显示index对应的子控制器UIViewController *newChildVc = self.childViewControllers[index];[self.view addSubview:newChildVc.view];self.showingChildVc = newChildVc;// 添加约束[newChildVc.view mas_makeConstraints:^(MASConstraintMaker *make) {//        make.width.mas_equalTo(600);make.right.equalTo(self.view.mas_right);make.top.equalTo(self.view.mas_top);make.bottom.equalTo(self.view.mas_bottom);make.left.equalTo(self.dock.mas_right);}];}
- (void)tabBarDidSelect:(NSNotification *)notification
{int index = [notification.userInfo[NYTabBarDidSelectIndex] intValue];[self switchChildVc:index];
}-(void)dealloc
{[[NSNotificationCenter defaultCenter]removeObserver:self];
}/**当设备旋转时候调用*/
- (void)willAnimateRotationToInterfaceOrientation:(UIInterfaceOrientation)toInterfaceOrientation duration:(NSTimeInterval)duration
{if (UIInterfaceOrientationIsLandscape(toInterfaceOrientation)) {//横屏self.dock.width = NYDockLW;self.dock.height = NYScreenPW;}else{//竖屏self.dock.width = NYDockPW;self.dock.height = NYScreenLW;}
}//-(void)viewWillTransitionToSize:(CGSize)size withTransitionCoordinator:(id<UIViewControllerTransitionCoordinator>)coordinator
//{
//    self.dock.width = size.width;
//    self.dock.height = size.height;
//}@end
Dock
//
//  NYDock.m
//  QQ空间 横竖屏适配
//
//  Created by apple on 15/10/17.
//  Copyright (c) 2015年 apple. All rights reserved.
//#import "NYDock.h"
#import "NYIconView.h"
#import "NYTabBar.h"
#import "NYToolBar.h"#import "NYConst.h"
@interface NYDock()
@property (nonatomic, weak) NYIconView *iconView;
@property (nonatomic, weak) NYTabBar *tabBarView;
@property (nonatomic, weak) NYToolBar *toolBarView;
@end@implementation NYDock-(instancetype)initWithFrame:(CGRect)frame
{if (self = [super initWithFrame:frame]) {//1.头像NYIconView *iconView = [[NYIconView alloc]init];[self addSubview:iconView];self.iconView = iconView;
//        iconView.backgroundColor = [UIColor grayColor];//2.tobBarNYTabBar *tabBarView = [[NYTabBar alloc]init];[self addSubview:tabBarView];self.tabBarView = tabBarView;
//        tabBarView.backgroundColor = [UIColor grayColor];//3.toolBarNYToolBar *toolBarView = [[NYToolBar alloc]init];[self addSubview:toolBarView];
//        toolBarView.backgroundColor = [UIColor grayColor];self.toolBarView = toolBarView;}return self;
}-(void)layoutSubviews
{[super layoutSubviews];self.toolBarView.width = self.width;self.tabBarView.width = self.width;self.tabBarView.height = NYDockPW * 6;if (Lanscape) {//横self.toolBarView.height = self.width / 3;self.toolBarView.y = self.height - self.toolBarView.height;self.tabBarView.y = self.toolBarView.y - self.tabBarView.height;//头像位置self.iconView.x = (self.width - self.iconView.width) * 0.5;self.iconView.y = self.iconView.x;self.iconView.width = self.width *0.4;self.iconView.height = self.iconView.width + 20;}else {//竖self.toolBarView.height = self.width * 3;self.toolBarView.y = self.height - self.toolBarView.height;self.tabBarView.y = self.toolBarView.y - self.tabBarView.height;//头像位置self.iconView.x = 5;self.iconView.y = 50;self.iconView.width = self.width - 5;self.iconView.height = self.iconView.width;}}@end
IconView
//
//  NYIconView.m
//  QQ空间 横竖屏适配
//
//  Created by apple on 15/10/18.
//  Copyright (c) 2015年 apple. All rights reserved.
//#import "NYIconView.h"#import "NYConst.h"
@implementation NYIconView
-(instancetype)initWithFrame:(CGRect)frame
{if (self = [super initWithFrame:frame]) {[self setImage:[UIImage imageNamed:@"cat"] forState:UIControlStateNormal    ];[self setTitle:@"znycat" forState:UIControlStateNormal];self.titleLabel.textAlignment = NSTextAlignmentCenter;self.imageView.layer.cornerRadius = 10;}return self;
}-(void)layoutSubviews
{[super layoutSubviews];if (Lanscape) {self.titleLabel.hidden = NO;self.imageView.width = self.width;self.imageView.height = self.width;self.imageView.y = 0;self.imageView.x = 0;self.titleLabel.width = self.width;self.titleLabel.height = self.height - self.width;self.titleLabel.y = self.width + 4;self.titleLabel.x = 0;}else{self.titleLabel.hidden = YES;self.imageView.bounds = self.bounds;}
}
@end
xtabBarView
//
//  NYTabBar.m
//  QQ空间 横竖屏适配
//
//  Created by apple on 15/10/18.
//  Copyright (c) 2015年 apple. All rights reserved.
//#import "NYTabBar.h"
#import "NYTabBarButton.h"@interface NYTabBar()
@property (nonatomic, weak) NYTabBarButton *selectedBtn;
@end@implementation NYTabBar-(id)initWithFrame:(CGRect)frame
{if (self = [super initWithFrame:frame]) {//创建按钮self.selectedBtn = [self setupButton:@"tabbar_photo"title:@"111"];self.selectedBtn.enabled = NO;[self setupButton:@"tabbar_mood"title:@"222"];[self setupButton:@"tabbar_blog"title:@"333"];[self setupButton:@"tabbar_photo"title:@"444"];[self setupButton:@"tabbar_mood"title:@"555"];[self setupButton:@"tabbar_blog"title:@"666"];}return self;
}/***  创建按钮*/
- (NYTabBarButton *) setupButton:(NSString *)icon title:(NSString *)title
{NYTabBarButton *button = [[NYTabBarButton alloc]init];[button setImage:[UIImage imageNamed:icon] forState:UIControlStateNormal];[button setTitle:title forState:UIControlStateNormal];[button addTarget:self action:@selector(btnClick:) forControlEvents:UIControlEventTouchDown];
//    button.contentMode(image的是contentModel)对内容无用[self addSubview:button];return button;
}-(void)layoutSubviews
{[super layoutSubviews];int count = self.subviews.count;for (int i = 0 ; i<count; i++) {NYTabBarButton *btn = self.subviews[i];btn.height = self.height / count;btn.width = self.width ;btn.x = 0;btn.y = btn.height * i;btn.tag = i;if (Lanscape) {btn.contentEdgeInsets = UIEdgeInsetsMake(0, 30, 0, 0);}else{btn.contentEdgeInsets = UIEdgeInsetsMake(0, 15, 0, 0);}}}-(void)btnClick:(NYTabBarButton *)btn
{self.selectedBtn.enabled = YES;btn.enabled = NO;self.selectedBtn = btn;//发送通知[[NSNotificationCenter defaultCenter] postNotificationName:NYTabBarDidSelectNotification object:nil userInfo:@{NYTabBarDidSelectIndex:@(btn.tag)}];
}@end
TabBarButton
//
//  NYTabBarButton.m
//  QQ空间 横竖屏适配
//
//  Created by apple on 15/10/18.
//  Copyright (c) 2015年 apple. All rights reserved.
//#import "NYTabBarButton.h"@implementation NYTabBarButton-(instancetype)initWithFrame:(CGRect)frame
{if (self = [super initWithFrame:frame]) {[self setBackgroundImage:[UIImage imageNamed:@"tabbar_separate_selected_bg"] forState:UIControlStateDisabled];
//        让图片不要拉伸self.imageView.contentMode = UIViewContentModeCenter;//不能选中和高亮时候的灰色去掉self.adjustsImageWhenDisabled = NO;self.adjustsImageWhenHighlighted = NO;
//        //设置按钮的内容样式向左边对其
//        self.contentHorizontalAlignment = UIControlContentHorizontalAlignmentLeft;
//
//        //    切割间距内边距
//        self.contentEdgeInsets = UIEdgeInsetsMake(0, 30, 0, 0);
//        self.titleEdgeInsets = UIEdgeInsetsMake(0, 30, 0, 0);}return self;
}-(void)setHighlighted:(BOOL)highlighted{
}- (void)layoutSubviews
{[super layoutSubviews];if (Lanscape) {self.imageView.height = self.height;self.imageView.width = self.width * 0.4;self.imageView.x = 0;self.imageView.y = 0;self.titleLabel.hidden = NO;self.titleLabel.y = 0;self.titleLabel.x = self.imageView.width;self.titleLabel.width = self.width - self.imageView.width;self.titleLabel.height = self.height;} else {self.titleLabel.hidden = YES;// 如果设置宽度或者高度为0,某个控件还是会显示一部分, 可以尝试设置控件的width或者height为负数//        self.titleLabel.frame = CGRectMake(0, 0, -1, 0);self.imageView.frame = self.bounds;}
}@end
ToolBarView
//
//  NYToolBar.m
//  QQ空间 横竖屏适配
//
//  Created by apple on 15/10/18.
//  Copyright (c) 2015年 apple. All rights reserved.
//#import "NYToolBar.h"@implementation NYToolBar-(id)initWithFrame:(CGRect)frame
{if (self = [super initWithFrame:frame]) {//创建按钮[self setupButton:@"tabbar_photo"];[self setupButton:@"tabbar_mood"];[self setupButton:@"tabbar_blog"];}return self;
}/***  创建按钮*/
- (UIButton *) setupButton:(NSString *)icon
{UIButton *button = [[UIButton alloc]init];[button setImage:[UIImage imageNamed:icon] forState:UIControlStateNormal];[button setImage:[UIImage imageNamed:@"tabbar_separate_selected_bg"] forState:UIControlStateSelected];[self addSubview:button];return button;
}-(void)layoutSubviews
{[super layoutSubviews];int count = self.subviews.count;if (Lanscape) {for (int i = 0 ; i<count; i++) {UIButton *btn = self.subviews[i];btn.height = self.height;btn.width = self.width / count;btn.x = btn.width * i;btn.y = 0;}} else{for (int i = 0 ; i<count; i++) {UIButton *btn = self.subviews[i];btn.height = self.height / count;btn.width = self.width ;btn.x = 0;btn.y = btn.height * i;}}
}@end
这篇关于猫猫学iOS之ipad开发qq空间项目横竖屏幕适配的文章就介绍到这儿,希望我们推荐的文章对编程师们有所帮助!


