本文主要是介绍【PyTorch][chapter 27][李宏毅深度学习][transformer-1],希望对大家解决编程问题提供一定的参考价值,需要的开发者们随着小编来一起学习吧!
前言:
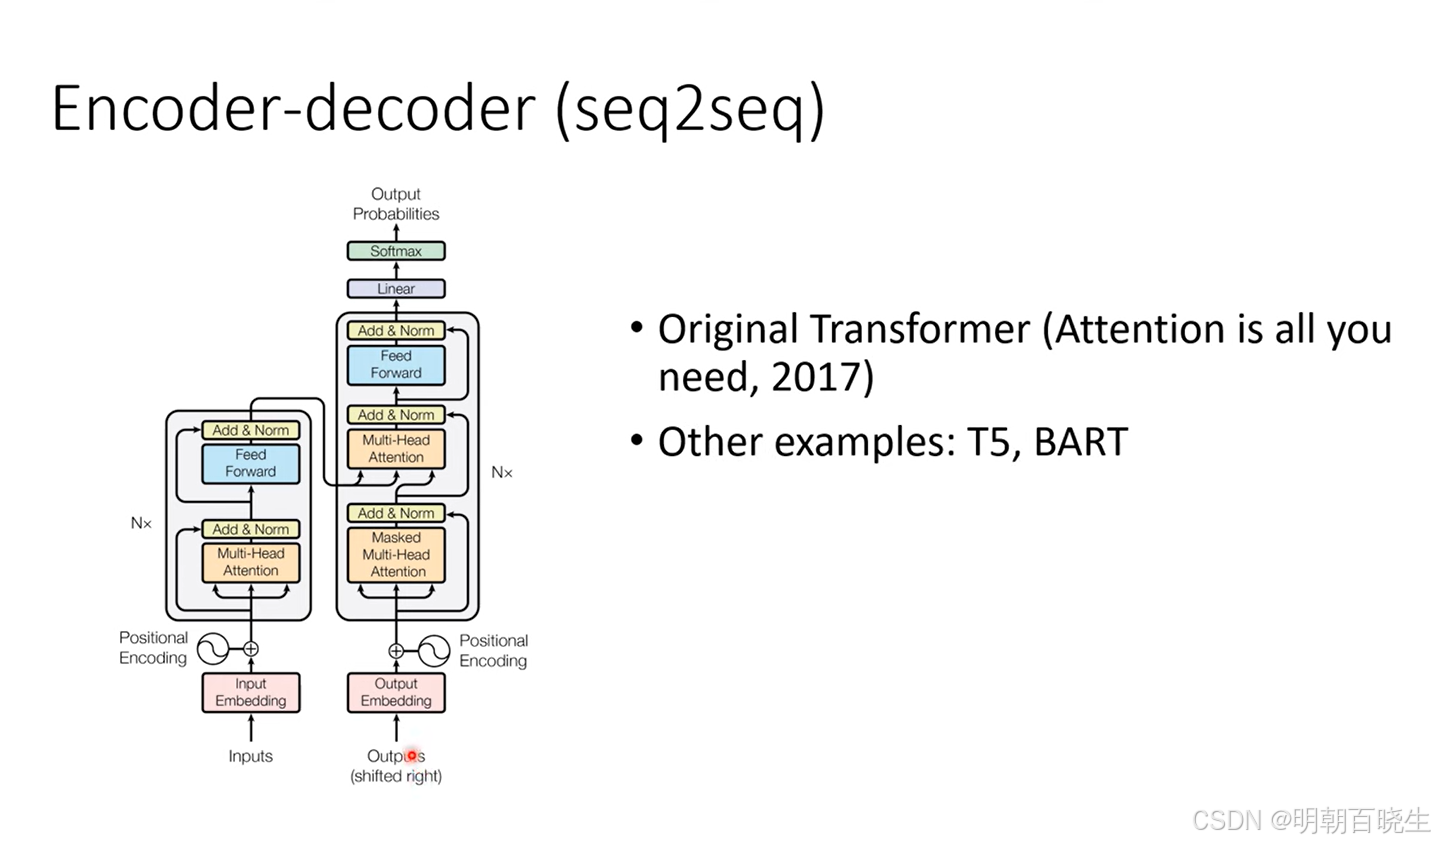
transformer 是深度学习四大基础架构之一,最早Google 发表在NIPS(NeurIPS 全称神经信息处理系统大会), 是一种seq2seq 的模型.采用的Encoder-Decoder 结构,应用比较广泛。
比如文本生成,语音转换,视频生成.
相对RNN, LSTM ,transformer 可以并行计算,本篇重点介绍transformer 的Encoder 架构以及实现.
深度学习四大基础架构
MLP(BP), CNN, RNN, transformer
目录:
- 论文简介
- Transorfomer 模型架构
- Encoder 输入层
- Transformer- Encoder 编码器
- Multi-Head Attention 注意力机制
- LayNorm
- Transformer-Encoder PyTorch实现
一 论文简介
1 摘要 Abstract
1.1 在主流的序列转录模型主要依赖循环,或者卷积神经网络,使用Encoder-Decoder 架构.
1.2 这篇文章提出了一种新的简单的架构:transformer 核心是self-attention.
1.3 通过机器翻译实验: 发现模型效果非常好.
2 结论 Conclusion
2.1: 这是一种序列转录模型. transformer主要应用了Mulite-Head Attention
2.2: 实验效果: 在机器翻译效果比其它模型训练速度快,效果好
2.3:预测该技术在其它领域的应用: 图片生成 ,语音生成 ,视频生成
2.4:代码位置
3 导言 Introduction
3.1: 现有技术:在seq2seq 里面常用的是 LSTM, RNN,GRU,CNN.
3.2 RNN的缺陷:
3.2.1 无法并行计算
3.2.2 当序列特别长的时候,前面的信息会丢失。
3.2.3 当序列特别长的时候,需要特别大的h 矩阵.内存开销大。
3.3 现有技术 attention已经在编码器,解码器中应用.
3.4 介绍 transformer 优势: 不再采用了Recurrent 架构,只使用attention 架构
3.4.1 可以并行计算,速度特别快
3.4.2 长序列,前面的信息不丢失
4 相关工作 relate work
4.1 现有技术
4.1.1 cons2s ByteNet 利用卷积神经网络,但是难以处理长序列,优点是多输出通道
4.1.2 self-attention: 在不同任务都表现不错
4.1.3 End-to End 模型
4.2 transformer:
4.2.1 跟 RNN, Convolution 模型区别,第一个只依赖 self-attention来做
Encoder-Encoder的转录模型
4.2.2 使用了mulite-head attention
mulite-head 是使用cnn里面多输出通道原理
二 模型(model architecture)
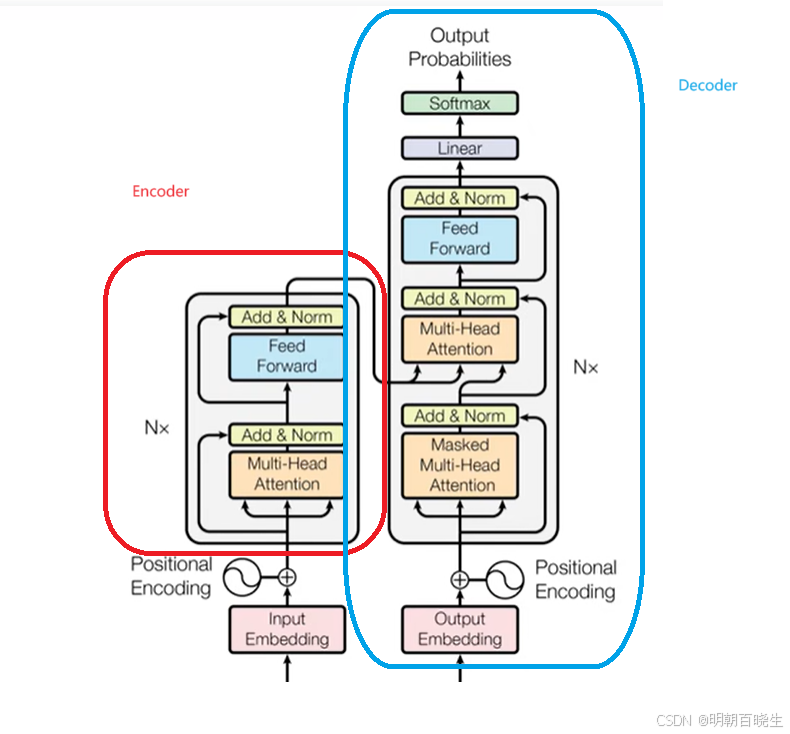
在序列转录模型里面现在较好的一个模型是Encoder-Decoder 架构,
transformer 采用的就是这种架构
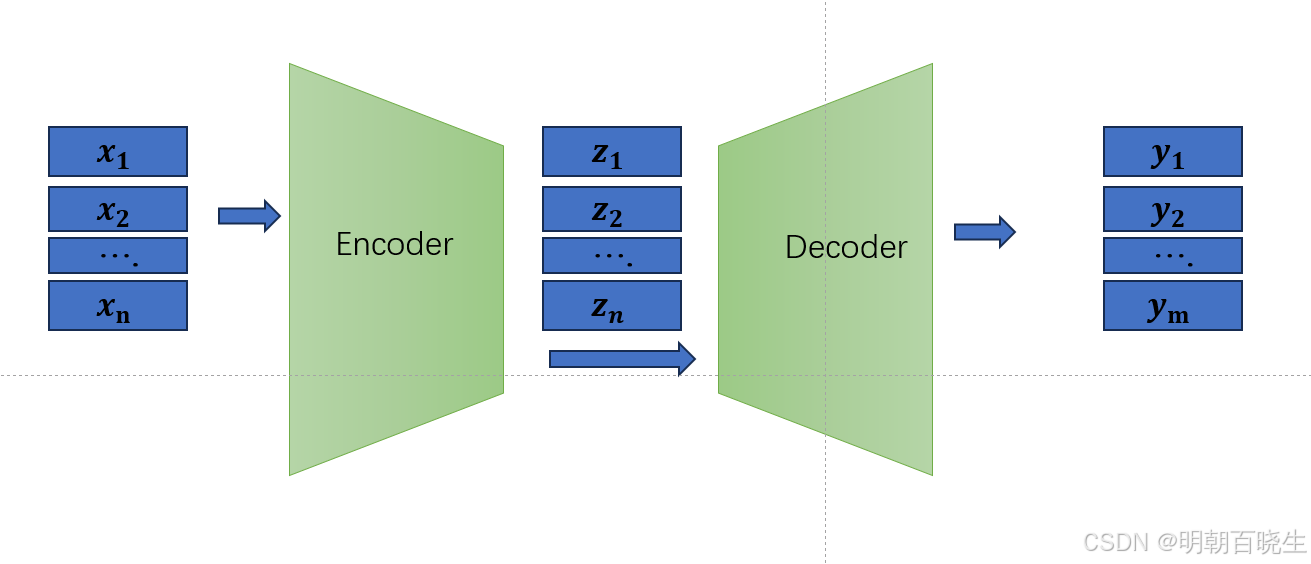
编码器:
输入:
输出:
解码器: 采用自回归模型
输入: 输出
。
根据得到
根据得到
三 Encoder 输入层
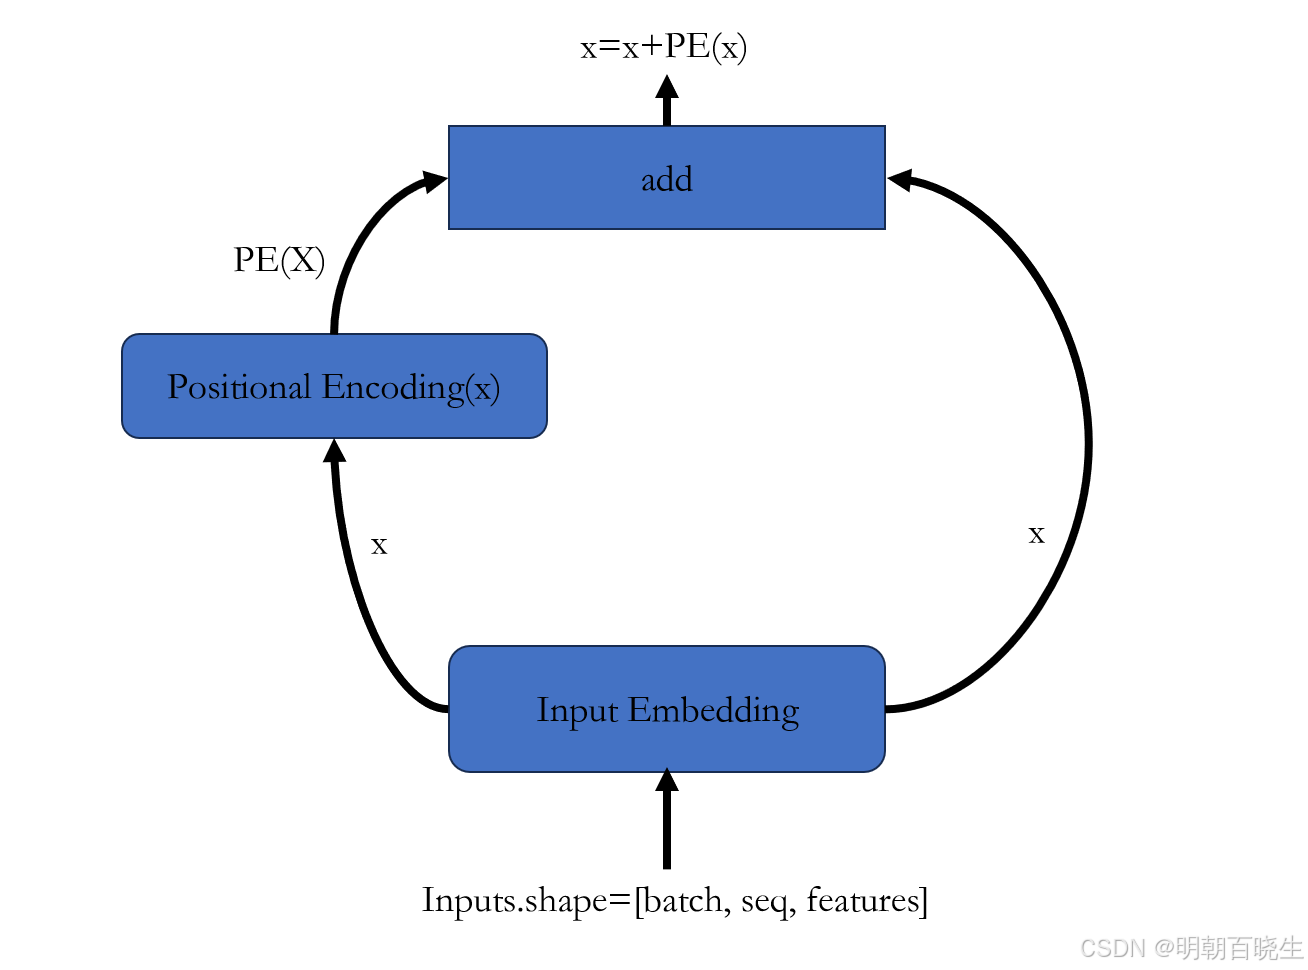
输入的是一个句子:
1 先提取词向量信息 X(Input Embedding)(batch_size,seq_length, input_size)
2 再通过Positional Encoding 提取词向量的位置信息 PE(X)
3 最后得到 含有位置信息的词向量 X=X+PE(X)
四 Transformer- Encoder 编码器
Encoder 由 N=5 相同的layer 组成.
每个layer 由2个sub-layer 组成
4.1 第一个sublayer
multi-Head attention->residual add->layerNorm
LayerNorm(x+sublayer(x))
4.2 第二个 sub-layer:
position-wise Feed Forward->residual add->layerNorm
LayerNorm(x+sublayer(x))
4.3 为什么叫simple,因为每个sub-layer 都是相同的
同时每个sub-layer 输出都是
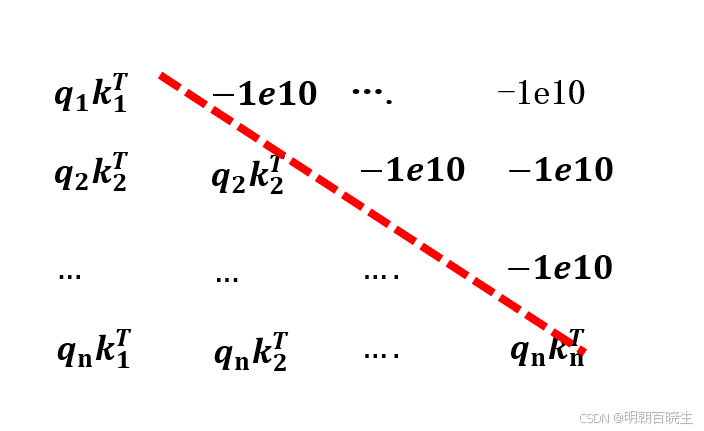
4.4 masked
这个在Decoder 时候用到
原因: t时刻不应该看到t时刻以后的东西
假设query ,key 特征大小都是N
计算attention score 的时候, 只希望看到
,
不希望看到
方案: 把之后的score 设置成特别小的数-1e10 ,再通过softmax
计算得到的结果接近为0
4.5 FFN
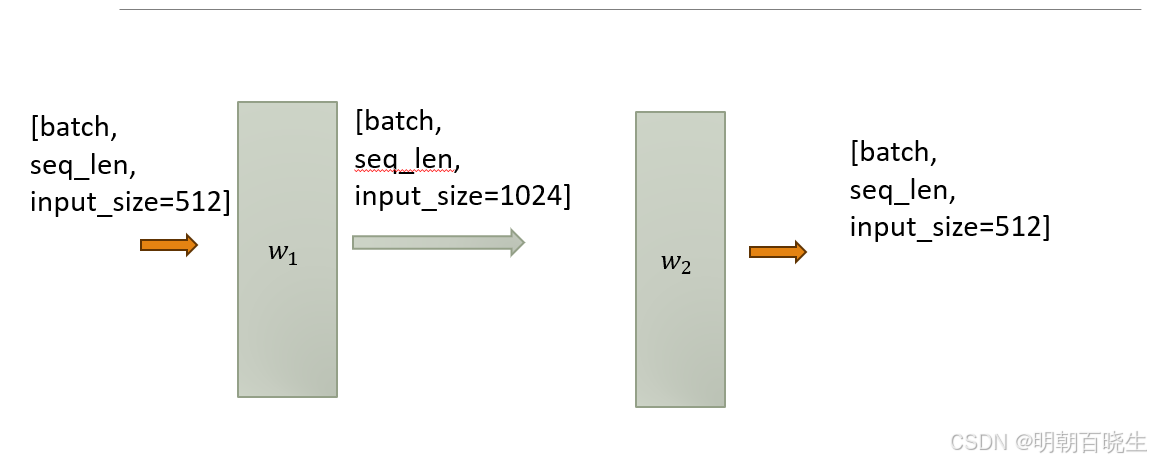
最后还包含一个全连接的feed-forward network . 由两个线性层组成,激活函数是ReLU:
:
五 Multi-Head Attention 注意力机制
卷积神经网络多通道输出,Multi-Head 也是利用其特性,实现多通道效果
5.1 模型结构
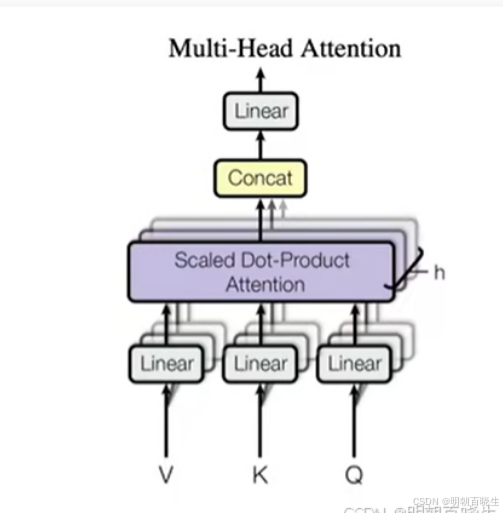
把Q,K,V 投影到一个低维度空间,投影到低维空间(head_size=8),然后单独做
Scaled Dot-Product Attention ,最后对得到的结果重新Concat,

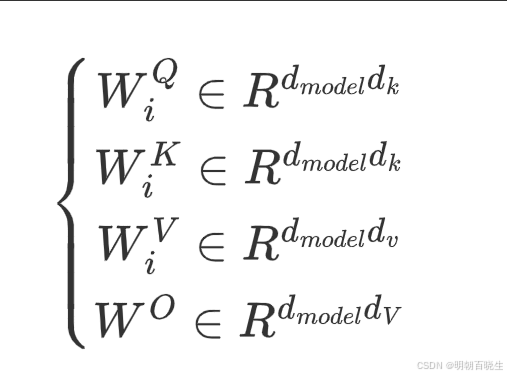
5.2 Scaled Dot-product Attention
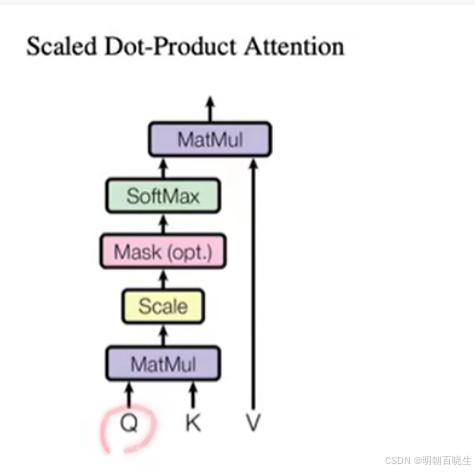
有两种注意力机制 additive attention & dot-product
这里主要用的是dot-prodct,区别是除以, 除以
原因
当 较小的时候可以不除,论文里面
=512/8
较大的时候,两个向量的内积较大,值最大的做softmax 后接近为1,其它的接近为0,
计算得到的梯度也小

六 LayNorm
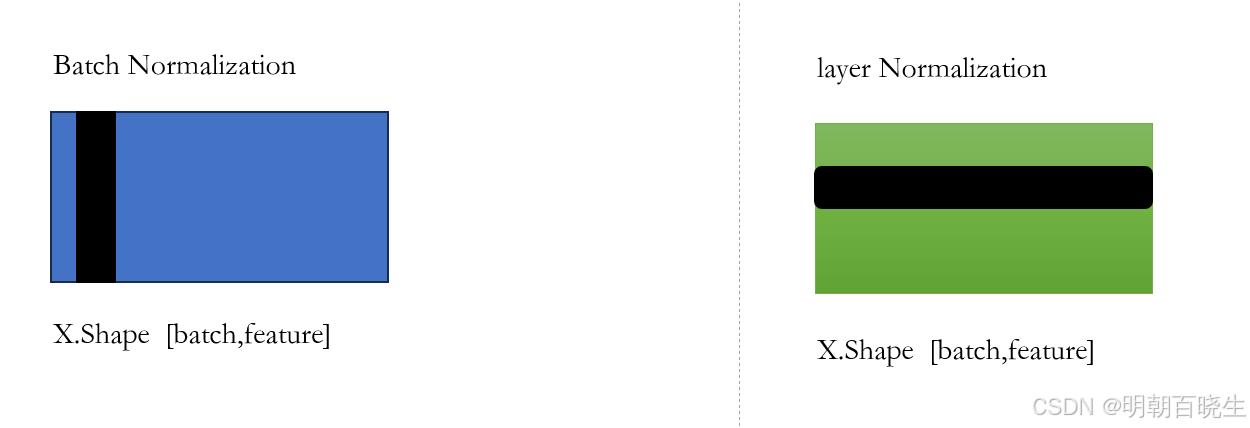
6.1 输入shape X.shape =[batch, feature]
Batch Normalizaiton ,按列切分样本, 统计其均值和方差,归一化
layer Normalizaition , 按行切分样本, 统计其均值和方差,归一化
6.2 输入 X.shape =[batch, seq_length, feature]
Batch Normalization: 按照黑色方向切分样本,flatten后,统计其均值方差
Layer Normalization: 按照黑色方向切分样本,flatten后,统计其均值方差
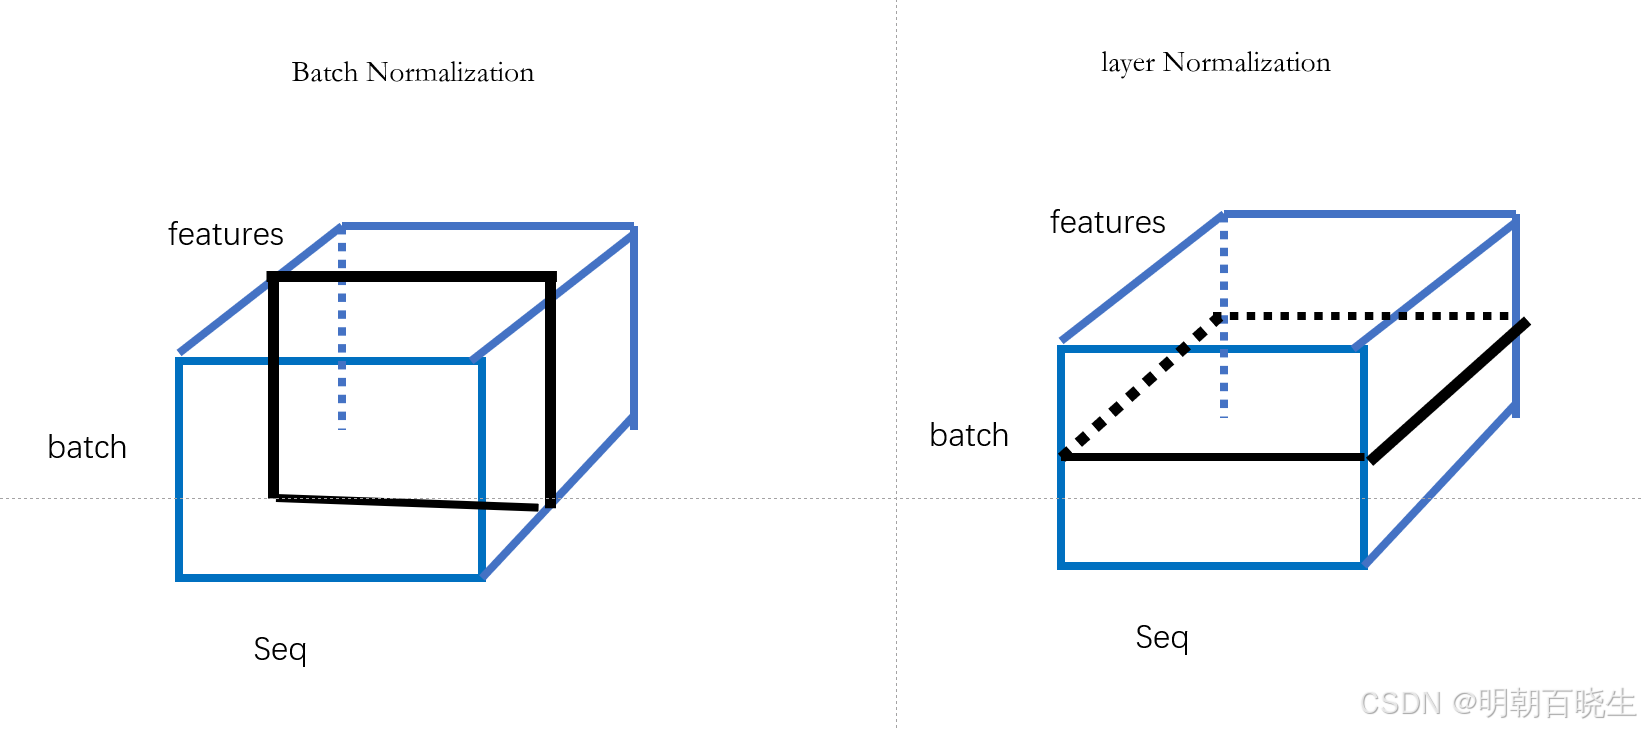
6.3 原因
在时序预测的时候,样本的seq_length 可能会发生变化
Batch Nomralization 切出来的样本如下:样本长度变化较大的时候,算出来的均值和方差变化较大。当预测的时候会使用全局的均值和方差,导致误差较大

# -*- coding: utf-8 -*-
"""
Created on Mon Aug 5 22:55:46 2024@author: cxf
"""import torch
import torch.nn as nnx = torch.tensor([ [1.0,1.0,1.0],
[1.0,2.0,4.0],
[1.0,5.0,5.0],
[1.0,3.0,4.0]])batchNorm = nn.BatchNorm1d(num_features=3)
y = batchNorm(x)
print("\n BatchNorm: ",y)
#layerNormlayerNorm = nn.LayerNorm(3)
out = layerNorm(x)
print("\n layerNorm: ",out)
七 代码实现
论文超参数

# -*- coding: utf-8 -*-
"""
Created on Sun Aug 25 15:36:03 2024@author: cxf
"""
import torch
import torch.nn as nn
import mathclass  PositionalEncoding(nn.Module):def __init__(self,max_seq_len=1e3, d_model=512):super(PositionalEncoding,self).__init__()pe = torch.zeros((max_seq_len,d_model))div_even =torch.pow(1e4,torch.arange(0, 512, 2)/d_model)div_odd = torch.pow(1e4,torch.arange(1, 512, 2)/d_model)position = torch.arange(0, max_seq_len).unsqueeze(1)pe[:,0::2]= torch.sin(position/div_even)pe[:,1::2]= torch.cos(position/div_odd)pe=pe.unsqueeze(0)self.register_buffer('pe', pe)def forward(self, x):batch_size, seq_len,embedding_size = x.shapex =x +self.pe[:,:seq_len,:].clone().detach()return xclass ScaledDotProduct_Attention(nn.Module):def __init__(self):super(ScaledDotProduct_Attention,self).__init__()self.softMax = nn.Softmax(dim=2)def forward(self, Q=None, K=None, V=None, attn_fill = None):batch_size, n_heads, seq_len,d_k = Q.shapescale = torch.matmul(Q,K.transpose(2,3))score = scale/math.sqrt(d_k**0.5)if attn_fill  is not None:score = scale.mask_fill(score,-1e9)attn_score = self.softMax(score)out = torch.matmul(attn_score,V)return outclass FFN(nn.Module):def __init__(self,input_size=512):super(FFN, self).__init__()self.net = nn.Sequential(nn.Linear(in_features=input_size, out_features=input_size*2),nn.ReLU(),nn.Linear(in_features=input_size*2, out_features=input_size))def forward(self,x):out = self.net(x)return outclass BlockAttention(nn.Module):def __init__(self, embedding_size, d_k,head_size):super(BlockAttention, self).__init__()self.layer_attention = MultiHeadAttention(embedding_size=512, d_k=64, head_size=8)self.layer_normal = nn.LayerNorm(embedding_size)def forward(self, x):x_residual = self.layer_attention(x,None)out = x_residual+xy = self.layer_normal(out)return yclass BlockFFN(nn.Module):def __init__(self, embedding_size):super(BlockFFN, self).__init__()self.layer_ffn = FFN()self.layer_normal = nn.LayerNorm(embedding_size)def forward(self, x):x_residual = self.layer_ffn(x)out = x_residual+xy = self.layer_normal(out)return yclass Encoder(nn.Module):def __init__(self,n=5,max_seq_len=1000,embedding_size=512,head_size=8):super(Encoder,self).__init__()d_k = int(embedding_size/head_size)self.layer_pe = PositionalEncoding(seq_len,embedding_size)layer = nn.Sequential(BlockAttention(embedding_size, d_k,head_size),BlockFFN(embedding_size))self.layers = nn.Sequential(*[layer for _ in range(n)])def forward(self, x):y = self.layers(x)return yclass MultiHeadAttention(nn.Module):def __init__(self,embedding_size=512, d_k=64, head_size=8):super(MultiHeadAttention,self).__init__()#[batch,seq_len, embedding_size]self.W_Q = nn.Linear(embedding_size, embedding_size)self.W_k = nn.Linear(embedding_size, embedding_size)self.W_V = nn.Linear(embedding_size, embedding_size)self.attention_layer = ScaledDotProduct_Attention()self.linear_layer = nn.Linear(in_features=embedding_size, out_features=embedding_size)self.head_size = head_sizeself.d_model = embedding_sizeself.d_k = d_kdef forward(self, inputs, attn_mask):#inputs.shape  [batch, seq_len, embedding_size]batch_size, seq_num, embedding_size = inputs.shapeQ = self.W_Q(inputs)K = self.W_k(inputs)V = self.W_V(inputs)#[batch,seq_num,nheads, d_k]->[batch,head_size, seq_num,d_k]subQ = Q.view(batch_size, -1,self.head_size,self.d_k).transpose(1,2)subK = K.view(batch_size, -1,self.head_size,self.d_k).transpose(1,2)subV = V.view(batch_size, -1,self.head_size,self.d_k).transpose(1,2)#[batch,head_size, seq_len, d_k]Z =self.attention_layer(subQ,subK, subV)#[batch, seq_len, d_k*n_heads]Z= Z.transpose(1,2).contiguous().view(batch_size,-1, self.d_model)print(Z.shape)out = self.linear_layer(Z)return outif __name__ == "__main__":max_seq_len =int(1e3)batch_size = 2embedding_size = 512head_size = 8d_k = int(embedding_size/head_size)seq_len = 3N = 5inputs = torch.rand(batch_size, seq_len, embedding_size)encoder = Encoder(N,max_seq_len,embedding_size,head_size)print(encoder)out = encoder(inputs)
参考:
3.【李宏毅机器学习2021】Transformer (上)_哔哩哔哩_bilibili
这篇关于【PyTorch][chapter 27][李宏毅深度学习][transformer-1]的文章就介绍到这儿,希望我们推荐的文章对编程师们有所帮助!


