本文主要是介绍Android性能优化系列之Bitmap图片优化,希望对大家解决编程问题提供一定的参考价值,需要的开发者们随着小编来一起学习吧!
在Android开发过程中,Bitmap往往会给开发者带来一些困扰,因为对Bitmap操作不慎,就容易造成OOM(Java.lang.OutofMemoryError - 内存溢出),本篇博客,我们将一起探讨Bitmap的性能优化。
为什么Bitmap会导致OOM?
1.每个机型在编译ROM时都设置了一个应用堆内存VM值上限dalvik.vm.heapgrowthlimit,用来限定每个应用可用的最大内存,超出这个最大值将会报OOM。这个阀值,一般根据手机屏幕dpi大小递增,dpi越小的手机,每个应用可用最大内存就越低。所以当加载图片的数量很多时,就很容易超过这个阀值,造成OOM。
2.图片分辨率越高,消耗的内存越大,当加载高分辨率图片的时候,将会非常占用内存,一旦处理不当就会OOM。例如,一张分辨率为:1920x1080的图片。如果Bitmap使用 ARGB_8888 32位来平铺显示的话,占用的内存是1920x1080x4个字节,占用将近8M内存,可想而知,如果不对图片进行处理的话,就会OOM。
3.在使用ListView, GridView等这些大量加载view的组件时,如果没有合理的处理缓存,大量加载Bitmap的时候,也将容易引发OOM
Bitmap基础知识
一张图片Bitmap所占用的内存 = 图片长度 x 图片宽度 x 一个像素点占用的字节数
而Bitmap.Config,正是指定单位像素占用的字节数的重要参数。
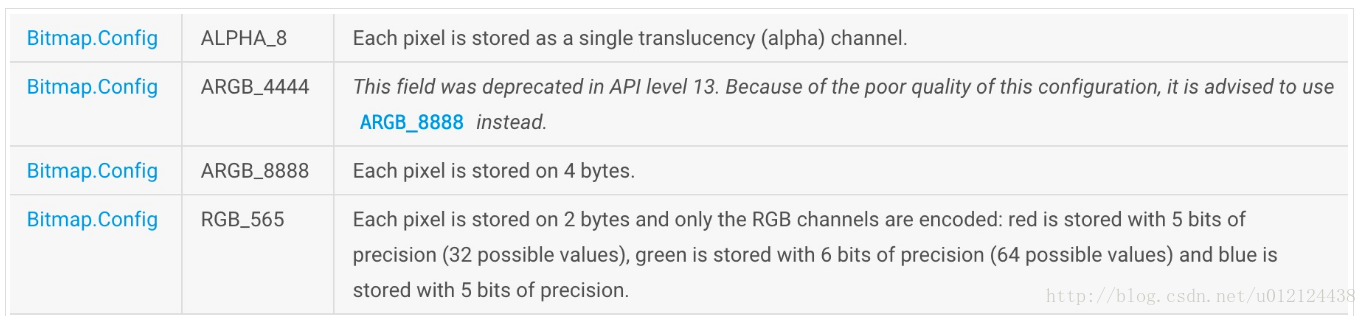
其中,A代表透明度;R代表红色;G代表绿色;B代表蓝色。
ALPHA_8
表示8位Alpha位图,即A=8,一个像素点占用1个字节,它没有颜色,只有透明度
ARGB_4444
表示16位ARGB位图,即A=4,R=4,G=4,B=4,一个像素点占4+4+4+4=16位,2个字节
ARGB_8888
表示32位ARGB位图,即A=8,R=8,G=8,B=8,一个像素点占8+8+8+8=32位,4个字节
RGB_565
表示16位RGB位图,即R=5,G=6,B=5,它没有透明度,一个像素点占5+6+5=16位,2个字节
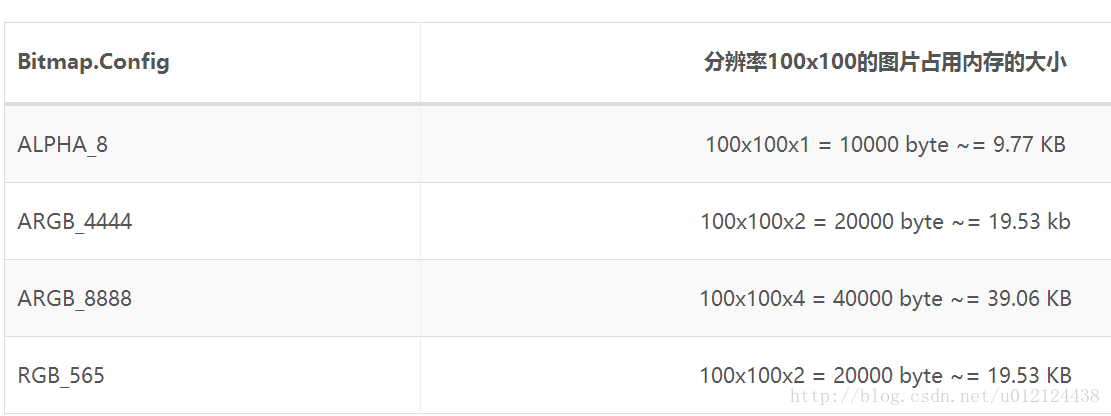
一张图片Bitmap所占用的内存 = 图片长度 x 图片宽度 x 一个像素点占用的字节数
根据以上的算法,可以计算出图片占用的内存,以100*100像素的图片为例
BitmapFactory解析Bitmap的原理
BitmapFactory提供的解析Bitmap的静态工厂方法有以下五种:
Bitmap decodeFile(...)
Bitmap decodeResource(...)
Bitmap decodeByteArray(...)
Bitmap decodeStream(...)
Bitmap decodeFileDescriptor(...)
其中常用的三个:decodeFile、decodeResource、decodeStream。
decodeFile和decodeResource其实最终都是调用decodeStream方法来解析Bitmap
decodeFile方法代码:
public static Bitmap decodeFile(String pathName, Options opts) {Bitmap bm = null;InputStream stream = null;try {stream = new FileInputStream(pathName);bm = decodeStream(stream, null, opts);} catch (Exception e) {/* do nothing.If the exception happened on open, bm will be null.*/Log.e("BitmapFactory", "Unable to decode stream: " + e);} finally {if (stream != null) {try {stream.close();} catch (IOException e) {// do nothing here}}}decodeResource方法的代码:
public static Bitmap decodeResource(Resources res, int id, Options opts) {Bitmap bm = null;InputStream is = null; try {final TypedValue value = new TypedValue();is = res.openRawResource(id, value);bm = decodeResourceStream(res, value, is, null, opts);} catch (Exception e) {/* do nothing.If the exception happened on open, bm will be null.If it happened on close, bm is still valid.*/} finally {try {if (is != null) is.close();} catch (IOException e) {// Ignore}}if (bm == null && opts != null && opts.inBitmap != null) {throw new IllegalArgumentException("Problem decoding into existing bitmap");}return bm;}decodeStream的逻辑如下:
public static Bitmap decodeStream(InputStream is, Rect outPadding, Options opts) {// we don't throw in this case, thus allowing the caller to only check// the cache, and not force the image to be decoded.if (is == null) {return null;}Bitmap bm = null;Trace.traceBegin(Trace.TRACE_TAG_GRAPHICS, "decodeBitmap");try {if (is instanceof AssetManager.AssetInputStream) {final long asset = ((AssetManager.AssetInputStream) is).getNativeAsset();bm = nativeDecodeAsset(asset, outPadding, opts);} else {bm = decodeStreamInternal(is, outPadding, opts);}if (bm == null && opts != null && opts.inBitmap != null) {throw new IllegalArgumentException("Problem decoding into existing bitmap");}setDensityFromOptions(bm, opts);} finally {Trace.traceEnd(Trace.TRACE_TAG_GRAPHICS);}return bm;}private static Bitmap decodeStreamInternal(InputStream is, Rect outPadding, Options opts) {// ASSERT(is != null);byte [] tempStorage = null;if (opts != null) tempStorage = opts.inTempStorage;if (tempStorage == null) tempStorage = new byte[DECODE_BUFFER_SIZE];return nativeDecodeStream(is, tempStorage, outPadding, opts);}从上面的代码可以看出,decodeStream的代码最终会调用以下两个native方法之一
nativeDecodeAsset()
nativeDecodeStream()
这两个native方法只是对应decodeFile和decodeResource、decodeStream来解析的,像decodeByteArray、decodeFileDescriptor也有专门的native方法负责解析Bitmap。
decodeFile、decodeResource的区别在于他们方法的调用路径不同:
decodeFile->decodeStream
decodeResource->decodeResourceStream->decodeStream
decodeResource在解析时多调用了一个decodeResourceStream方法,而这个decodeResourceStream方法代码如下:
public static Bitmap decodeResourceStream(Resources res, TypedValue value,InputStream is, Rect pad, Options opts) {if (opts == null) {opts = new Options();}if (opts.inDensity == 0 && value != null) {final int density = value.density;if (density == TypedValue.DENSITY_DEFAULT) {opts.inDensity = DisplayMetrics.DENSITY_DEFAULT;} else if (density != TypedValue.DENSITY_NONE) {opts.inDensity = density;}}if (opts.inTargetDensity == 0 && res != null) {opts.inTargetDensity = res.getDisplayMetrics().densityDpi;}return decodeStream(is, pad, opts);}其中对Options进行处理了,在得到opts.inDensity属性的前提下,如果我们没有对该属性设定值,那么将opts.inDensity = DisplayMetrics.DENSITY_DEFAULT;赋定这个默认的Density值,这个默认值为160,为标准的dpi比例,即在Density=160的设备上1dp=1px,这个方法中还有这么一行
opts.inTargetDensity = res.getDisplayMetrics().densityDpi;
对opts.inTargetDensity进行了赋值,该值为当前设备的densityDpi值,所以说在decodeResourceStream方法中主要做了两件事:
1.对opts.inDensity赋值,没有则赋默认值160
2.对opts.inTargetDensity赋值,没有则赋当前设备的densityDpi值
之后参数将传入decodeStream方法,该方法中在调用native方法进行解析Bitmap后会调用这个方法setDensityFromOptions(bm, opts);:
private static void setDensityFromOptions(Bitmap outputBitmap, Options opts) {if (outputBitmap == null || opts == null) return;final int density = opts.inDensity;if (density != 0) {outputBitmap.setDensity(density);final int targetDensity = opts.inTargetDensity;if (targetDensity == 0 || density == targetDensity || density == opts.inScreenDensity) {return;}byte[] np = outputBitmap.getNinePatchChunk();final boolean isNinePatch = np != null && NinePatch.isNinePatchChunk(np);if (opts.inScaled || isNinePatch) {outputBitmap.setDensity(targetDensity);}} else if (opts.inBitmap != null) {// bitmap was reused, ensure density is resetoutputBitmap.setDensity(Bitmap.getDefaultDensity());}}主要就是把刚刚赋值过的两个属性inDensity和inTargetDensity给Bitmap进行赋值,不过并不是直接赋给Bitmap就完了,中间有个判断,当inDensity的值与inTargetDensity或与设备的屏幕Density不相等时,则将应用inTargetDensity的值,如果相等则应用inDensity的值。
所以总结来说,setDensityFromOptions方法就是把inTargetDensity的值赋给Bitmap,不过前提是opts.inScaled = true;
进过上面的分析,结论如下:
在不配置Options的情况下:
1.decodeFile、decodeStream在解析时不会对Bitmap进行一系列的屏幕适配,解析出来的将是原始大小的图
2.decodeResource在解析时会对Bitmap根据当前设备屏幕像素密度densityDpi的值进行缩放适配操作,使得解析出来的Bitmap与当前设备的分辨率匹配,达到一个最佳的显示效果,并且Bitmap的大小将比原始的大
Bitmap的优化策略
经过上面的分析,我们可以得出Bitmap优化的思路:
1、BitmapConfig的配置
2、使用decodeFile、decodeResource、decodeStream进行解析Bitmap时,配置inDensity和inTargetDensity,两者应该相等,值可以等于屏幕像素密度*0.75f
3、使用inJustDecodeBounds预判断Bitmap的大小及使用inSampleSize进行压缩
4、对Density>240的设备进行Bitmap的适配(缩放Density)
5、2.3版本inNativeAlloc的使用
6、4.4以下版本inPurgeable、inInputShareable的使用
7、Bitmap的回收
所以我们根据以上的思路,我们将Bitmap优化的策略总结为以下3种:
1.对图片质量进行压缩
2.对图片尺寸进行压缩
3.使用libjpeg.so库进行压缩
对图片质量进行压缩
public static Bitmap compressImage(Bitmap bitmap){ ByteArrayOutputStream baos = new ByteArrayOutputStream(); //质量压缩方法,这里100表示不压缩,把压缩后的数据存放到baos中 bitmap.compress(Bitmap.CompressFormat.JPEG, 100, baos); int options = 100; //循环判断如果压缩后图片是否大于50kb,大于继续压缩 while ( baos.toByteArray().length / 1024>50) { //清空baos baos.reset(); bitmap.compress(Bitmap.CompressFormat.JPEG, options, baos); options -= 10;//每次都减少10 } //把压缩后的数据baos存放到ByteArrayInputStream中 ByteArrayInputStream isBm = new ByteArrayInputStream(baos.toByteArray()); //把ByteArrayInputStream数据生成图片 Bitmap newBitmap = BitmapFactory.decodeStream(isBm, null, null); return newBitmap; } 对图片尺寸进行压缩
/*** 按图片尺寸压缩 参数是bitmap* @param bitmap* @param pixelW* @param pixelH* @return*/public static Bitmap compressImageFromBitmap(Bitmap bitmap, int pixelW, int pixelH) {ByteArrayOutputStream os = new ByteArrayOutputStream();bitmap.compress(Bitmap.CompressFormat.JPEG, 100, os);if( os.toByteArray().length / 1024>512) {//判断如果图片大于0.5M,进行压缩避免在生成图片(BitmapFactory.decodeStream)时溢出os.reset();bitmap.compress(Bitmap.CompressFormat.JPEG, 50, os);//这里压缩50%,把压缩后的数据存放到baos中}ByteArrayInputStream is = new ByteArrayInputStream(os.toByteArray());BitmapFactory.Options options = new BitmapFactory.Options();options.inJustDecodeBounds = true;options.inPreferredConfig = Bitmap.Config.RGB_565;BitmapFactory.decodeStream(is, null, options);options.inJustDecodeBounds = false;options.inSampleSize = computeSampleSize(options , pixelH > pixelW ? pixelW : pixelH ,pixelW * pixelH );is = new ByteArrayInputStream(os.toByteArray());Bitmap newBitmap = BitmapFactory.decodeStream(is, null, options);return newBitmap;}/*** 动态计算出图片的inSampleSize* @param options* @param minSideLength* @param maxNumOfPixels* @return*/public static int computeSampleSize(BitmapFactory.Options options, int minSideLength, int maxNumOfPixels) {int initialSize = computeInitialSampleSize(options, minSideLength, maxNumOfPixels);int roundedSize;if (initialSize <= 8) {roundedSize = 1;while (roundedSize < initialSize) {roundedSize <<= 1;}} else {roundedSize = (initialSize + 7) / 8 * 8;}return roundedSize;}private static int computeInitialSampleSize(BitmapFactory.Options options, int minSideLength, int maxNumOfPixels) {double w = options.outWidth;double h = options.outHeight;int lowerBound = (maxNumOfPixels == -1) ? 1 : (int) Math.ceil(Math.sqrt(w * h / maxNumOfPixels));int upperBound = (minSideLength == -1) ? 128 :(int) Math.min(Math.floor(w / minSideLength), Math.floor(h / minSideLength));if (upperBound < lowerBound) {return lowerBound;}if ((maxNumOfPixels == -1) && (minSideLength == -1)) {return 1;} else if (minSideLength == -1) {return lowerBound;} else {return upperBound;}}
使用libjpeg.so库进行压缩
除了通过设置simpleSize根据图片尺寸压缩图片和通过Bitmap.compress方法通过压缩图片质量两种方法外,我们还可以使用libjpeg.so这个库来进行压缩。
libjpeg是广泛使用的开源JPEG图像库,Android所用的是skia的压缩算法,而Skia对libjpeg进行了的封装。
libjpeg在压缩图像时,有一个参数叫optimize_coding,关于这个参数,libjpeg.doc有如下解释:
boolean optimize_coding
TRUE causes the compressor to compute optimal Huffman coding tables
for the image. This requires an extra pass over the data and
therefore costs a good deal of space and time. The default is
FALSE, which tells the compressor to use the supplied or default
Huffman tables. In most cases optimal tables save only a few percent
of file size compared to the default tables. Note that when this is
TRUE, you need not supply Huffman tables at all, and any you do
supply will be overwritten.
如果设置optimize_coding为TRUE,将会使得压缩图像过程中基于图像数据计算哈弗曼表,由于这个计算会显著消耗空间和时间,默认值被设置为FALSE。
谷歌的Skia项目工程师们最终没有设置这个参数,optimize_coding在Skia中默认的等于了FALSE,但是问题就随之出现了,如果我们想在FALSE和TRUE时压缩成相同大小的JPEG 图片,FALSE的品质将大大逊色于TRUE的,尽管谷歌工程师没有将该值设置为true,但是我们可以自己编译libjpeg进行图片的压缩。
libjpeg的官网下载地址:http://www.ijg.org/
从官网下载之后,我们必须自己对其进行编译。
编译libjpeg
下载最新的源码,解压后将所有文件放到jni目录中,准备用ndk编译
1、新建config.sh,将ndk中的交叉编译工具加入其中,内容如下:
NDK=/opt/ndk/android-ndk-r10e/
PLATFORM=$NDK/platforms/android-9/arch-arm/
PREBUILT=$NDK/toolchains/arm-linux-androideabi-4.9/prebuilt/linux-x86/
CC=$PREBUILT/bin/arm-linux-androideabi-gcc
./configure --prefix=/home/linc/jpeg-9b/jni/dist --host=arm CC="$CC --sysroot=$PLATFORM"
2、执行此脚本
$ sh config.sh
...
checking whether to build shared libraries... no
checking whether to build static libraries... yes
...
config.status: creating Makefile
config.status: creating jconfig.h
首先,它生成了Makefile,我们可以直接使用此Makefile进行编译;其次,它生成了重要的头文件,jconfig.h.
但是这个Makefile是编译static库而不是共享库的。
此时,我们可以执行构建命令进行编译:
jni$ make install-libLTLIBRARIES
libtool: install: ranlib /home/linc/jpeg-9b/jni/dist/lib/libjpeg.a
3、Android.mk
使用ndk-build指令编译,需要手动编写Android.mk文件,内容如下:
LOCAL_PATH:= $(call my-dir)
include $(CLEAR_VARS)LOCAL_ARM_MODE := armLOCAL_SRC_FILES :=jaricom.c jcapimin.c jcapistd.c jcarith.c jccoefct.c jccolor.c \jcdctmgr.c jchuff.c jcinit.c jcmainct.c jcmarker.c jcmaster.c \jcomapi.c jcparam.c jcprepct.c jcsample.c jctrans.c jdapimin.c \jdapistd.c jdarith.c jdatadst.c jdatasrc.c jdcoefct.c jdcolor.c \jddctmgr.c jdhuff.c jdinput.c jdmainct.c jdmarker.c jdmaster.c \jdmerge.c jdpostct.c jdsample.c jdtrans.c jerror.c jfdctflt.c \jfdctfst.c jfdctint.c jidctflt.c jidctfst.c jidctint.c jquant1.c \jquant2.c jutils.c jmemmgr.c jmemnobs.cLOCAL_C_INCLUDES := $(LOCAL_PATH)
LOCAL_CFLAGS += -O3 -fstrict-aliasing -fprefetch-loop-arrays \-DANDROID -DANDROID_TILE_BASED_DECODE -DENABLE_ANDROID_NULL_CONVERTLOCAL_MODULE := libjpegLOCAL_MODULE_TAGS := optional# unbundled branch, built against NDK.
LOCAL_SDK_VERSION := 17include $(BUILD_SHARED_LIBRARY)
其中LOCAL_SRC_FILES后面的源文件可以参考刚刚生成的Makefile。
在jni目录上一级使用ndk-build编译即可。
$ ndk-build
[armeabi] Compile arm    : jpeg <= jaricom.c
...
[armeabi] Compile arm    : jpeg <= jmemnobs.c
[armeabi] SharedLibrary  : libjpeg.so
[armeabi] Install        : libjpeg.so => libs/armeabi/libjpeg.so
在Android项目引入编译好的libjpeg
首先把so库加载到libs中,然后将编译好的头文件拷贝到项目的jni文件夹下,就可以使用Android的具体函数了,具体使用分为如下几步:
1、将Android的bitmap解码并转换为RGB数据
2、为JPEG对象分配空间并初始化
3、指定压缩数据源
4、获取文件信息
5、为压缩设定参数,包括图像大小,颜色空间
6、开始压缩
7、压缩完毕
8、释放资源
#include <string.h>
#include <android/bitmap.h>
#include <android/log.h>
#include <jni.h>
#include <stdio.h>
#include <setjmp.h>
#include <math.h>
#include <stdint.h>
#include <time.h>
#include "jpeglib.h"
#include "cdjpeg.h"     /* Common decls for cjpeg/djpeg applications */
#include "jversion.h"       /* for version message */
#include "config.h"#define LOG_TAG "jni"
#define LOGW(...)  __android_log_write(ANDROID_LOG_WARN,LOG_TAG,__VA_ARGS__)
#define LOGI(...) __android_log_print(ANDROID_LOG_INFO,LOG_TAG,__VA_ARGS__)
#define LOGE(...) __android_log_print(ANDROID_LOG_ERROR,LOG_TAG,__VA_ARGS__)#define true 1
#define false 0typedef uint8_t BYTE;char *error;
struct my_error_mgr {struct jpeg_error_mgr pub;jmp_buf setjmp_buffer;
};typedef struct my_error_mgr * my_error_ptr;METHODDEF(void)
my_error_exit (j_common_ptr cinfo)
{my_error_ptr myerr = (my_error_ptr) cinfo->err;(*cinfo->err->output_message) (cinfo);error=myerr->pub.jpeg_message_table[myerr->pub.msg_code];LOGE("jpeg_message_table[%d]:%s", myerr->pub.msg_code,myerr->pub.jpeg_message_table[myerr->pub.msg_code]);// LOGE("addon_message_table:%s", myerr->pub.addon_message_table);
//  LOGE("SIZEOF:%d",myerr->pub.msg_parm.i[0]);
//  LOGE("sizeof:%d",myerr->pub.msg_parm.i[1]);longjmp(myerr->setjmp_buffer, 1);
}
//图片压缩方法
int generateJPEG(BYTE* data, int w, int h, int quality,const char* outfilename, jboolean optimize) {int nComponent = 3;struct jpeg_compress_struct jcs;struct my_error_mgr jem;jcs.err = jpeg_std_error(&jem.pub);jem.pub.error_exit = my_error_exit;if (setjmp(jem.setjmp_buffer)) {return 0;}//为JPEG对象分配空间并初始化jpeg_create_compress(&jcs);//获取文件信息FILE* f = fopen(outfilename, "wb");if (f == NULL) {return 0;}//指定压缩数据源jpeg_stdio_dest(&jcs, f);jcs.image_width = w;jcs.image_height = h;if (optimize) {LOGI("optimize==ture");} else {LOGI("optimize==false");}jcs.arith_code = false;jcs.input_components = nComponent;if (nComponent == 1)jcs.in_color_space = JCS_GRAYSCALE;elsejcs.in_color_space = JCS_RGB;jpeg_set_defaults(&jcs);jcs.optimize_coding = optimize;//为压缩设定参数,包括图像大小,颜色空间jpeg_set_quality(&jcs, quality, true);//开始压缩jpeg_start_compress(&jcs, TRUE);JSAMPROW row_pointer[1];int row_stride;row_stride = jcs.image_width * nComponent;while (jcs.next_scanline < jcs.image_height) {row_pointer[0] = &data[jcs.next_scanline * row_stride];//写入数据jpeg_write_scanlines(&jcs, row_pointer, 1);}if (jcs.optimize_coding) {LOGI("optimize==ture");} else {LOGI("optimize==false");}//压缩完毕jpeg_finish_compress(&jcs);//释放资源jpeg_destroy_compress(&jcs);fclose(f);return 1;
}typedef struct {uint8_t r;uint8_t g;uint8_t b;
} rgb;//将java string转换为char*
char* jstrinTostring(JNIEnv* env, jbyteArray barr) {char* rtn = NULL;jsize alen = (*env)->GetArrayLength(env, barr);jbyte* ba = (*env)->GetByteArrayElements(env, barr, 0);if (alen > 0) {rtn = (char*) malloc(alen + 1);memcpy(rtn, ba, alen);rtn[alen] = 0;}(*env)->ReleaseByteArrayElements(env, barr, ba, 0);return rtn;
}
//jni方法入口
jstring Java_net_bither_util_NativeUtil_compressBitmap(JNIEnv* env,jobject thiz, jobject bitmapcolor, int w, int h, int quality,jbyteArray fileNameStr, jboolean optimize) {AndroidBitmapInfo infocolor;BYTE* pixelscolor;int ret;BYTE * data;BYTE *tmpdata;char * fileName = jstrinTostring(env, fileNameStr);//解码Android bitmap信息,并存储值infocolor中if ((ret = AndroidBitmap_getInfo(env, bitmapcolor, &infocolor)) < 0) {LOGE("AndroidBitmap_getInfo() failed ! error=%d", ret);return (*env)->NewStringUTF(env, "0");;}if ((ret = AndroidBitmap_lockPixels(env, bitmapcolor, &pixelscolor)) < 0) {LOGE("AndroidBitmap_lockPixels() failed ! error=%d", ret);}BYTE r, g, b;data = NULL;data = malloc(w * h * 3);tmpdata = data;int j = 0, i = 0;int color;//将bitmap转换为rgb数据for (i = 0; i < h; i++) {for (j = 0; j < w; j++) {color = *((int *) pixelscolor);r = ((color & 0x00FF0000) >> 16);g = ((color & 0x0000FF00) >> 8);b = color & 0x000000FF;*data = b;*(data + 1) = g;*(data + 2) = r;data = data + 3;pixelscolor += 4;}}AndroidBitmap_unlockPixels(env, bitmapcolor);//进行压缩int resultCode= generateJPEG(tmpdata, w, h, quality, fileName, optimize);free(tmpdata);if(resultCode==0){jstring result=(*env)->NewStringUTF(env, error);error=NULL;return result;}return (*env)->NewStringUTF(env, "1"); //success
}
新建Android.mk,生成可执行文件:
LOCAL_PATH:= $(call my-dir)
include $(CLEAR_VARS)LOCAL_SRC_FILES:= jpeg_compress.cppLOCAL_MODULE:= jtestLOCAL_LDLIBS :=-llog
LOCAL_LDLIBS += $(LOCAL_PATH)/libjpeg.so
LOCAL_C_INCLUDES := $(LOCAL_PATH)LOCAL_MODULE_PATH := $(TARGET_OUT_OPTIONAL_EXECUTABLES)
LOCAL_MODULE_TAGS := debug include $(BUILD_EXECUTABLE)
本篇博客总结了3种图片压缩的方法,大家可以根据自己的情况进行相应的使用,如有错漏,欢迎留言。
参考文章:
http://blog.csdn.net/lincyang/article/details/51085737
这篇关于Android性能优化系列之Bitmap图片优化的文章就介绍到这儿,希望我们推荐的文章对编程师们有所帮助!


