本文主要是介绍【chatgpt】train_split_test的random_state,希望对大家解决编程问题提供一定的参考价值,需要的开发者们随着小编来一起学习吧!
在使用train_test_split函数划分数据集时,random_state参数用于控制随机数生成器的种子,以确保划分结果的可重复性。这样,无论你运行多少次代码,只要使用相同的random_state值,得到的训练集和测试集划分就会是一样的。
使用 train_test_split 示例
以下是一个示例,展示如何使用train_test_split函数进行数据集划分,并设置random_state参数:
程序输出结果
Training set shape: (80, 10), (80,)
Test set shape: (20, 10), (20,)
import numpy as np
from sklearn.model_selection import train_test_split# 假设我们有一些数据
X = np.random.rand(100, 10)  # 100个样本,每个样本10个特征
y = np.random.randint(0, 2, 100)  # 100个样本的标签(0或1)# 使用train_test_split进行数据集划分
X_train, X_test, y_train, y_test = train_test_split(X, y, test_size=0.2, random_state=42)# 打印划分后的数据集形状
print(f'Training set shape: {X_train.shape}, {y_train.shape}')
print(f'Test set shape: {X_test.shape}, {y_test.shape}')
在这个示例中:
X是特征矩阵,包含100个样本,每个样本有10个特征。y是标签数组,包含100个样本的标签。test_size=0.2表示将数据集的20%用作测试集,剩下的80%用作训练集。random_state=42用于确保划分的可重复性。
为什么使用 random_state
使用 random_state 可以确保在多次运行代码时,得到的训练集和测试集划分是一致的,这在以下情况下特别有用:
- 调试和开发: 在开发和调试模型时,使用相同的
random_state可以确保数据划分的一致性,从而使得调试更加容易。 - 实验的可重复性: 在进行实验时,使用相同的
random_state可以确保实验结果的可重复性,使得其他人可以验证你的结果。 - 比较模型性能: 在比较不同模型的性能时,使用相同的
random_state可以确保每个模型都使用相同的训练集和测试集,从而使比较更加公平。
示例:比较大数据集和小数据集的模型性能
假设我们有一个大数据集和一个小数据集,我们想要比较它们在同一模型上的性能。我们可以使用 train_test_split 进行数据集划分,并设置 random_state 以确保划分的可重复性。
import torch
import torch.nn as nn
import torch.optim as optim
from sklearn.model_selection import train_test_split
from torch.utils.data import DataLoader, TensorDataset
import matplotlib.pyplot as plt
import numpy as np
# 创建大数据集和小数据集
X_large = np.random.rand(1000, 10)
y_large = np.random.rand(1000, 1)X_small = np.random.rand(100, 10)
y_small = np.random.rand(100, 1)# 使用train_test_split进行数据集划分
X_train_large, X_test_large, y_train_large, y_test_large = train_test_split(X_large, y_large, test_size=0.2, random_state=42)
X_train_small, X_test_small, y_train_small, y_test_small = train_test_split(X_small, y_small, test_size=0.2, random_state=42)# 转换为张量
X_train_large = torch.tensor(X_train_large, dtype=torch.float32)
y_train_large = torch.tensor(y_train_large, dtype=torch.float32)
X_test_large = torch.tensor(X_test_large, dtype=torch.float32)
y_test_large = torch.tensor(y_test_large, dtype=torch.float32)X_train_small = torch.tensor(X_train_small, dtype=torch.float32)
y_train_small = torch.tensor(y_train_small, dtype=torch.float32)
X_test_small = torch.tensor(X_test_small, dtype=torch.float32)
y_test_small = torch.tensor(y_test_small, dtype=torch.float32)# 创建数据加载器
train_loader_large = DataLoader(TensorDataset(X_train_large, y_train_large), batch_size=32, shuffle=True)
test_loader_large = DataLoader(TensorDataset(X_test_large, y_test_large), batch_size=32, shuffle=False)train_loader_small = DataLoader(TensorDataset(X_train_small, y_train_small), batch_size=32, shuffle=True)
test_loader_small = DataLoader(TensorDataset(X_test_small, y_test_small), batch_size=32, shuffle=False)# 定义简单的线性模型
class SimpleModel(nn.Module):def __init__(self):super(SimpleModel, self).__init__()self.linear = nn.Linear(10, 1)def forward(self, x):return self.linear(x)# 训练模型的通用函数
def train_model(train_loader, num_epochs=50, learning_rate=0.01):model = SimpleModel()criterion = nn.MSELoss()optimizer = optim.SGD(model.parameters(), lr=learning_rate)train_losses = []for epoch in range(num_epochs):model.train()epoch_train_loss = 0.0for batch_x, batch_y in train_loader:outputs = model(batch_x)loss = criterion(outputs, batch_y)optimizer.zero_grad()loss.backward()optimizer.step()epoch_train_loss += loss.item()epoch_train_loss /= len(train_loader)train_losses.append(epoch_train_loss)print(f'Epoch [{epoch+1}/{num_epochs}], Train Loss: {epoch_train_loss:.4f}')return model, train_losses# 训练大数据集的模型
print("Training on large dataset")
model_large, train_losses_large = train_model(train_loader_large)# 训练小数据集的模型
print("\nTraining on small dataset")
model_small, train_losses_small = train_model(train_loader_small)# 绘制训练损失曲线
plt.figure(figsize=(12, 6))
plt.plot(range(1, len(train_losses_large) + 1), train_losses_large, label='Large Dataset Train Loss')
plt.plot(range(1, len(train_losses_small) + 1), train_losses_small, label='Small Dataset Train Loss')
plt.xlabel('Epoch')
plt.ylabel('Loss')
plt.legend()
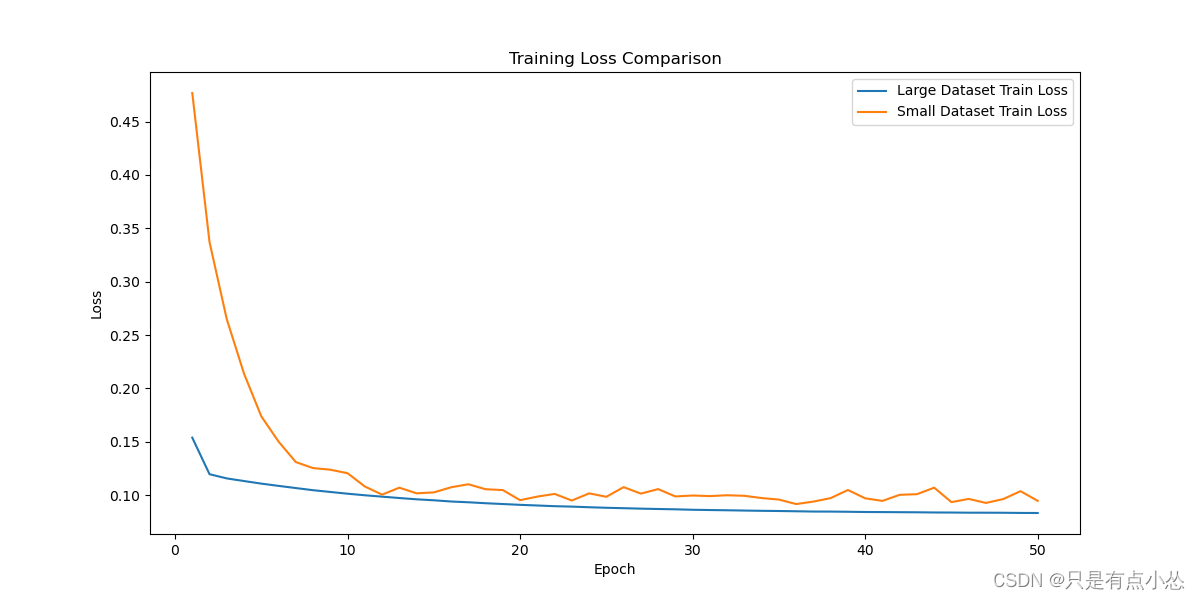
plt.title('Training Loss Comparison')
plt.savefig("test")# 在测试集上计算最终的评估指标(例如均方误差)
def evaluate_model(model, test_loader):model.eval()test_loss = 0.0criterion = nn.MSELoss()with torch.no_grad():for batch_x, batch_y in test_loader:outputs = model(batch_x)loss = criterion(outputs, batch_y)test_loss += loss.item()test_loss /= len(test_loader)return test_loss# 评估大数据集的模型
final_test_loss_large = evaluate_model(model_large, test_loader_large)# 评估小数据集的模型
final_test_loss_small = evaluate_model(model_small, test_loader_small)print(f'Final Test Loss on Large Dataset: {final_test_loss_large:.4f}')
print(f'Final Test Loss on Small Dataset: {final_test_loss_small:.4f}')结果分析
通过上述代码,可以得到大数据集和小数据集在训练过程中的损失曲线以及最终的测试损失。根据这些信息,可以比较它们的收敛情况和性能。
-
损失曲线: 通过观察损失曲线,判断模型在两个数据集上的收敛速度和稳定性。如果两者曲线形状相似,并且在同一水平上趋于平稳,可以认为它们收敛到了相似的程度。
-
最终测试损失: 最终测试损失值可以用于直接比较两个模型的性能。如果两者最终测试损失值接近,则可以认为它们的模型性能相当。
通过使用相同的 random_state 值,确保数据集划分的一致性,从而使得比较结果更加公平和具有可重复性。
这篇关于【chatgpt】train_split_test的random_state的文章就介绍到这儿,希望我们推荐的文章对编程师们有所帮助!


