本文主要是介绍NeRF从入门到放弃2:InstantNGP,希望对大家解决编程问题提供一定的参考价值,需要的开发者们随着小编来一起学习吧!
原始的NeRF每条光线上的点都要经过MLP的查询,才能得到其密度和颜色值,要查询的点非常多,而MLP的推理是比较耗时的。
InstantNGP将空间划分成多个层级的体素(voxels),并且在每个体素内部使用神经网络来预测feature。
而Plenoxels则干脆就不使用神经网络了,它直接在体素中存储场景的辐射亮度和密度信息。通过使用球谐函数(Spherical Harmonics)来近似每个体素内的光照分布,Plenoxels能够有效地压缩存储需求,同时保持高质量的渲染效果。这种方法避免了复杂的神经网络计算,显著提升了渲染速度。Tesla用的就是这种方法。
Direct Voxel Grid也是类似的想法。
现在比较常调用的是InstantNGP,所以我们重点看这个方法。
算法解读
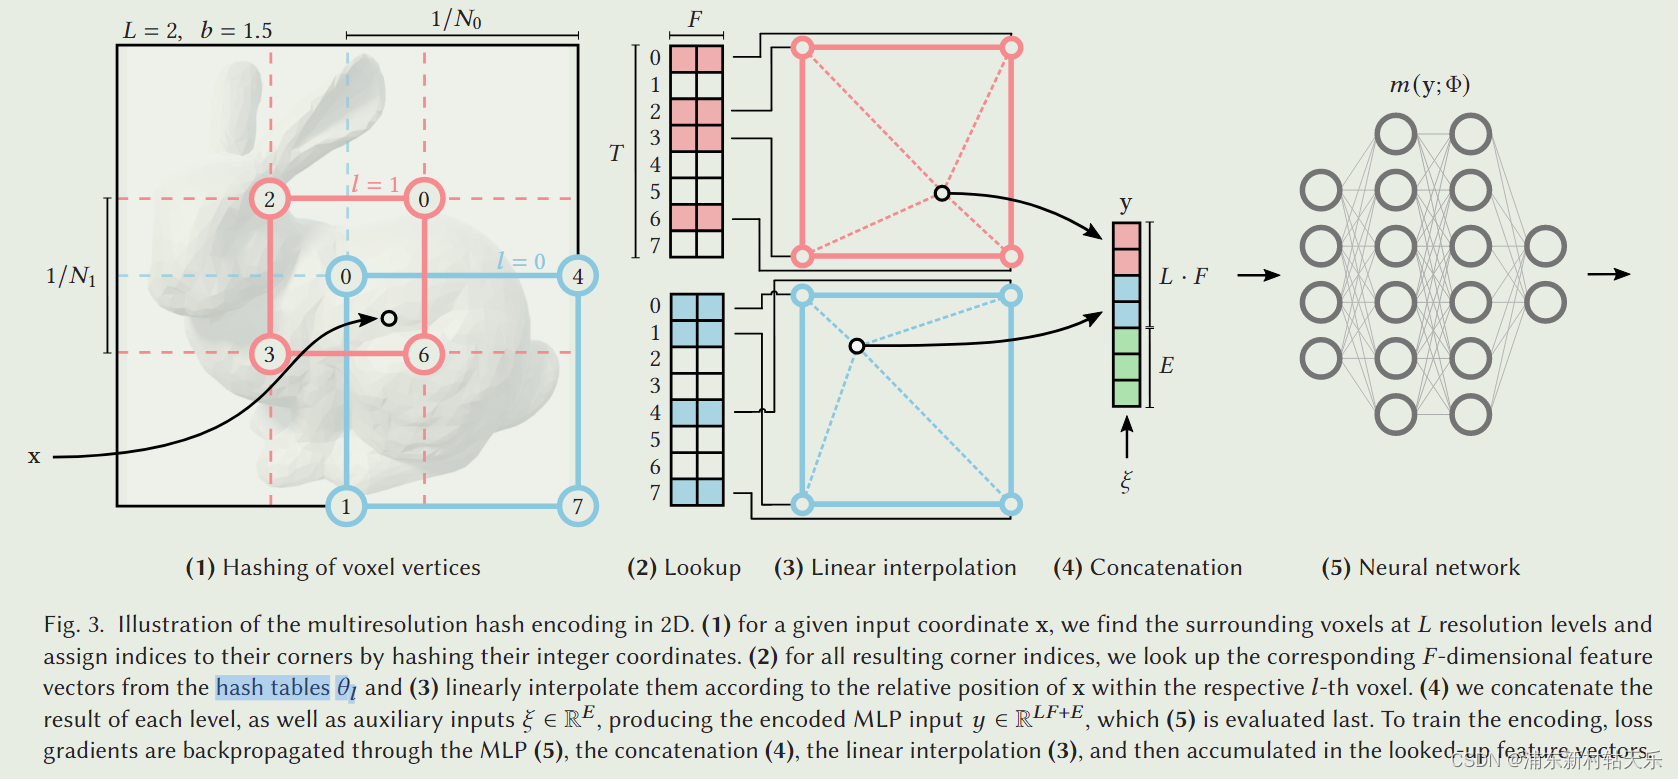
Given a fully connected neural network 𝑚(y; Φ), we are interested in an encoding of its inputs y = enc(x; 𝜃 ) that improves the approximation quality and training speed across a wide range of applications without incurring a notable performance overhead
InstantNGP把空间划分成多个分辨率,具体查询某个点的feature时,利用hash表查询到这个点附近的四个角点,这四个角点的feature是已知的,通过三线性插值的方法,得到该点在该分辨率下的feature。
最终的feature是多个分辨率下的feature concate起来,作为最终的feature。
也就是说,原始的NeRF是输入(x,y,z),经过mlp,输出feature;而InstantNGP是输入(x,y,z),查询其4个邻域的feature(事先编码好的,所以很快),插值得到feature。
参数意义
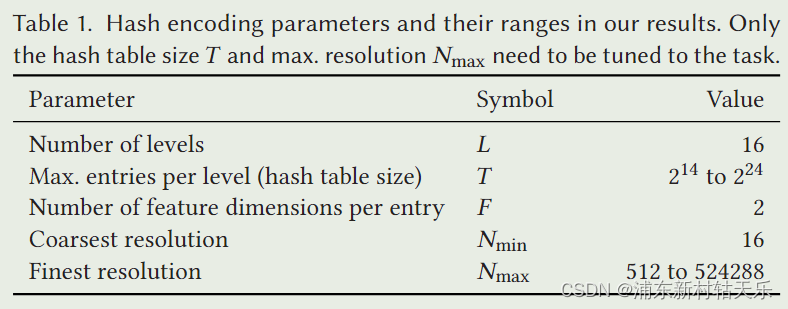

5个参数,根据最小、最大分辨率和层数,计算出每一层的放大系数,也就是等比数列的公比(也就是b)。算出公比后每一层的分辨率就是Nmin * b的l次方,l是层的序号。
F是要编码成的向量的维度。
T表示hash表的最大容量,如果超过了这个最大容量,就会出现hash冲突。
如第一张图中编码的feature是2维,有2个层级(L),那最后的特征向量就是这两个层级的特征向量concate起来,是4维度。
代码实例
# nerfstudio/field_components/encodings.py
class HashEncoding(Encoding):"""Hash encodingArgs:num_levels: Number of feature grids.min_res: Resolution of smallest feature grid.max_res: Resolution of largest feature grid.log2_hashmap_size: Size of hash map is 2^log2_hashmap_size.features_per_level: Number of features per level.hash_init_scale: Value to initialize hash grid.implementation: Implementation of hash encoding. Fallback to torch if tcnn not available.interpolation: Interpolation override for tcnn hashgrid. Not supported for torch unless linear.n_input_dims: Number of input dimensions (typically 3 for x,y,z)"""def __init__(self,num_levels: int = 16,min_res: int = 16,max_res: int = 1024,log2_hashmap_size: int = 19,features_per_level: int = 2,hash_init_scale: float = 0.001,implementation: Literal["tcnn", "torch"] = "tcnn",interpolation: Optional[Literal["Nearest", "Linear", "Smoothstep"]] = None,n_input_dims: int = 3,) -> None:super().__init__(in_dim=3)self.num_levels = num_levelsself.min_res = min_resself.features_per_level = features_per_levelself.hash_init_scale = hash_init_scaleself.log2_hashmap_size = log2_hashmap_sizeself.hash_table_size = 2**log2_hashmap_sizeself.min_res = min_resself.hash_init_scale = hash_init_scalelevels = torch.arange(num_levels)self.growth_factor = np.exp((np.log(max_res) - np.log(min_res)) / (num_levels - 1)) if num_levels > 1 else 1.0self.register_buffer("scalings", torch.floor(min_res * self.growth_factor**levels))self.hash_offset = levels * self.hash_table_sizeself.tcnn_encoding = Noneself.hash_table = torch.empty(0)if implementation == "torch":self.build_nn_modules()elif implementation == "tcnn" and not TCNN_EXISTS:print_tcnn_speed_warning("HashEncoding")self.build_nn_modules()elif implementation == "tcnn":encoding_config = self.get_tcnn_encoding_config(num_levels=self.num_levels,features_per_level=self.features_per_level,log2_hashmap_size=self.log2_hashmap_size,min_res=self.min_res,growth_factor=self.growth_factor,interpolation=interpolation,)self.tcnn_encoding = tcnn.Encoding(n_input_dims=n_input_dims,encoding_config=encoding_config,)if self.tcnn_encoding is None:assert (interpolation is None or interpolation == "Linear"), f"interpolation '{interpolation}' is not supported for torch encoding backend"def build_nn_modules(self) -> None:"""Initialize the torch version of the hash encoding."""self.hash_table = torch.rand(size=(self.hash_table_size * self.num_levels, self.features_per_level)) * 2 - 1self.hash_table *= self.hash_init_scaleself.hash_table = nn.Parameter(self.hash_table)
这篇关于NeRF从入门到放弃2:InstantNGP的文章就介绍到这儿,希望我们推荐的文章对编程师们有所帮助!


