本文主要是介绍手把手教你实现条纹结构光三维重建(3)——相机投影仪标定,希望对大家解决编程问题提供一定的参考价值,需要的开发者们随着小编来一起学习吧!
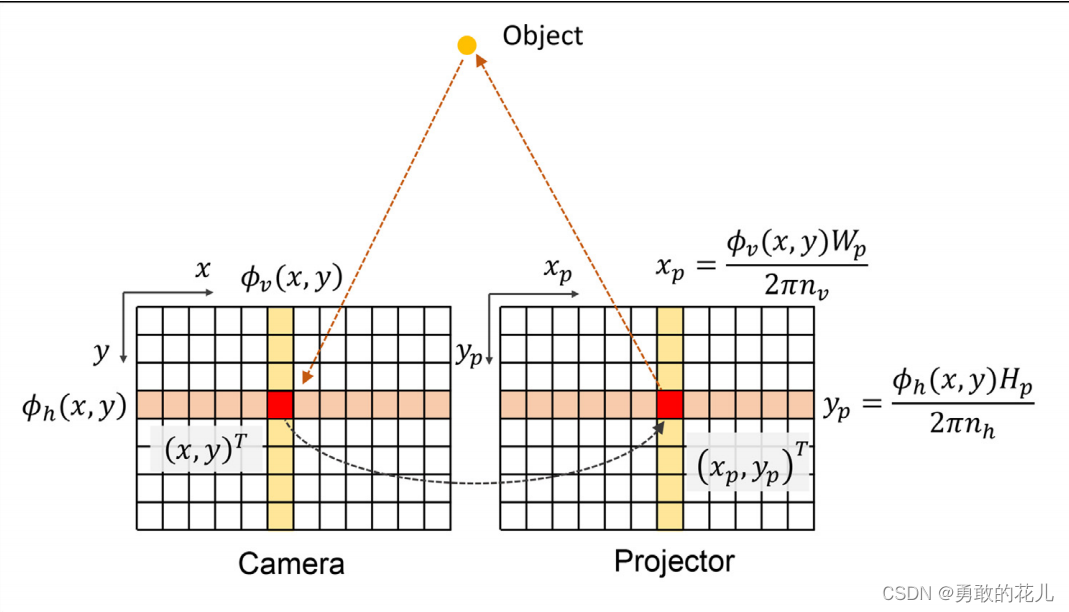
我们都知道,投影仪其实就是个反向相机,如果我们了解双目标定的原理,那么相机和投影仪的标定就不难,关键是我们怎么得到投影仪在图像特征点(比如棋盘格角点)上的像素位置。
投影仪也类似于一个cmos,图像有像素位置(u,v),那么通过我们上一讲的条纹解码,给图像添加水平方向和垂直方向的投影,就可以通过解码,得到图像对应的投影相位值,此相位值就是投影的像素坐标(xp,yp)。如下图所示,具体的原理可以参考论文《Calibration of fringe projection profilometry A comparative review》。
这里,为了方便大家理解,可以参考中文文献《基于数字光栅投影的结构光三维测量技术与系统研究》 ,我将重点截图如下:
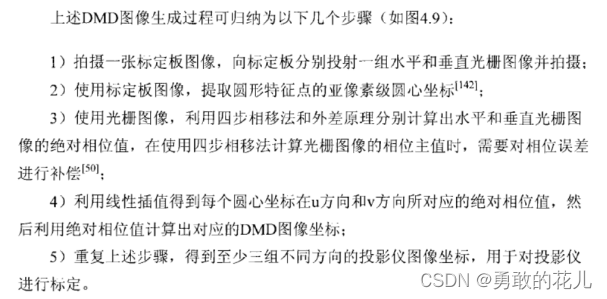
第四点,绝对相位映射到DMD图像坐标,如下所示:


say easy,show me code。。。
代码如下:
#include <iostream>
#include <vector>
#include <opencv2/opencv.hpp>
//#define PROJECTOR_WIDTH_1080P    1920          //这里定义的是1080P投影仪的分辨率
//#define PROJECTOR_HEIGHT_1080P   1080#define PROJECTOR_WIDTH_1080P    912          //这里定义的是1080P投影仪的分辨率
#define PROJECTOR_HEIGHT_1080P   1140#define PROJECTOR_WIDTH_720P    1280          //这里定义的是720P投影仪的分辨率
#define PROJECTOR_HEIGHT_720P   720#define PROJECTOR_WIDTH_480P    854          //这里定义的是480P投影仪的分辨率
#define PROJECTOR_HEIGHT_480P   480#define PROJECTOR_WIDTH_4500    912          //这里定义的是TI的4500投影仪的分辨率
#define PROJECTOR_HEIGHT_4500   1140
#define PI 3.1415926std::vector<float> h_freq_array, v_freq_array;// Absolute phase from 4 frames
cv::Mat get_phase4(const cv::Mat I1, const cv::Mat I2, const cv::Mat I3, const cv::Mat I4) {cv::Mat_<float> I1_(I1);cv::Mat_<float> I2_(I2);cv::Mat_<float> I3_(I3);cv::Mat_<float> I4_(I4);//获取wrap相位int m_nHeight = I1.rows;int m_nWidth = I1.cols;cv::Mat phase = cv::Mat::zeros(m_nHeight, m_nWidth, CV_32FC1);//#pragma omp parallel forfor (int i = 0; i < m_nHeight; i++){for (int j = 0; j < m_nWidth; j++){int a1 = I1_.at<float>(i, j);int a2 = I2_.at<float>(i, j);int a3 = I3_.at<float>(i, j);int a4 = I4_.at<float>(i, j);phase.at<float>(i, j) = (float)atan2((a2 - a4), (a1 - a3));if (phase.at<float>(i, j) < 0)phase.at<float>(i, j) += (2 * PI);}}return phase;
}
cv::Mat unwrap_with_cue(const cv::Mat up, const cv::Mat upCue, float nPhase)
{// Determine number of jumpscv::Mat P = ((upCue)*nPhase - up) / (2 * PI);cv::Mat tmp(P.rows, P.cols, CV_32FC1);for (int i = 0; i < up.rows; i++) {for (int j = 0; j < up.cols; j++) {tmp.at<float>(i, j) = round(P.at<float>(i, j));}}// Add to phasecv::Mat upUnwrapped = up + tmp * 2 * PI;// Scale to range [0; 2pi]upUnwrapped *= 1.0 / nPhase;return upUnwrapped;
}cv::Mat decode_pattern(const std::vector<cv::Mat>& encode_images, const std::vector<float>& phases, const int projector_lens)
{//前面四组图案最低频率的编码(频率为1),所以不需要进行相位展开std::vector<cv::Mat> frames_low_freq(encode_images.begin(), encode_images.begin() + 4);cv::Mat upCue = get_phase4(frames_low_freq[0], frames_low_freq[1], frames_low_freq[2], frames_low_freq[3]);for (int index = 1; index < phases.size(); index++)  //两两求解双频{std::vector<cv::Mat> frames_high_freq(encode_images.begin() + 4 * (index), encode_images.begin() + 4 * (index + 1));cv::Mat unPhase = get_phase4(frames_high_freq[0], frames_high_freq[1], frames_high_freq[2], frames_high_freq[3]);upCue = unwrap_with_cue(unPhase, upCue, phases[index]);}cv::Mat decode_phase_img = projector_lens * ((upCue) / (2 * PI));return decode_phase_img;
}void generate_freqs(std::vector <float>& freq_array, int length, int min_T)
{freq_array[4] = (double)length / min_T;     //我们需要生成五个频率,第五个频率为[投影宽度/周期]double x = sqrtf(sqrtf(freq_array[4]));    //第二个频率定义为第五个频率的开四次根号freq_array[3] = x * x * x; //第四个频率  freq_array[2] = x * x;     //第三个频率freq_array[1] = x;         //第二个频率freq_array[0] = 1;         //第一个频率
}void init()
{v_freq_array.resize(5);generate_freqs(v_freq_array, PROJECTOR_HEIGHT_4500, 10);        //图像垂直方向——横条纹频率h_freq_array.resize(5);generate_freqs(h_freq_array, PROJECTOR_WIDTH_4500, 10);         //图像水平方向——竖条纹频率
}void save_calibrate_xml(std::string filename,const cv::Mat& Kc, const cv::Mat& kc, double cam_error,const cv::Mat& Kp, const cv::Mat& kp, double proj_error,const cv::Mat& Rpc, const cv::Mat& Tpc, double stereo_error)
{cv::FileStorage fs(filename, cv::FileStorage::WRITE);if (!fs.isOpened())return;fs << "Kc" << cv::Mat(Kc) << "kc" << cv::Mat(kc) << "Kp" << cv::Mat(Kp) << "kp" << cv::Mat(kp) << "Rpc" << cv::Mat(Rpc) << "Tpc" << cv::Mat(Tpc) << "cam_error" << cam_error << "proj_error"<< proj_error << "stereo_error" << stereo_error;fs.release();
}bool calibrate_Impl(const std::vector<cv::Mat>& chess_imgs, const std::vector<cv::Mat>& vps, const std::vector<cv::Mat>& ups)
{unsigned int img_height = chess_imgs[0].rows;unsigned int img_width = chess_imgs[0].cols;cv::Size pattern_size(8, 11);float checkerSize = 10;std::vector<cv::Point3f> Qi;for (int h = 0; h < pattern_size.height; h++)for (int w = 0; w < pattern_size.width; w++)Qi.push_back(cv::Point3f(checkerSize * w, checkerSize * h, 0.0));std::vector<std::vector<cv::Point2f> > qc, qp;std::vector<std::vector<cv::Point3f> > object_points;int nFrameSeq = chess_imgs.size();for (unsigned int i = 0; i < nFrameSeq; i++){std::vector<cv::Point2f> qci;bool success =cv::findChessboardCorners(chess_imgs[i], pattern_size, qci, cv::CALIB_CB_ADAPTIVE_THRESH);if (!success){std::cout << "图像 " << i << " 不能找到角点\n";continue;}else {// Refine corner locationscv::cornerSubPix(chess_imgs[i], qci, cv::Size(5, 5), cv::Size(1, 1),cv::TermCriteria(CV_TERMCRIT_EPS + CV_TERMCRIT_ITER, 30, 0.1));}// Draw colored chessboardcv::Mat chess_imgs_color;cv::cvtColor(chess_imgs[i], chess_imgs_color, cv::COLOR_GRAY2RGB);cv::drawChessboardCorners(chess_imgs_color, pattern_size, qci, success);
#if 1cv::resize(chess_imgs_color, chess_imgs_color, cv::Size(chess_imgs_color.cols * 0.5, chess_imgs_color.rows * 0.5));cv::imshow("chess_imgs_color", chess_imgs_color);cv::waitKey(0);
#endif// Vectors of accepted points for current viewstd::vector<cv::Point2f> qpi_a;std::vector<cv::Point2f> qci_a;std::vector<cv::Point3f> Qi_a;// Loop through checkerboard cornersfor (unsigned int j = 0; j < qci.size(); j++) {const cv::Point2f& qcij = qci[j];// Collect neighbor pointsconst unsigned int WINDOW_SIZE = 10;std::vector<cv::Point2f> N_qcij, N_qpij;// avoid going out of boundsunsigned int starth = std::max(int(qcij.y + 0.5) - WINDOW_SIZE, 0u);unsigned int stoph = std::min(int(qcij.y + 0.5) + WINDOW_SIZE, img_height - 1);unsigned int startw = std::max(int(qcij.x + 0.5) - WINDOW_SIZE, 0u);unsigned int stopw = std::min(int(qcij.x + 0.5) + WINDOW_SIZE, img_width - 1);for (unsigned int h = starth; h <= stoph; h++) {for (unsigned int w = startw; w <= stopw; w++) {N_qcij.push_back(cv::Point2f(w, h));float upijwh = ups[i].at<float>(h, w);float vpijwh = vps[i].at<float>(h, w);N_qpij.push_back(cv::Point2f(upijwh, vpijwh));}}// std::cout << i << " findHomography " << N_qcij.size() << " " << N_qpij.size() <<// std::endl;// if enough valid points to build homographyif (N_qpij.size() >= 50) {//                    std::cout << i << " findHomography" << std::endl;// translate qcij into qpij using local homographycv::Mat H = cv::findHomography(N_qcij, N_qpij, cv::RANSAC);/*std::cout << "H:\n" << H << endl;*/if (!H.empty()) {cv::Point3d Q =cv::Point3d(cv::Mat(H * cv::Mat(cv::Point3d(qcij.x, qcij.y, 1.0))));cv::Point2f qpij = cv::Point2f(Q.x / Q.z, Q.y / Q.z);qpi_a.push_back(qpij);qci_a.push_back(qci[j]);Qi_a.push_back(Qi[j]);}}}if (!Qi_a.empty()) {// Store projector corner coordinatesqp.push_back(qpi_a);// Store camera corner coordinatesqc.push_back(qci_a);// Store world corner coordinatesobject_points.push_back(Qi_a);}}if (object_points.size() <= 4) {std::cerr << "没有足够的标定数据!" << std::endl;return false;}// 标定相机cv::Mat Kc, kc;std::vector<cv::Mat> cam_rvecs, cam_tvecs;cv::Size frameSize(img_width, img_height);int cal_flags = 0+ cv::CALIB_FIX_K4+ cv::CALIB_FIX_K5;double cam_error = cv::calibrateCamera(object_points, qc, frameSize, Kc, kc, cam_rvecs, cam_tvecs, cal_flags,cv::TermCriteria(cv::TermCriteria::COUNT + cv::TermCriteria::EPS, 50, DBL_EPSILON));// 标定投影仪cv::Mat Kp, kp;std::vector<cv::Mat> proj_rvecs, proj_tvecs;cv::Size screenSize(PROJECTOR_WIDTH_4500, PROJECTOR_HEIGHT_4500);double proj_error = cv::calibrateCamera(object_points, qp, screenSize, Kp, kp, proj_rvecs, proj_tvecs, cal_flags,cv::TermCriteria(cv::TermCriteria::COUNT + cv::TermCriteria::EPS, 50, DBL_EPSILON));// 双目标定cv::Mat Rp, Tp, E, F;double stereo_error = cv::stereoCalibrate(object_points, qc, qp, Kc, kc, Kp, kp, frameSize, Rp, Tp, E, F,cv::CALIB_FIX_INTRINSIC + cal_flags,cv::TermCriteria(cv::TermCriteria::COUNT + cv::TermCriteria::EPS, 100, DBL_EPSILON));//显示标定结果std::cout << "Kc = \n" << Kc;std::cout << "\nkc = \n" << kc;std::cout << "\ncam_error = " << cam_error << std::endl;std::cout << "\nKp = \n" << Kp;std::cout << "\nkp = \n" << kp;std::cout << "\nproj_error = " << proj_error << std::endl;std::cout << "\nRp = \n" << Rp;std::cout << "\nTp = \n" << Tp;std::cout << "\nstereo_error = " << stereo_error;std::string filename = "calibration_0.xml";save_calibrate_xml(filename, Kc,kc, cam_error,Kp,kp, proj_error,Rp,Tp, stereo_error);
}void read_calib_images(std::string folder_path, int img_count,std::vector<std::vector<cv::Mat>>& multi_calib_images_H, std::vector<std::vector<cv::Mat>>& multi_calib_images_V)
{for (int group = 0; group < img_count; group++)   //总共的图像组数{std::vector<cv::Mat> calib_images_H, calib_images_V;std::string folder_path_index = folder_path + std::to_string(group) + "//*.bmp";std::vector<cv::String> image_files;cv::glob(folder_path_index, image_files);int img_index = 0;for (const auto& file : image_files) {cv::Mat image = cv::imread(file,0);if (image.empty()) {std::cerr << "Failed to read image: " << file << std::endl;continue;}if (img_index < 20)calib_images_V.push_back(image);elsecalib_images_H.push_back(image);img_index++;}multi_calib_images_H.push_back(calib_images_H);multi_calib_images_V.push_back(calib_images_V);}
}int main()
{init();//1. 读取标定图像std::vector<std::vector<cv::Mat>> multi_calib_images_H, multi_calib_images_V;std::string folder_path = ".//calibImage//";int img_count = 7;read_calib_images(folder_path, img_count, multi_calib_images_H, multi_calib_images_V);if (multi_calib_images_V.size() <= 4){std::cout << "至少需要4组图像!\n";return 0;}std::vector<cv::Mat> chess_imgs, vps, ups;int encode_img_count = multi_calib_images_V[0].size();    //获取每一组编码图像的数量,5个频率,4步相移,其实就是20张图像for (int i = 0; i < img_count; i++){cv::Mat chess_img = multi_calib_images_H[i][encode_img_count];   //获取最后一张没有条纹的棋盘格图像cv::Mat decode_img_V = decode_pattern(multi_calib_images_V[i], v_freq_array, PROJECTOR_HEIGHT_4500);cv::Mat decode_img_H = decode_pattern(multi_calib_images_H[i], h_freq_array, PROJECTOR_WIDTH_4500*2);chess_imgs.push_back(chess_img.clone());vps.push_back(decode_img_V.clone());ups.push_back(decode_img_H.clone());}calibrate_Impl(chess_imgs, vps, ups);return 0;
}
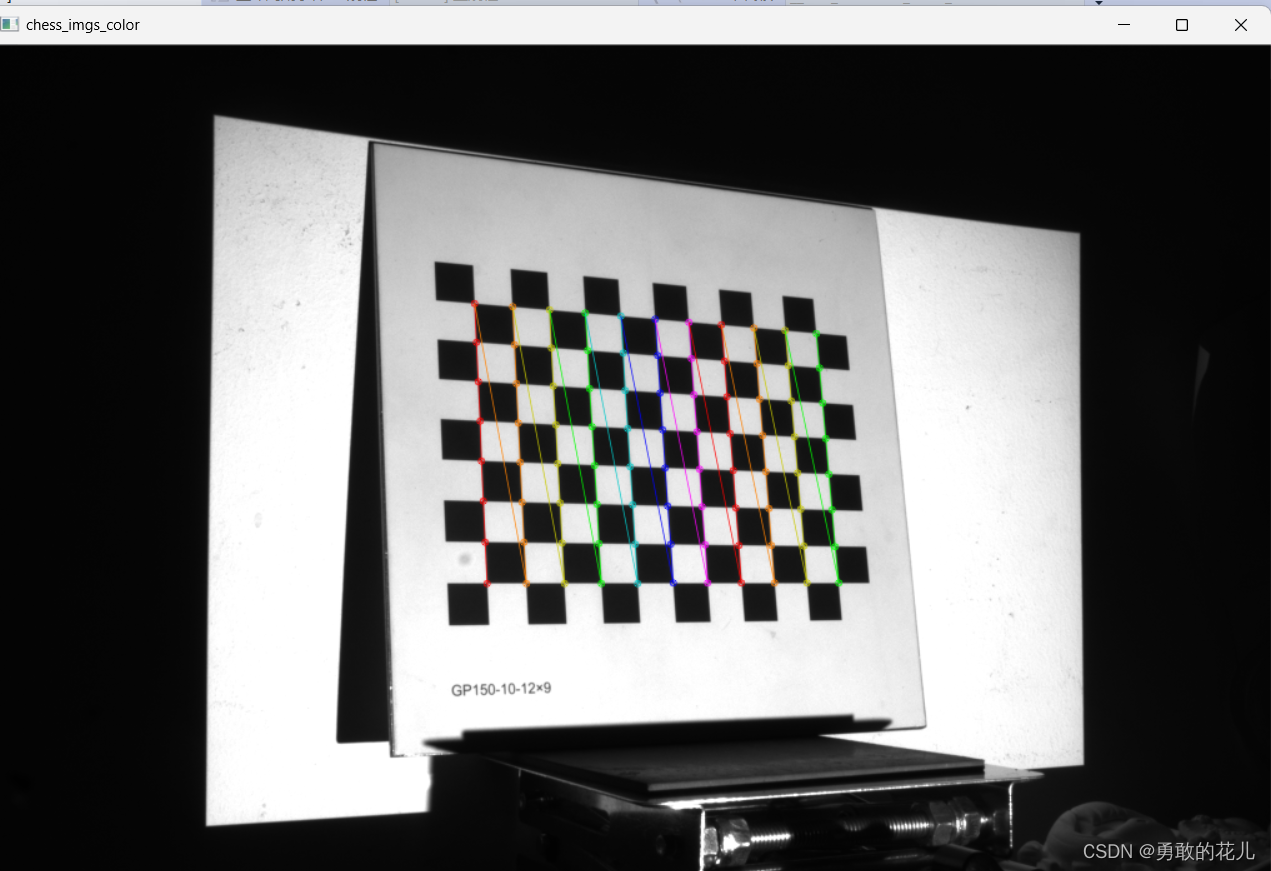
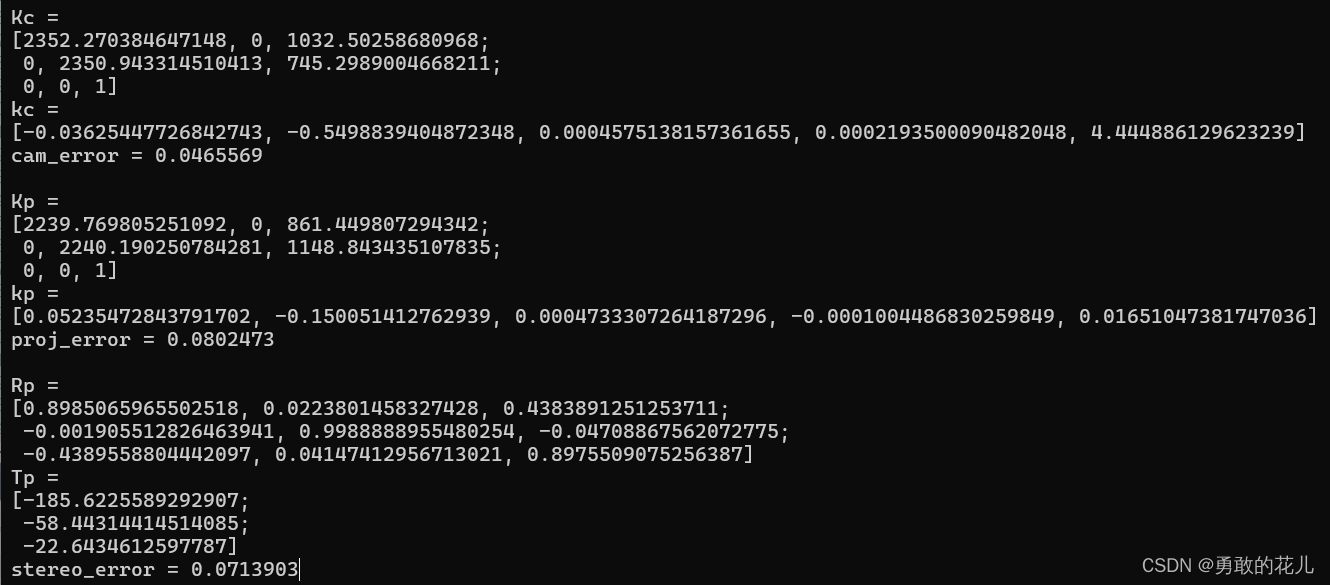
部分运行效果(检测到的棋盘格角点)如下所示:
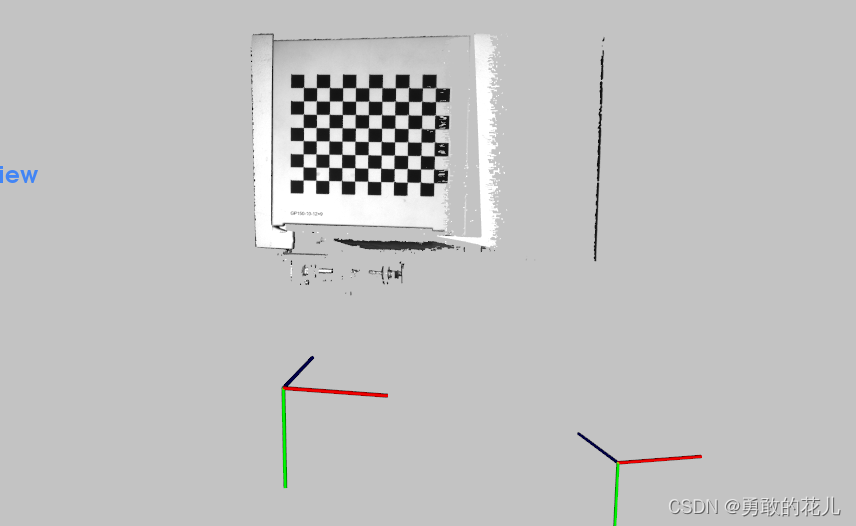
我们将最后一组图像作为测试,进行三维重建,效果如下:
如果大家有什么疑问,欢迎留言,我将一一解答。
相关的测试数据集可以下面链接中下载
https://download.csdn.net/download/laiyinping/89464283
这篇关于手把手教你实现条纹结构光三维重建(3)——相机投影仪标定的文章就介绍到这儿,希望我们推荐的文章对编程师们有所帮助!


