本文主要是介绍Qt Quick实现一个炫酷的折叠动画效果,希望对大家解决编程问题提供一定的参考价值,需要的开发者们随着小编来一起学习吧!
demo来自 https://github.com/cjmdaixi/FlipAnimation
代码上传到了 csdn
文章目录
- 效果图
- 核心代码
- 从中学习到了什么
- ShaderEffectSource
- Flipable
- 感谢无私奉献的人
效果图
可以动态配置折叠次数

核心代码
FlipCards.qml
import QtQuick 2.9
import QtQuick.Controls 2.2Item {id: rootproperty int segments: 4property Item flipContentproperty Item coverItemproperty int expandSpeed: 300property int foldSpeed: 300property bool expanding: falseproperty bool folding: falseproperty bool folded: truewidth: flipCardWidthheight: flipCardHeightproperty real flipCardWidth: flipContent.widthproperty real flipCardHeight: flipContent.height / segmentsproperty int flipCardCount: segments - 1signal beginFold()signal beginExpand()ShaderEffectSource{id: bottomCardwidth: flipCardWidthheight: flipCardHeightanchors{left: parent.left; top: parent.top}sourceItem: flipContentsourceRect: Qt.rect(0, 0, flipCardWidth, flipCardHeight)z: flipContent.z + 1}Component{id: flipCardComponentFlipable{id: flipablewidth: root.flipCardWidthheight: root.flipCardHeightproperty alias expandAnimation: expandAnimationproperty alias foldAnimation: foldAnimationproperty alias backItem: backItemproperty alias frontItem: frontItemproperty int index: 0property bool isFirstCard: index === 0property bool isLastCard: index === root.flipCardCount - 1transform: Rotation {id: rotationorigin.x: flipable.width / 2origin.y: flipable.heightaxis.x: -1; axis.y: 0; axis.z: 0angle: 0}front: Item{id: frontItemanchors.fill: parentRectangle{anchors.fill: parentcolor: "white"}}back: ShaderEffectSource{id: backItemsourceItem: flipContentsourceRect: Qt.rect(0, flipCardHeight * (index + 1), flipCardWidth, flipCardHeight)anchors.fill: parent}NumberAnimation{id: expandAnimationduration: expandSpeedtarget: rotationproperty: "angle"to: 180onStarted: {root.height += flipCardHeight;if(isFirstCard){root.expanding = true;}}onStopped: {if(isLastCard){flipContent.layer.enabled = false;flipContent.visible = true;bottomCard.visible = false;root.expanding = false;root.folded = false;}}}NumberAnimation{id: foldAnimationduration: foldSpeedtarget: rotationproperty: "angle"to: 0onStarted: {if(isLastCard){flipContent.layer.enabled = true;flipContent.visible = false;bottomCard.visible = true;root.folding = true;}}onStopped: {root.height -= flipCardHeight;if(isFirstCard){root.folding = false;root.folded = true;}}}}}Loader{id: firstCardLoadersourceComponent: flipCardComponentonLoaded: {var prev = firstCardLoader.item;root.beginExpand.connect(prev.expandAnimation.start);flipContent.parent = root;flipContent.visible = false;coverItem.parent = prev.frontItem;prev.parent = bottomCard;for(var i = 1; i < root.flipCardCount; i++){//console.log("create flip card ", i);var card = flipCardComponent.createObject(prev.backItem, {"index": i});prev.expandAnimation.stopped.connect(card.expandAnimation.start);if(i === root.flipCardCount - 1){root.beginFold.connect(card.foldAnimation.start);}card.foldAnimation.stopped.connect(prev.foldAnimation.start);prev = card;}}}function expand(){root.beginExpand();}function fold(){root.beginFold();}
}
从中学习到了什么
ShaderEffectSource
ShaderEffectSource类型将sourceItem渲染为纹理并在场景中显示。sourceItem被绘制到纹理中,就像它是一个完全不透明的根项目一样。因此,sourceItem本身可以不可见,但仍会出现在纹理中。
ShaderEffectSource可以用作:
- ShaderEffect中的纹理源。这允许您将自定义着色器效果应用于任何Qt Quick项目。
- 用于复杂项目的缓存。复杂项目可以在纹理中渲染一次,然后可以自由设置动画,而无需每帧再次渲染复杂项目。
- 不透明层。ShaderEffectSource允许将不透明度作为一个组应用于项目,而不是单独应用于每个项目。
用法如下:
import QtQuick 2.0Rectangle {width: 200height: 100gradient: Gradient {GradientStop { position: 0; color: "white" }GradientStop { position: 1; color: "black" }}Row {opacity: 0.5Item {id: foowidth: 100; height: 100Rectangle { x: 5; y: 5; width: 60; height: 60; color: "red" }Rectangle { x: 20; y: 20; width: 60; height: 60; color: "orange" }Rectangle { x: 35; y: 35; width: 60; height: 60; color: "yellow" }}ShaderEffectSource {width: 100; height: 100sourceItem: foo}}}
效果: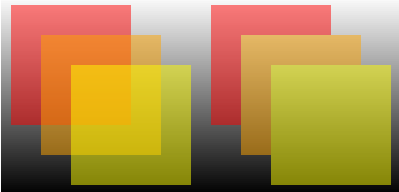
即使把foo隐藏掉,ShaderEffectSource 仍然可以显示。
Flipable
Flipable是一种可以在正面和背面之间明显“翻转”的物品,就像一张卡片。它可以与旋转、状态和过渡类型一起使用,以产生翻转效果。
front和back属性用于保存分别显示在可翻转项目正面和背面的项目。
用法如下,纸牌反转demo,效果如图:

flipable.qmlproject
import QmlProject 1.1Project {mainFile: "flipable.qml"/* Include .qml, .js, and image files from current directory and subdirectories */QmlFiles {directory: "."}JavaScriptFiles {directory: "."}ImageFiles {directory: "."}
}
Card.qml
import QtQuick 2.0Flipable {id: containerproperty alias source: frontImage.sourceproperty bool flipped: trueproperty int xAxis: 0property int yAxis: 0property int angle: 0width: front.width; height: front.heightfront: Image { id: frontImage }back: Image { source: "back.png" }state: "back"MouseArea { anchors.fill: parent; onClicked: container.flipped = !container.flipped }transform: Rotation {id: rotation; origin.x: container.width / 2; origin.y: container.height / 2axis.x: container.xAxis; axis.y: container.yAxis; axis.z: 0}states: State {name: "back"; when: container.flippedPropertyChanges { target: rotation; angle: container.angle }}transitions: Transition {ParallelAnimation {NumberAnimation { target: rotation; properties: "angle"; duration: 600 }SequentialAnimation {NumberAnimation { target: container; property: "scale"; to: 0.75; duration: 300 }NumberAnimation { target: container; property: "scale"; to: 1.0; duration: 300 }}}}
}
flipable.qml
import QtQuick 2.0
import "content"Rectangle {id: windowwidth: 480; height: 320color: "darkgreen"Row {anchors.centerIn: parent; spacing: 30Card { source: "content/9_club.png"; angle: 180; yAxis: 1 }Card { source: "content/5_heart.png"; angle: 540; xAxis: 1 }}
}
感谢无私奉献的人
这篇关于Qt Quick实现一个炫酷的折叠动画效果的文章就介绍到这儿,希望我们推荐的文章对编程师们有所帮助!


