本文主要是介绍用智能插件(Fitten Code: Faster and Better AI Assistant)再次修改vue3 <script setup>留言板,希望对大家解决编程问题提供一定的参考价值,需要的开发者们随着小编来一起学习吧!

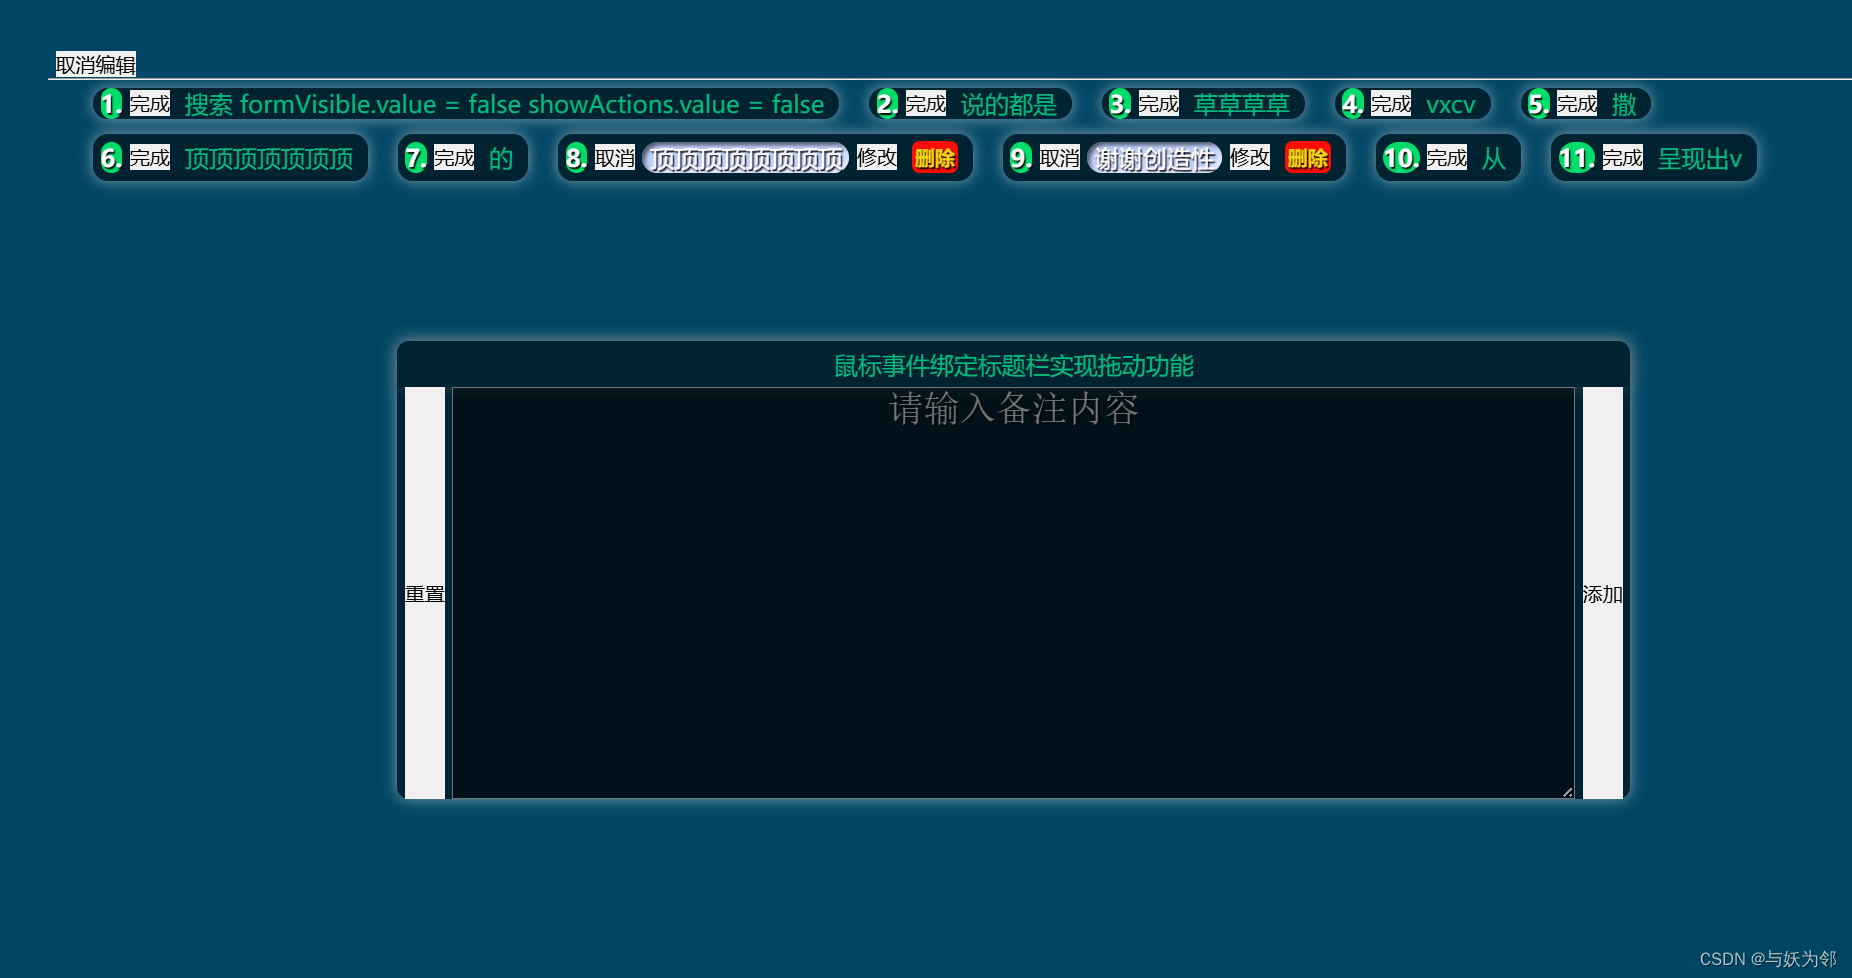
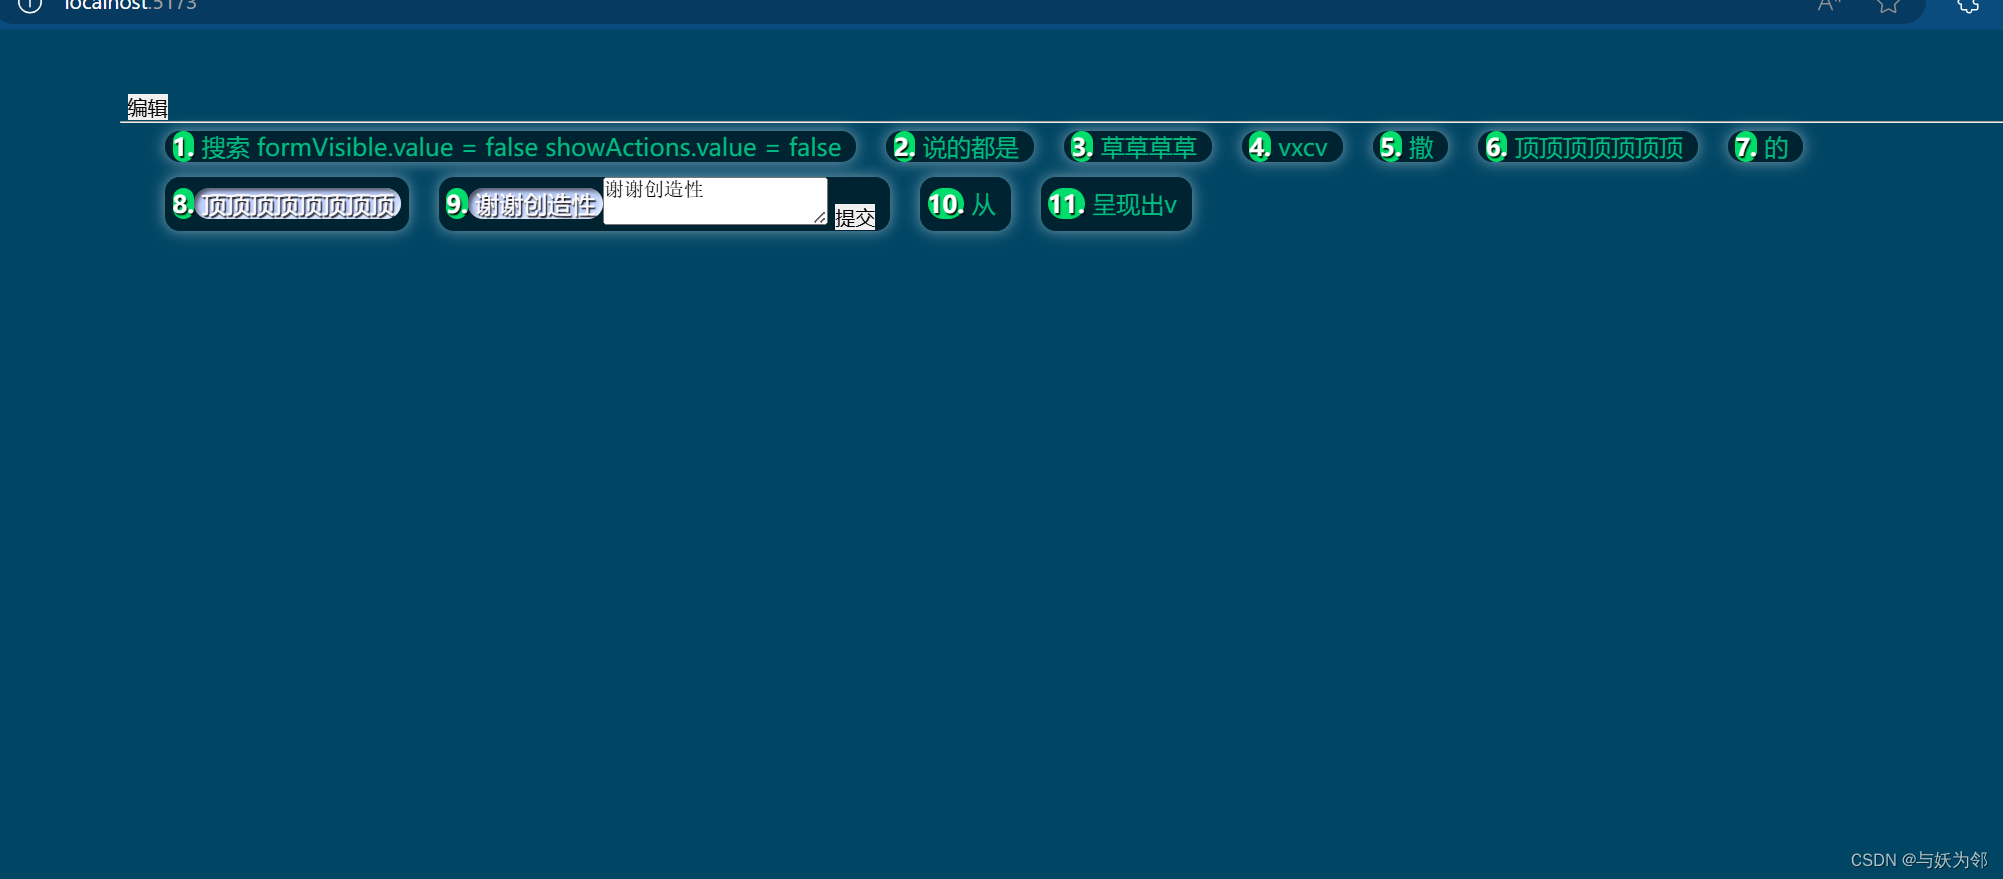
<template><div><button class="openForm" @click="openForm" v-if="!formVisible">编辑</button><button @click="closeForm" v-if="formVisible">取消编辑</button><hr /><formv-if="formVisible"@submit.prevent="addMemo"class="draggable-form":style="{ top: formPosition.y + 'px', left: formPosition.x + 'px' }"><div class="form-title" @mousedown="startDrag">{{ formTitle }}</div><div class="form-content"><input type="reset" value="重置" /><textarea v-model="newItem" rows="10" placeholder="请输入备注内容"></textarea><button type="submit" class="addBtn">添加</button></div></form><div class="memo" @click="handleMemoAction"><div v-for="(memo, index) in memos" :key="index" class="item"><span class="item-number">{{ index + 1 }}.</span><button v-if="showActions && !memo.finished" @click="completeMemo(index)">完成</button><button v-if="showActions && memo.finished" @click="cancelMemo(index)">取消</button><span class="text-content" :class="{ content: true, finish: memo.finished }">{{ memo.name }}</span><button v-if="showActions && memo.finished" @click="reworkMemo(index)">修改</button><buttonclass="deleteBtn"v-if="showActions && memo.finished"v-show="noindex == index ? false : true"@click="deleteMemo(index)">删除</button><span v-show="noindex == index ? true : false" class="alter"><textarea v-model="newItem"></textarea><button @click="csu">提交</button></span></div></div></div>
</template>
<script setup>
import { ref, reactive, onMounted } from 'vue'
const formVisible = ref(false)
const newItem = ref('')
const memos = ref([])
const showActions = ref(false)
const noindex = ref(-1)
const openForm = () => {formVisible.value = trueshowActions.value = true
}
const closeForm = () => {formVisible.value = falseshowActions.value = false
}
const reworkMemo = (index) => {if (newItem.value === '' || false) {newItem.value = memos.value[index].namenoindex.value = indexformVisible.value = falseshowActions.value = false} else {newItem.value = ''noindex.value = -1}
}
const csu = () => {if (noindex.value === -1) {return}memos.value[noindex.value].name = newItem.value// 取消备忘录的完成状态memos.value[noindex.value].finished = falsenoindex.value = -1newItem.value = ''saveTodo()
}
const addMemo = () => {if (newItem.value.trim() !== '') {memos.value.push({ name: newItem.value, finished: false })newItem.value = ''formVisible.value = falseshowActions.value = falsesaveTodo()}
}
const completeMemo = (index) => {memos.value[index].finished = truesaveTodo()
}
const cancelMemo = (index) => {memos.value[index].finished = falsesaveTodo()
}
const deleteMemo = (index) => {memos.value.splice(index, 1)updateItemNumbers()formVisible.value = falseshowActions.value = falsesaveTodo()
}
const handleMemoAction = (event) => {const target = event.targetif (target.innerHTML === '完成') {// handle complete action} else if (target.innerHTML === '取消') {// handle cancel action} else if (target.innerHTML === '删除') {// handle delete action}
}
const saveTodo = () => {localStorage.myLogs = JSON.stringify(memos.value)
}
const loadTodo = () => {const savedMemos = JSON.parse(localStorage.myLogs ?? '[]')memos.value = savedMemosupdateItemNumbers()
}
const updateItemNumbers = () => {const itemNumbers = document.querySelectorAll('.item-number')itemNumbers.forEach((item, index) => {item.textContent = index + 1})
}
loadTodo()
/*窗口移动事件*/
const formTitle = '鼠标事件绑定标题栏实现拖动功能'
const formPosition = reactive({ x: 0, y: 0 }) // 记录窗口位置的变量
const startDrag = (event) => {event.preventDefault() // 阻止默认拖动行为const offsetX = event.clientX - formPosition.xconst offsetY = event.clientY - formPosition.yconst onDrag = (e) => {formPosition.x = e.clientX - offsetXformPosition.y = e.clientY - offsetY}const onStopDrag = () => {document.removeEventListener('mousemove', onDrag)document.removeEventListener('mouseup', onStopDrag)}document.addEventListener('mousemove', onDrag)document.addEventListener('mouseup', onStopDrag)
}
onMounted(() => {const initialX = window.innerWidth / 4 // 窗口水平const initialY = window.innerHeight / 4 // 窗口垂直formPosition.x = initialXformPosition.y = initialY
})
</script>
<style scoped>
/* 全局样式 */
* {margin: 0;padding: 0;box-sizing: border-box;user-select: none;
}
button,
input {cursor: pointer;margin: 0 5px;border: none;&:hover {color: #fff;background-color: hsla(160, 100%, 37%, 0.2);box-shadow: 0 0 15px rgba(255, 254, 254, 0.5);}
}
/* 拖动窗口的样式 */
.draggable-form {position: fixed;/* 最小宽度 */min-width: 50%;background-color: #fff;box-shadow: 2px 2px 5px rgba(251, 249, 249, 0.76);border-radius: 8px;background-color: rgba(0, 0, 0, 0.5);z-index: 9;box-shadow: 0 0 10px rgba(255, 254, 254, 0.5);
}
.form-title {text-align: center;padding: 5px;box-shadow: 0 0 10px rgba(93, 93, 93, 0.537);color: hsla(160, 100%, 37%, 1);cursor: move;
}
.form-content {display: flex;textarea {flex: 1;font-size: 1.5rem;background-color: rgba(0, 0, 0, 0.5);color: rgb(255, 255, 255);text-shadow: 1px 1px 1px rgba(0, 0, 0, 0.5);&::placeholder {text-align: center;}}
}
/* 文本显示区样式 */
.memo {display: flex;align-content: flex-start;flex-wrap: wrap;margin: 0 20px;
}
.item {margin: 5px 10px;padding: 0 5px;border-radius: 10px;background-color: rgba(0, 0, 0, 0.5);box-shadow: 0 0 10px rgba(255, 254, 254, 0.5);display: flex;align-items: center;transition: all 0.3s ease-in-out;&:hover {transform: scale(1.05);box-shadow: 0 0 15px rgba(255, 254, 254, 0.5);}
}
.item-number {/* 粗字体 */font-weight: bold;color: #fff;text-shadow: 1px 1px 1px #030303;/* 背景颜色 */background-color: #09de69;border-radius: 20px;
}
.text-content {color: hsla(160, 100%, 37%, 1);user-select: text;padding: 0 5px;&:hover {color: #fff;background-color: hsla(160, 100%, 37%, 0.2);}
}
/* 点击完成按钮显示.finish样式  */
.finish {/* 文本-装饰:删除线 *//* text-decoration: line-through; */background-color: rgb(191, 210, 255);color: rgb(255, 250, 250);text-shadow: 1px 1px 1px #030303;box-shadow:inset -2px -2px 3px rgba(255, 255, 255, 0.6),inset 2px 2px 3px rgba(0, 0, 0, 0.6);border-radius: 20px;
}
/* 点击删除按钮显示.alter样式  */
.deleteBtn {color: #f3d303;text-shadow: 1px 1px 1px rgb(0, 0, 0);background: #ff0000;border-radius: 5px;border: none;margin: 5px;padding: 2px;/* 粗体 */font-weight: bold;&:hover {background-color: #f3d303;color: #ff0505;}
}
</style>
这篇关于用智能插件(Fitten Code: Faster and Better AI Assistant)再次修改vue3 <script setup>留言板的文章就介绍到这儿,希望我们推荐的文章对编程师们有所帮助!


