本文主要是介绍ROS 自动驾驶多点巡航,希望对大家解决编程问题提供一定的参考价值,需要的开发者们随着小编来一起学习吧!
ROS 自动驾驶多点巡航:
1、首先创建工作空间:
基于我们的artca_ws;
2、创建功能包:
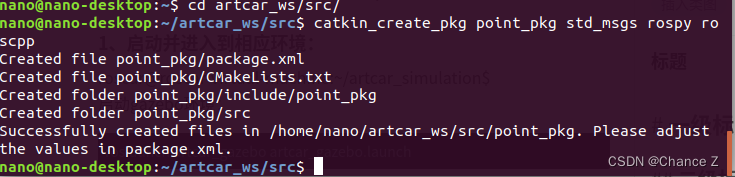
进入src目录,输入命令:
catkin_create_pkg point_pkg std_msgs rospy roscpp
test_pkg 为功能包名,后面两个是依赖;
3、创建python文件
我们通过vscode打开src下功能包:
创建 point.py:
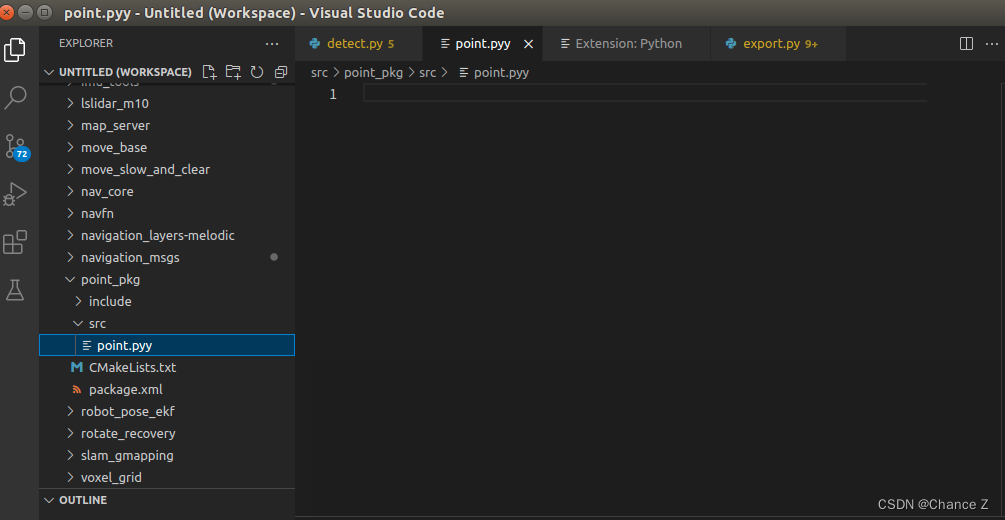
代码内容写入 :
#!/usr/bin/env python
import rospy
import actionlib
import collections
from actionlib_msgs.msg import *
from geometry_msgs.msg import Pose, PoseWithCovarianceStamped, Point, Quaternion, Twist
from move_base_msgs.msg import MoveBaseAction, MoveBaseGoal
from random import sample
from math import pow, sqrt  class MultiNav():  def __init__(self):  rospy.init_node('MultiNav', anonymous=True)  rospy.on_shutdown(self.shutdown)  # How long in seconds should the robot pause at each location?  self.rest_time = rospy.get_param("~rest_time", 10)  # Are we running in the fake simulator?  self.fake_test = rospy.get_param("~fake_test", False)  # Goal state return values  goal_states = ['PENDING', 'ACTIVE', 'PREEMPTED','SUCCEEDED',  'ABORTED', 'REJECTED','PREEMPTING', 'RECALLING',   'RECALLED','LOST']  # Set up the goal locations. Poses are defined in the map frame.  # An easy way to find the pose coordinates is to point-and-click  # Nav Goals in RViz when running in the simulator.  # Pose coordinates are then displayed in the terminal  # that was used to launch RViz.  locations = collections.OrderedDict()  locations['point-1'] = Pose(Point(5.21, -2.07, 0.00), Quaternion(0.000, 0.000, -0.69, 0.72)) locations['point-2'] = Pose(Point(3.50, -5.78, 0.00), Quaternion(0.000, 0.000, 0.99, 0.021))#locations['point-3'] = Pose(Point(-6.95, 2.26, 0.00), Quaternion(0.000, 0.000, 0.000, 1.000))#locations['point-4'] = Pose(Point(-6.50, 2.04, 0.00), Quaternion(0.000, 0.000, 0.000, 1.000))# Publisher to manually control the robot (e.g. to stop it)  self.cmd_vel_pub = rospy.Publisher('cmd_vel', Twist, queue_size=5)  # Subscribe to the move_base action server  self.move_base = actionlib.SimpleActionClient("move_base", MoveBaseAction)  rospy.loginfo("Waiting for move_base action server...")  # Wait 60 seconds for the action server to become available  self.move_base.wait_for_server(rospy.Duration(10))  rospy.loginfo("Connected to move base server")  # A variable to hold the initial pose of the robot to be set by the user in RViz  initial_pose = PoseWithCovarianceStamped()  # Variables to keep track of success rate, running time, and distance traveled  n_locations = len(locations)  n_goals = 0  n_successes = 0  i = 0  distance_traveled = 0  start_time = rospy.Time.now()  running_time = 0  location = ""  last_location = ""  # Get the initial pose from the user  rospy.loginfo("Click on the map in RViz to set the intial pose...")  rospy.wait_for_message('initialpose', PoseWithCovarianceStamped)  self.last_location = Pose()  rospy.Subscriber('initialpose', PoseWithCovarianceStamped, self.update_initial_pose) keyinput = int(input("Input 0 to continue,or reget the initialpose!\n"))while keyinput != 0:rospy.loginfo("Click on the map in RViz to set the intial pose...")  rospy.wait_for_message('initialpose', PoseWithCovarianceStamped)  rospy.Subscriber('initialpose', PoseWithCovarianceStamped, self.update_initial_pose) rospy.loginfo("Press y to continue,or reget the initialpose!")keyinput = int(input("Input 0 to continue,or reget the initialpose!"))# Make sure we have the initial pose  while initial_pose.header.stamp == "":  rospy.sleep(1)  rospy.loginfo("Starting navigation test")  # Begin the main loop and run through a sequence of locations  for location in locations.keys():  rospy.loginfo("Updating current pose.")  distance = sqrt(pow(locations[location].position.x  - initial_pose.pose.pose.position.x, 2) +  pow(locations[location].position.y -  initial_pose.pose.pose.position.y, 2))  initial_pose.header.stamp = ""  # Store the last location for distance calculations  last_location = location  # Increment the counters  i += 1  n_goals += 1  # Set up the next goal location  self.goal = MoveBaseGoal()  self.goal.target_pose.pose = locations[location]  self.goal.target_pose.header.frame_id = 'map'  self.goal.target_pose.header.stamp = rospy.Time.now()  # Let the user know where the robot is going next  rospy.loginfo("Going to: " + str(location))  # Start the robot toward the next location  self.move_base.send_goal(self.goal)  # Allow 5 minutes to get there  finished_within_time = self.move_base.wait_for_result(rospy.Duration(300))  # Check for success or failure  if not finished_within_time:  self.move_base.cancel_goal()  rospy.loginfo("Timed out achieving goal")  else:  state = self.move_base.get_state()  if state == GoalStatus.SUCCEEDED:  rospy.loginfo("Goal succeeded!")  n_successes += 1  distance_traveled += distance  else:  rospy.loginfo("Goal failed with error code: " + str(goal_states[state]))  # How long have we been running?  running_time = rospy.Time.now() - start_time  running_time = running_time.secs / 60.0  # Print a summary success/failure, distance traveled and time elapsed  rospy.loginfo("Success so far: " + str(n_successes) + "/" +  str(n_goals) + " = " + str(100 * n_successes/n_goals) + "%")  rospy.loginfo("Running time: " + str(trunc(running_time, 1)) +  " min Distance: " + str(trunc(distance_traveled, 1)) + " m")  rospy.sleep(self.rest_time)  def update_initial_pose(self, initial_pose):  self.initial_pose = initial_pose  def shutdown(self):  rospy.loginfo("Stopping the robot...")  self.move_base.cancel_goal()  rospy.sleep(2)  self.cmd_vel_pub.publish(Twist())  rospy.sleep(1)
def trunc(f, n):  # Truncates/pads a float f to n decimal places without rounding  slen = len('%.*f' % (n, f))  return float(str(f)[:slen])  if __name__ == '__main__':  try:  MultiNav()  rospy.spin()  except rospy.ROSInterruptException:  rospy.loginfo("AMCL navigation test finished.")
4、编译:
nano@nano-desktop:~/artcar_ws/src$ cd ..
nano@nano-desktop:~/artcar_ws$ catkin build

5、案例实操;
启动小车并进入到相应环境:
(1)打开终端,启动底盘环境,输入如下命令:
$ roslaunch artcar_nav artcar_bringup.launch
(2)启动导航程序:
$ roslaunch artcar_nav artcar_move_base.launch
(3)启动RVIZ:
(4)获取点位:
rostopic echo /move_base_sile/goal
获取点位
roscar@roscar-virtual-machine:~/artcar_simulation/src$ rostopic echo /move_base_simple/goal
WARNING: no messages received and simulated time is active.
Is /clock being published?
header: seq: 0stamp: secs: 405nsecs: 141000000frame_id: "odom"
pose: position: x: 5.21420097351y: -2.07076597214z: 0.0orientation: x: 0.0y: 0.0z: -0.69109139328w: 0.722767380375
---
header: seq: 1stamp: secs: 422nsecs:  52000000frame_id: "odom"
pose: position: x: 3.50902605057y: -5.78046607971z: 0.0orientation: x: 0.0y: 0.0z: 0.999777096296w: 0.0211129752124
---
(5)修改point.py文件中点位数据的位置:

(6 ) 然后开启终端执行:
nano@nano-desktop:~/artcar_ws/src/point_pkg/src$ ./point.py
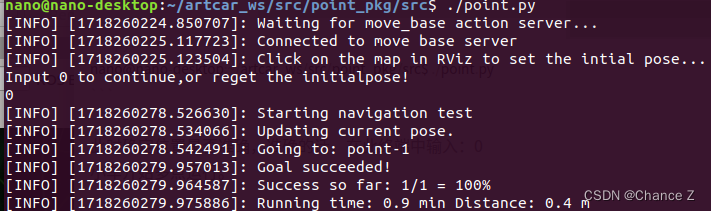
此时确定位置是否准确,准确的话,在此终端中输入:0
小车开始多点运行。
这篇关于ROS 自动驾驶多点巡航的文章就介绍到这儿,希望我们推荐的文章对编程师们有所帮助!


