本文主要是介绍【Vue3-Element-Admin 动态路由】涉及到的页面配置,希望对大家解决编程问题提供一定的参考价值,需要的开发者们随着小编来一起学习吧!
Vue3-Element-Admin 动态路由 涉及到的页面配置
- 0. Vue3-Element-Admin 项目地址
- 1. router/index.ts
- 2. Mock接口模拟数据
- 3. store/permission
- 4. api/menu
- 5. plugins/permission
这篇文章讲的主要是
Vue3-Element-Admin差不多内置的动态路由配置(根据后端接口渲染)
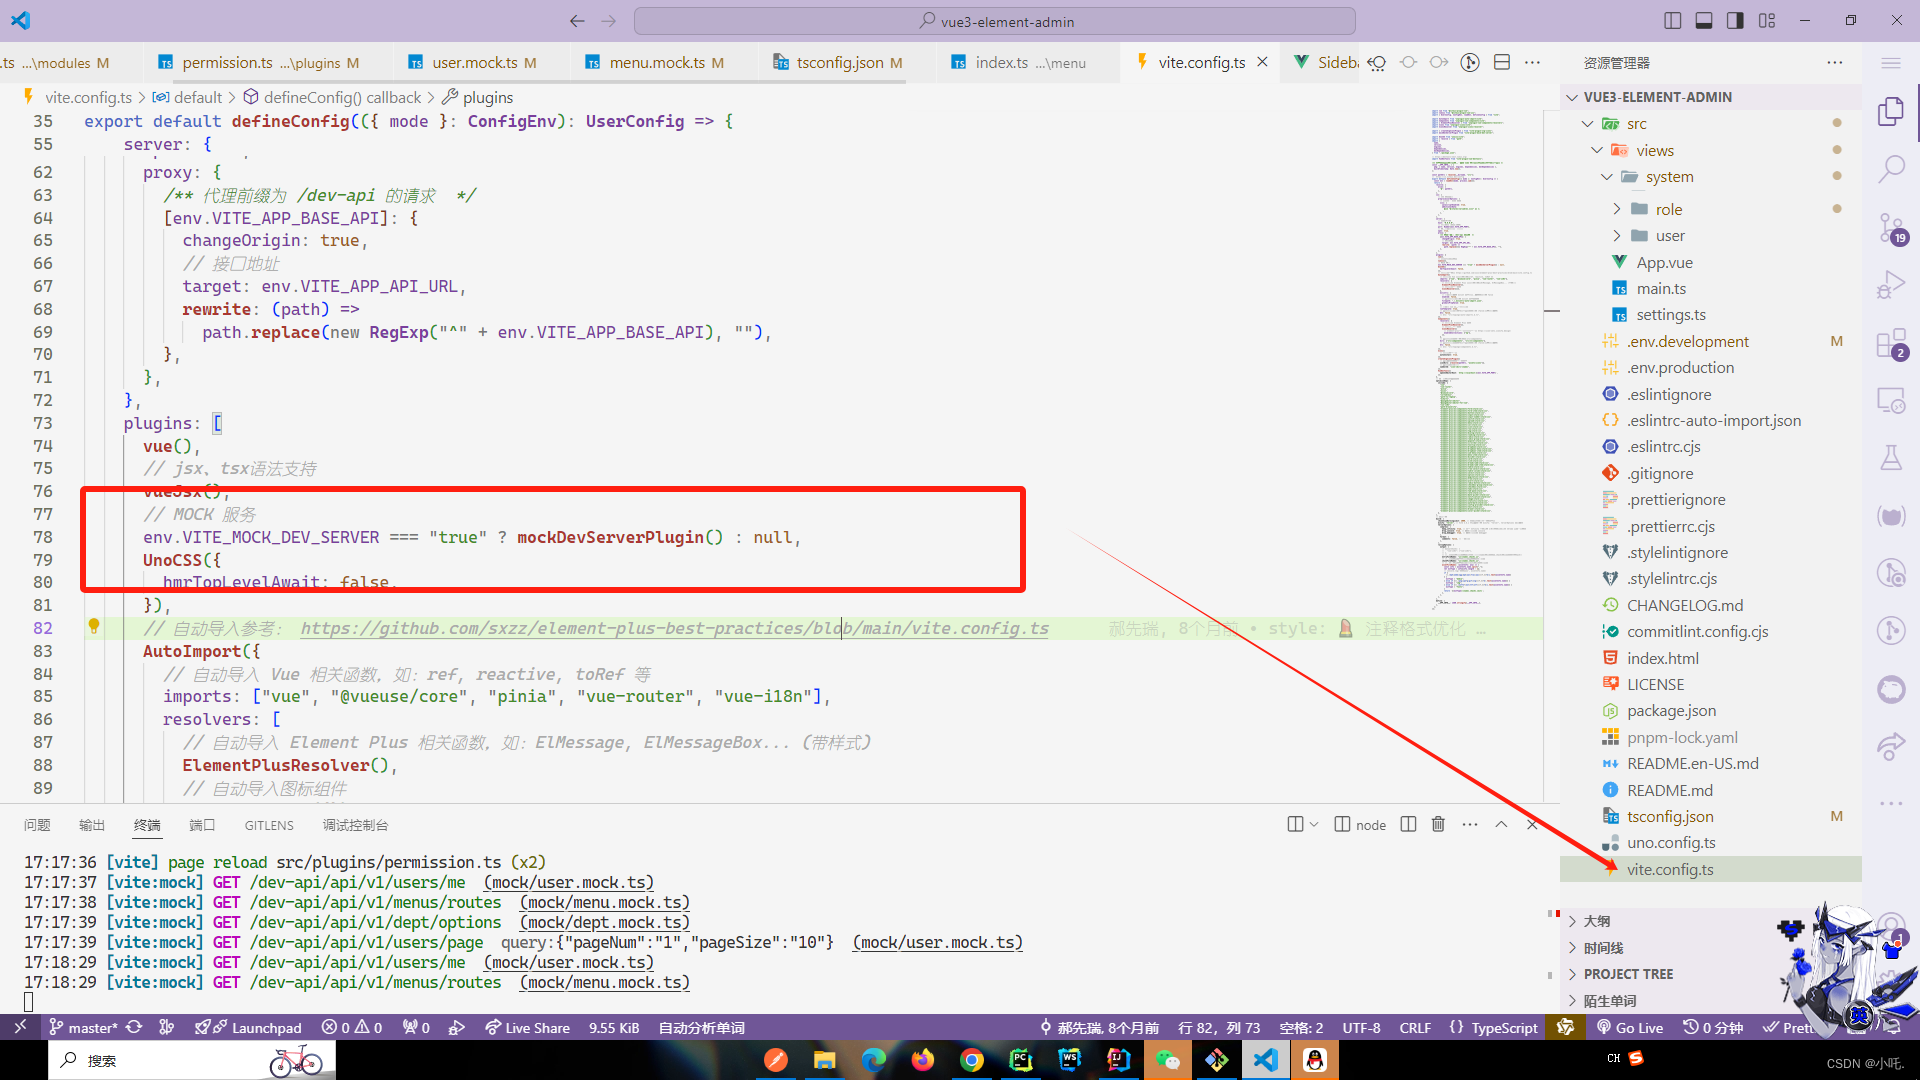
先把开发环境(.env.development)中的 VITE_MOCK_DEV_SERVER 设置为 true 这代表启用 Mock 服务
Mock 数据模拟 在 vite 中已经配置好了
0. Vue3-Element-Admin 项目地址
Vue3-Element-Admin:Vue3-Element-Admin
1. router/index.ts
这个文件主要放一些静态初始路由,可以不用管
import type { App } from 'vue'
import { createRouter, createWebHistory, RouteRecordRaw } from 'vue-router'export const Layout = () => import('@/layout/index.vue')// 静态路由
export const constantRoutes: RouteRecordRaw[] = [{path: '/redirect',component: Layout,meta: { hidden: true },children: [{path: '/redirect/:path(.*)',component: () => import('@/views/redirect/index.vue')}]},{path: '/login',component: () => import('@/views/login/index.vue'),meta: { hidden: true }},{path: '/',name: '/',component: Layout,redirect: '/dashboard',children: [{path: 'dashboard',component: () => import('@/views/dashboard/index.vue'),name: 'Dashboard', // 用于 keep-alive, 必须与SFC自动推导或者显示声明的组件name一致// https://cn.vuejs.org/guide/built-ins/keep-alive.html#include-excludemeta: {title: 'dashboard',icon: 'homepage',affix: true,keepAlive: true,alwaysShow: false}},{path: '401',component: () => import('@/views/error-page/401.vue'),meta: { hidden: true }},{path: '404',component: () => import('@/views/error-page/404.vue'),meta: { hidden: true }}]}
]/*** 创建路由*/
const router = createRouter({history: createWebHistory(),routes: constantRoutes,// 刷新时,滚动条位置还原scrollBehavior: () => ({ left: 0, top: 0 })
})// 全局注册 router
export function setupRouter(app: App<Element>) {app.use(router)
}/*** 重置路由*/
export function resetRouter() {router.replace({ path: '/login' })
}export default router
2. Mock接口模拟数据
如果目前没有后端接口支持的话,可以先去文件根目录 mock 文件夹中的 menu.mock.ts 查看,一开始可能会有很多数据,全改成我的就好,可以先模拟看一下
import { defineMock } from './base'export default defineMock([{url: 'menus/routes',method: ['GET'],body: {code: '00000',data: [{path: '/dashboard',component: 'Dashboard',redirect: '/dashboard',name: '/dashboard',meta: {title: '首页',icon: 'dashboard',hidden: true,roles: ['ADMIN'],alwaysShow: false,params: null}},{path: '/nihao',component: 'Layout',redirect: '/nihao/hello',name: '/nihao',meta: {title: '你好',icon: 'system',hidden: false,roles: ['ADMIN'],alwaysShow: true,params: null},children: [{path: 'hello',component: 'nihao/hello/index',name: 'Hello',meta: {title: 'Hello',icon: 'user',hidden: false,roles: ['ADMIN'],keepAlive: true,alwaysShow: false,params: null}}]},{path: '/system',component: 'Layout',redirect: '/system/user',name: '/system',meta: {title: '系统管理',icon: 'system',hidden: false,roles: ['ADMIN'],alwaysShow: true,params: null},children: [{path: 'user',component: 'system/user/index',name: 'User',meta: {title: 'Test1',icon: 'user',hidden: false,roles: ['ADMIN'],keepAlive: true,alwaysShow: false,params: null}},{path: 'user',component: 'system/user/index',name: 'User',meta: {title: 'Test2',icon: 'user',hidden: false,roles: ['ADMIN'],keepAlive: true,alwaysShow: false,params: null}}]}],msg: '一切ok'}}// ... 其他接口
])
3. store/permission
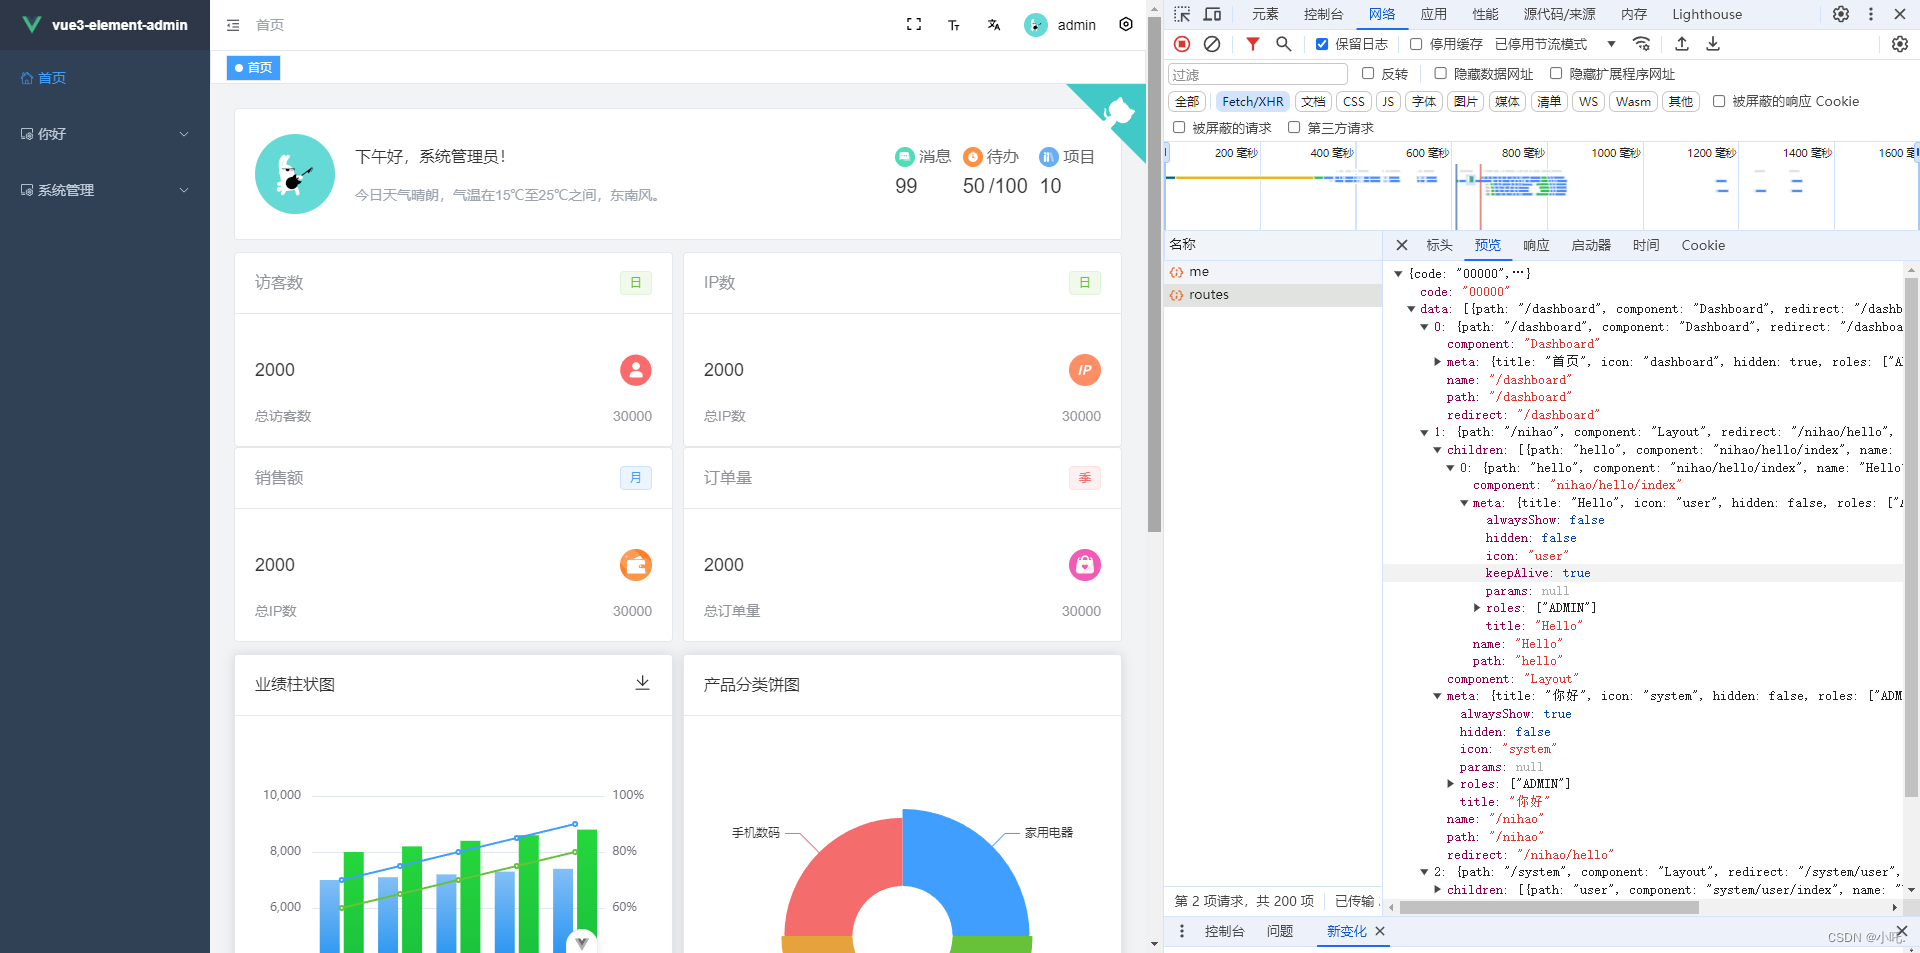
查看权限配置相关页面,这边主要是做一些角色鉴权、角色菜单权限,差不多都是菜单相关配置,主要看一下 generateRoutes 方法,它是配置动态路由所需要用到的方法,这边我是使用了我上面那个 Mock 接口,你可以看到
MenuAPI.getRoutes() .then(data => { //... })
import { RouteRecordRaw } from 'vue-router'
import { constantRoutes } from '@/router'
import { store } from '@/store'
import MenuAPI from '@/api/menu'
import { RouteVO } from '@/api/menu/model'const modules = import.meta.glob('../../views/**/**.vue')
const Layout = () => import('@/layout/index.vue')/*** Use meta.role to determine if the current user has permission** @param roles 用户角色集合* @param route 路由* @returns*/
const hasPermission = (roles: string[], route: RouteRecordRaw) => {if (route.meta && route.meta.roles) {// 角色【超级管理员】拥有所有权限,忽略校验if (roles.includes('ROOT')) {return true}return roles.some(role => {if (route.meta?.roles) {return route.meta.roles.includes(role)}})}return false
}/*** 递归过滤有权限的动态路由** @param routes 接口返回所有的动态路由* @param roles 用户角色集合* @returns 返回用户有权限的动态路由*/
const filterAsyncRoutes = (routes: RouteVO[], roles: string[]) => {const asyncRoutes: RouteRecordRaw[] = []routes.forEach(route => {const tmpRoute = { ...route } as RouteRecordRaw // 深拷贝 route 对象 避免污染if (hasPermission(roles, tmpRoute)) {// 如果是顶级目录,替换为 Layout 组件if (tmpRoute.component?.toString() == 'Layout') {tmpRoute.component = Layout} else {// 如果是子目录,动态加载组件const component = modules[`../../views/${tmpRoute.component}.vue`]if (component) {tmpRoute.component = component} else {tmpRoute.component = modules[`../../views/error-page/404.vue`]}}if (tmpRoute.children) {tmpRoute.children = filterAsyncRoutes(route.children, roles)}asyncRoutes.push(tmpRoute)}})return asyncRoutes
}
// setup
export const usePermissionStore = defineStore('permission', () => {// stateconst routes = ref<RouteRecordRaw[]>([])// actionsfunction setRoutes(newRoutes: RouteRecordRaw[]) {routes.value = constantRoutes.concat(newRoutes)}/*** 生成动态路由** @param roles 用户角色集合* @returns*/function generateRoutes(roles: string[]) {return new Promise<RouteRecordRaw[]>((resolve, reject) => {// 接口获取所有路由MenuAPI.getRoutes().then(data => {// 过滤有权限的动态路由const accessedRoutes = filterAsyncRoutes(data, roles)setRoutes(accessedRoutes)resolve(accessedRoutes)}).catch(error => {reject(error)})})}/*** 获取与激活的顶部菜单项相关的混合模式左侧菜单集合*/const mixLeftMenus = ref<RouteRecordRaw[]>([])function setMixLeftMenus(topMenuPath: string) {const matchedItem = routes.value.find(item => item.path === topMenuPath)if (matchedItem && matchedItem.children) {mixLeftMenus.value = matchedItem.children}}return {routes,setRoutes,generateRoutes,mixLeftMenus,setMixLeftMenus}
})// 非setup
export function usePermissionStoreHook() {return usePermissionStore(store)
}
4. api/menu
上面的 MenuAPI.getRoutes() 就是在 api/menu 里面定义的接口请求
import request from "@/utils/request";
import { MenuQuery, MenuVO, MenuForm, RouteVO } from "./model";class MenuAPI {/*** 获取路由列表*/static getRoutes() {return request<any, RouteVO[]>({url: "/api/v1/menus/routes",method: "get",});}// ... 其它接口
export default MenuAPI;
5. plugins/permission
这个文件内也是一些权限配置,按钮鉴权,路由守卫都放在这里面了,主要看 setupPermission 中的 router.addRoute(route) 跳转时会把动态路由塞到原本路由表内
import router from '@/router'
import { useUserStore, usePermissionStore } from '@/store'
import NProgress from '@/utils/nprogress'
import { RouteRecordRaw } from 'vue-router'
import { TOKEN_KEY } from '@/enums/CacheEnum'// 是否有权限
export function hasAuth(value: string | string[], type: 'button' | 'role' = 'button') {const { roles, perms } = useUserStore().user//「超级管理员」拥有所有的按钮权限if (type === 'button' && roles.includes('ROOT')) {return true}const auths = type === 'button' ? perms : rolesreturn typeof value === 'string'? auths.includes(value): auths.some(perm => {return value.includes(perm)})
}export function setupPermission() {// 白名单路由const whiteList = ['/login', '/404']router.beforeEach(async (to, from, next) => {NProgress.start()const hasToken = localStorage.getItem(TOKEN_KEY)if (hasToken) {if (to.path === '/login') {// 如果已登录,跳转首页next({ path: '/' })NProgress.done()} else {const userStore = useUserStore()const hasRoles = userStore.user.roles && userStore.user.roles.length > 0if (hasRoles) {// 未匹配到任何路由,跳转404if (to.matched.length === 0) {from.name ? next({ name: from.name }) : next('/404')} else {next()}} else {const permissionStore = usePermissionStore()try {const { roles } = await userStore.getUserInfo()const accessRoutes = await permissionStore.generateRoutes(roles)accessRoutes.forEach((route: RouteRecordRaw) => {router.addRoute(route)})next({ ...to, replace: true })} catch (error) {// 移除 token 并跳转登录页await userStore.resetToken()next(`/login?redirect=${to.path}`)NProgress.done()}}}} else {// 未登录可以访问白名单页面if (whiteList.indexOf(to.path) !== -1) {next()} else {next(`/login?redirect=${to.path}`)NProgress.done()}}})router.afterEach(() => {NProgress.done()})
}
差不多是这样的,大概页面就这样了
这篇关于【Vue3-Element-Admin 动态路由】涉及到的页面配置的文章就介绍到这儿,希望我们推荐的文章对编程师们有所帮助!