本文主要是介绍使用Gradio构建大模型应用:Building Generative AI Applications with Gradio,希望对大家解决编程问题提供一定的参考价值,需要的开发者们随着小编来一起学习吧!
Building Generative AI Applications with Gradio
本文是学习 https://www.deeplearning.ai/short-courses/building-generative-ai-applications-with-gradio/ 这门课的学习笔记。

What you’ll learn in this course
Join our new short course, Building Generative AI Applications with Gradio! Learn from Apolinário Passos, Machine Learning Art Engineer at Hugging Face.
What you’ll do:
- With a few lines of code, create a user-friendly app (usable for non-coders) to take input text, summarize it with an open-source large language model, and display the summary.
- Create an app that allows the user to upload an image, which uses an image to text (image captioning) to describe the uploaded image, and display both the image and the caption in the app.
- Create an app that takes text and generates an image with a diffusion model, then displays the generated image within the app.
- Combine what you learned in the previous two lessons: Upload an image, caption the image, and use the caption to generate a new image.
- Create an interface to chat with an open source LLM using Falcon, the best-ranking open source LLM on the Open LLM Leaderboard.
By the end of the course, you’ll gain the practical knowledge to rapidly build interactive apps and demos to validate your project and ship faster
文章目录
- Building Generative AI Applications with Gradio
- What you’ll learn in this course
- L1: NLP tasks with a simple interface 🗞️
- Building a text summarization app
- Building a Named Entity Recognition app
- gr.interface()
- Adding a helper function to merge tokens
- L2: Image captioning app 🖼️📝
- Building an image captioning app
- Captioning with `gr.Interface()`
- L3: Image generation app 🎨
- Building an image generation app
- Generating with `gr.Interface()`
- Building a more advanced interface
- gr.Slider()
- `gr.Blocks()`
- scale
- gr.Accordion()
- L4: Describe-and-Generate game 🖍️
- Building your game with `gr.Blocks()`
- First attempt, just captioning
- Let's add generation
- Doing it all at once
- L5: Chat with any LLM! 💬
- Building an app to chat with any LLM
- `gr.Chatbot()`
- Adding other advanced features
- Streaming
- Afterword
L1: NLP tasks with a simple interface 🗞️
Load your HF API key and relevant Python libraries.
import os
import io
from IPython.display import Image, display, HTML
from PIL import Image
import base64
from dotenv import load_dotenv, find_dotenv
_ = load_dotenv(find_dotenv()) # read local .env file
hf_api_key = os.environ['HF_API_KEY']
# Helper function
import requests, json#Summarization endpoint
def get_completion(inputs, parameters=None,ENDPOINT_URL=os.environ['HF_API_SUMMARY_BASE']): headers = {"Authorization": f"Bearer {hf_api_key}","Content-Type": "application/json"}data = { "inputs": inputs }if parameters is not None:data.update({"parameters": parameters})response = requests.request("POST",ENDPOINT_URL, headers=headers,data=json.dumps(data))return json.loads(response.content.decode("utf-8"))
How about running it locally?
The code would look very similar if you were running it locally instead of from an API. The same is true for all the models in the rest of the course, make sure to check the Pipelines documentation page
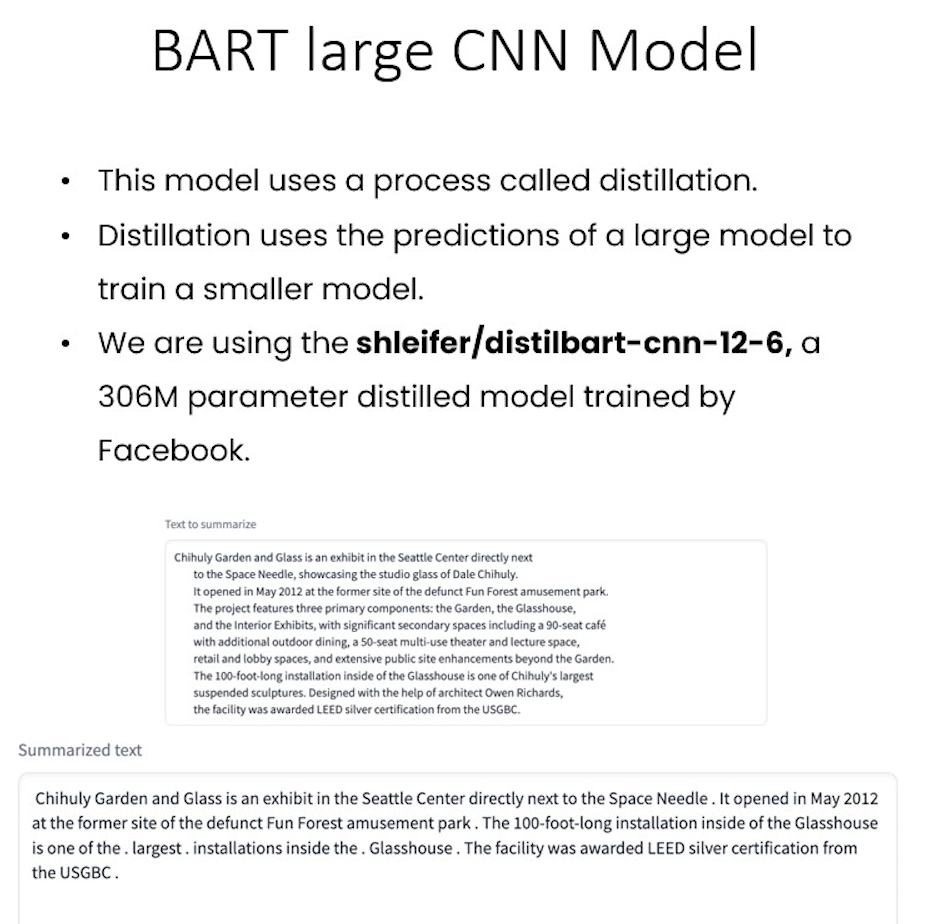
from transformers import pipelineget_completion = pipeline("summarization", model="shleifer/distilbart-cnn-12-6")def summarize(input):output = get_completion(input)return output[0]['summary_text']Building a text summarization app
text = ('''The tower is 324 metres (1,063 ft) tall, about the same heightas an 81-storey building, and the tallest structure in Paris. Its base is square, measuring 125 metres (410 ft) on each side. During its construction, the Eiffel Tower surpassed the Washington Monument to become the tallest man-made structure in the world,a title it held for 41 years until the Chrysler Buildingin New York City was finished in 1930. It was the first structure to reach a height of 300 metres. Due to the addition of a broadcasting aerial at the top of the tower in 1957, it is now taller than the Chrysler Building by 5.2 metres (17 ft). Excluding transmitters, the Eiffel Tower is the second tallest free-standing structure in France after the Millau Viaduct.''')get_completion(text)
Output
[{'summary_text': ' The tower is 324 metres (1,063 ft) tall, about the same height as an 81-storey building . It is the tallest structure in Paris and the second tallest free-standing structure in France after the Millau Viaduct . It was the first structure in the world to reach a height of 300 metres .'}]
Getting started with Gradio gr.Interface
import gradio as gr
def summarize(input):output = get_completion(input)return output[0]['summary_text']gr.close_all()
demo = gr.Interface(fn=summarize, inputs="text", outputs="text")
demo.launch(share=True, server_port=int(os.environ['PORT1']))
demo.launch(share=True) lets you create a public link to share with your team or friends.
import gradio as grdef summarize(input):output = get_completion(input)return output[0]['summary_text']gr.close_all()
demo = gr.Interface(fn=summarize, inputs=[gr.Textbox(label="Text to summarize", lines=6)],outputs=[gr.Textbox(label="Result", lines=3)],title="Text summarization with distilbart-cnn",description="Summarize any text using the `shleifer/distilbart-cnn-12-6` model under the hood!")
demo.launch(share=True, server_port=int(os.environ['PORT2']))
Output
Building a Named Entity Recognition app
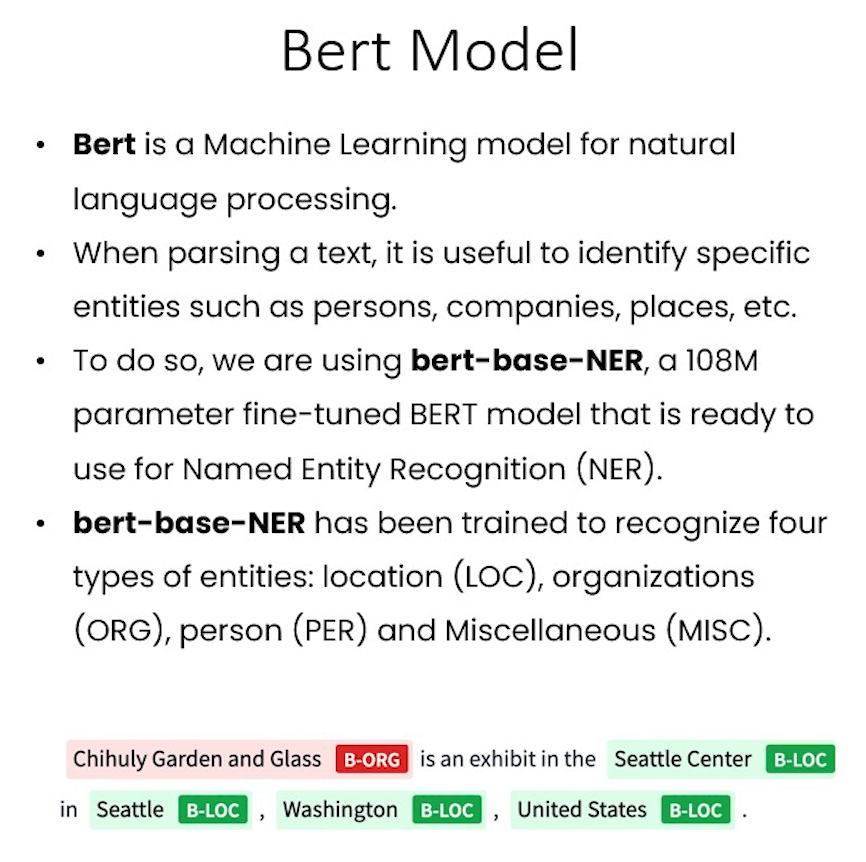
We are using this Inference Endpoint for dslim/bert-base-NER, a 108M parameter fine-tuned BART model on the NER task.
How about running it locally?
from transformers import pipelineget_completion = pipeline("ner", model="dslim/bert-base-NER")def ner(input):output = get_completion(input)return {"text": input, "entities": output}API_URL = os.environ['HF_API_NER_BASE'] #NER endpoint
text = "My name is Andrew, I'm building DeepLearningAI and I live in California"
get_completion(text, parameters=None, ENDPOINT_URL= API_URL)
Output
[{'entity': 'B-PER','score': 0.9990625,'index': 4,'word': 'Andrew','start': 11,'end': 17},{'entity': 'B-ORG','score': 0.9927857,'index': 10,'word': 'Deep','start': 32,'end': 36},{'entity': 'I-ORG','score': 0.99677867,'index': 11,'word': '##L','start': 36,'end': 37},{'entity': 'I-ORG','score': 0.9954496,'index': 12,'word': '##ear','start': 37,'end': 40},{'entity': 'I-ORG','score': 0.9959293,'index': 13,'word': '##ning','start': 40,'end': 44},{'entity': 'I-ORG','score': 0.8917463,'index': 14,'word': '##A','start': 44,'end': 45},{'entity': 'I-ORG','score': 0.50361204,'index': 15,'word': '##I','start': 45,'end': 46},{'entity': 'B-LOC','score': 0.99969244,'index': 20,'word': 'California','start': 61,'end': 71}]
gr.interface()
- Notice below that we pass in a list
[]toinputsand tooutputsbecause the functionfn(in this case,ner(), can take in more than one input and return more than one output. - The number of objects passed to
inputslist should match the number of parameters that thefnfunction takes in, and the number of objects passed to theoutputslist should match the number of objects returned by thefnfunction.
def ner(input):output = get_completion(input, parameters=None, ENDPOINT_URL=API_URL)return {"text": input, "entities": output}gr.close_all()
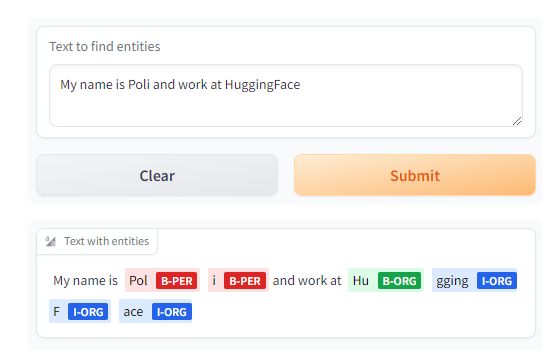
demo = gr.Interface(fn=ner,inputs=[gr.Textbox(label="Text to find entities", lines=2)],outputs=[gr.HighlightedText(label="Text with entities")],title="NER with dslim/bert-base-NER",description="Find entities using the `dslim/bert-base-NER` model under the hood!",allow_flagging="never",#Here we introduce a new tag, examples, easy to use examples for your applicationexamples=["My name is Andrew and I live in California", "My name is Poli and work at HuggingFace"])
demo.launch(share=True, server_port=int(os.environ['PORT3']))
Output
Adding a helper function to merge tokens
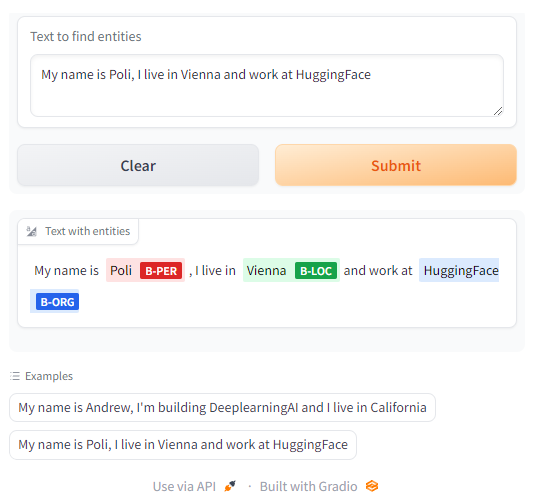
def merge_tokens(tokens):merged_tokens = []for token in tokens:if merged_tokens and token['entity'].startswith('I-') and merged_tokens[-1]['entity'].endswith(token['entity'][2:]):# If current token continues the entity of the last one, merge themlast_token = merged_tokens[-1]last_token['word'] += token['word'].replace('##', '')last_token['end'] = token['end']last_token['score'] = (last_token['score'] + token['score']) / 2else:# Otherwise, add the token to the listmerged_tokens.append(token)return merged_tokensdef ner(input):output = get_completion(input, parameters=None, ENDPOINT_URL=API_URL)merged_tokens = merge_tokens(output)return {"text": input, "entities": merged_tokens}gr.close_all()
demo = gr.Interface(fn=ner,inputs=[gr.Textbox(label="Text to find entities", lines=2)],outputs=[gr.HighlightedText(label="Text with entities")],title="NER with dslim/bert-base-NER",description="Find entities using the `dslim/bert-base-NER` model under the hood!",allow_flagging="never",examples=["My name is Andrew, I'm building DeeplearningAI and I live in California", "My name is Poli, I live in Vienna and work at HuggingFace"])demo.launch(share=True, server_port=int(os.environ['PORT4']))
Output
L2: Image captioning app 🖼️📝
import os
import io
import IPython.display
from PIL import Image
import base64
from dotenv import load_dotenv, find_dotenv
_ = load_dotenv(find_dotenv()) # read local .env file
hf_api_key = os.environ['HF_API_KEY']
# Helper functions
import requests, json#Image-to-text endpoint
def get_completion(inputs, parameters=None, ENDPOINT_URL=os.environ['HF_API_ITT_BASE']):headers = {"Authorization": f"Bearer {hf_api_key}","Content-Type": "application/json"}data = { "inputs": inputs }if parameters is not None:data.update({"parameters": parameters})response = requests.request("POST",ENDPOINT_URL,headers=headers,data=json.dumps(data))return json.loads(response.content.decode("utf-8"))
Building an image captioning app
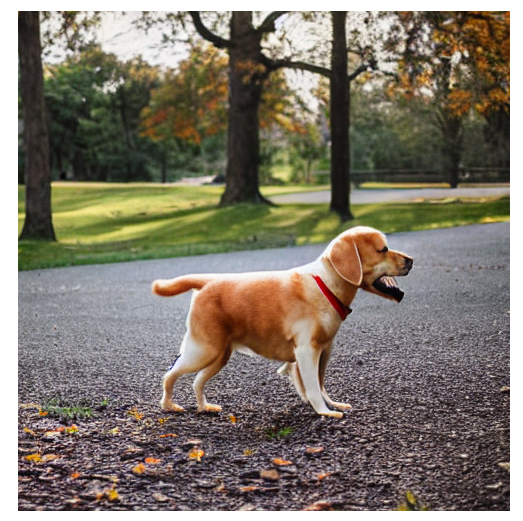
Here we’ll be using an Inference Endpoint for Salesforce/blip-image-captioning-base a 14M parameter captioning model.
The free images are available on: https://free-images.com/
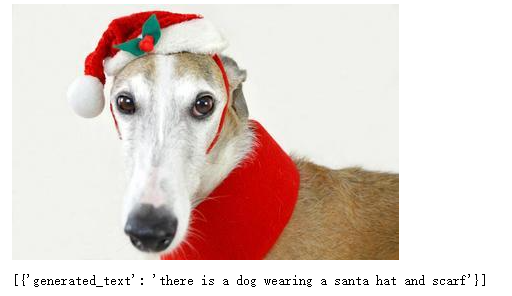
image_url = "https://free-images.com/sm/9596/dog_animal_greyhound_983023.jpg"
display(IPython.display.Image(url=image_url))
get_completion(image_url)
Output
Captioning with gr.Interface()
gr.Image()
- The
typeparameter is the format that thefnfunction expects to receive as its input. Iftypeisnumpyorpil,gr.Image()will convert the uploaded file to this format before sending it to thefnfunction. - If
typeisfilepath,gr.Image()will temporarily store the image and provide a string path to that image location as input to thefnfunction.
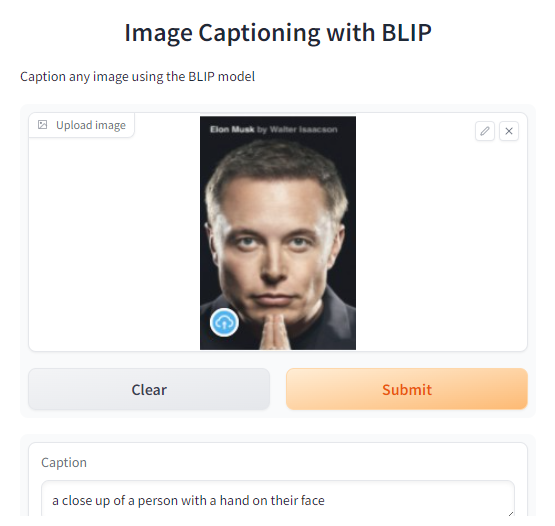
import gradio as gr def image_to_base64_str(pil_image):byte_arr = io.BytesIO()pil_image.save(byte_arr, format='PNG')byte_arr = byte_arr.getvalue()return str(base64.b64encode(byte_arr).decode('utf-8'))def captioner(image):base64_image = image_to_base64_str(image)result = get_completion(base64_image)return result[0]['generated_text']gr.close_all()
demo = gr.Interface(fn=captioner,inputs=[gr.Image(label="Upload image", type="pil")],outputs=[gr.Textbox(label="Caption")],title="Image Captioning with BLIP",description="Caption any image using the BLIP model",allow_flagging="never",examples=["christmas_dog.jpeg", "bird_flight.jpeg", "cow.jpeg"])demo.launch(share=True, server_port=int(os.environ['PORT1']))
Output
L3: Image generation app 🎨
import os
import io
import IPython.display
from PIL import Image
import base64
from dotenv import load_dotenv, find_dotenv
_ = load_dotenv(find_dotenv()) # read local .env file
hf_api_key = os.environ['HF_API_KEY']
# Helper function
import requests, json#Text-to-image endpoint
def get_completion(inputs, parameters=None, ENDPOINT_URL=os.environ['HF_API_TTI_BASE']):headers = {"Authorization": f"Bearer {hf_api_key}","Content-Type": "application/json"}   data = { "inputs": inputs }if parameters is not None:data.update({"parameters": parameters})response = requests.request("POST",ENDPOINT_URL,headers=headers,data=json.dumps(data))return json.loads(response.content.decode("utf-8"))
Building an image generation app
Here we are going to run runwayml/stable-diffusion-v1-5 using the 🧨 diffusers library.
prompt = "a dog in a park"result = get_completion(prompt)
IPython.display.HTML(f'<img src="data:image/png;base64,{result}" />')
Output
Generating with gr.Interface()
import gradio as gr #A helper function to convert the PIL image to base64
#so you can send it to the API
def base64_to_pil(img_base64):base64_decoded = base64.b64decode(img_base64)byte_stream = io.BytesIO(base64_decoded)pil_image = Image.open(byte_stream)return pil_imagedef generate(prompt):output = get_completion(prompt)result_image = base64_to_pil(output)return result_imagegr.close_all()
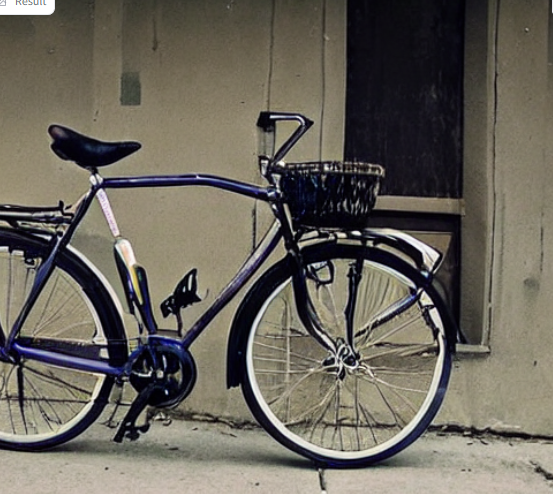
demo = gr.Interface(fn=generate,inputs=[gr.Textbox(label="Your prompt")],outputs=[gr.Image(label="Result")],title="Image Generation with Stable Diffusion",description="Generate any image with Stable Diffusion",allow_flagging="never",examples=["the spirit of a tamagotchi wandering in the city of Vienna","a mecha robot in a favela"])demo.launch(share=True, server_port=int(os.environ['PORT1']))
Input
A photo of a lovely bike
Output
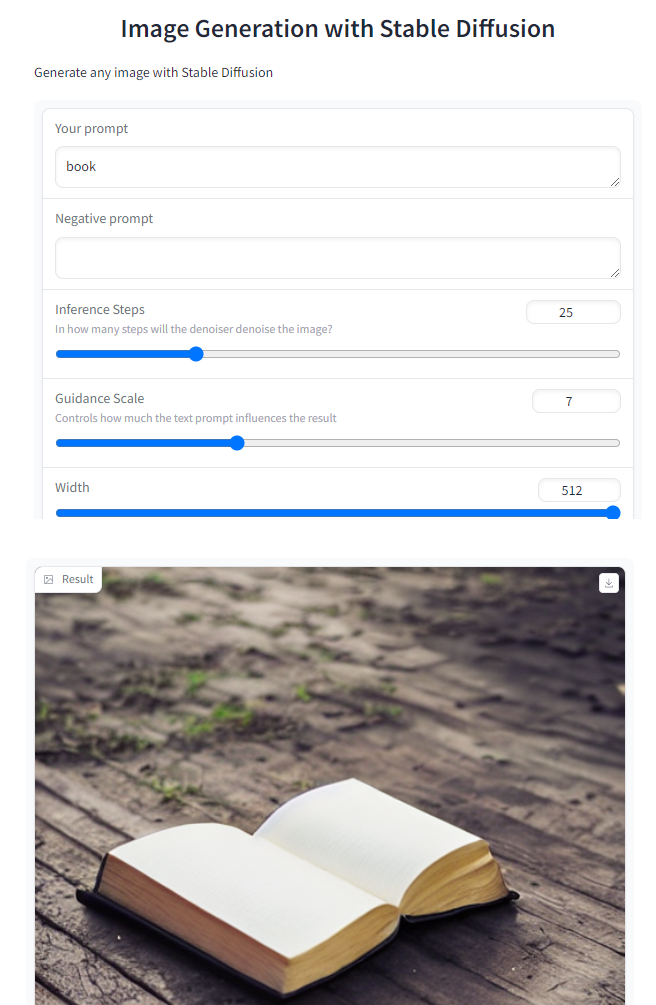
Building a more advanced interface
import gradio as gr #A helper function to convert the PIL image to base64
# so you can send it to the API
def base64_to_pil(img_base64):base64_decoded = base64.b64decode(img_base64)byte_stream = io.BytesIO(base64_decoded)pil_image = Image.open(byte_stream)return pil_imagedef generate(prompt, negative_prompt, steps, guidance, width, height):params = {"negative_prompt": negative_prompt,"num_inference_steps": steps,"guidance_scale": guidance,"width": width,"height": height}output = get_completion(prompt, params)pil_image = base64_to_pil(output)return pil_image
gr.Slider()
- You can set the
minimum,maximum, and startingvaluefor agr.Slider(). - If you want the slider to increment by integer values, you can set
step=1.
gr.close_all()
demo = gr.Interface(fn=generate,inputs=[gr.Textbox(label="Your prompt"),gr.Textbox(label="Negative prompt"),gr.Slider(label="Inference Steps", minimum=1, maximum=100, value=25,info="In how many steps will the denoiser denoise the image?"),gr.Slider(label="Guidance Scale", minimum=1, maximum=20, value=7, info="Controls how much the text prompt influences the result"),gr.Slider(label="Width", minimum=64, maximum=512, step=64, value=512),gr.Slider(label="Height", minimum=64, maximum=512, step=64, value=512),],outputs=[gr.Image(label="Result")],title="Image Generation with Stable Diffusion",description="Generate any image with Stable Diffusion",allow_flagging="never")demo.launch(share=True, server_port=int(os.environ['PORT2']))
Output
gr.Blocks()
-
Within
gr.Blocks(), you can define multiplegr.Row()s, or multiplegr.Column()s. -
Note that if the jupyter notebook is very narrow, the layout may change to better display the objects. If you define two columns but don’t see the two columns in the app, try expanding the width of your web browser, and the screen containing this jupyter notebook.
-
When using
gr.Blocks(), you’ll need to explicitly define the “Submit” button usinggr.Button(), whereas the ‘Clear’ and ‘Submit’ buttons are automatically added when usinggr.Interface().
with gr.Blocks() as demo:gr.Markdown("# Image Generation with Stable Diffusion")prompt = gr.Textbox(label="Your prompt")with gr.Row():with gr.Column():negative_prompt = gr.Textbox(label="Negative prompt")steps = gr.Slider(label="Inference Steps", minimum=1, maximum=100, value=25,info="In many steps will the denoiser denoise the image?")guidance = gr.Slider(label="Guidance Scale", minimum=1, maximum=20, value=7,info="Controls how much the text prompt influences the result")width = gr.Slider(label="Width", minimum=64, maximum=512, step=64, value=512)height = gr.Slider(label="Height", minimum=64, maximum=512, step=64, value=512)btn = gr.Button("Submit")with gr.Column():output = gr.Image(label="Result")btn.click(fn=generate, inputs=[prompt,negative_prompt,steps,guidance,width,height], outputs=[output])
gr.close_all()
demo.launch(share=True, server_port=int(os.environ['PORT2']))
scale
- To choose how much relative width to give to each column, set the
scaleparameter of eachgr.Column(). - If one column has
scale=4and the second column hasscale=1, then the first column takes up 4/5 of the total width, and the second column takes up 1/5 of the total width.
gr.Accordion()
- The
gr.Accordion()can show/hide the app options with a mouse click. - Set
open=Trueto show the contents of the Accordion by default, orFalseto hide it by default.
with gr.Blocks() as demo:gr.Markdown("# Image Generation with Stable Diffusion")with gr.Row():with gr.Column(scale=4):prompt = gr.Textbox(label="Your prompt") #Give prompt some real estatewith gr.Column(scale=1, min_width=50):btn = gr.Button("Submit") #Submit button side by side!with gr.Accordion("Advanced options", open=False): #Let's hide the advanced options!negative_prompt = gr.Textbox(label="Negative prompt")with gr.Row():with gr.Column():steps = gr.Slider(label="Inference Steps", minimum=1, maximum=100, value=25,info="In many steps will the denoiser denoise the image?")guidance = gr.Slider(label="Guidance Scale", minimum=1, maximum=20, value=7,info="Controls how much the text prompt influences the result")with gr.Column():width = gr.Slider(label="Width", minimum=64, maximum=512, step=64, value=512)height = gr.Slider(label="Height", minimum=64, maximum=512, step=64, value=512)output = gr.Image(label="Result") #Move the output up toobtn.click(fn=generate, inputs=[prompt,negative_prompt,steps,guidance,width,height], outputs=[output])gr.close_all()
demo.launch(share=True, server_port=int(os.environ['PORT4']))
Output

L4: Describe-and-Generate game 🖍️
Construct a game app

import os
import io
from IPython.display import Image, display, HTML
from PIL import Image
import base64 from dotenv import load_dotenv, find_dotenv
_ = load_dotenv(find_dotenv()) # read local .env file
hf_api_key = os.environ['HF_API_KEY']
#### Helper function
import requests, json#Here we are going to call multiple endpoints!
def get_completion(inputs, parameters=None, ENDPOINT_URL=""):headers = {"Authorization": f"Bearer {hf_api_key}","Content-Type": "application/json"}   data = { "inputs": inputs }if parameters is not None:data.update({"parameters": parameters})response = requests.request("POST",ENDPOINT_URL,headers=headers,data=json.dumps(data))return json.loads(response.content.decode("utf-8"))
#text-to-image
TTI_ENDPOINT = os.environ['HF_API_TTI_BASE']
#image-to-text
ITT_ENDPOINT = os.environ['HF_API_ITT_BASE']
Building your game with gr.Blocks()
#Bringing the functions from lessons 3 and 4!
def image_to_base64_str(pil_image):byte_arr = io.BytesIO()pil_image.save(byte_arr, format='PNG')byte_arr = byte_arr.getvalue()return str(base64.b64encode(byte_arr).decode('utf-8'))def base64_to_pil(img_base64):base64_decoded = base64.b64decode(img_base64)byte_stream = io.BytesIO(base64_decoded)pil_image = Image.open(byte_stream)return pil_imagedef captioner(image):base64_image = image_to_base64_str(image)result = get_completion(base64_image, None, ITT_ENDPOINT)return result[0]['generated_text']def generate(prompt):output = get_completion(prompt, None, TTI_ENDPOINT)result_image = base64_to_pil(output)return result_image
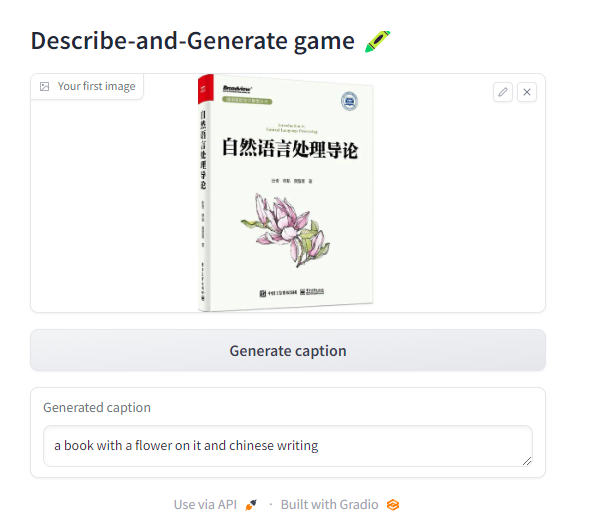
First attempt, just captioning
import gradio as gr
with gr.Blocks() as demo:gr.Markdown("# Describe-and-Generate game 🖍️")image_upload = gr.Image(label="Your first image",type="pil")btn_caption = gr.Button("Generate caption")caption = gr.Textbox(label="Generated caption")btn_caption.click(fn=captioner, inputs=[image_upload], outputs=[caption])gr.close_all()
demo.launch(share=True, server_port=int(os.environ['PORT1']))
Output
Let’s add generation
with gr.Blocks() as demo:gr.Markdown("# Describe-and-Generate game 🖍️")image_upload = gr.Image(label="Your first image",type="pil")btn_caption = gr.Button("Generate caption")caption = gr.Textbox(label="Generated caption")btn_image = gr.Button("Generate image")image_output = gr.Image(label="Generated Image")btn_caption.click(fn=captioner, inputs=[image_upload], outputs=[caption])btn_image.click(fn=generate, inputs=[caption], outputs=[image_output])gr.close_all()
demo.launch(share=True, server_port=int(os.environ['PORT2']))
Output
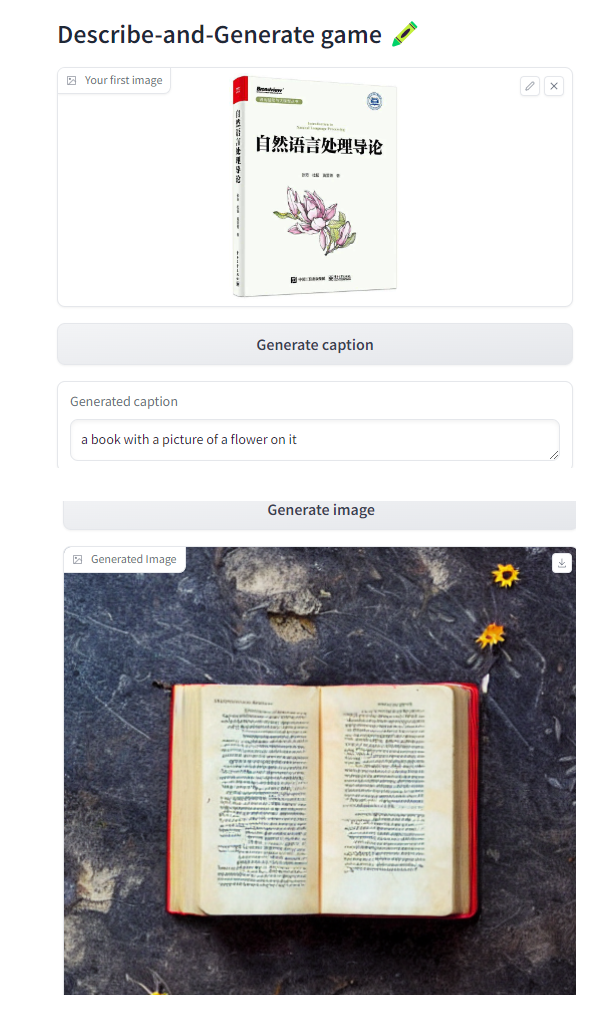
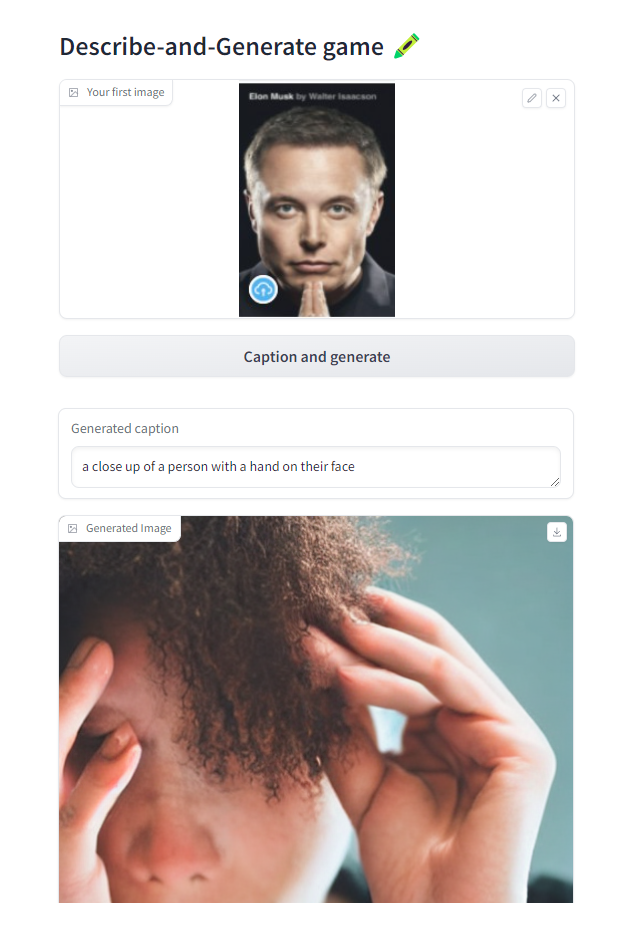
Doing it all at once
def caption_and_generate(image):caption = captioner(image)image = generate(caption)return [caption, image]with gr.Blocks() as demo:gr.Markdown("# Describe-and-Generate game 🖍️")image_upload = gr.Image(label="Your first image",type="pil")btn_all = gr.Button("Caption and generate")caption = gr.Textbox(label="Generated caption")image_output = gr.Image(label="Generated Image")btn_all.click(fn=caption_and_generate, inputs=[image_upload], outputs=[caption, image_output])gr.close_all()
demo.launch(share=True, server_port=int(os.environ['PORT3']))
Output
L5: Chat with any LLM! 💬
import os
import io
import IPython.display
from PIL import Image
import base64
import requests
requests.adapters.DEFAULT_TIMEOUT = 60from dotenv import load_dotenv, find_dotenv
_ = load_dotenv(find_dotenv()) # read local .env file
hf_api_key = os.environ['HF_API_KEY']
# Helper function
import requests, json
from text_generation import Client#FalcomLM-instruct endpoint on the text_generation library
client = Client(os.environ['HF_API_FALCOM_BASE'], headers={"Authorization": f"Basic {hf_api_key}"}, timeout=120)
Building an app to chat with any LLM
Here we’ll be using an Inference Endpoint for falcon-40b-instruct , the best ranking open source LLM on the 🤗 Open LLM Leaderboard.
prompt = "Has math been invented or discovered?"
client.generate(prompt, max_new_tokens=256).generated_text
Output
'\nMath has been both invented and discovered. It is a human invention in the sense that it is a system of rules and concepts that we have created to help us understand the world around us. However, it is also a discovery in the sense that it is a fundamental aspect of the universe that we have uncovered through our observations and experiments.'
#Back to Lesson 2, time flies!
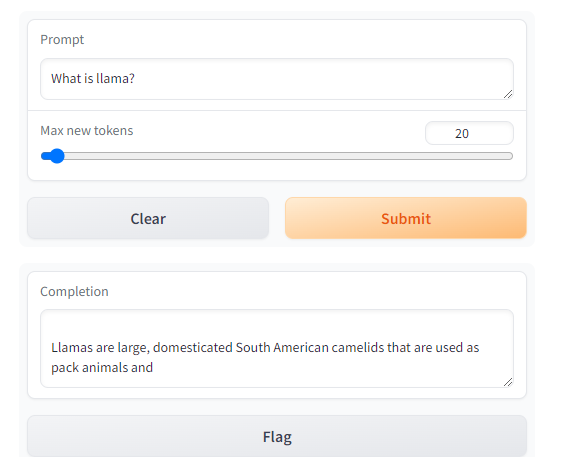
import gradio as gr
def generate(input, slider):output = client.generate(input, max_new_tokens=slider).generated_textreturn outputdemo = gr.Interface(fn=generate, inputs=[gr.Textbox(label="Prompt"), gr.Slider(label="Max new tokens", value=20, maximum=1024, minimum=1)], outputs=[gr.Textbox(label="Completion")])gr.close_all()
demo.launch(share=True, server_port=int(os.environ['PORT1']))
Output
gr.Chatbot()
-
gr.Chatbot()allows you to save the chat history (between the user and the LLM) as well as display the dialogue in the app. -
Define your
fnto take in agr.Chatbot()object.- Within your defined
fnfunction, append a tuple (or a list) containing the user message and the LLM’s response:
chatbot_object.append( (user_message, llm_message) )
- Within your defined
-
Include the chatbot object in both the inputs and the outputs of the app.
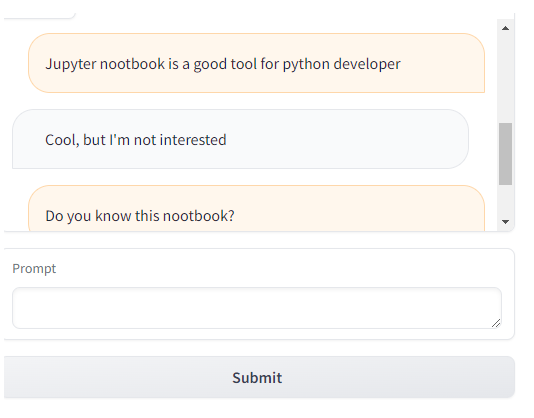
import randomdef respond(message, chat_history):#No LLM here, just respond with a random pre-made messagebot_message = random.choice(["Tell me more about it", "Cool, but I'm not interested", "Hmmmm, ok then"]) chat_history.append((message, bot_message))return "", chat_historywith gr.Blocks() as demo:chatbot = gr.Chatbot(height=240) #just to fit the notebookmsg = gr.Textbox(label="Prompt")	btn = gr.Button("Submit")clear = gr.ClearButton(components=[msg, chatbot], value="Clear console")btn.click(respond, inputs=[msg, chatbot], outputs=[msg, chatbot])msg.submit(respond, inputs=[msg, chatbot], outputs=[msg, chatbot]) #Press enter to submitgr.close_all()
demo.launch(share=True, server_port=int(os.environ['PORT2']))
Output
Format the prompt with the chat history
- You can iterate through the chatbot object with a for loop.
- Each item is a tuple containing the user message and the LLM’s message.
for turn in chat_history:user_msg, bot_msg = turn...
def format_chat_prompt(message, chat_history):prompt = ""for turn in chat_history:user_message, bot_message = turnprompt = f"{prompt}\nUser: {user_message}\nAssistant: {bot_message}"prompt = f"{prompt}\nUser: {message}\nAssistant:"return promptdef respond(message, chat_history):formatted_prompt = format_chat_prompt(message, chat_history)bot_message = client.generate(formatted_prompt,max_new_tokens=1024,stop_sequences=["\nUser:", "<|endoftext|>"]).generated_textchat_history.append((message, bot_message))return "", chat_historywith gr.Blocks() as demo:chatbot = gr.Chatbot(height=240) #just to fit the notebookmsg = gr.Textbox(label="Prompt")btn = gr.Button("Submit")clear = gr.ClearButton(components=[msg, chatbot], value="Clear console")btn.click(respond, inputs=[msg, chatbot], outputs=[msg, chatbot])msg.submit(respond, inputs=[msg, chatbot], outputs=[msg, chatbot]) #Press enter to submitgr.close_all()
demo.launch(share=True, server_port=int(os.environ['PORT3']))
Adding other advanced features
def format_chat_prompt(message, chat_history, instruction):prompt = f"System:{instruction}"for turn in chat_history:user_message, bot_message = turnprompt = f"{prompt}\nUser: {user_message}\nAssistant: {bot_message}"prompt = f"{prompt}\nUser: {message}\nAssistant:"return prompt
Streaming
- If your LLM can provide its tokens one at a time in a stream, you can accumulate those tokens in the chatbot object.
- The
forloop in the following function goes through all the tokens that are in the stream and appends them to the most recent conversational turn in the chatbot’s message history.
def respond(message, chat_history, instruction, temperature=0.7):prompt = format_chat_prompt(message, chat_history, instruction)chat_history = chat_history + [[message, ""]]stream = client.generate_stream(prompt,max_new_tokens=1024,stop_sequences=["\nUser:", "<|endoftext|>"],temperature=temperature)#stop_sequences to not generate the user answeracc_text = ""#Streaming the tokensfor idx, response in enumerate(stream):text_token = response.token.textif response.details:returnif idx == 0 and text_token.startswith(" "):text_token = text_token[1:]acc_text += text_tokenlast_turn = list(chat_history.pop(-1))last_turn[-1] += acc_textchat_history = chat_history + [last_turn]yield "", chat_historyacc_text = ""
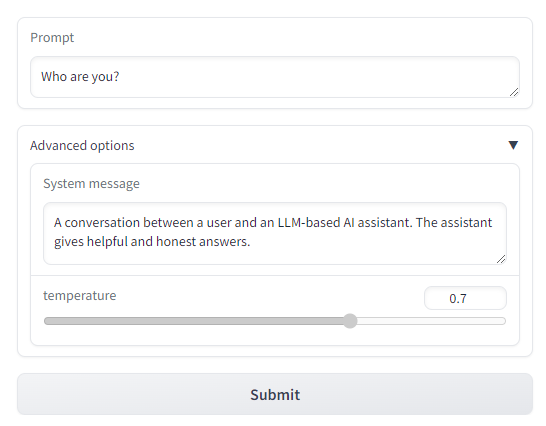
with gr.Blocks() as demo:chatbot = gr.Chatbot(height=240) #just to fit the notebookmsg = gr.Textbox(label="Prompt")with gr.Accordion(label="Advanced options",open=False):system = gr.Textbox(label="System message", lines=2, value="A conversation between a user and an LLM-based AI assistant. The assistant gives helpful and honest answers.")temperature = gr.Slider(label="temperature", minimum=0.1, maximum=1, value=0.7, step=0.1)btn = gr.Button("Submit")clear = gr.ClearButton(components=[msg, chatbot], value="Clear console")btn.click(respond, inputs=[msg, chatbot, system], outputs=[msg, chatbot])msg.submit(respond, inputs=[msg, chatbot, system], outputs=[msg, chatbot]) #Press enter to submitgr.close_all()
demo.queue().launch(share=True, server_port=int(os.environ['PORT4']))
Output
Notice, in the cell above, you have used demo.queue().launch() instead of demo.launch(). “queue” helps you to boost up the performance for your demo. You can read setting up a demo for maximum performance for more details.
Afterword
2024年6月1日19点52分完成这门课的学习,了解了gradio的基本用法。
这篇关于使用Gradio构建大模型应用:Building Generative AI Applications with Gradio的文章就介绍到这儿,希望我们推荐的文章对编程师们有所帮助!


